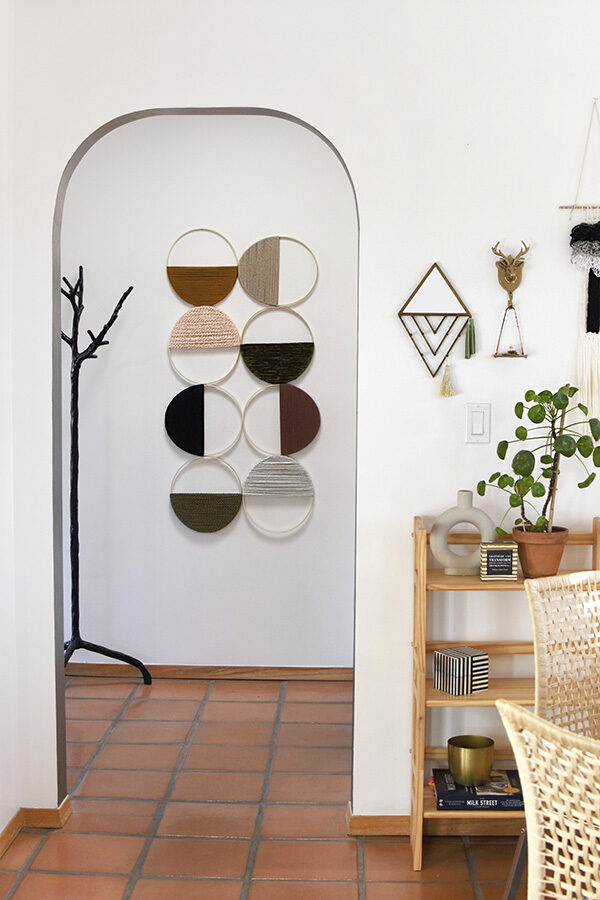
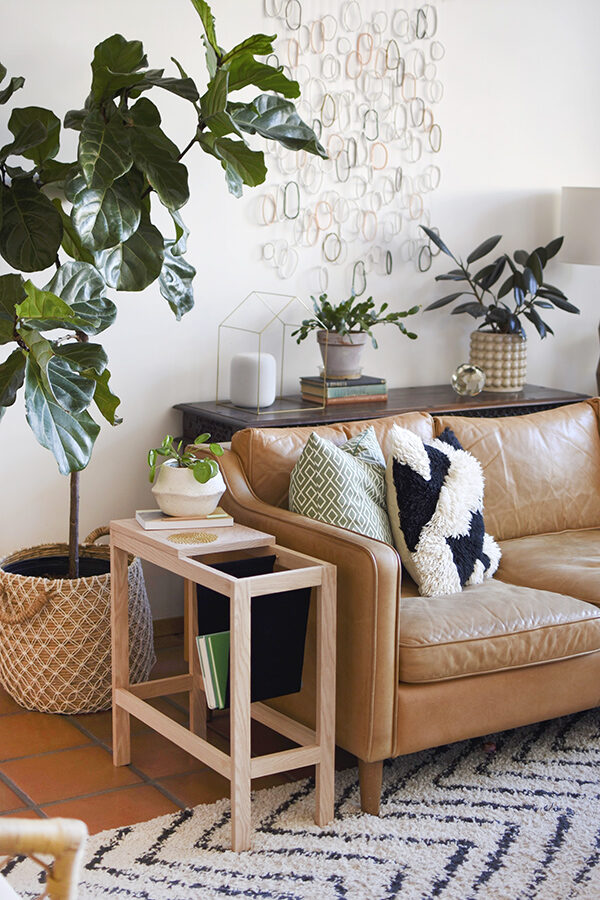
Ring Yarn Art
INSIDE : Learn how to create this lovely textural wall decor to hang in your home. See how simple Ring Yarn Art is to make and my tips for picking the perfect yarn during week 3 of our the New Year, New Room challenge.
This post may contain affiliate links. See my full disclosure.
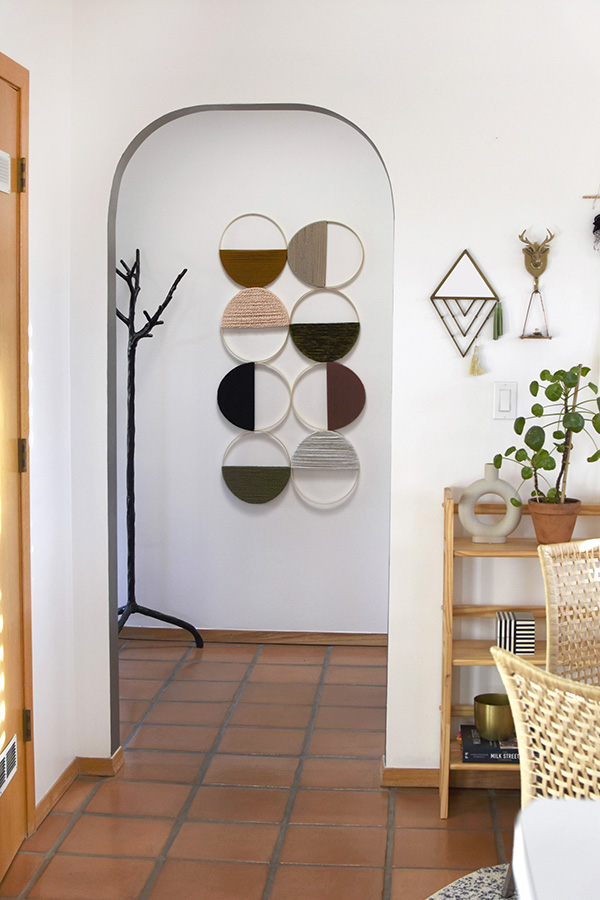
Welcome back to the third week of our New Year, New Room Refresh Challenge hosted by Stephanie of Casa Watkins Living. Last week I shared how I painted my entry white and repaired some walls with patching. Today I will be sharing some prettier items, like how to make this fun yarn wall decor that was inspired by a similar idea I saw at Wilo + Grove.
And next week, seven bloggers and I are all sharing our final reveals for our “refreshed” rooms. Read to the bottom of the post for links to all of their posts.

This project was also recently featured on HGTV’s social media as part of my Video Contributor work for them.
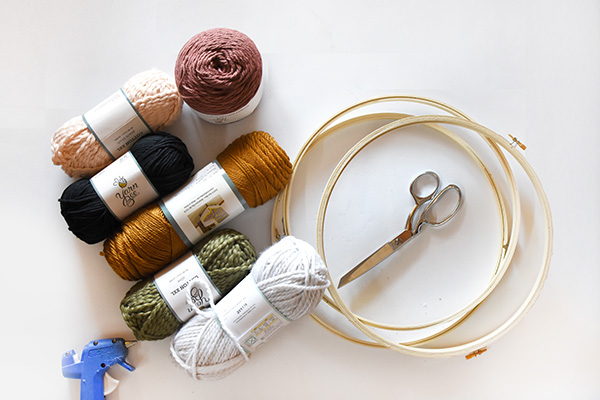
What supplies are needed to make Ring Yarn Art?
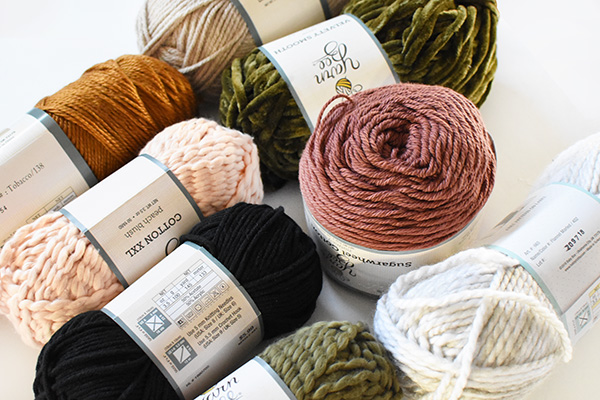
- 8 – different colors or textures of Yarn (I got mine at Hobby Lobby)
- 8 – 12″ Embroidery Hoops (Note, you will only use interior hoop)
- Sewing Scissors
- Cream colored sewing thread
- Hot Glue
- Ruler + Pencil
- OPTIONAL but helpful for a more refined look : Corresponding (or similar) paint colors
How to do Yarn Art?
There are endless ways to make yarn art. Once you have yarn, you can create all kinds of amazing projects. I’ve learned Yarn Art Jeans is a very popular brand of yarn. It’s a Cotton Yarn that is good for crocheting, knitting and even wall art like this one I’m sharing today! And Amazon carries quite a big color selection, as well.
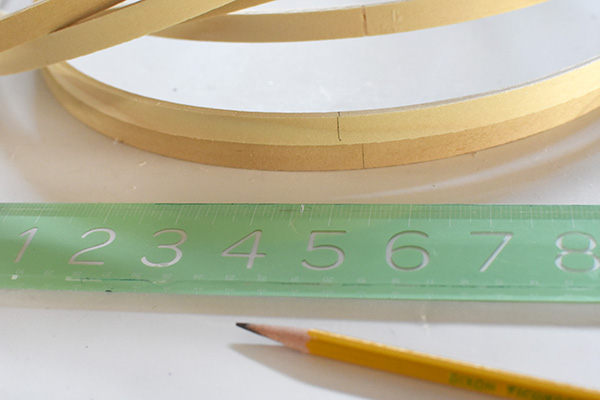
To make today’s hanging yarn wall art, start by markingthe halfway point on your embroidery hoops with a pencil and ruler. Be sure to make your line dark enough to see. This step it is very important for your first wrap of yarn.
Begin each wrapped hoop, by placing about an inch of hot glue on the inside of your embroidery hoop JUST BELOW your halfway pencil mark.
Place the end of your yarn inside on that hot glue line and hold until it is dry. Next, place a line the width of your hoop on your pencil line. Wrap the yarn around the outside of the hoop and then along the pencil line.
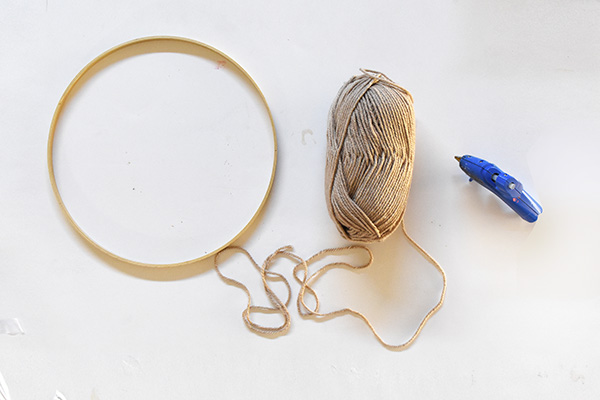
From that first line of hot glue, add another line of hot glue on the other halfway pencil line and pull your yarn nice and taught. You can now begin to freely wrap your yarn back and forth across the hoop.
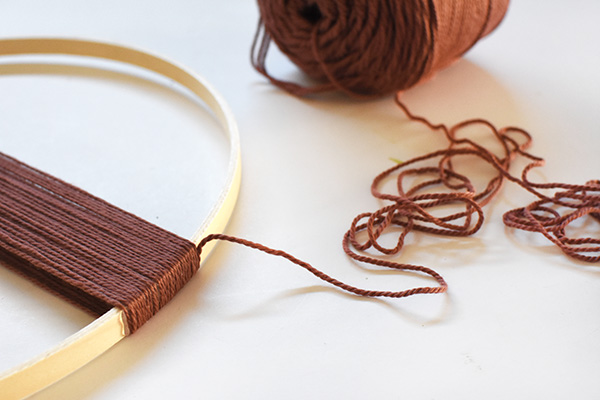
I noticed as I got closer to the edge of the hoop, the yarn was more prone to slipping. So, feel free to use hot glue to keep the yarn from falling off. Going slow and not rushing is the key to keep your yarn looking as clean and perfect as possible.
Hot Glue your Yarn Ring
Once you get to the very edge of your hoop, hot glue is essential for every wrap. You will basically be gluing every single line of yarn as you slowly make concentric circles.

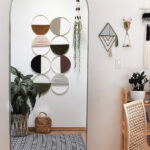
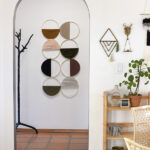
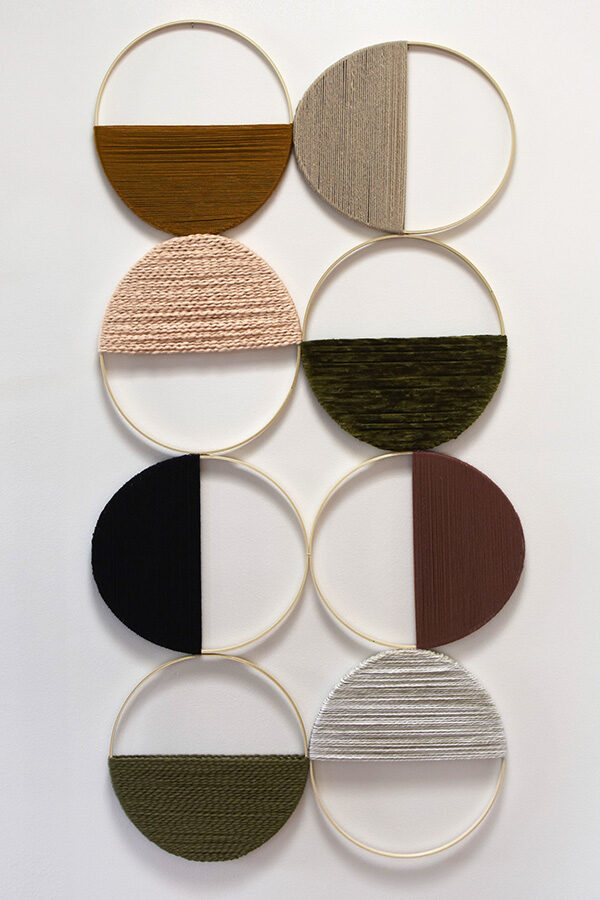
Yarn Wall Art
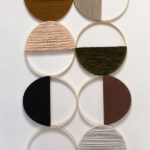
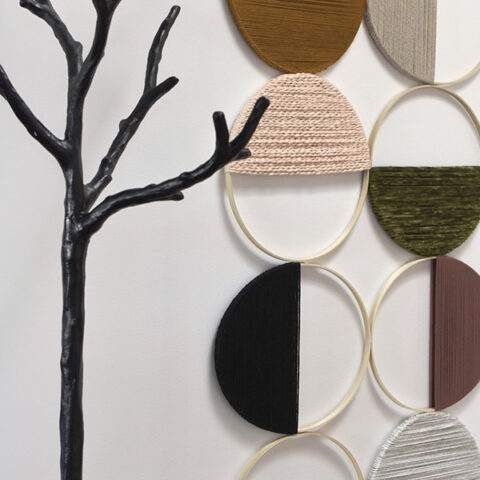
You can see all eight of my rings stacked up on each other below. I loved these colors. They already have begun to make up such beautiful yarn wall art and they aren’t even on the wall quite yet!
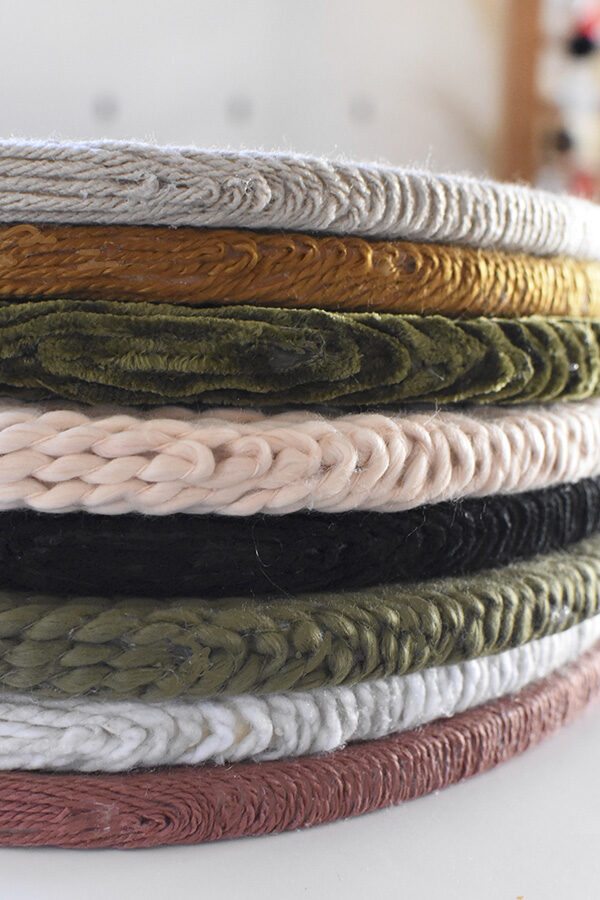
And after seeing the yarn wrapped at different points and layered on each other… I gave SERIOUS pause on possibly doing a Stacked Yarn Art hoop thing. I loved the shapes and patterns they created when stacked together!!
However, I didn’t have enough embroidery hoops to fill my space and do stacking. If you decide to stack yours, be sure to let me know because I bet it will be GORGEOUS.
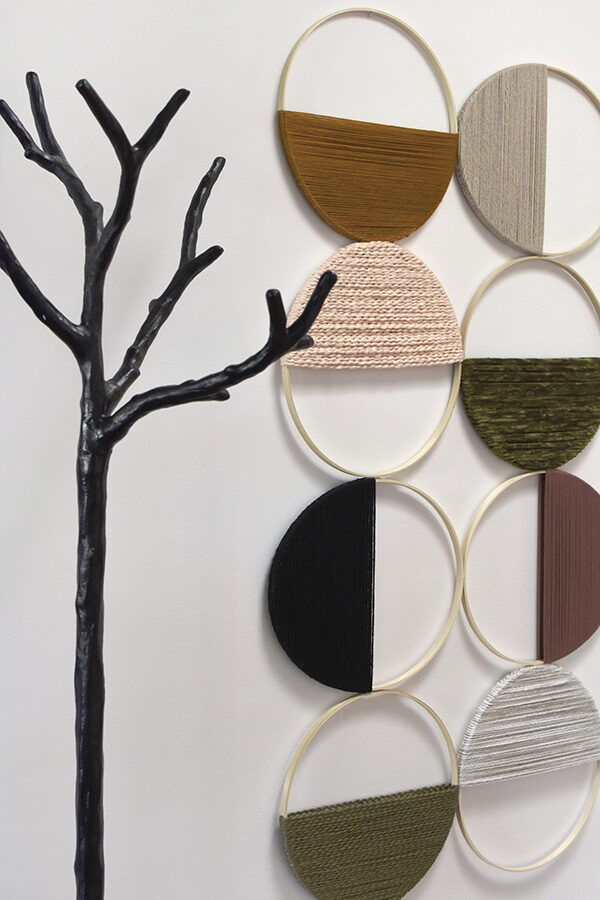
Next up, was connecting the hoops all together. I had already decided on the directional patterns I wanted each hoop to have, so I laid them out on our dining room table accordingly.
Yarn Wall Hanging Hoops
I hot glued each row of rings that were “wood” side by side first. Ample hot glue, but not enough that it was oozing out the side of the hoop. Then, once the glue was dry, I tied cream colored sewing thread around the two rings for extra strength.
Once I had the four rows connected horizontally, I simply repeated the same process and began gluing together the two columns of hoops vertically.
Some of them I couldn’t add thread to, but thankfully this is a very light weight project so it didn’t seem to make a big difference.
Yarn Art TIP
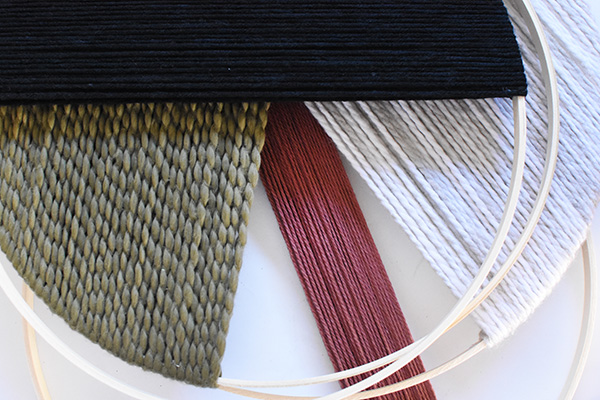
Here is a MAJOR TIP : When picking out your various yarn types, you will be SO MUCH happier by picking thicker yarns. Not only does it making the wrapping process 100x faster, but it allows for SO MANY slight mess-ups.
Although beautiful in color, my black yarn and the gorgeous golden yellow ochre yarn were nightmares on this project. I’m showing the picture below, so you can see what the thicker versus thinner yarns look like.
Check out my other beautiful yarn projects here :
DIY Ring Yarn Art
Learn how to create this lovely textural wall decor to hang in your home. See how simple Ring Yarn Art is to make and my tips for picking the perfect yarn during week 3 of our the New Year, New Room challenge.
Materials
- 8 – different colors or textures of Yarn (I got mine at Hobby Lobby)
- 8 – 12″ Embroidery Hoops (Note, you will only use interior hoop)
- Sewing Scissors
- Cream colored sewing thread
- Hot Glue
- Ruler + Pencil
- OPTIONAL : Corresponding (or similar) paint colors
Instructions
- Mark the halfway point on your embroidery hoops with a pencil and ruler.
- Begin each wrapped hoop, by placing about an inch of hot glue on the inside of the embroidery hoop - JUST BELOW the previous pencil mark.
- Place the end of the yarn inside on that hot glue line and hold until it is dry.
- Wrap the yarn around the outside of the hoop and then along the pencil line.
- From that first line of hot glue, add another line of hot glue on the other halfway pencil line and pull the yarn nice and taught. You can now begin to freely wrap your yarn back and forth across the hoop.
- Once at the very edge of the hoop, hot glue is essential for every wrap. You will be gluing every single line of yarn as you slowly make concentric circles at the end.
- Next up, start to connect the completed hoops together. Decide on the directional pattern for each hoop by laying the hoops out on a large flat surface.
- Hot glue each row of rings that are side by side. Apply ample hot glue, but not enough that it ooze out the side of the hoop. Then, once the glue is dry, tie a light colored sewing thread around the two rings for extra strength.
- Once the four rows are connected, repeat the same process and began gluing together the hoops vertically.
- Hang on the wall and enjoy!
Notes
- When picking out your various yarn types, you will be SO MUCH happier by picking thicker yarns. Not only does it making the wrapping process 100x faster, but it allows for SO MANY slight mess-ups.
- I noticed as I got closer to the edge of the hoop, the yarn was more prone to slipping. Use hot glue to keep the yarn from falling off. Going slow and not rushing is the key to keep your yarn looking as clean and perfect as possible.
Completed Room updates :
Week 1 Front Entry Refresh Plan
Week 2 Painting + Patching
Week 3 Ring Yarn Art
FRONT FOYER TO-DO LIST:
-Paint the cream walls a fresh white-Patch holes from Cowboy Swing Door
-Replace the crazy winter coat situation with something more sleek, maybe-Create an art/yarn focal point
-Replace rug with something less “southwest” feeling
-Warm up space with some plants
Be sure to check out the other amazing Room Refresh plans from the other participating bloggers! I can’t wait to see what they all will be working on.
Casa Watkins Living // Up To Date Interiors // House by Hoff // Our Fifth House // Jeweled Interiors // Blue I Style // Domicile 37 // Delineate Your Dwelling
And if you want to check out a few other yarn crafts, look no further:
– Ring Yarn Art
– Yarn Wrapped Twig Wreaths
– DIY Ombre Basket Yarn Handle
– Printed Letter Tote Bag
– Flower Wall Hanging with Yarn Tassle
– Colorful HOME Sign
– Pom Pom Throw Blanket
– Lounge Tassel Pillow
Looking for some other fun DIY projects? Check out these.
I’m curious to know how you hung these on the walls. Thanks!
Great question. I just used two small nails to hold the top two rings up. The other rings are all tied together.
Amy this is one of my favorite projects of yours EVER! It turned out so beautiful and I love how doable it is.
Such a complement, Haeley! It was a fun one to make, too. 😉
I like the ease of these creative design options, especially at this time of the year.