
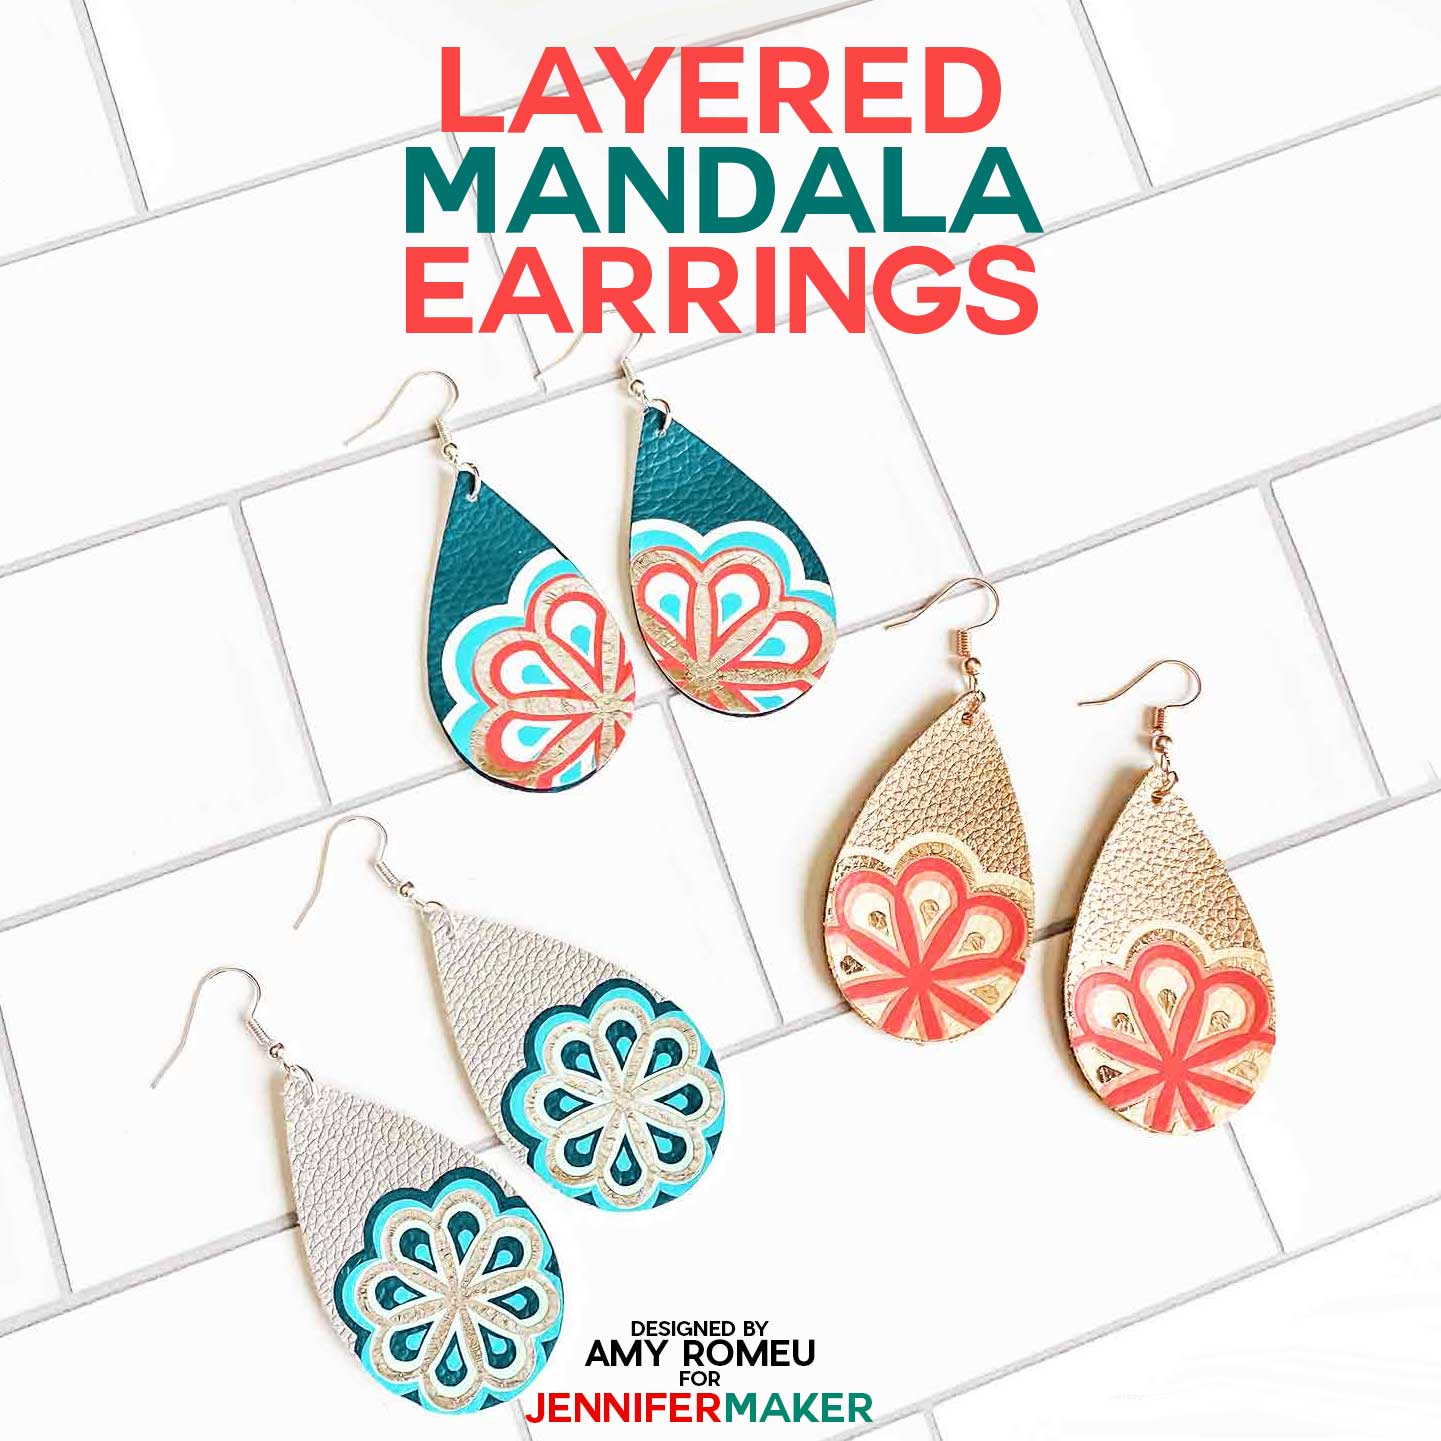
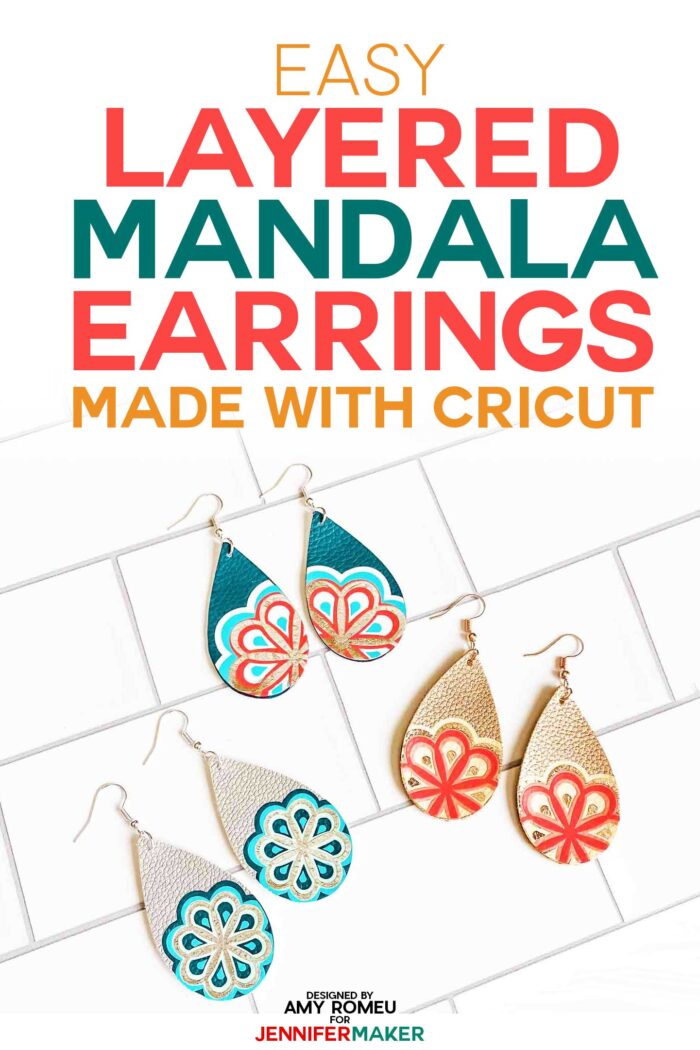
Learn how to make your own LAYERED MANDALA EARRINGS. This step-by-step tutorial shows you everything you need to make these fun and creative accessories!
I have a popular online course called CUT ABOVE SVG Design in which I teach my fellow crafters how to do what I do. I show you how to create, design, and share designs as SVG cut files for projects! One of my amazing students, Amy Romeu, is doing just that, designing wonderful creations and sharing the SVG design cut files with others on her own blog. Her designs are so cute and totally wearable! Today she’s showing us how to make faux leather Cricut earring designs. Take it away, Amy!
Hi, I’m Amy, and I’m the owner of the craft blog AmyRomeu.com. I’m so excited Jennifer asked me to share a special earring design project with you. I love to create fashionable and fun earring designs that you can cut with a cutting machine and turn into wearable crafts. I’ve designed so many different earring shapes — from teardrops and feathers to tacos and ice cream cones! I love to create new designs, and these Cricut earrings design project is no exception!
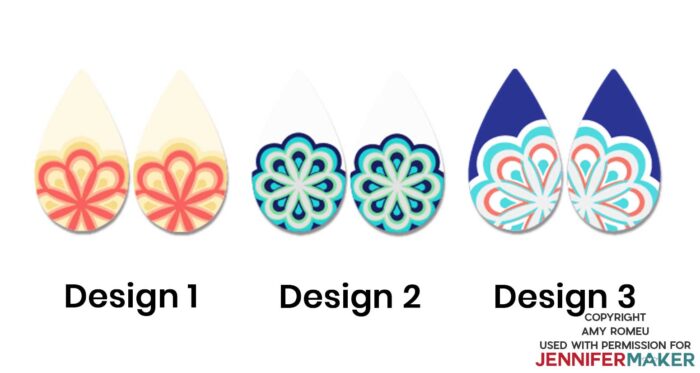
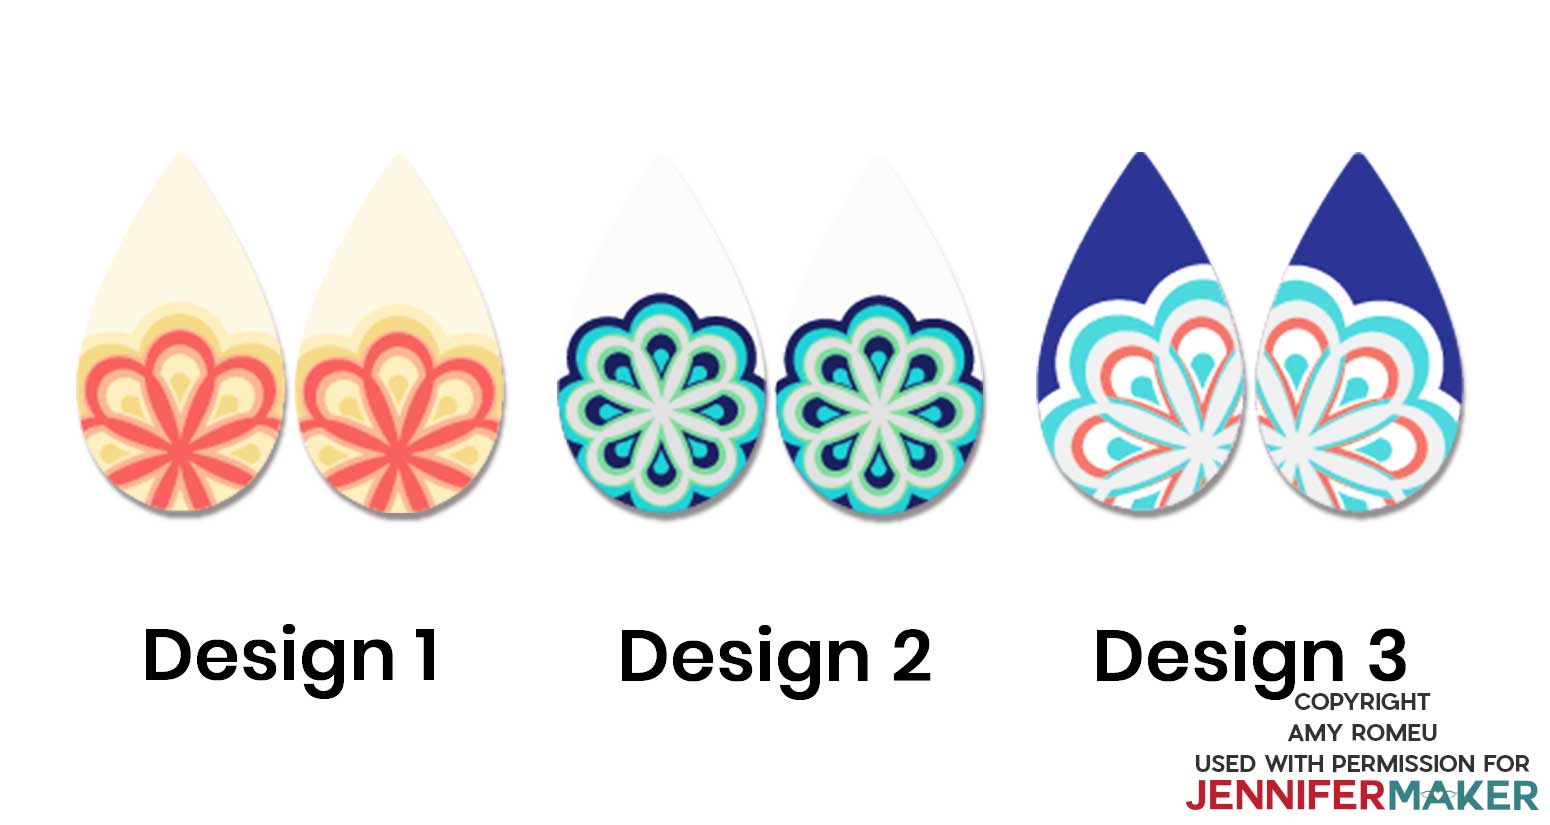
I’ve been loving all the layered mandala designs everyone has been making and sharing in Jennifer’s crafting community on Facebook, so I decided to try making a layered mandala myself — but as part of an earring design. I’m so excited to say it worked! I had so much fun that I ended up designing three versions of layered mandala earrings, which I’m happy to share with Jennifer’s readers today.
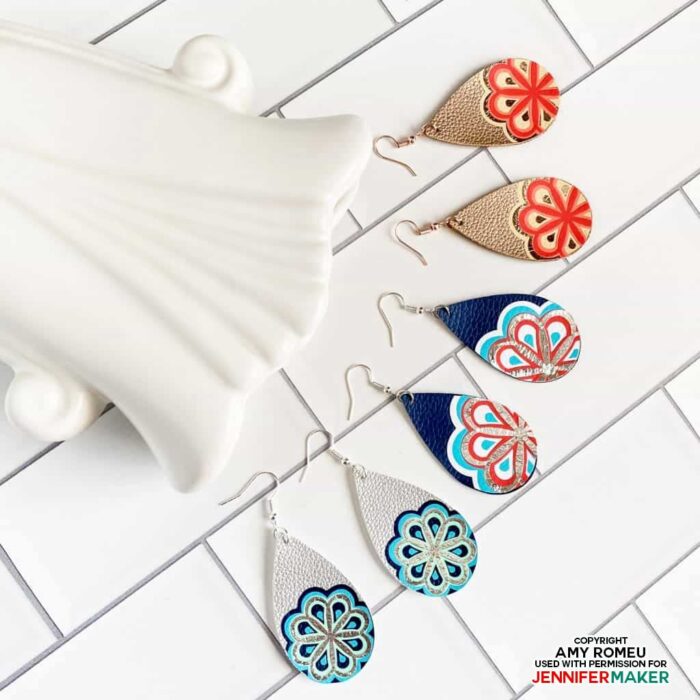
These layered mandala earrings are made using faux leather and four layers of heat transfer vinyl. If that sounds complicated, I promise, it’s not. I’ve designed the layers to be very easy to cut and weed!
If you haven’t cut faux leather before with your Cricut cutting machine, don’t worry, I’ll walk you through this earring design project step by step. The fantastic news is you can cut faux leather with a Cricut Maker, or a Cricut Explore Air 2, or even the Cricut Joy! I’ll share tips specific to the different machines along the way.
So if you’re ready to try the layered mandala crafting trend on Cricut earrings, let’s get started!

Let me show you how easy it is to make these cute layered mandala Cricut earrings from faux leather! This post contains some affiliate links for your convenience (which means if you make a purchase after clicking a link I will earn a small commission but it won’t cost you a penny more)! Read my full disclosure policy.
Materials to Make Layered Mandala Cricut Earrings
- Faux Leather in the color and texture of your choice (I used metallic faux leathers from this assorted faux leather pack on Amazon and navy faux leather from this assorted faux leather pack on Amazon)
- HTV (iron-on vinyl) and/or Foil Iron-On vinyl in the colors of your choice
- Cricut StrongGrip Cutting Mat (Purple)
- Cricut StandardGrip Cutting Mat (Green)
- Blue Painter’s Tape
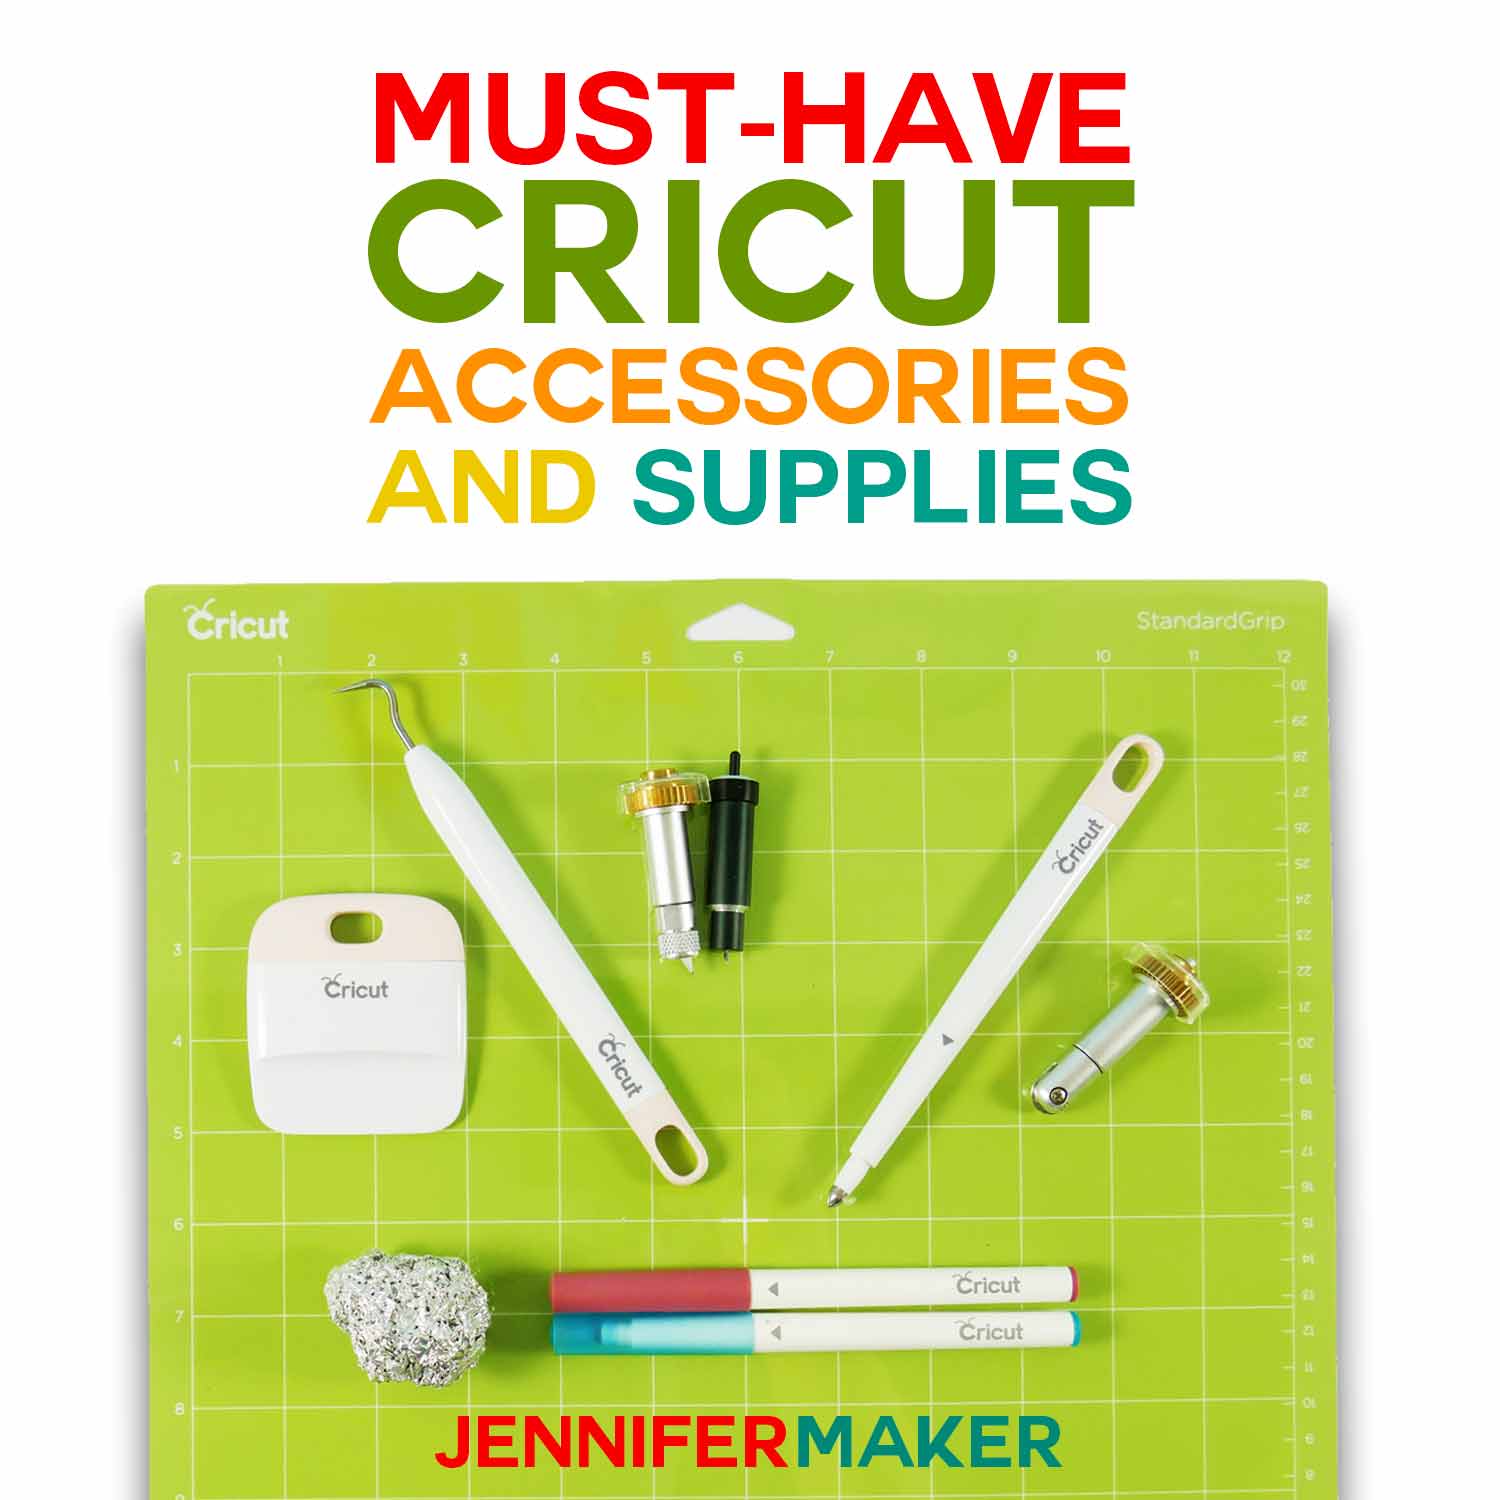
- Weeding Tool
- Cricut EasyPress or EasyPress Mini
- Cricut EasyPress Mat
- Teflon Cover Sheet or Parchment Paper
- 1/16″ Hole Punch
- Flat Nose Pliers
- Earring Hooks or Ball Ear Wire Hooks
- Jump Rings (6mm size or 5mm size)
- A way to cut your faux leather and vinyl (I used the Cricut Maker cutting machine but they can also be cut on a Cricut Explore or Cricut Joy)
- Design #238 – The free layered mandala earrings SVG/DXF/PNG design files (available in my free resource library—get the password by filling out the form at the bottom of this page)
How to Make Layered Mandala Cricut Earrings
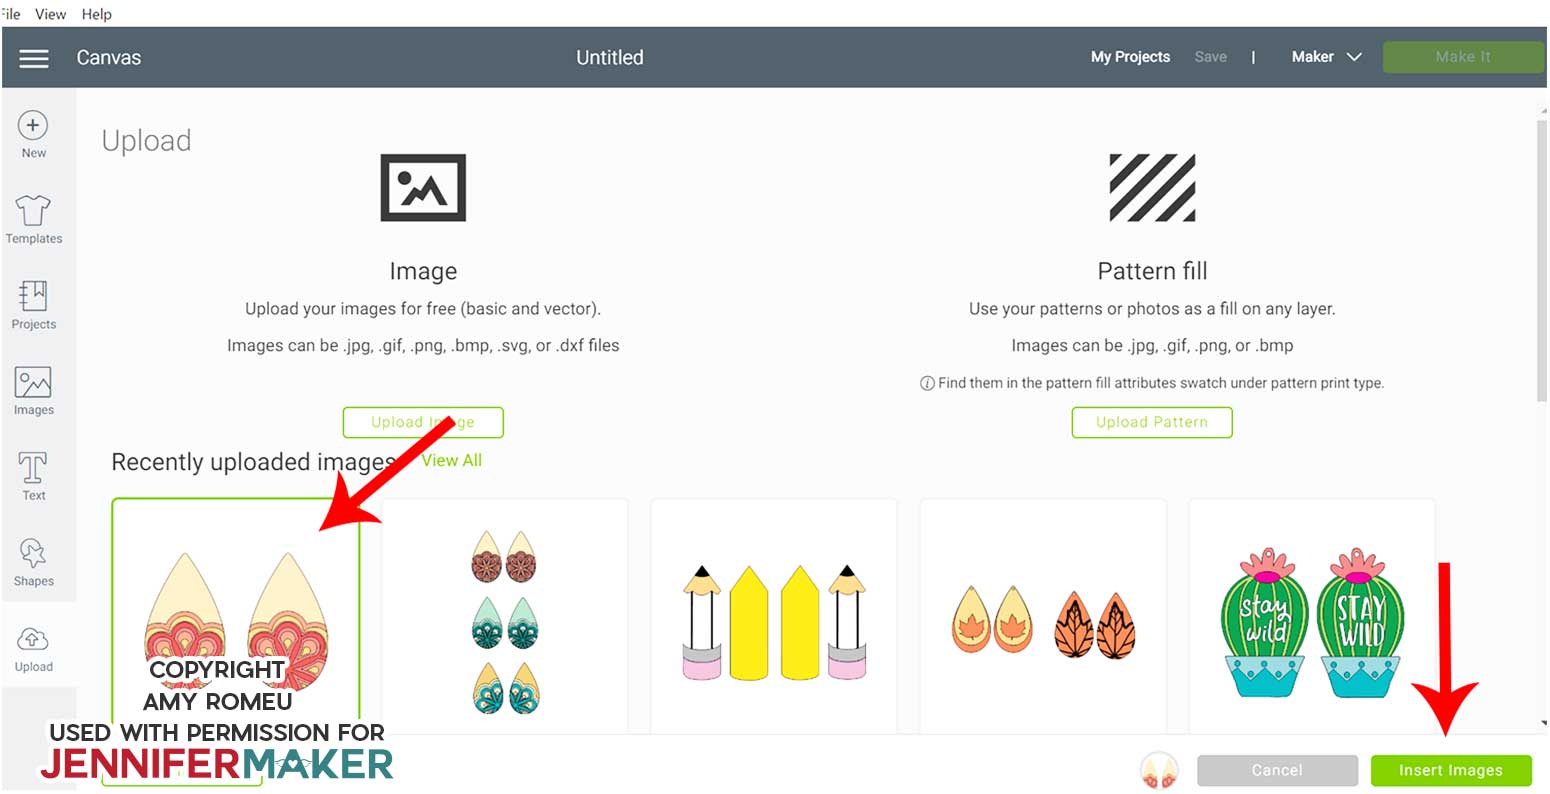
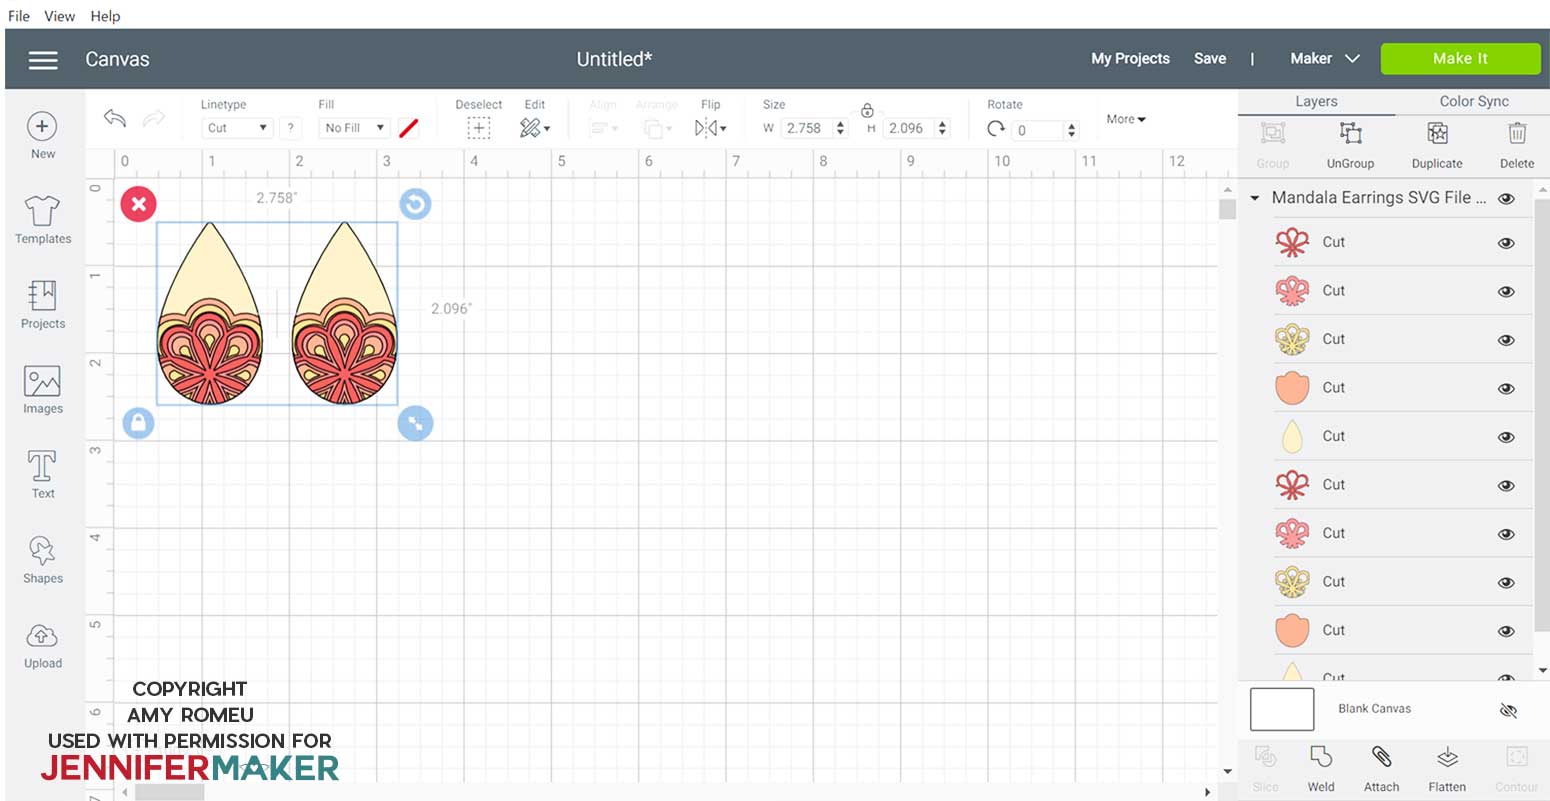
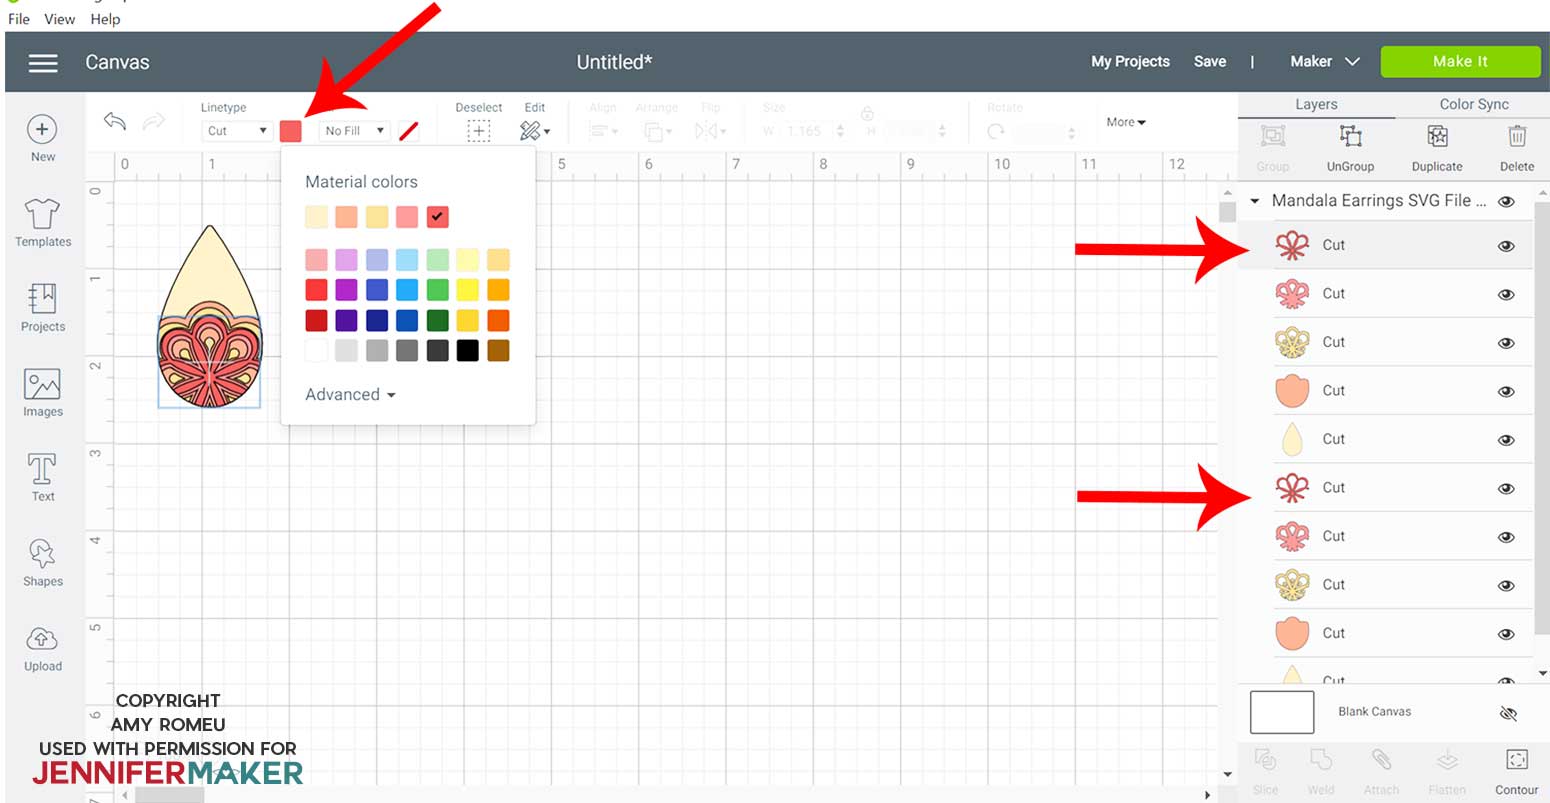
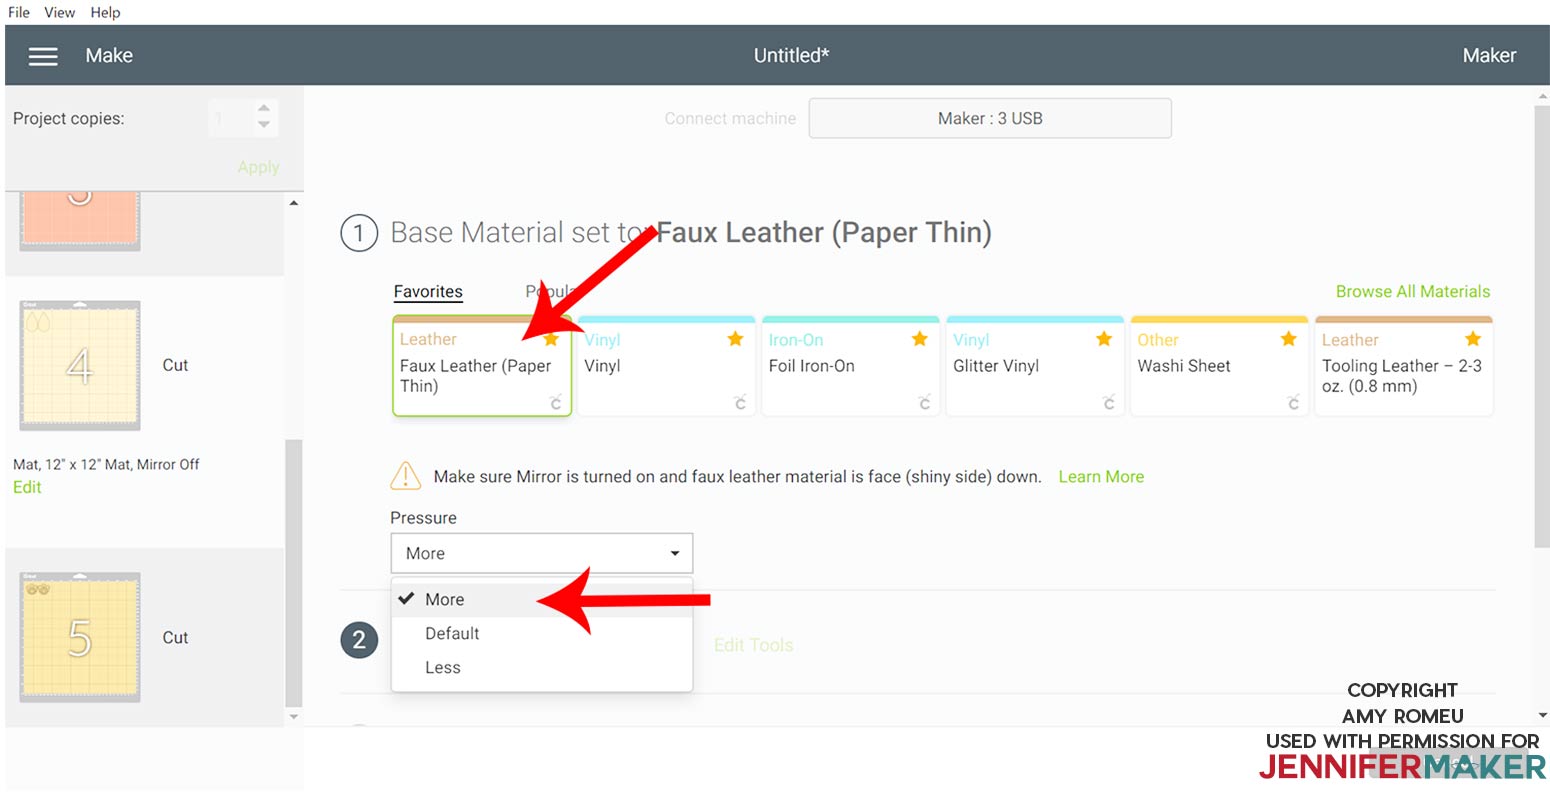
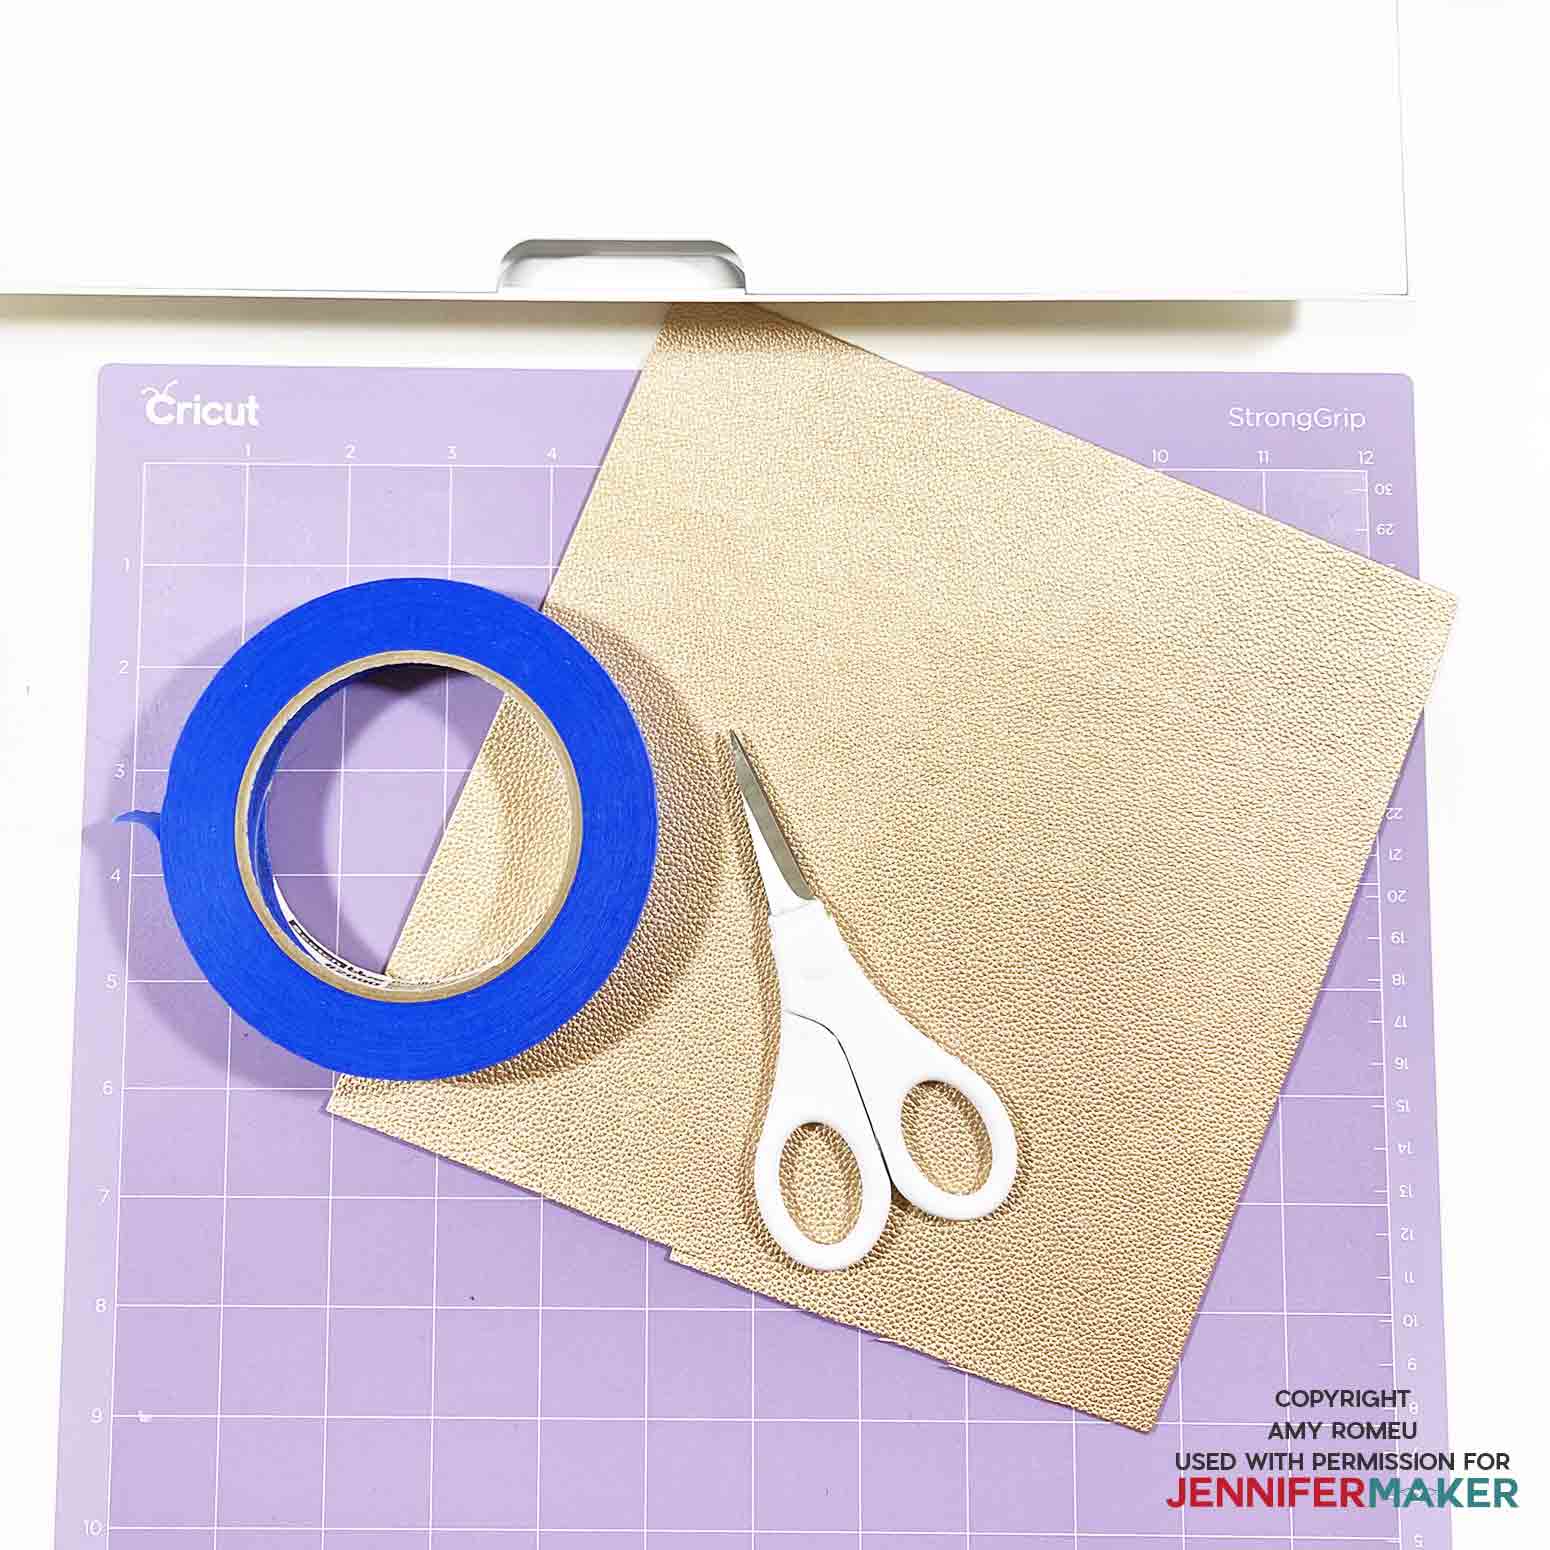
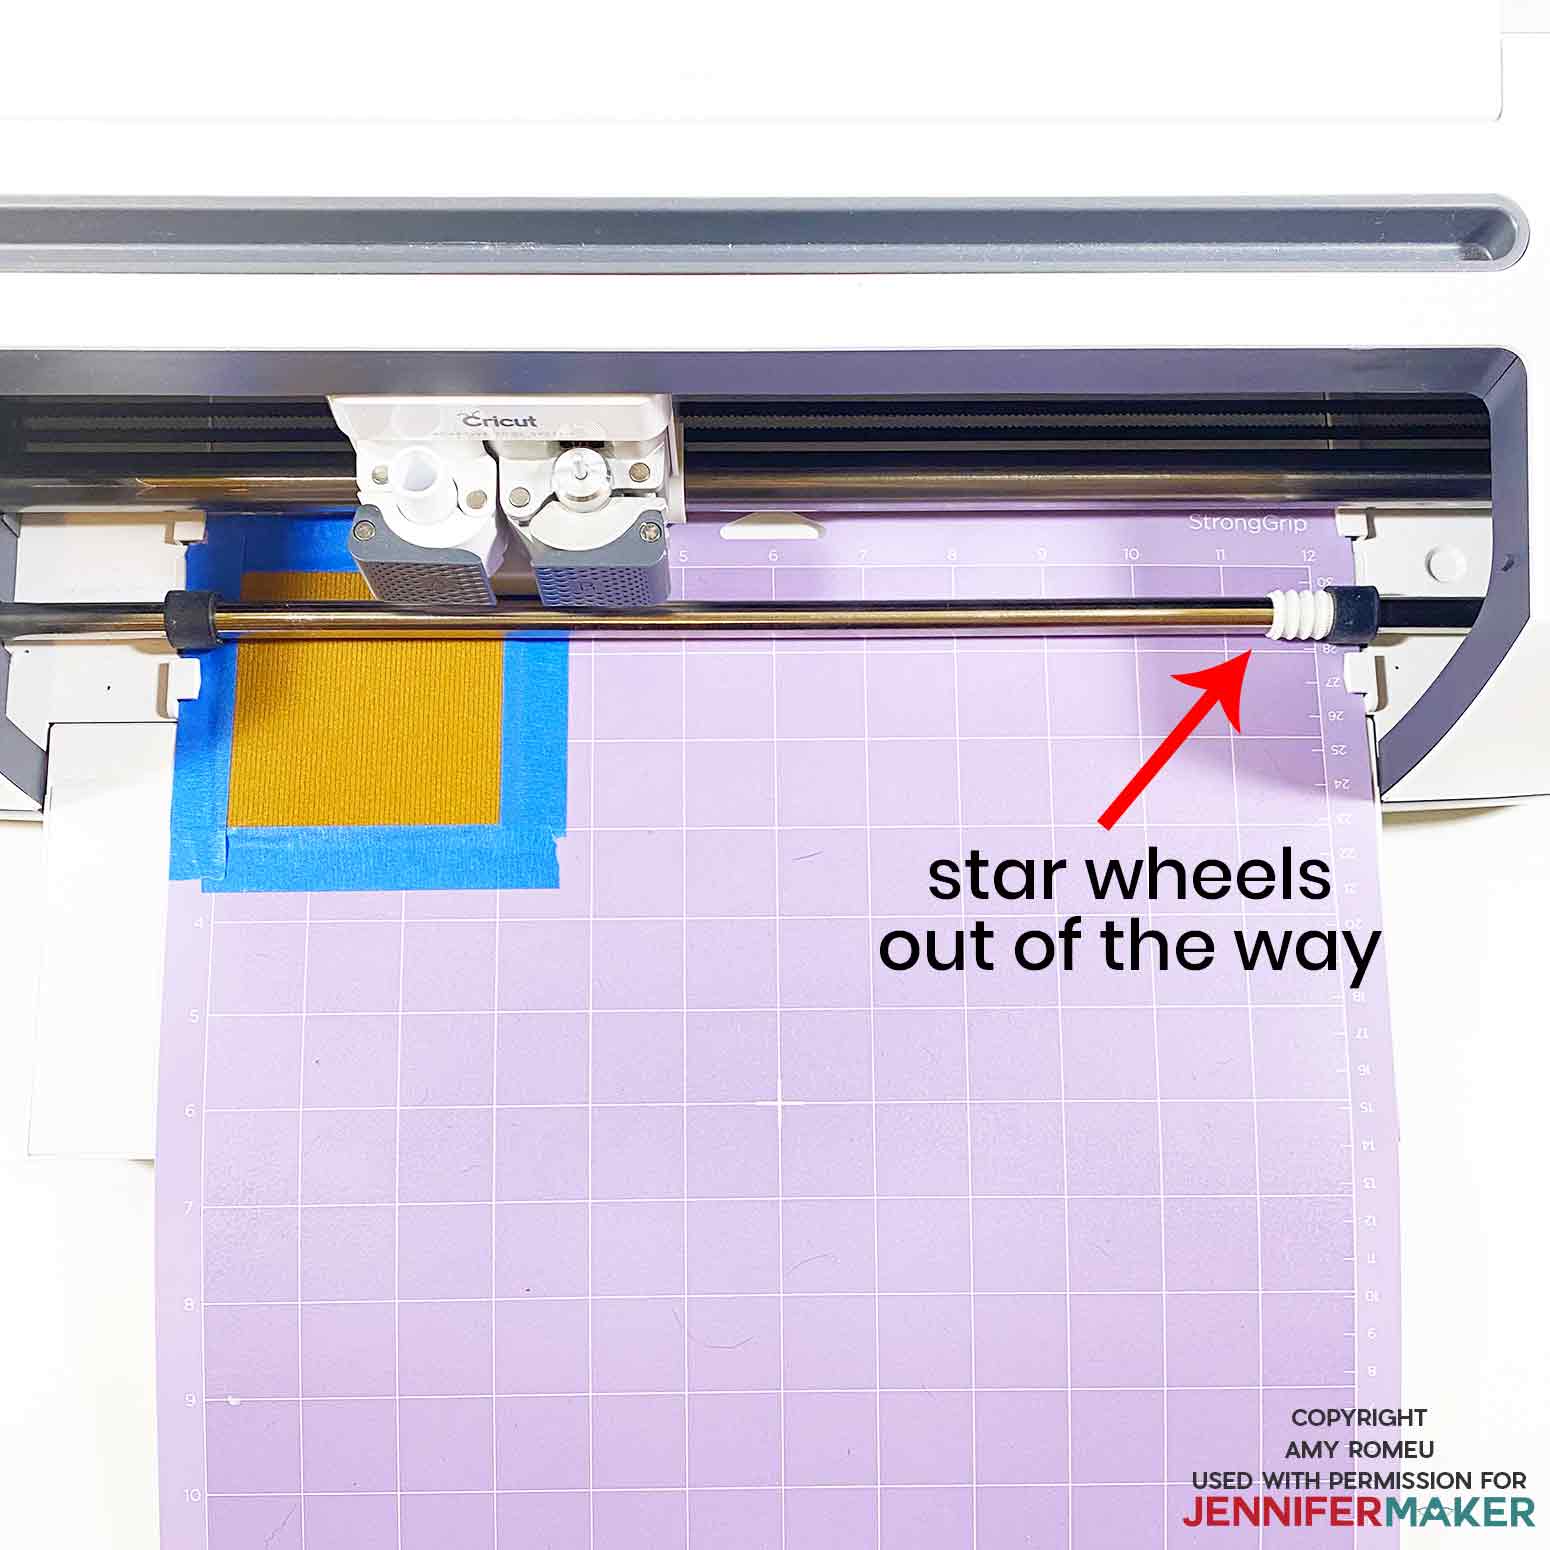
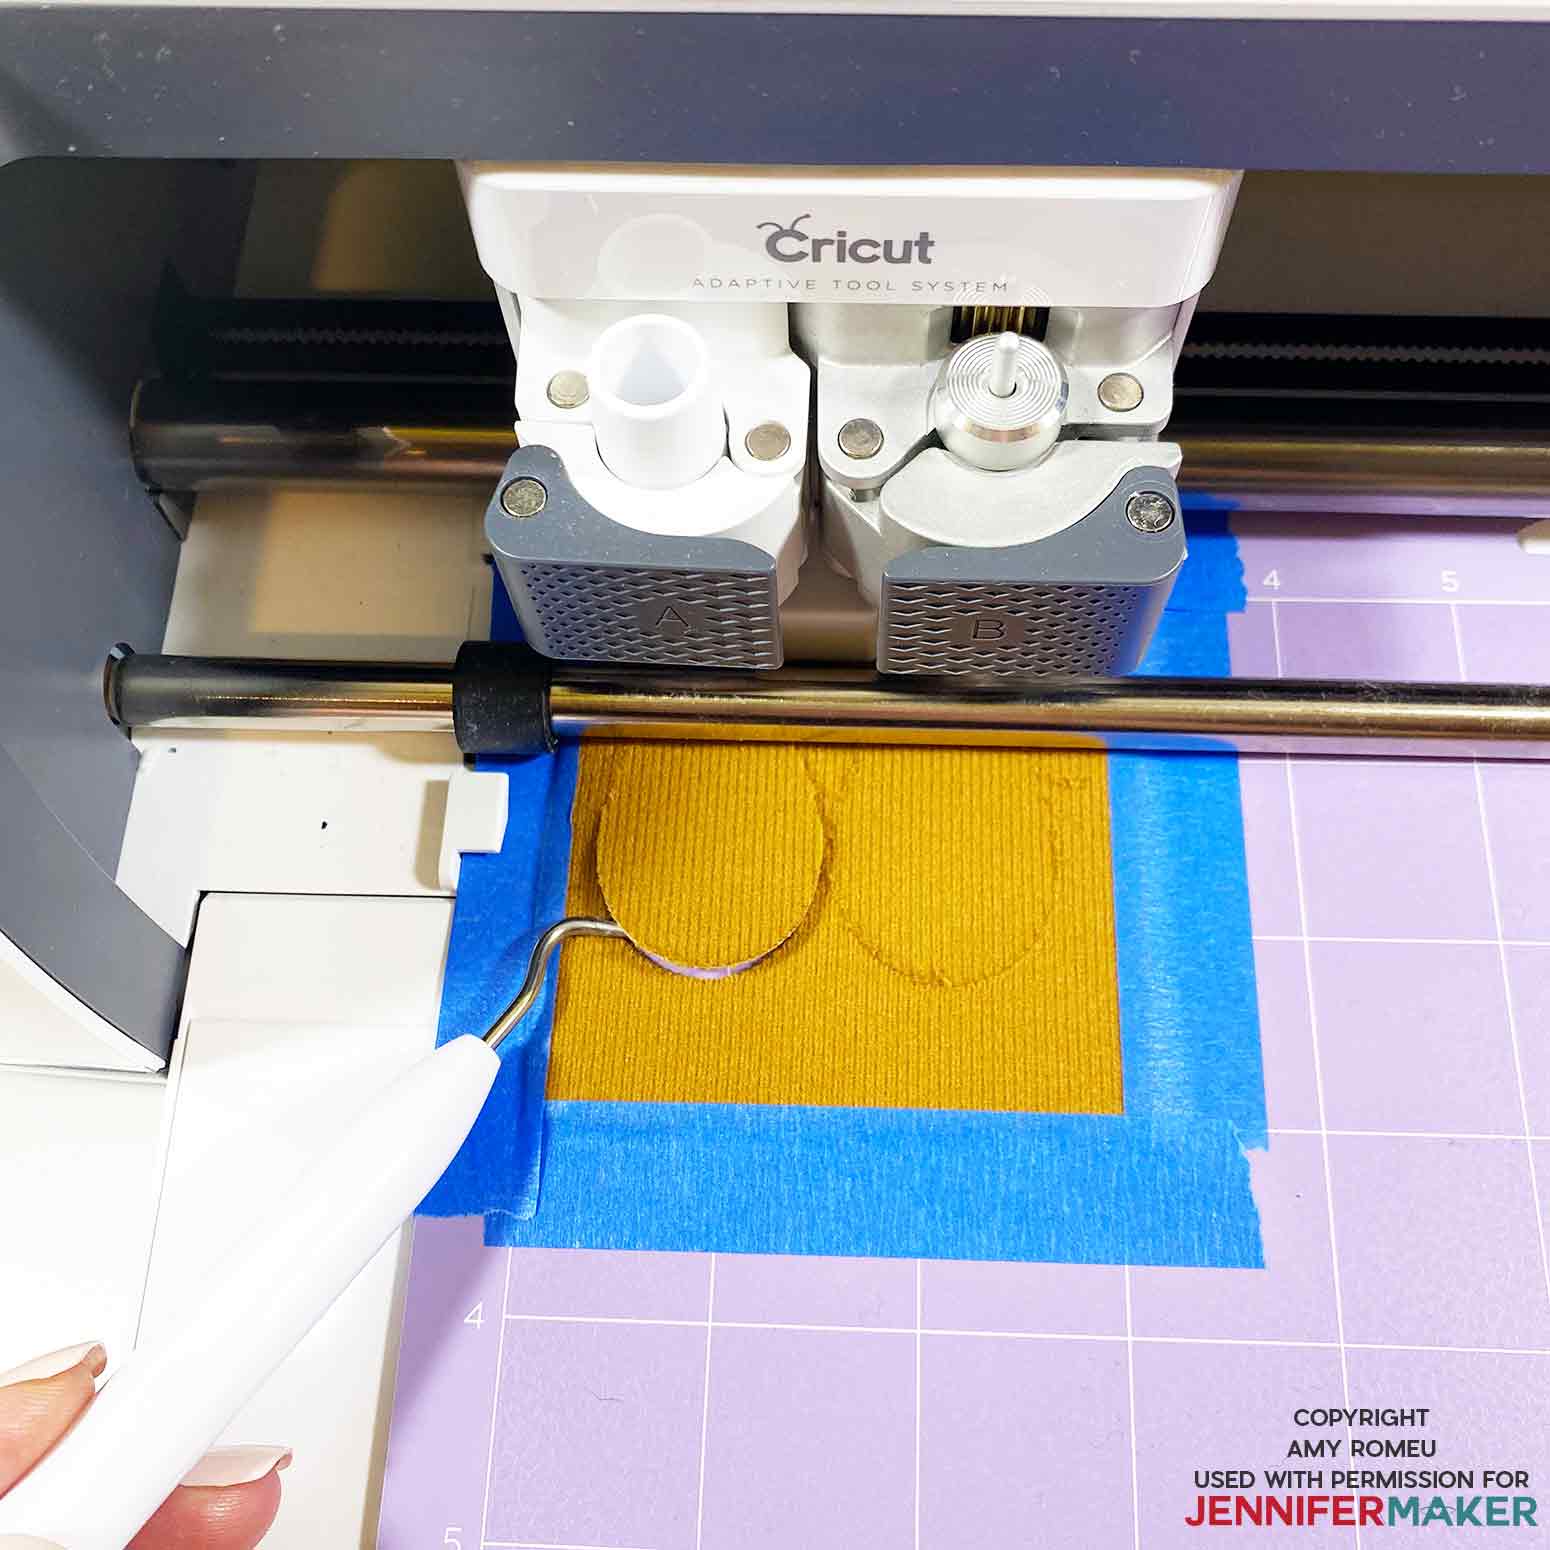
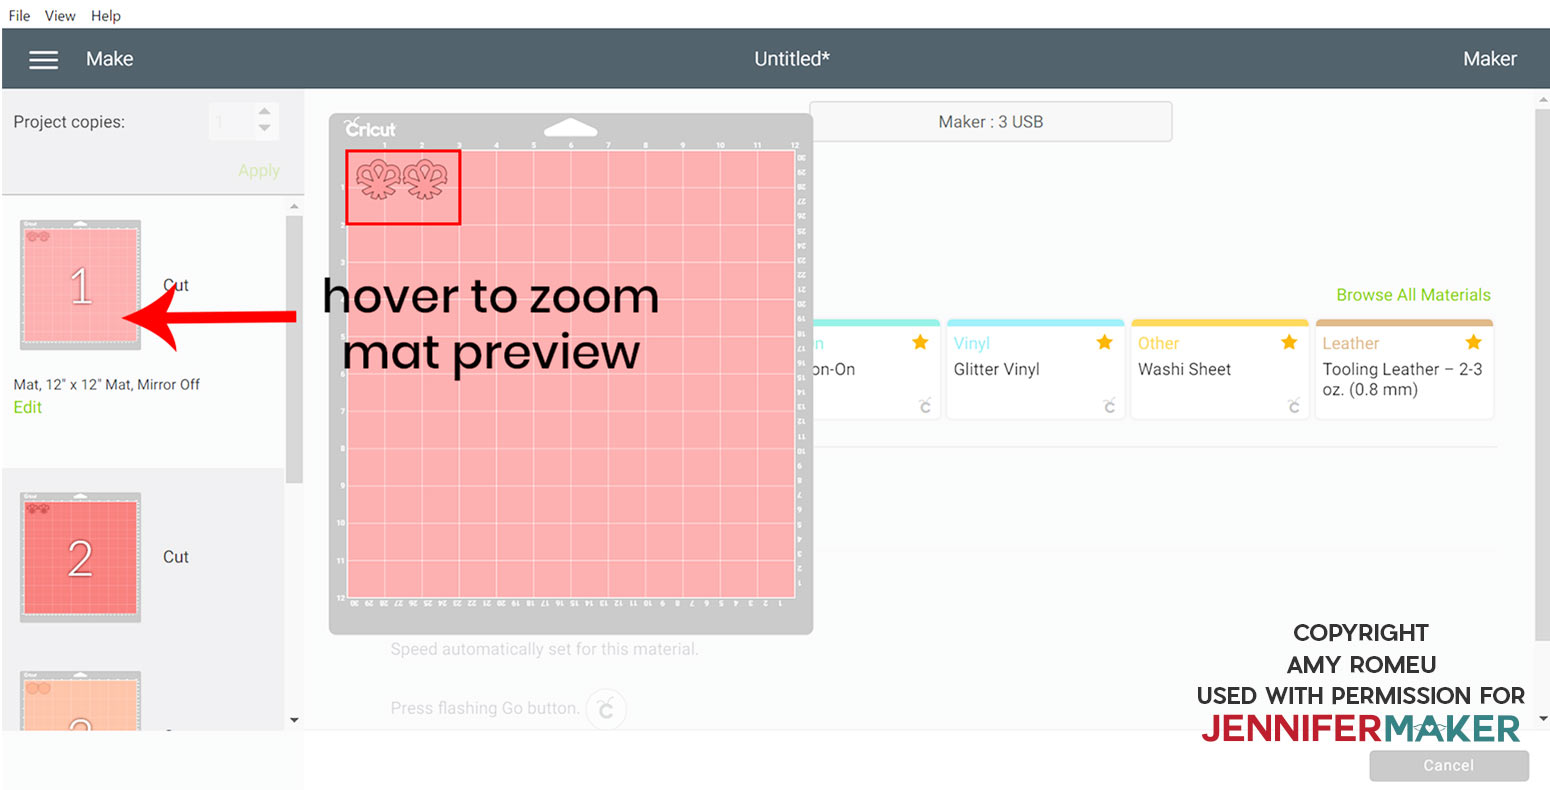
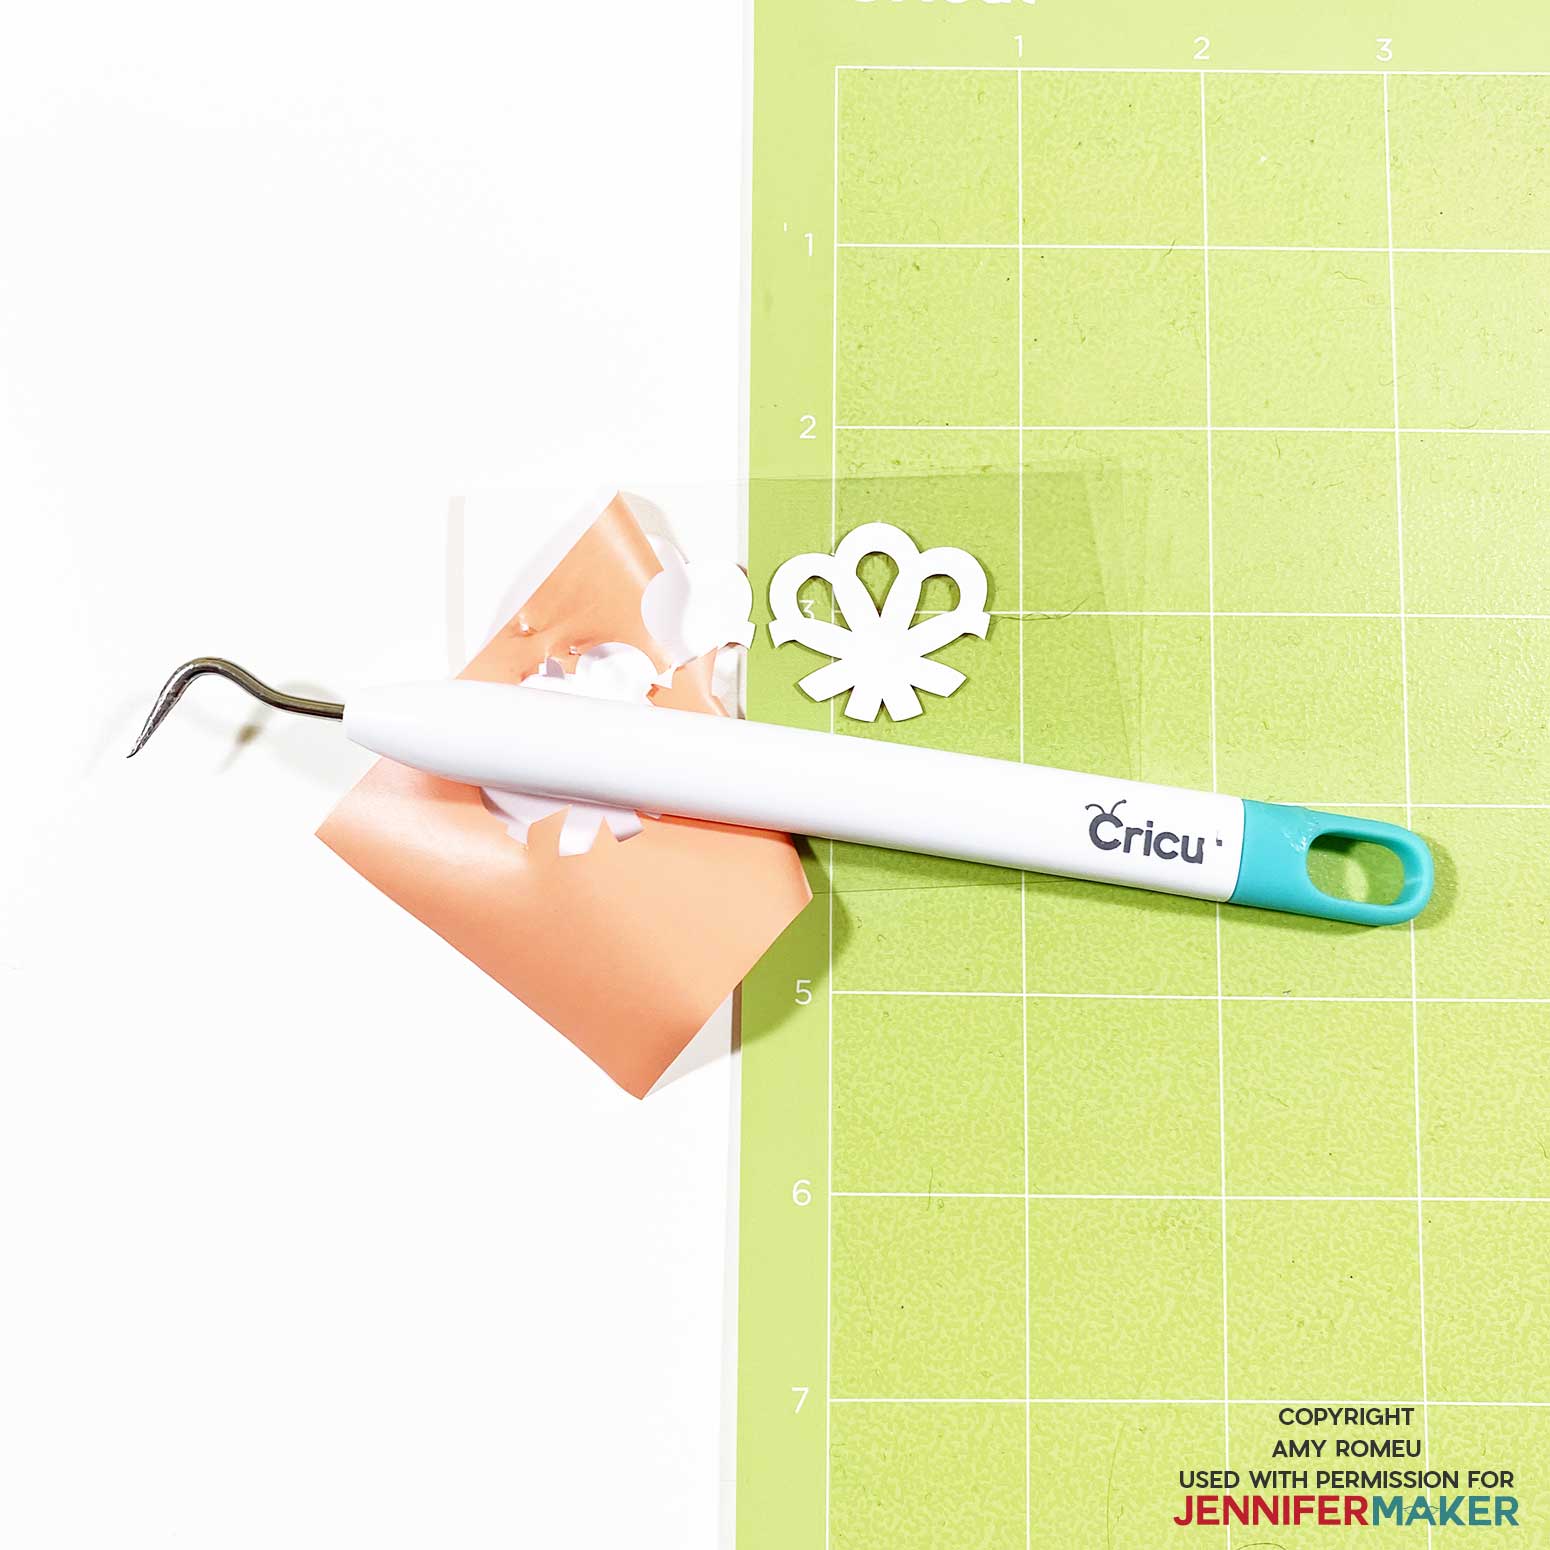
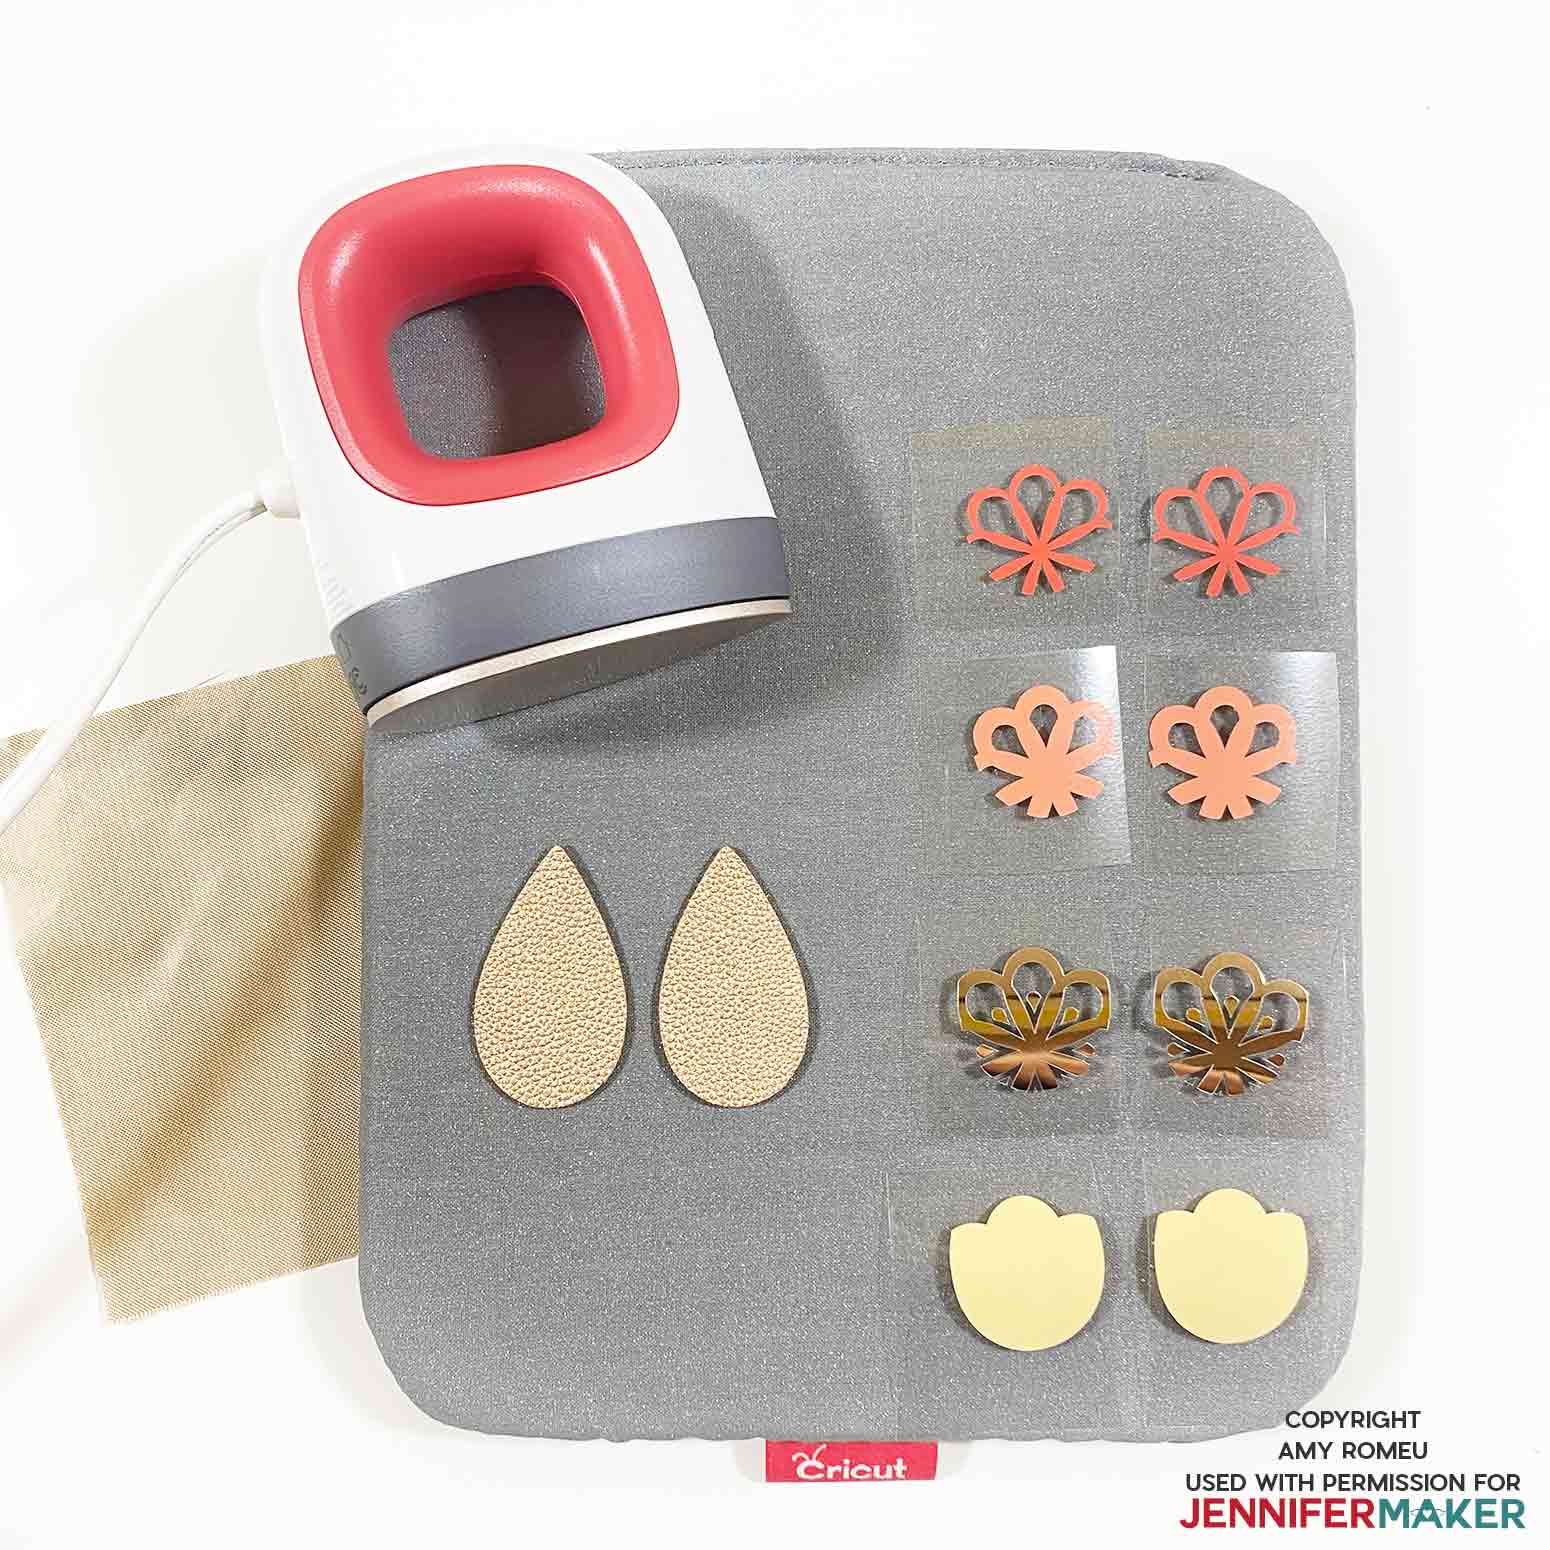
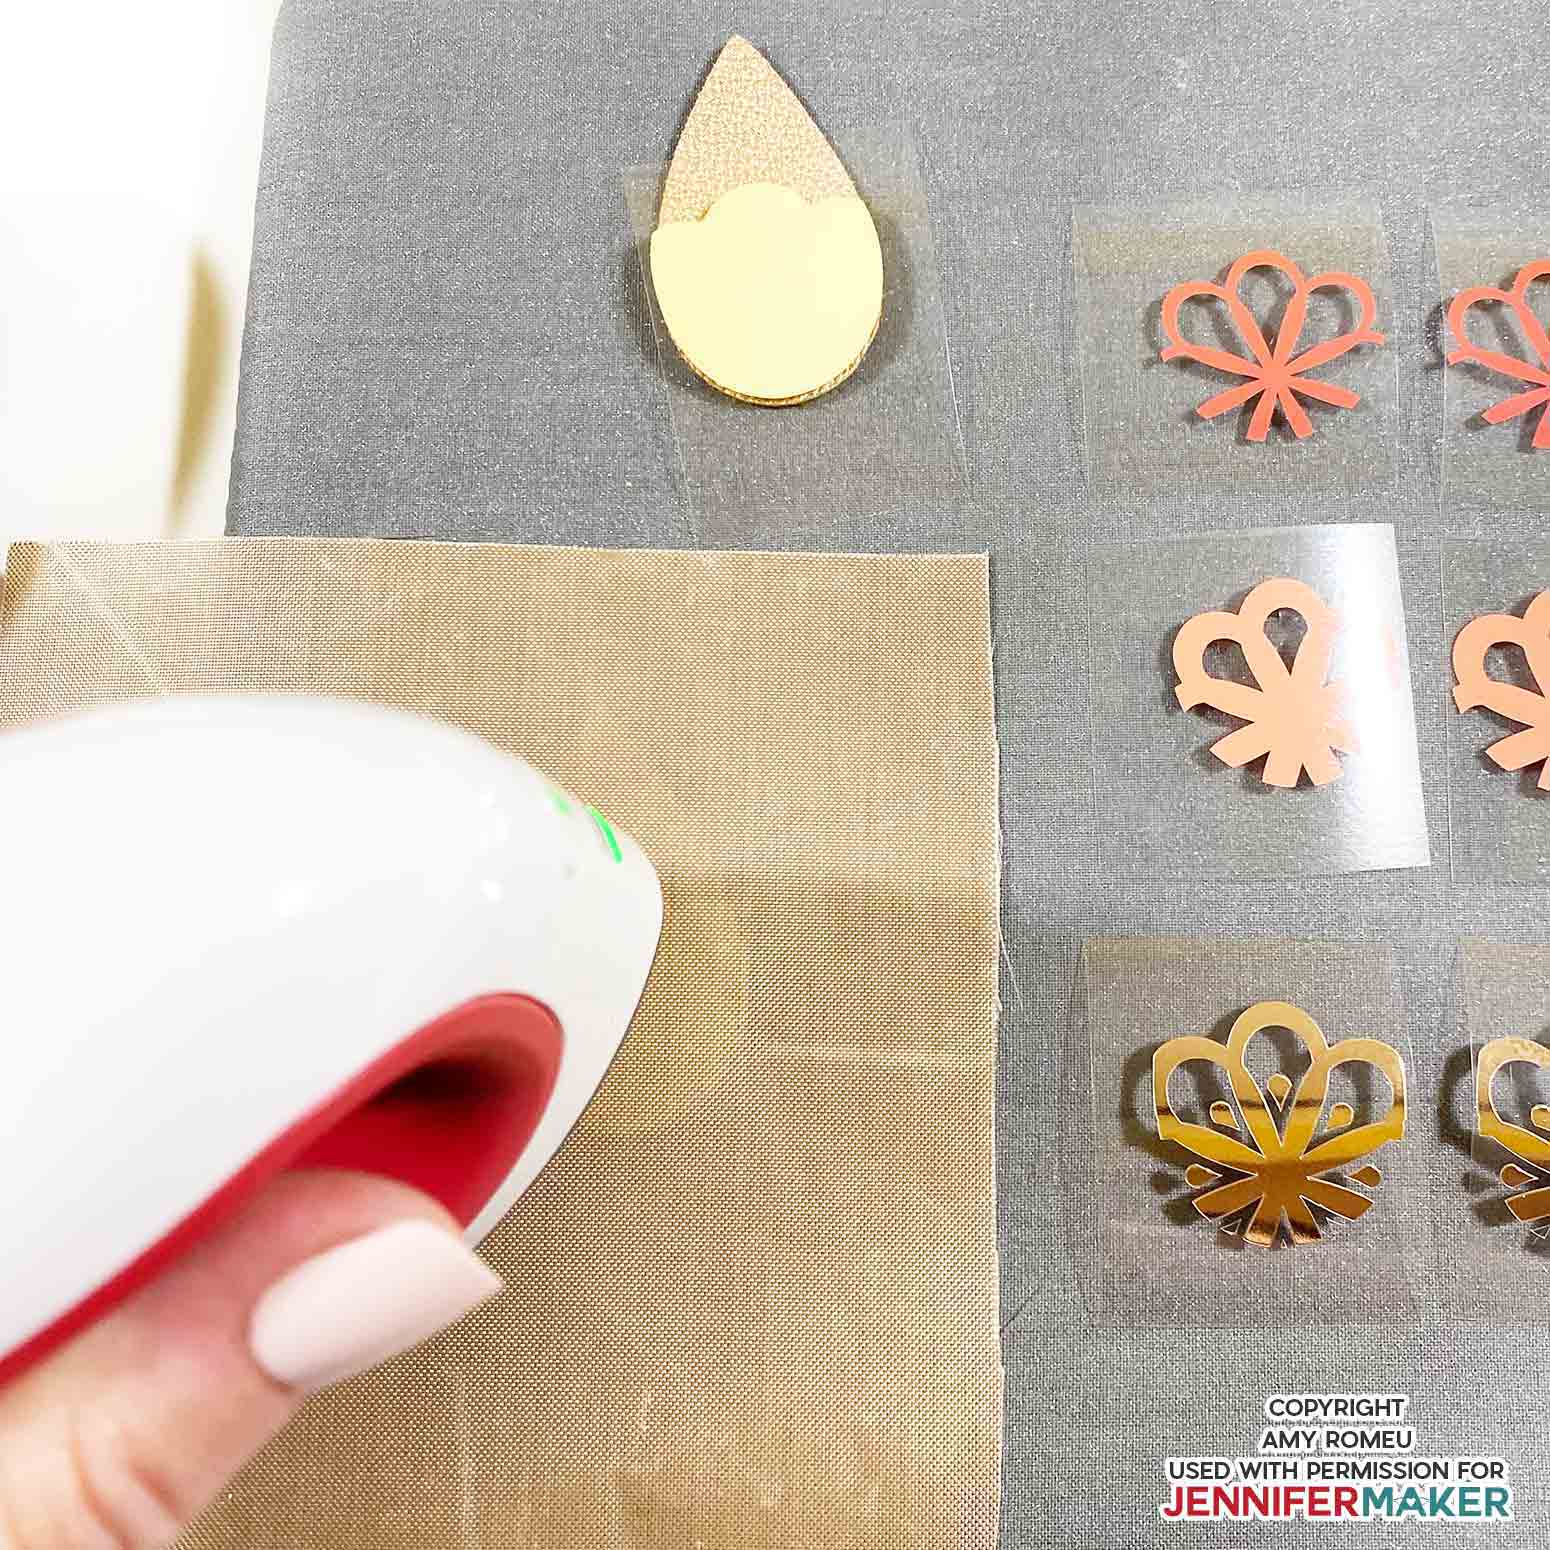
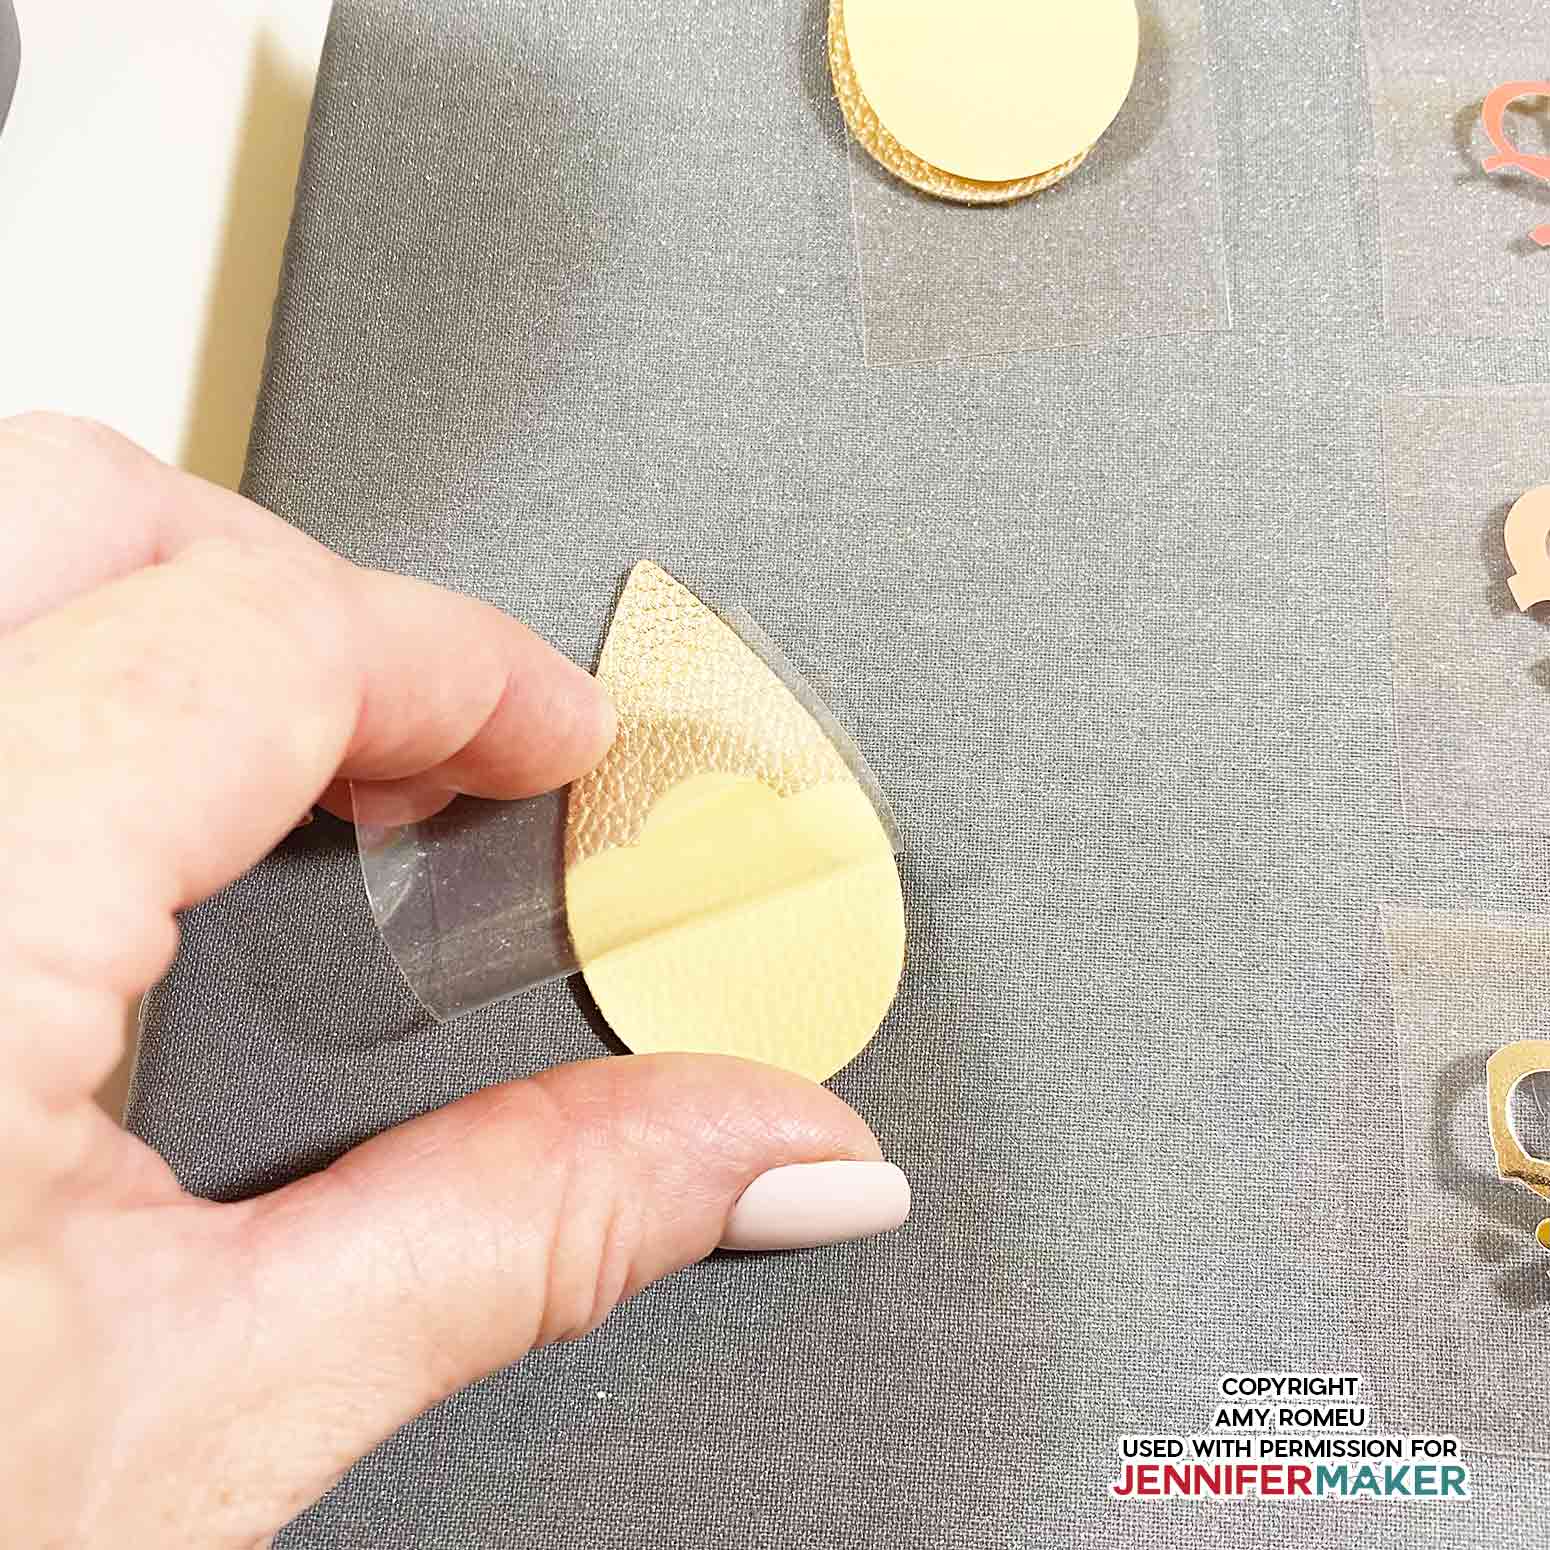
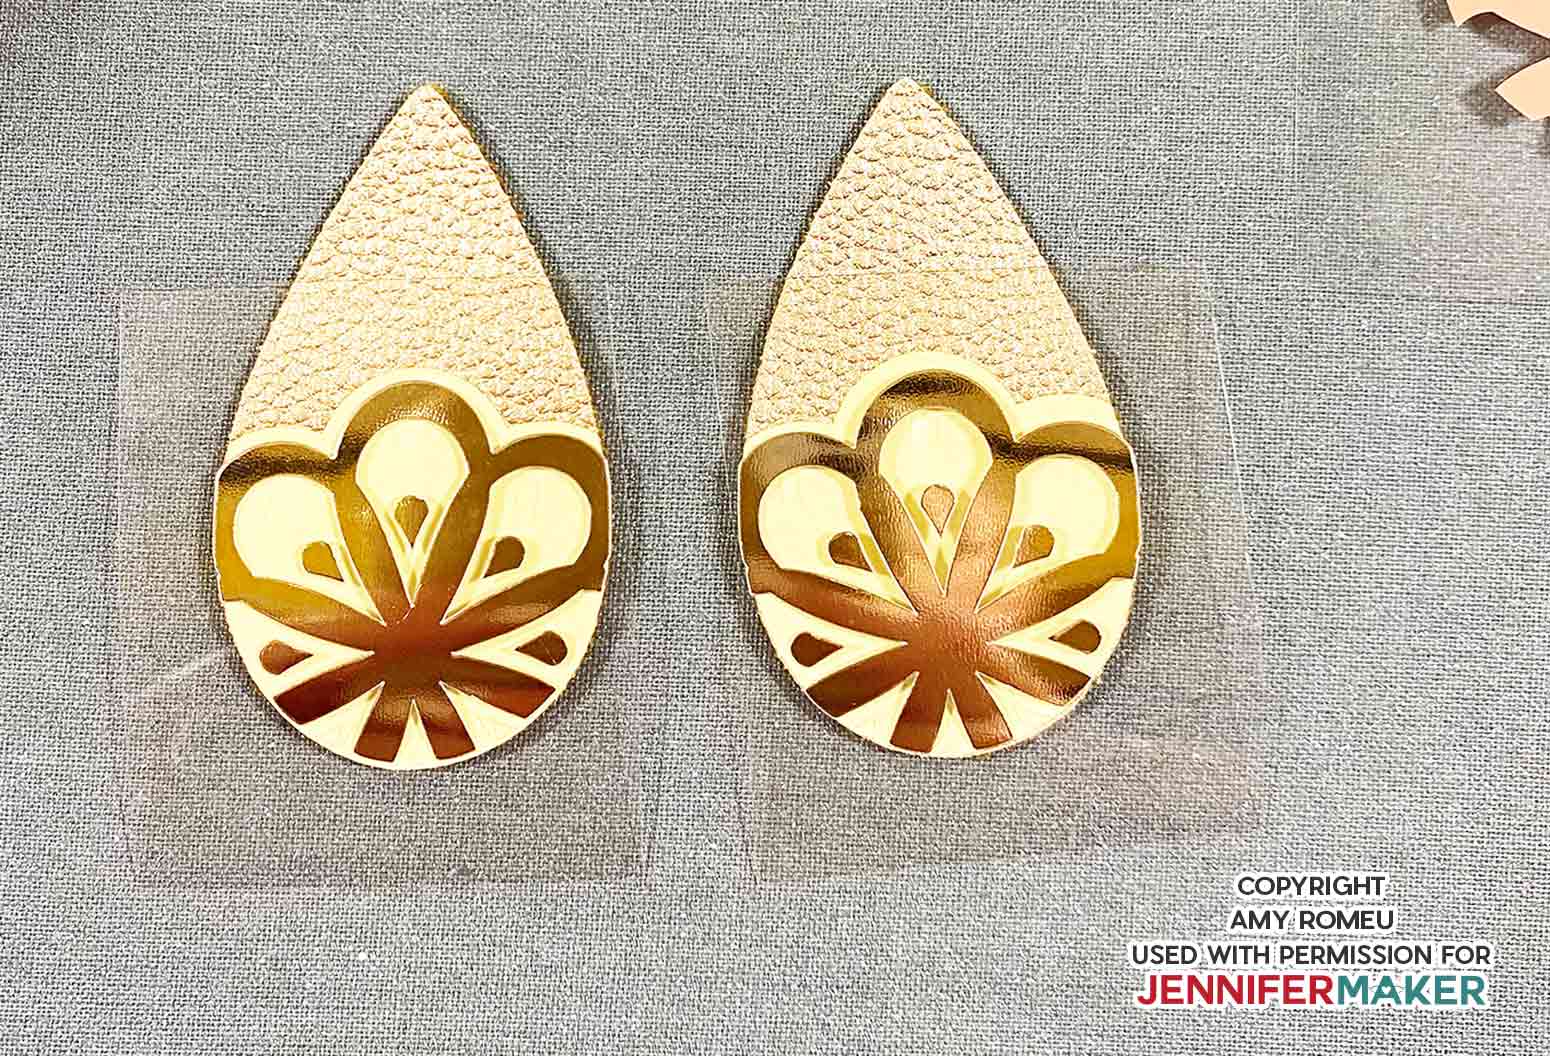
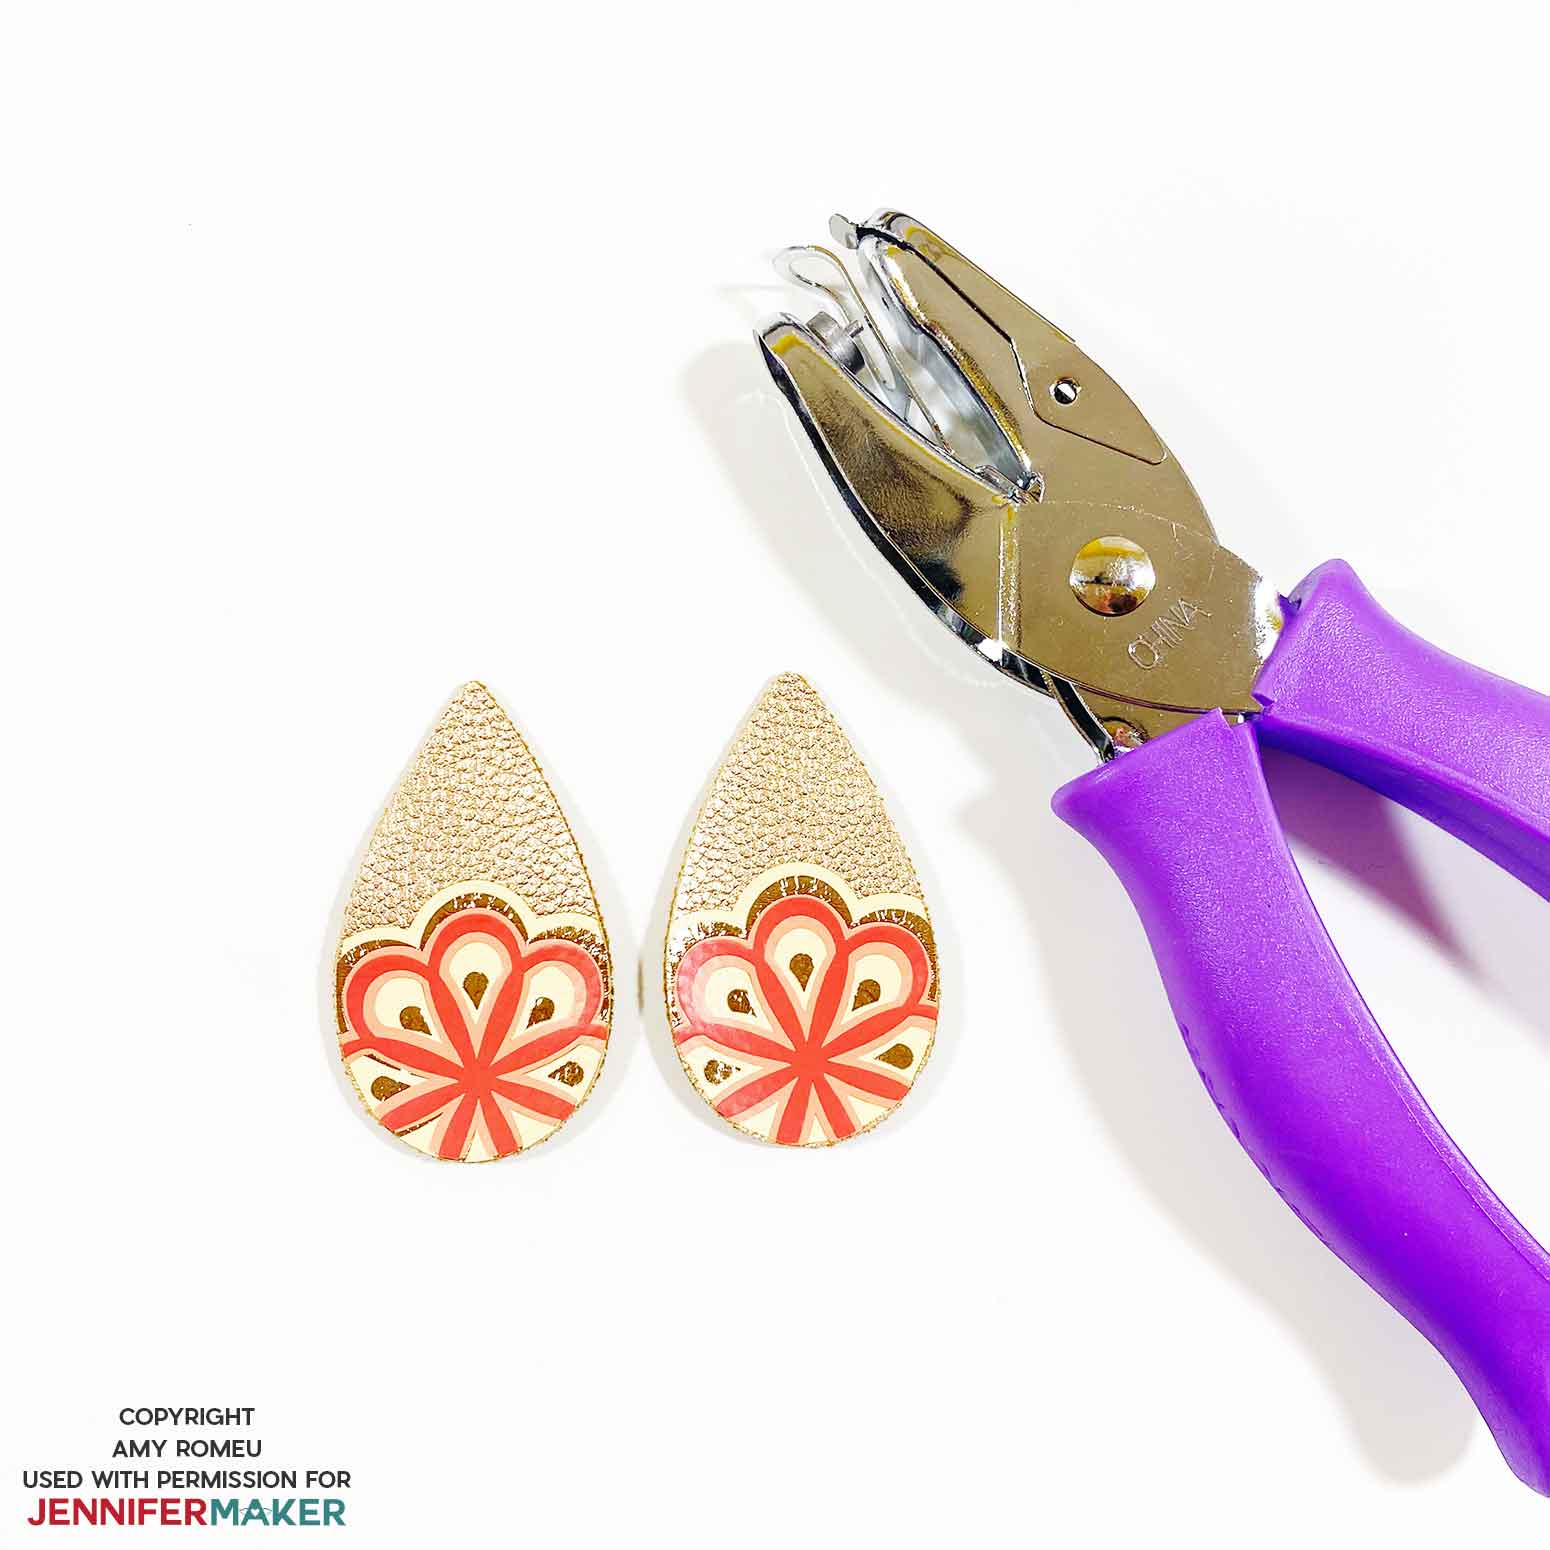
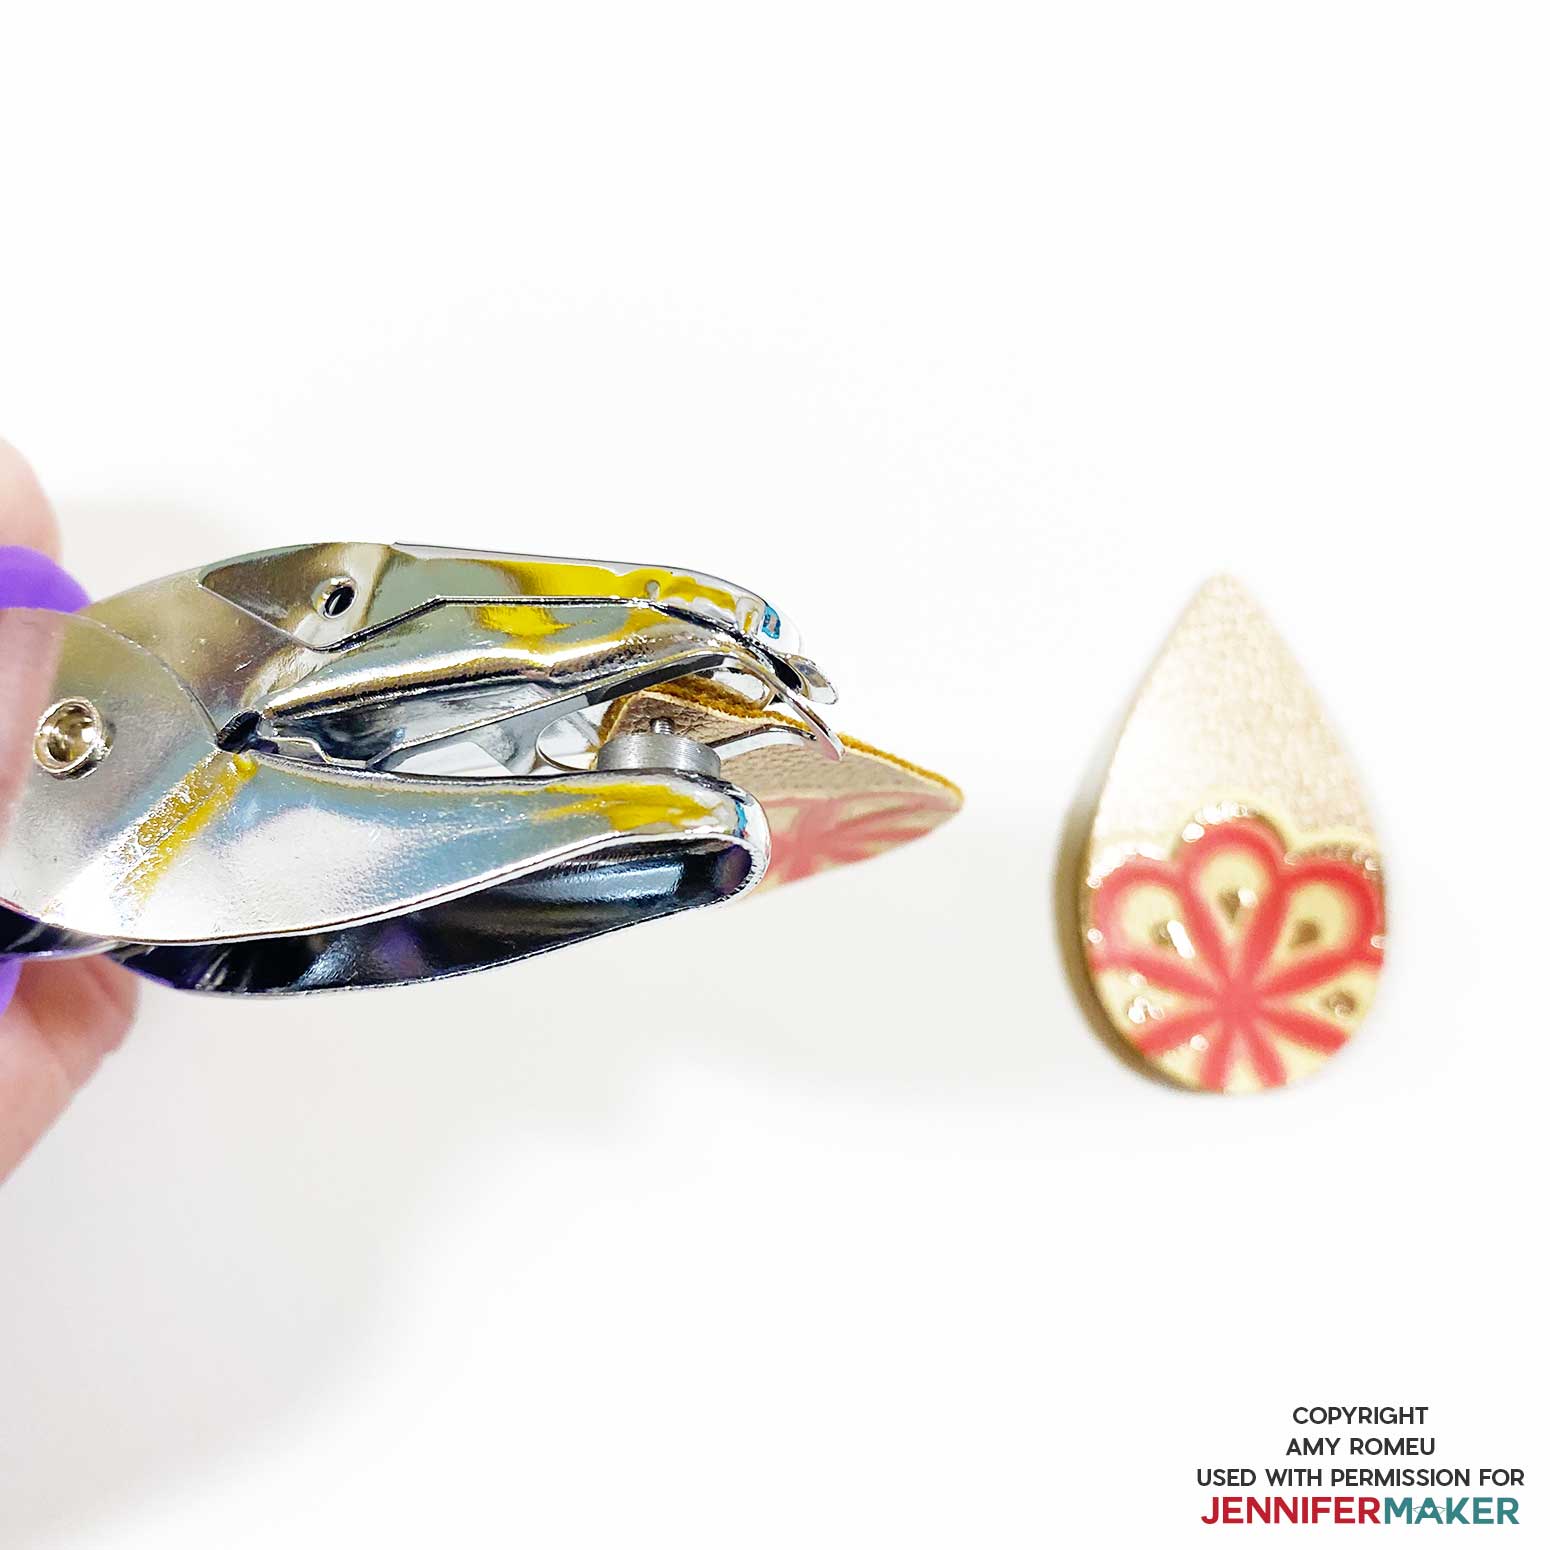
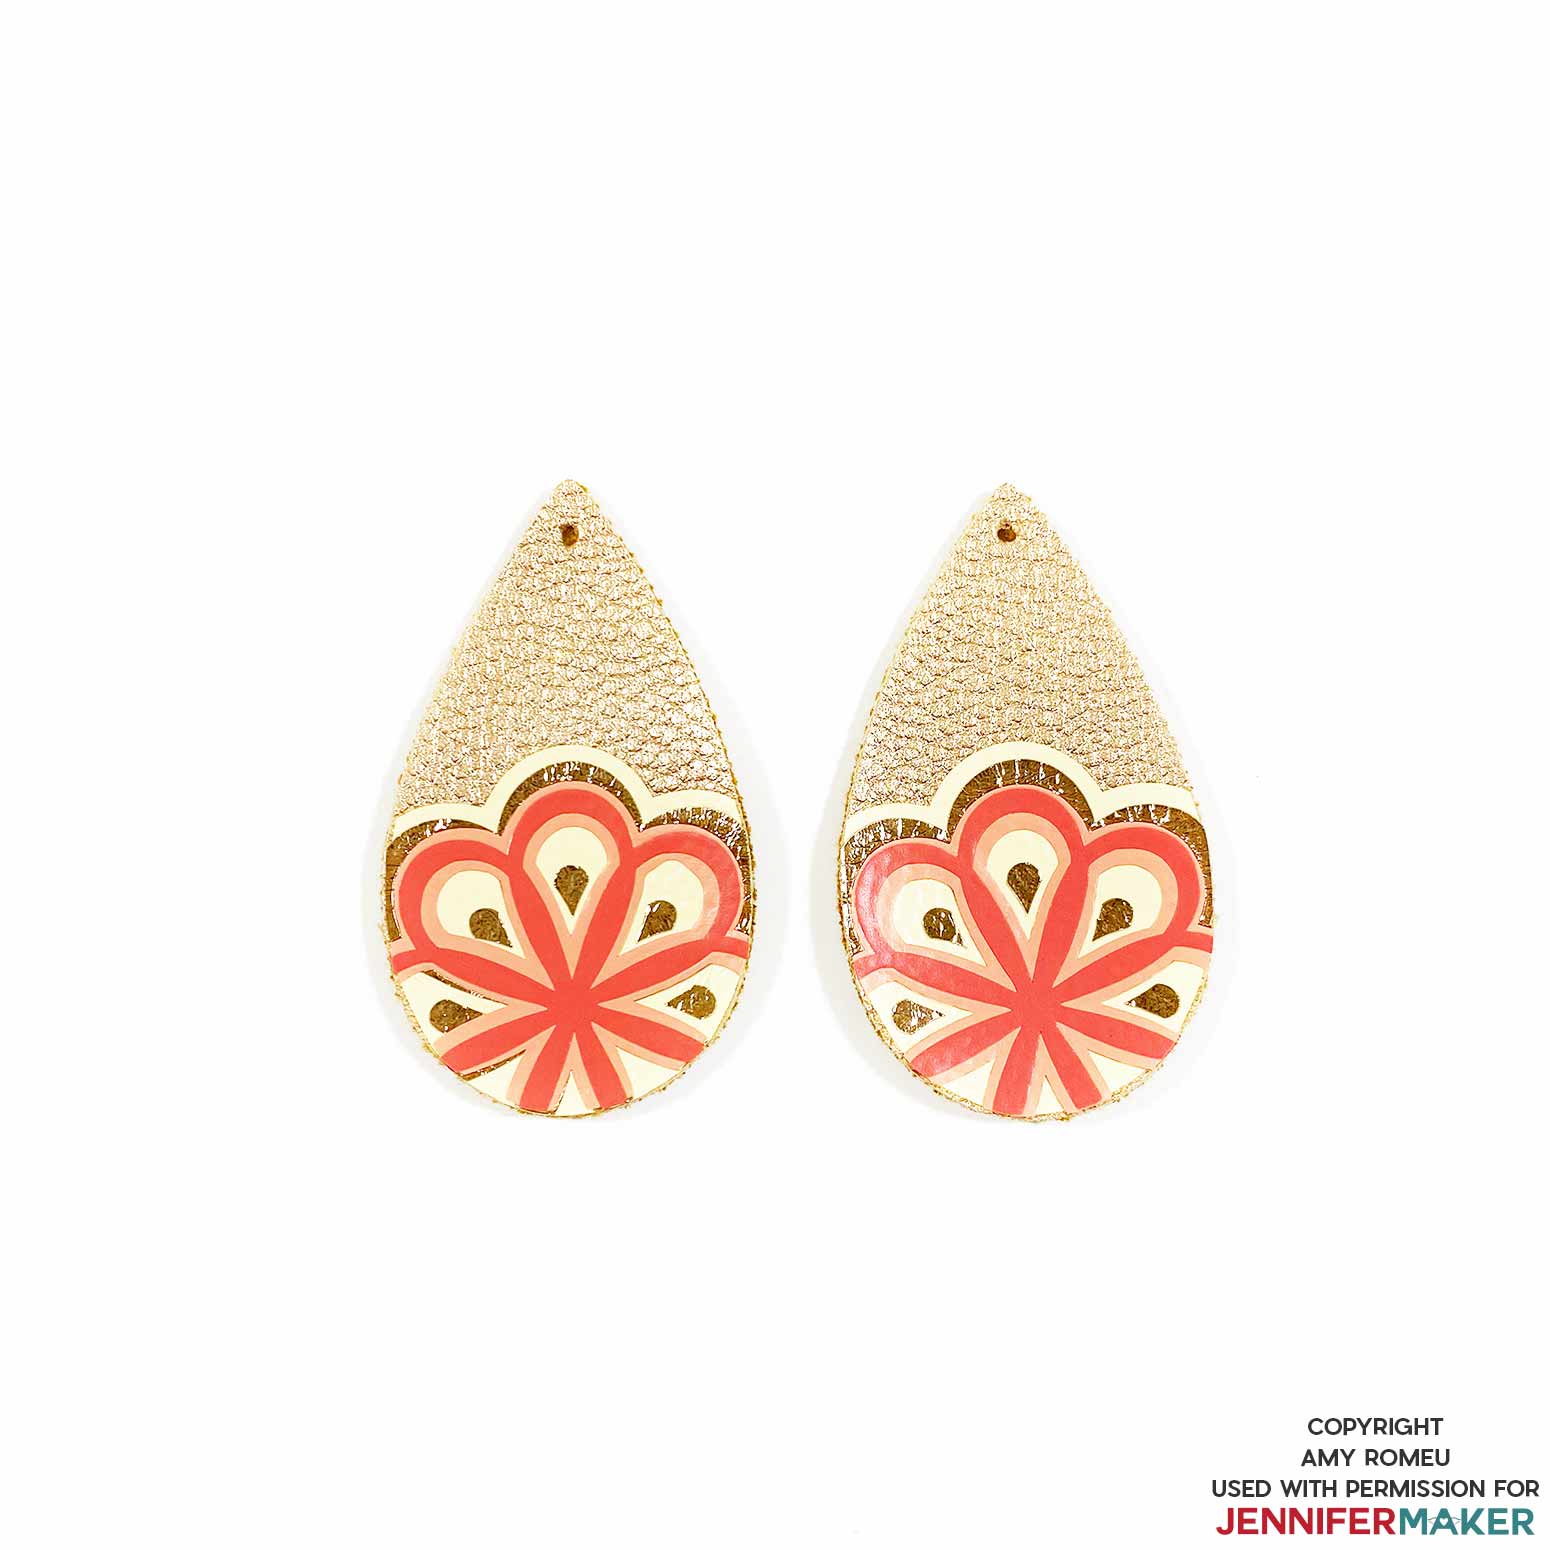
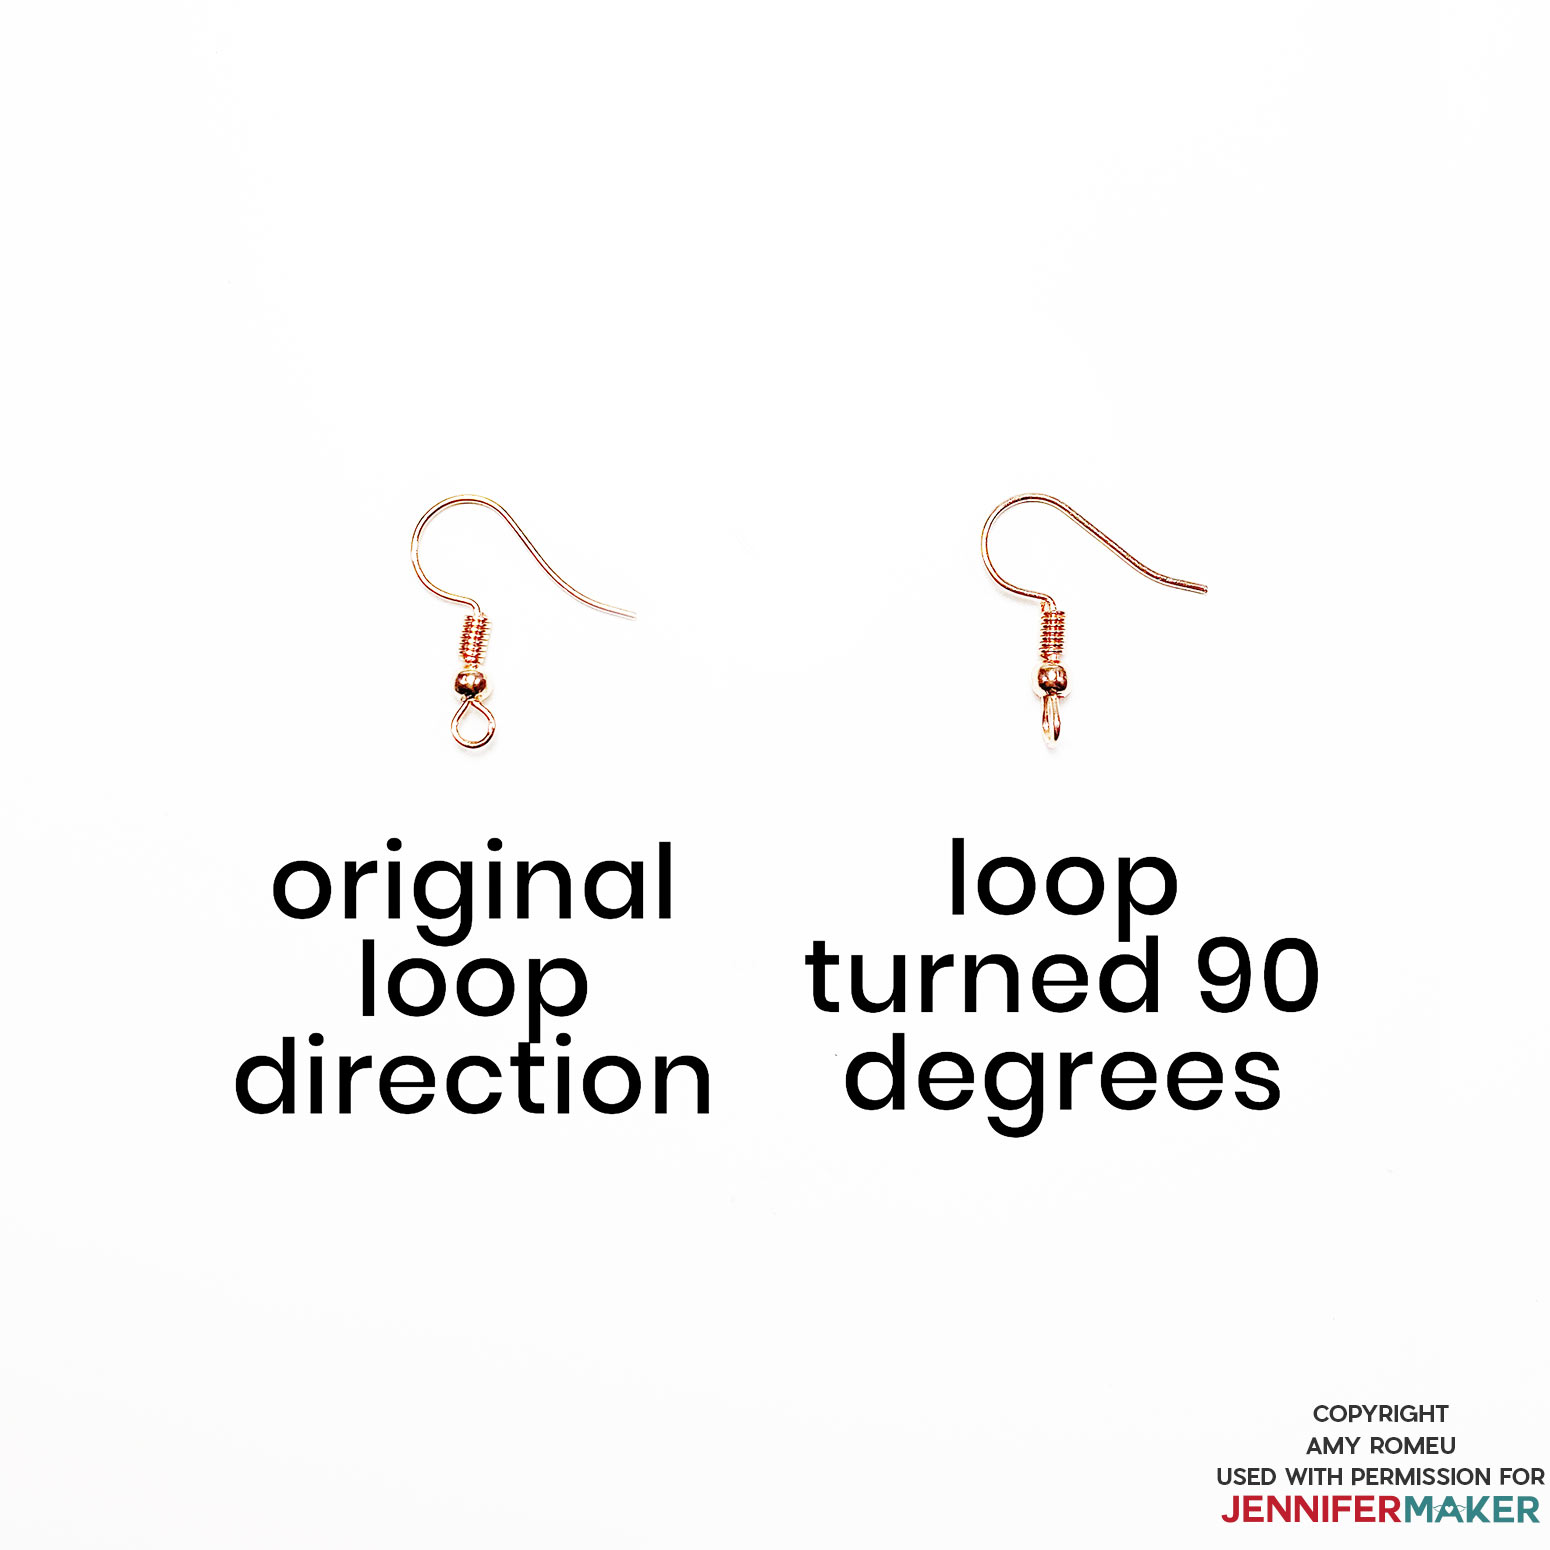
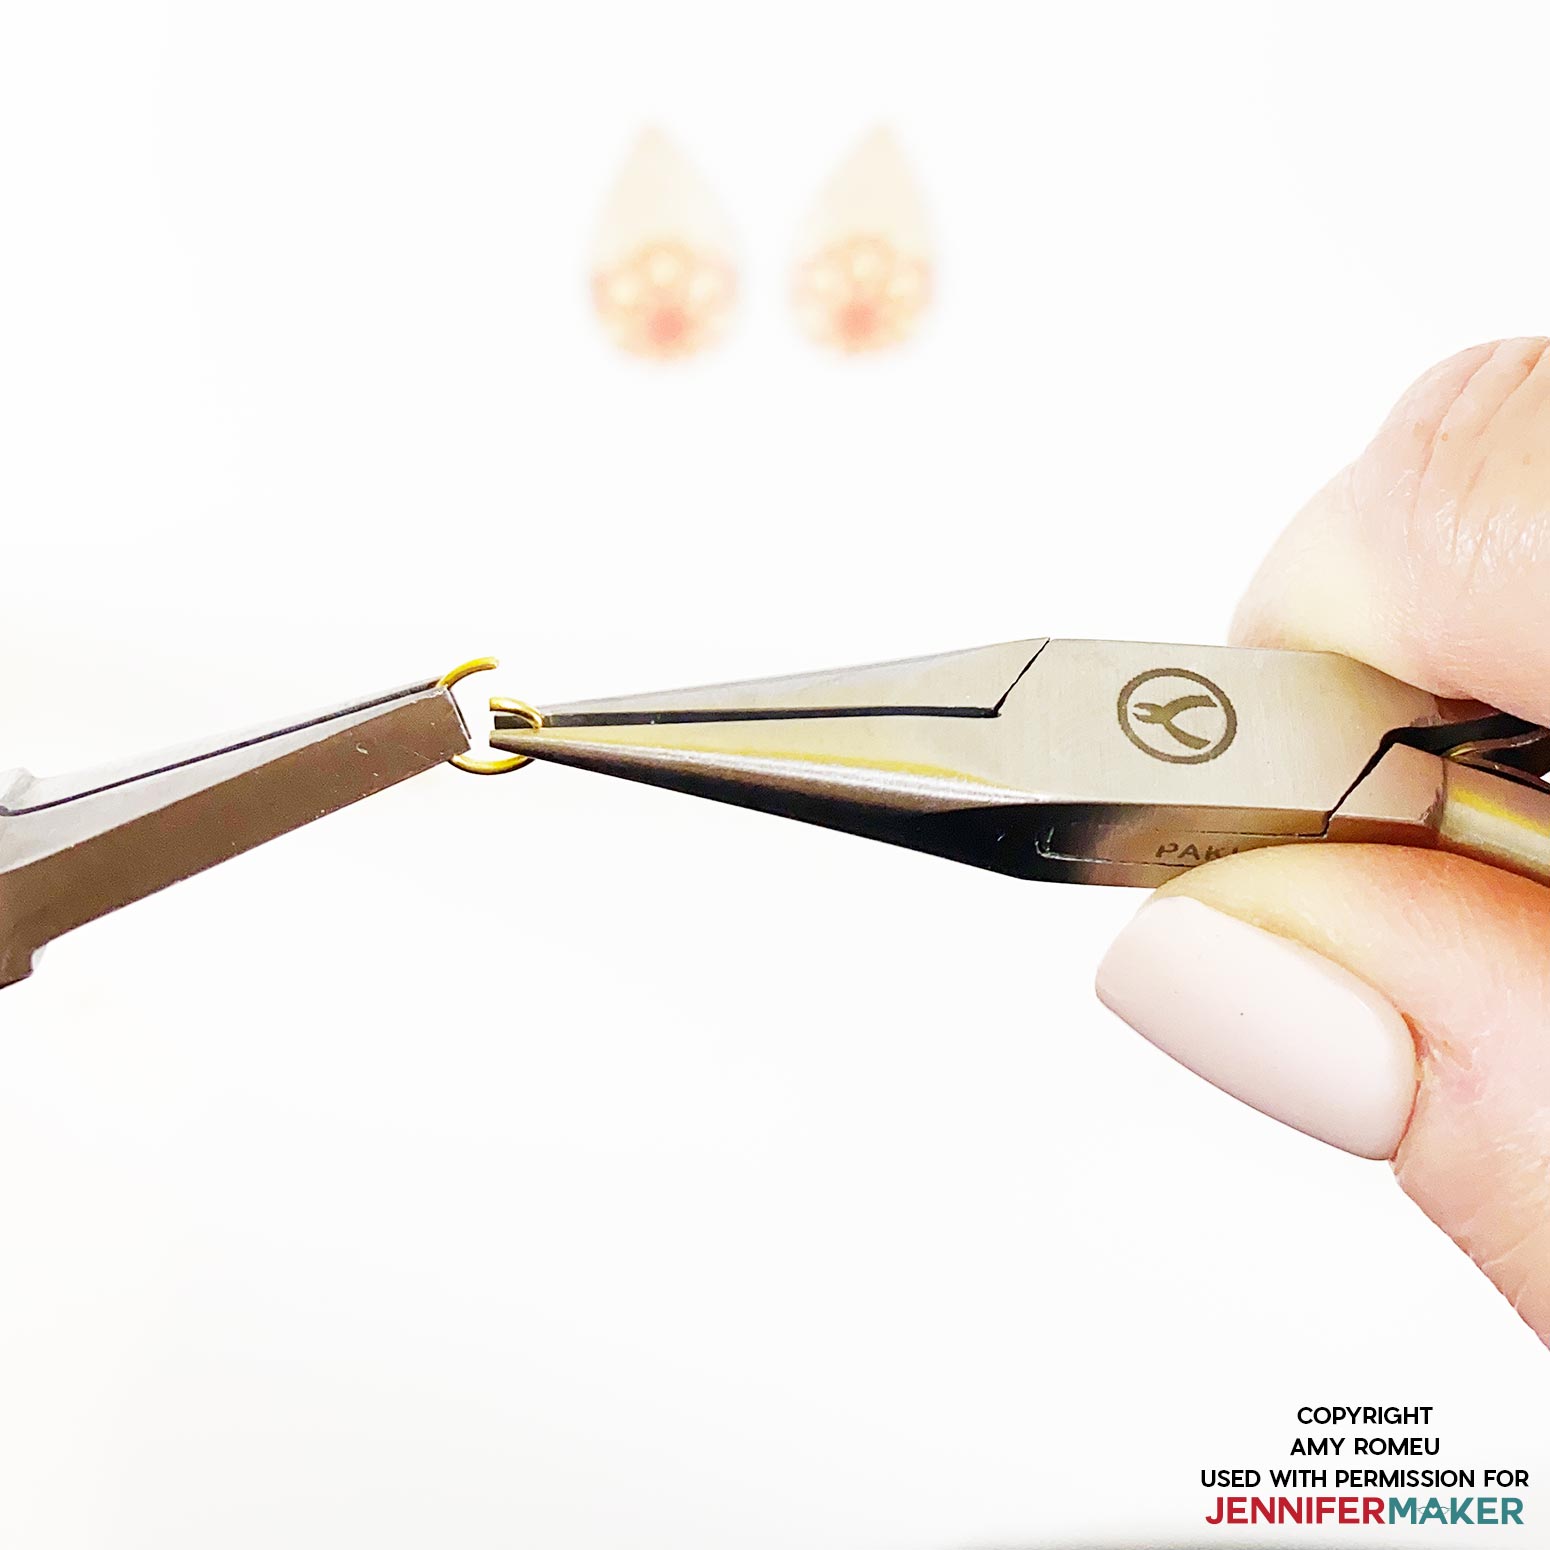
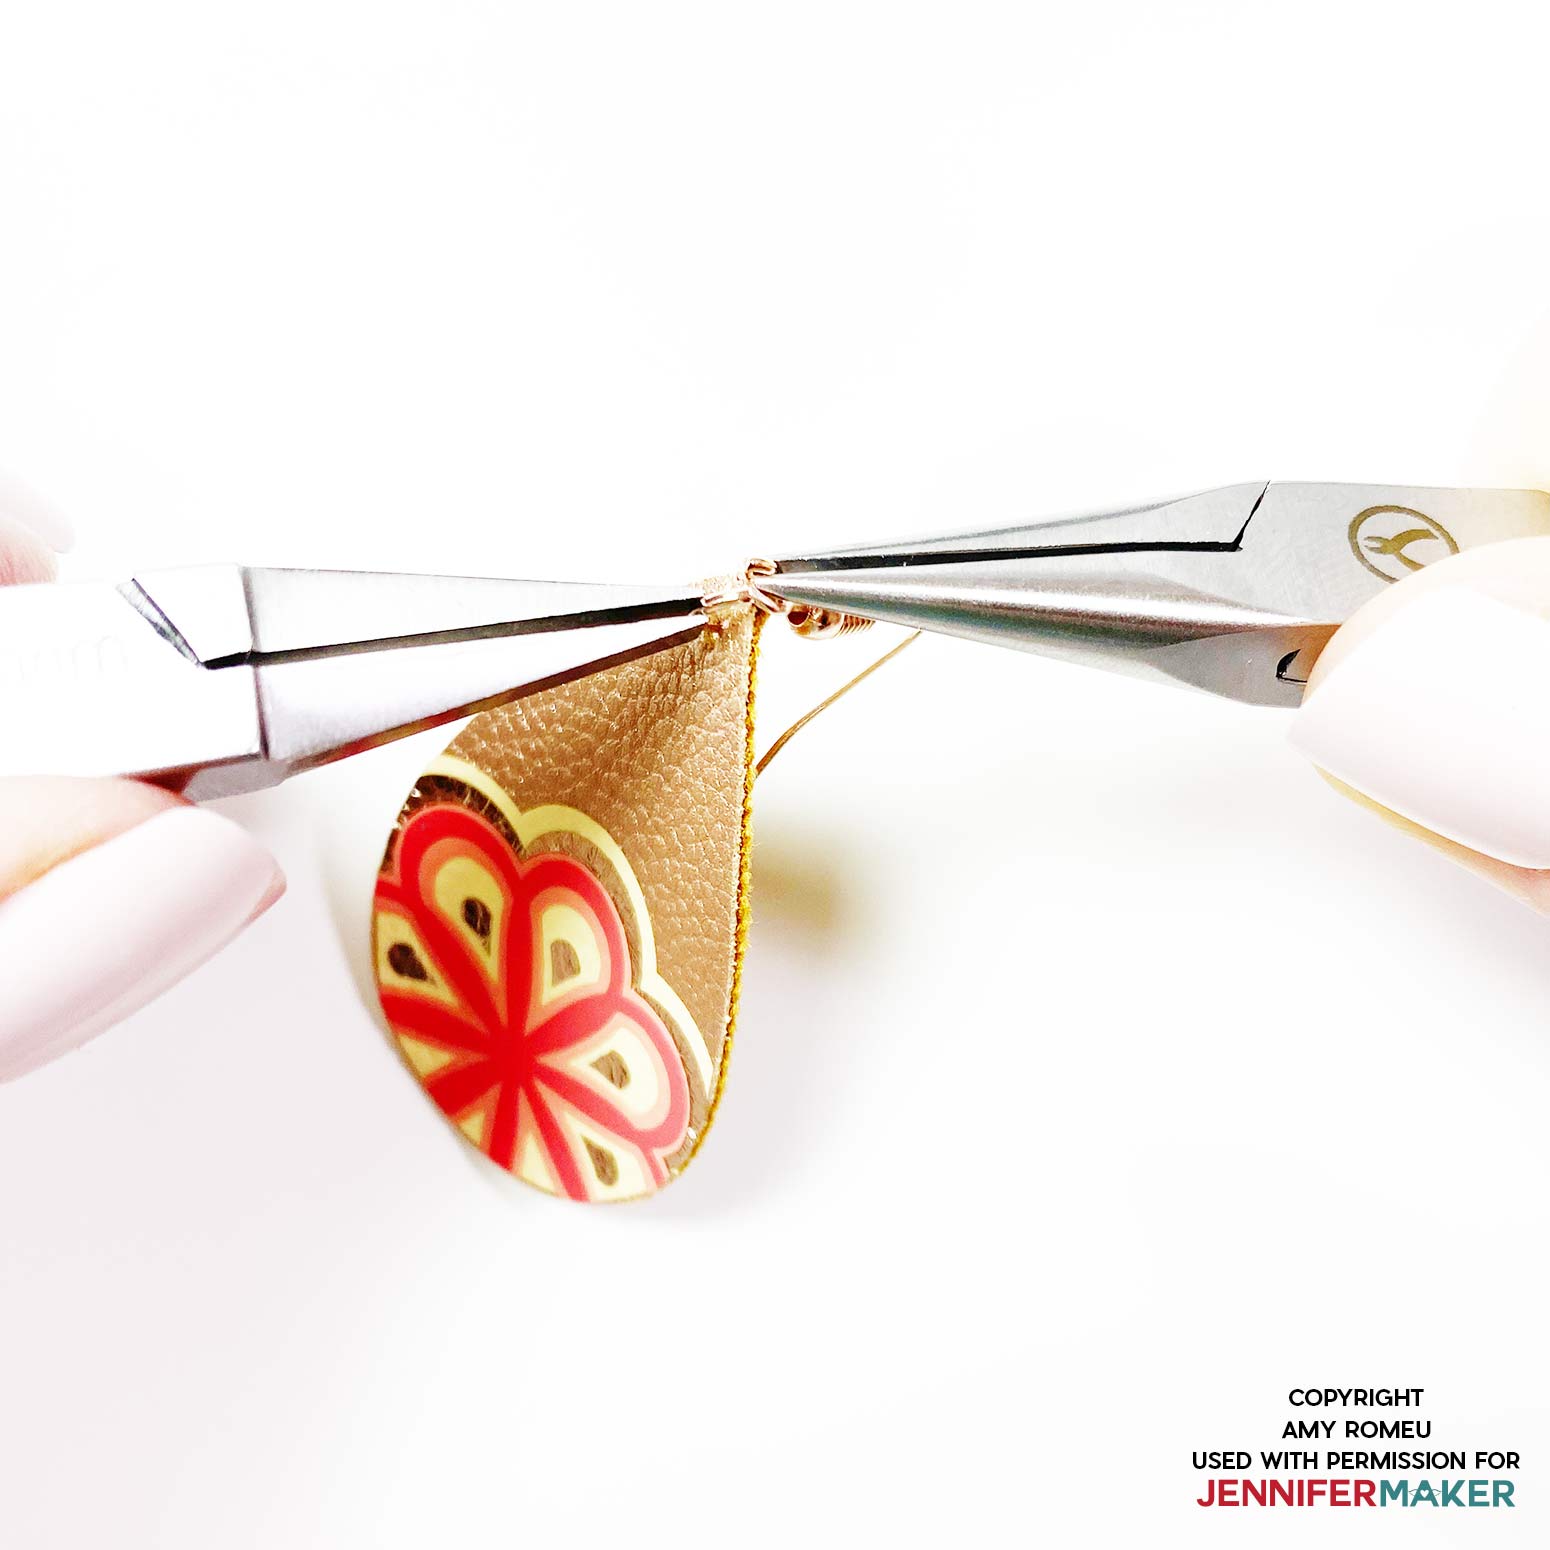
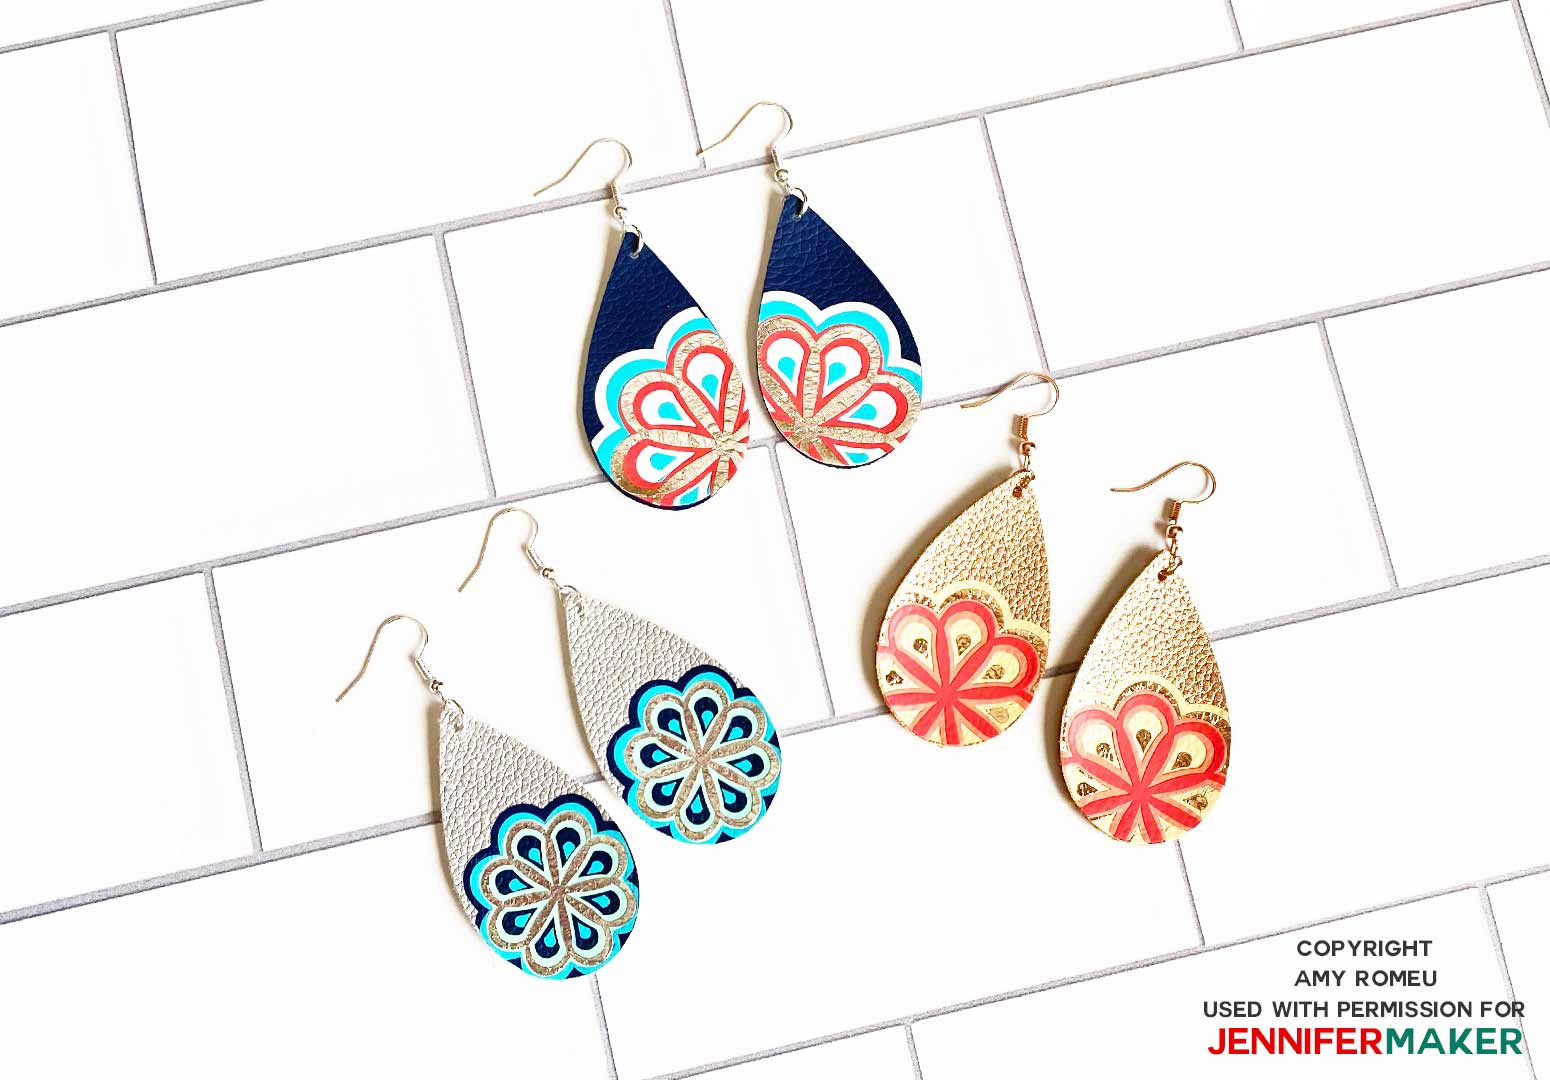
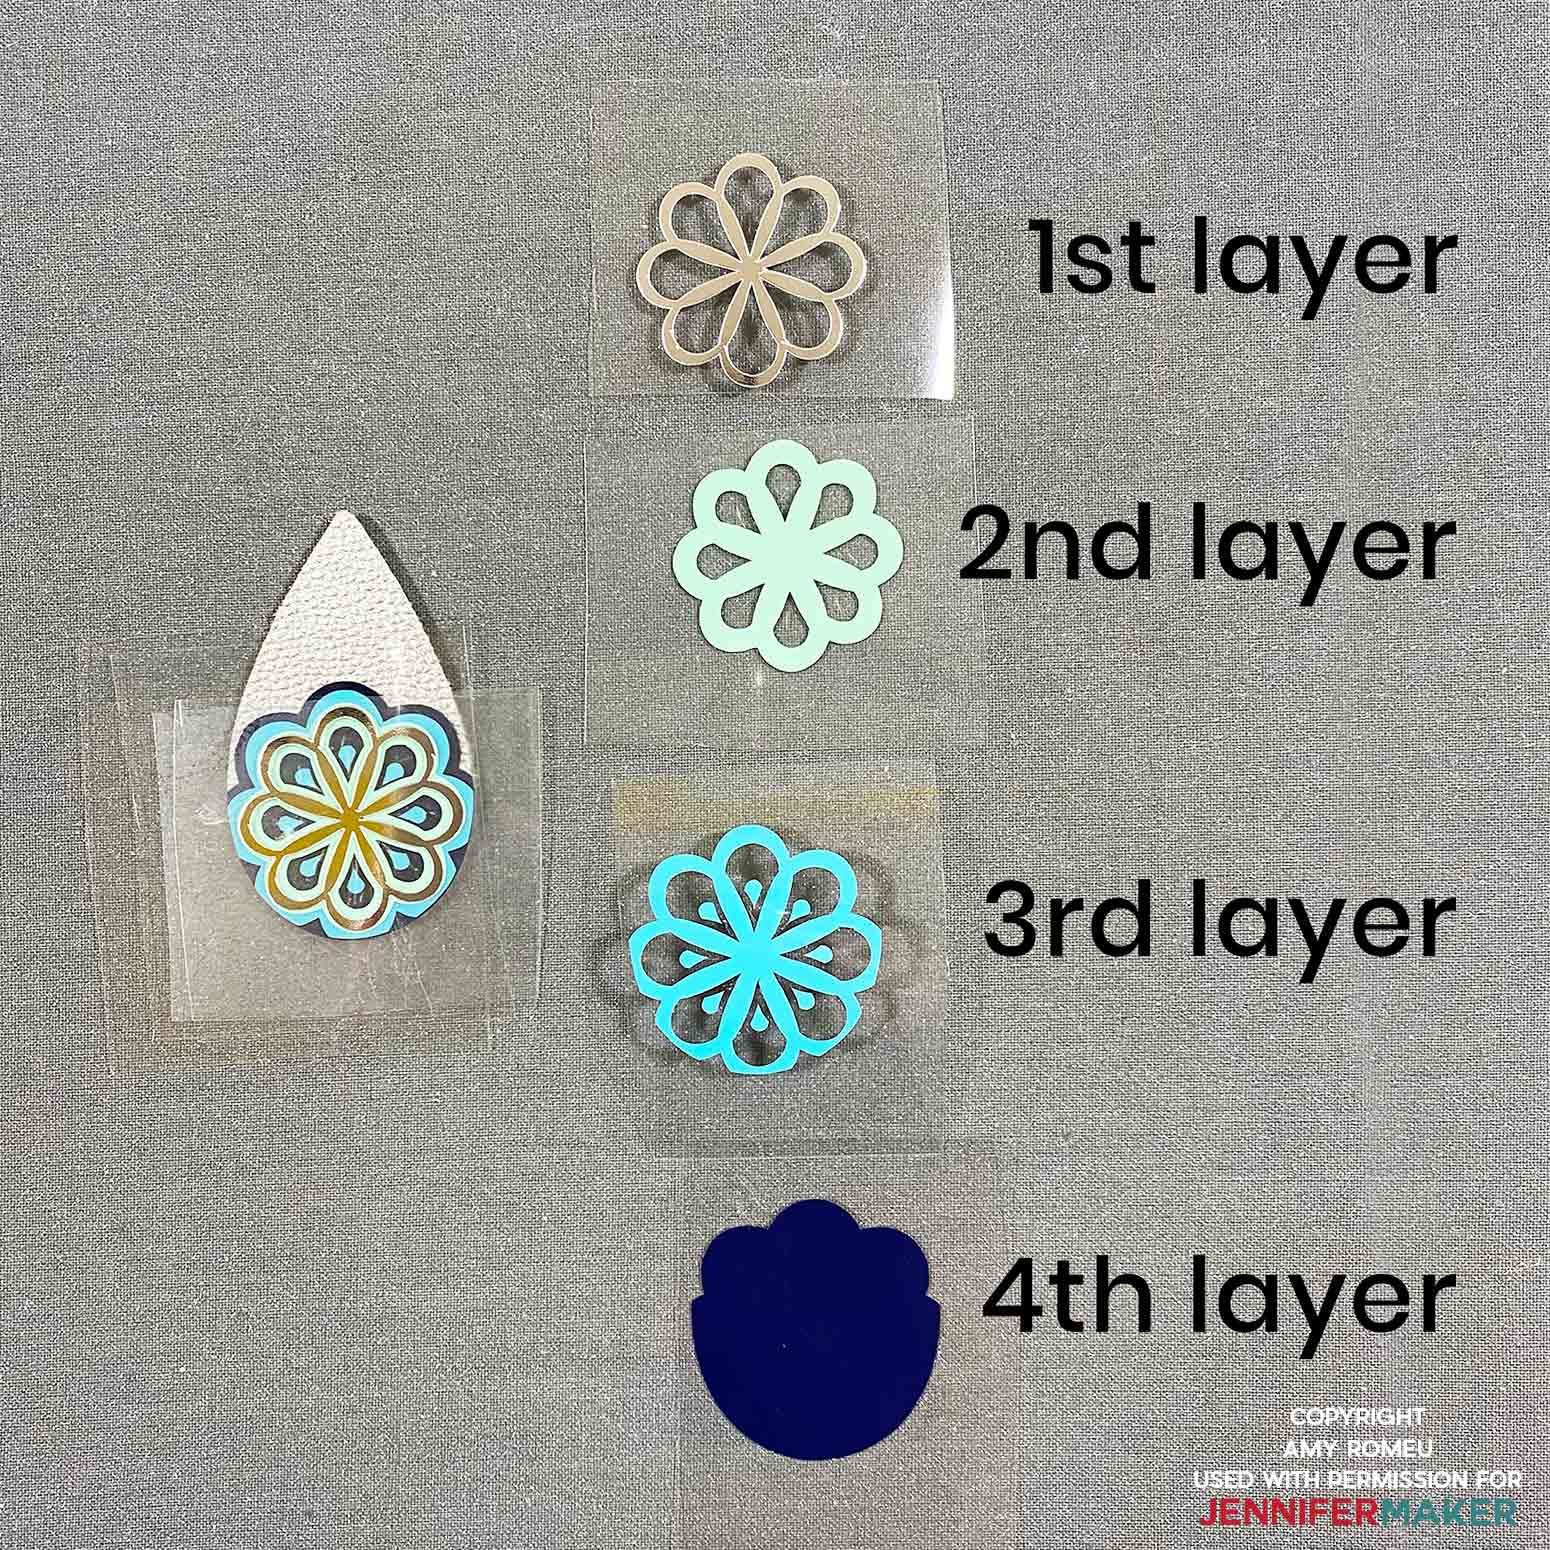
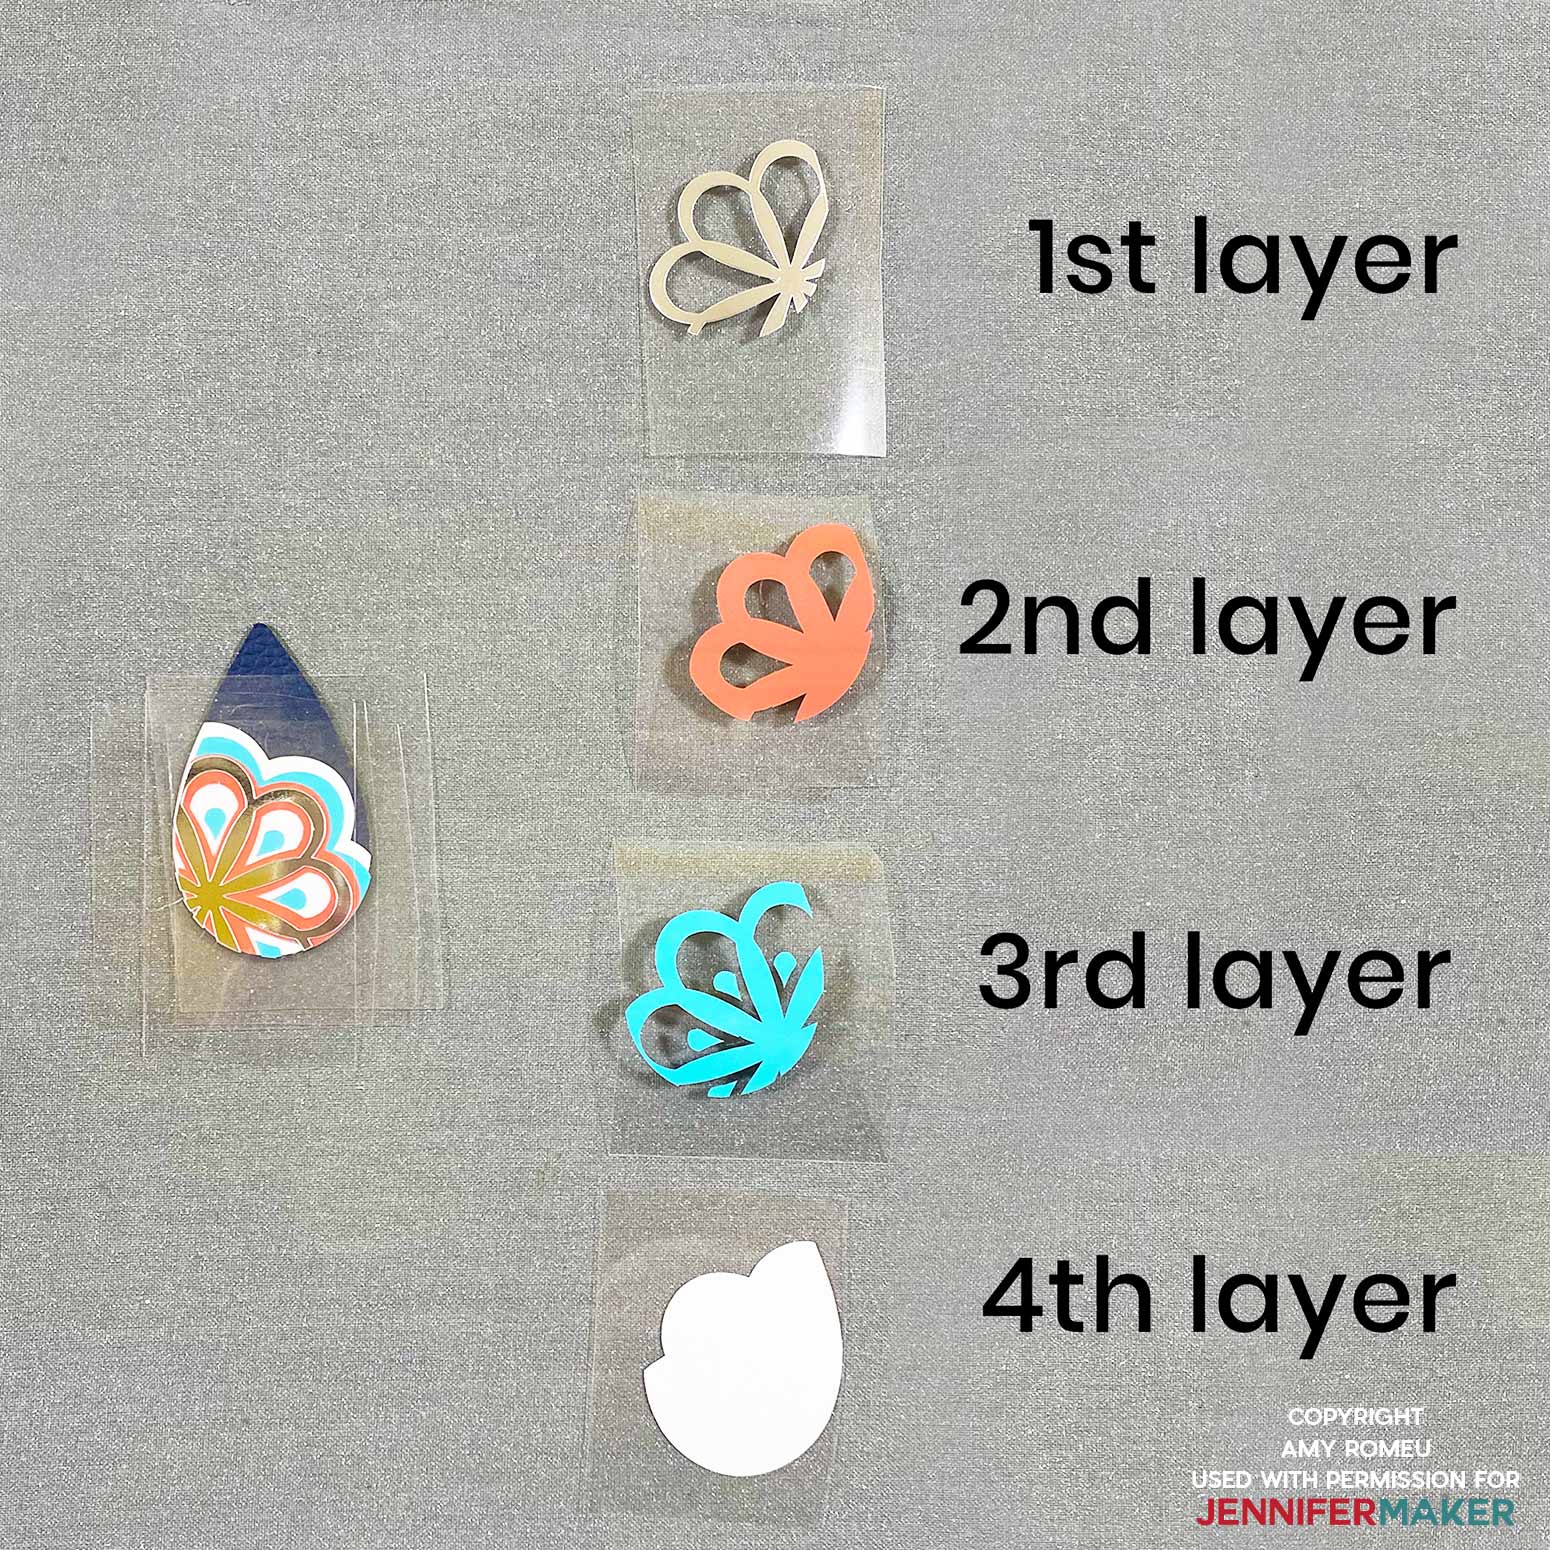
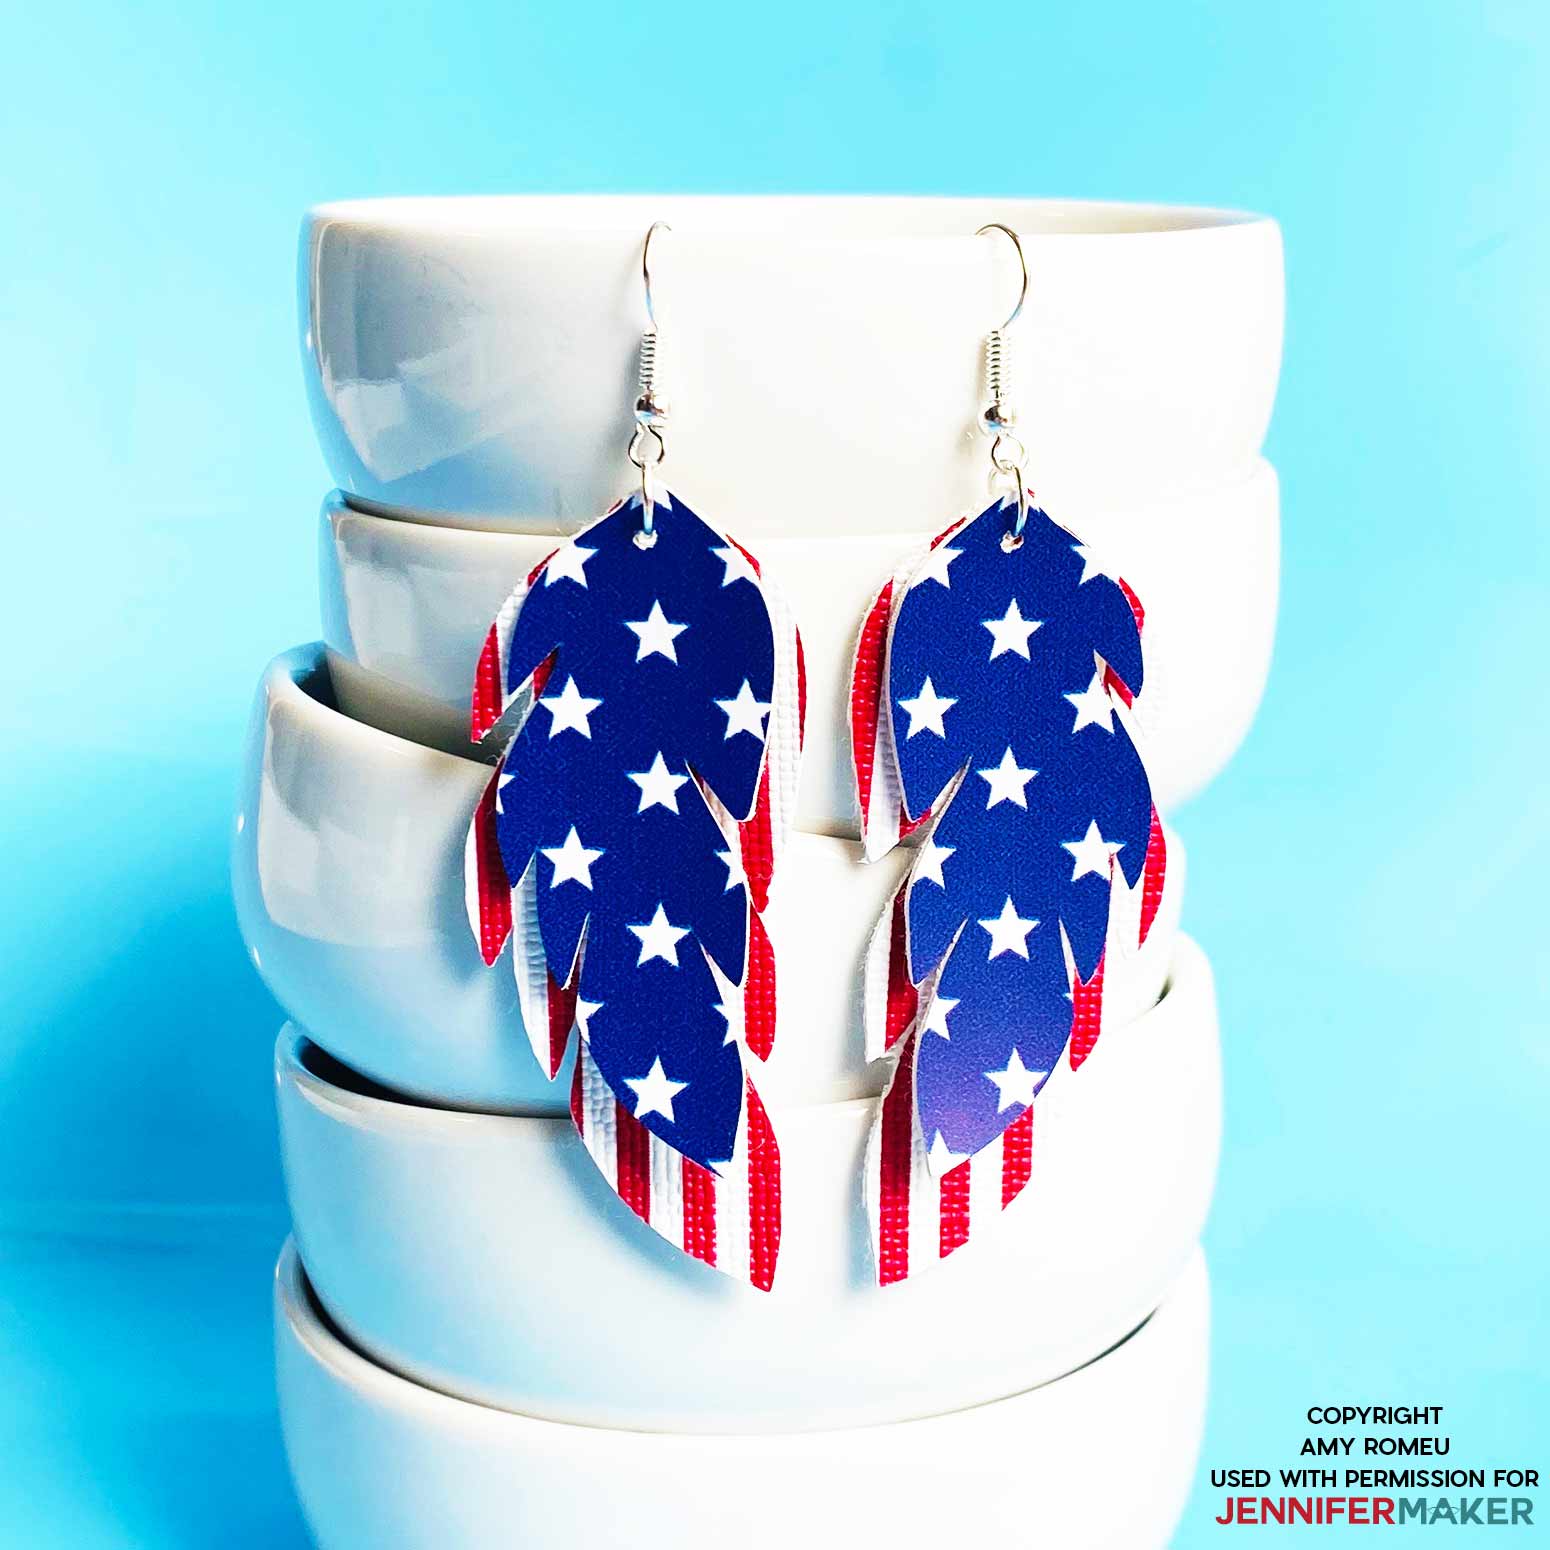
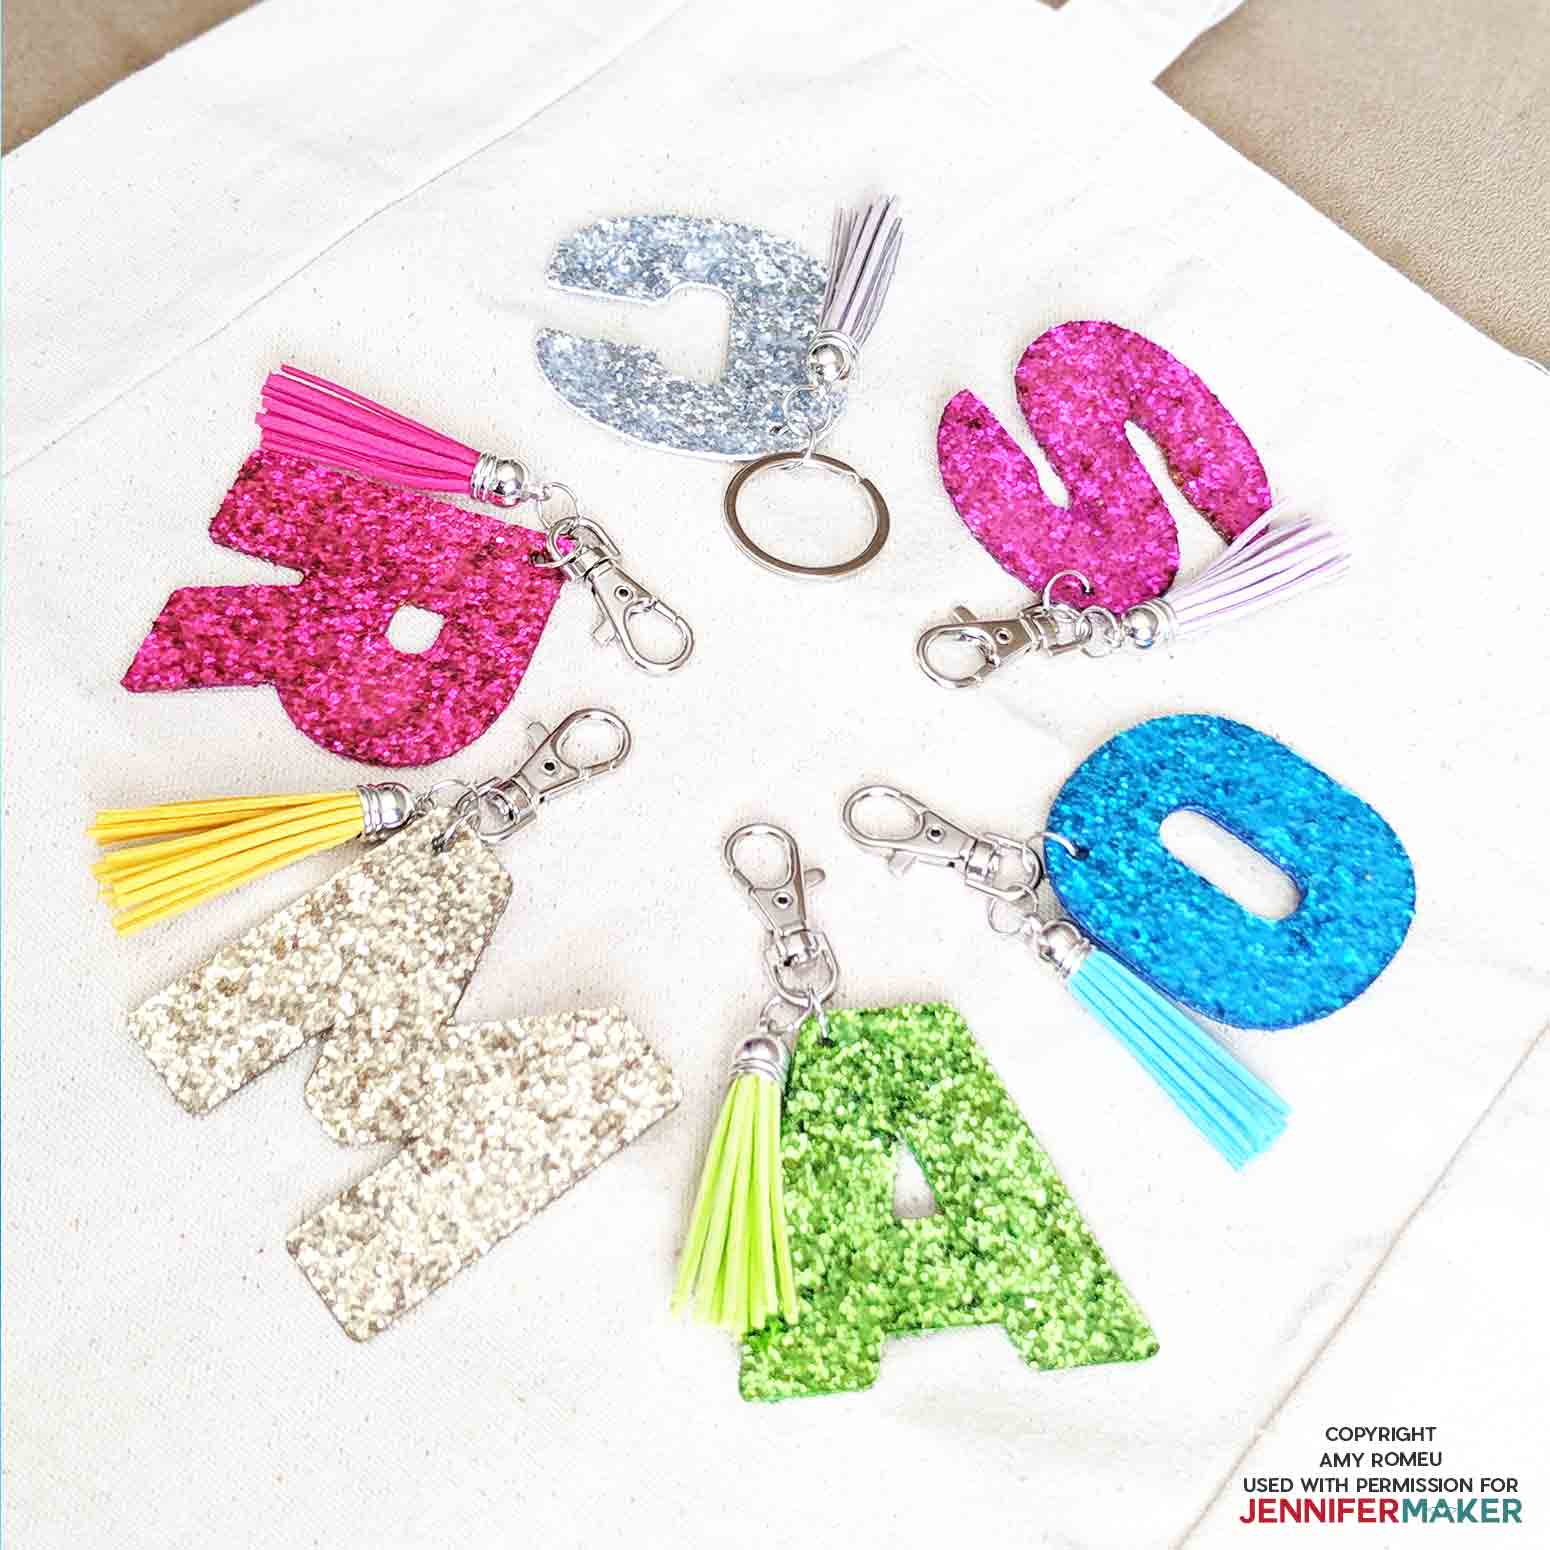
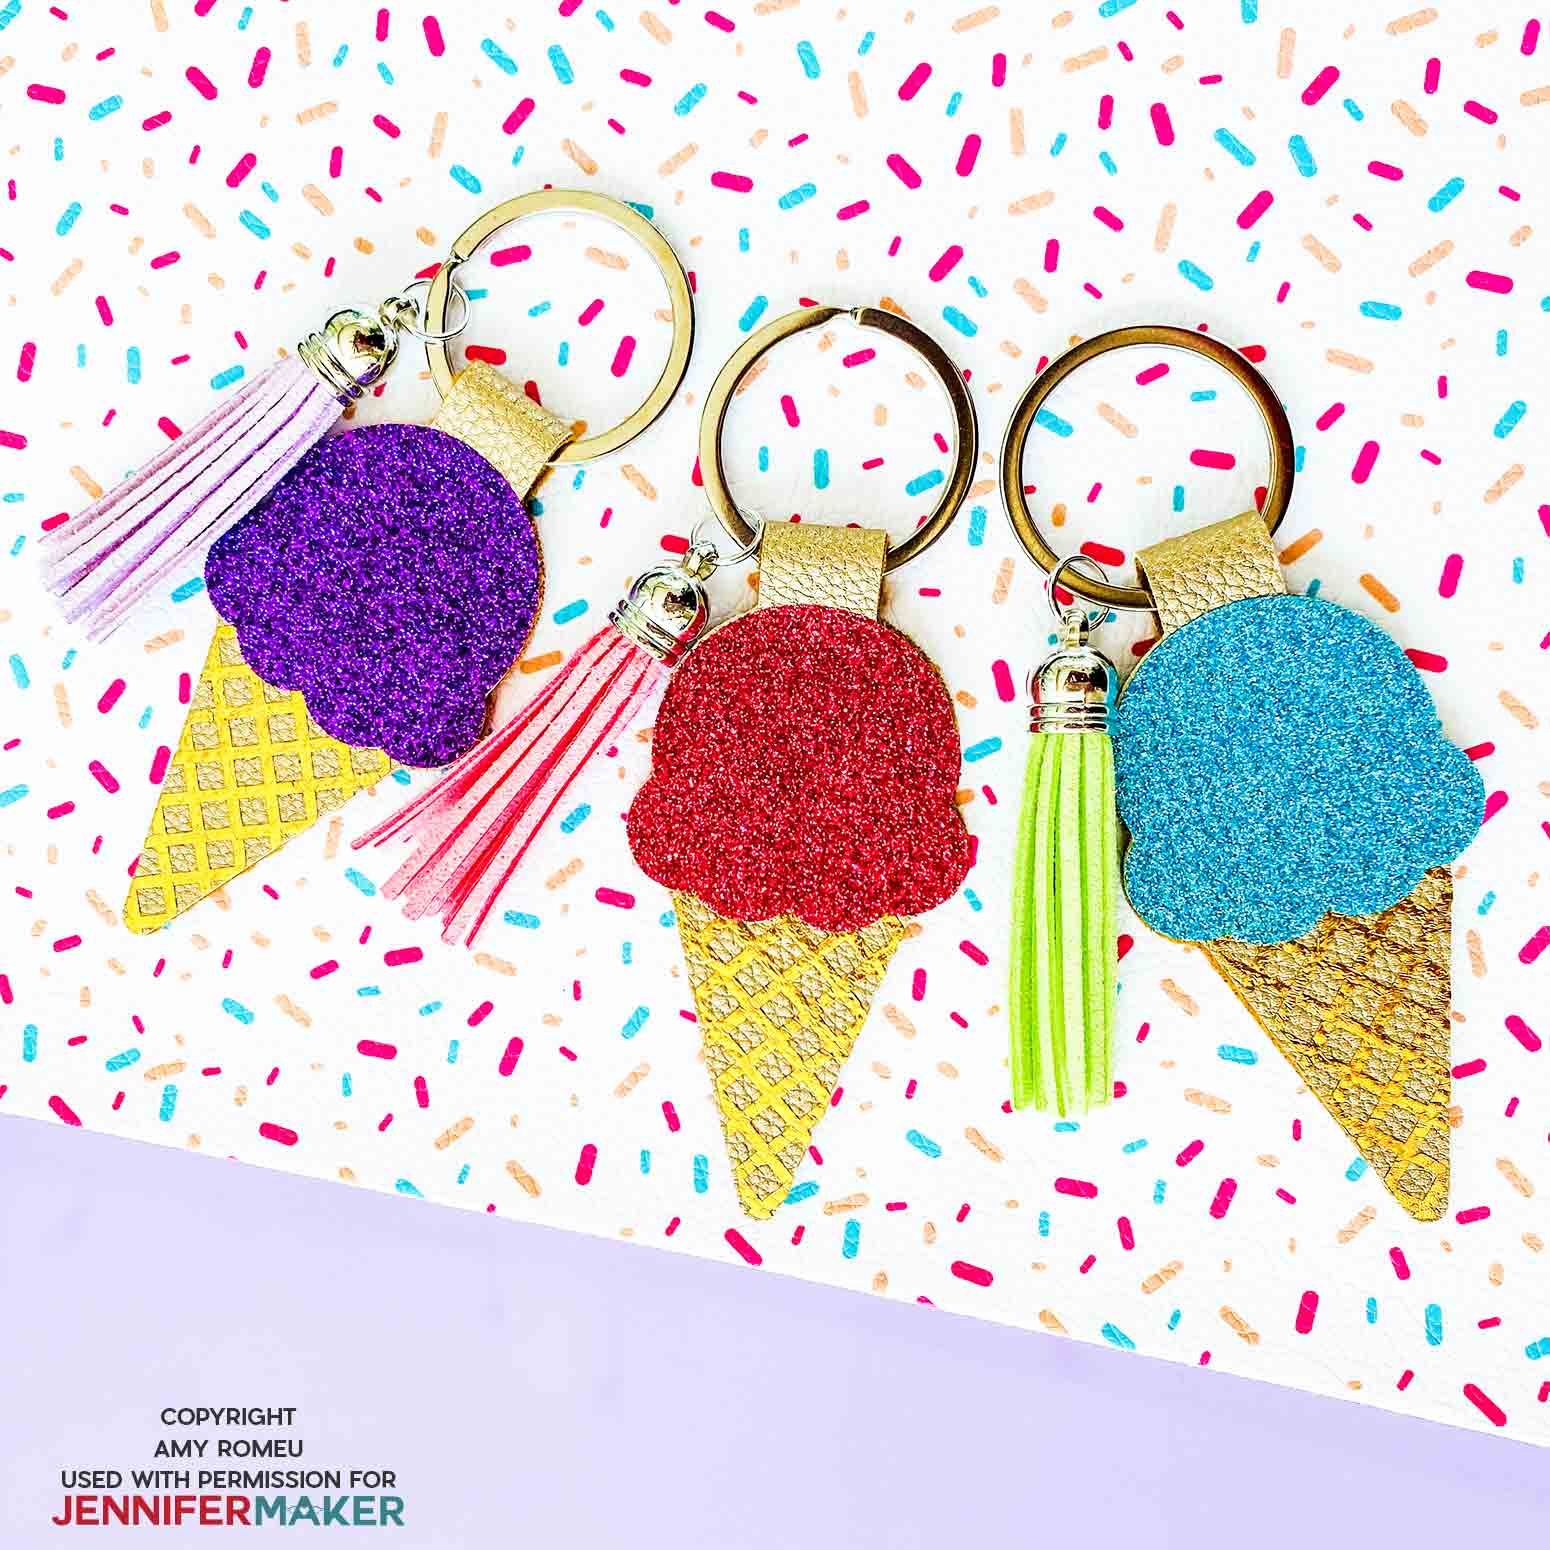
This fun and easy Cricut earring project incorporates layers of iron-on vinyl (HTV) for a fun layered mandala look! So on trend! First, download the free layered mandala earrings SVG/DXF/PNG from my free resource library. There are three different earring patterns to choose from within the download folder. I recommend uploading only one earring pattern at a time since these are multi-layered earrings. Tip: If you're not sure how to upload an SVG cut file to Cricut Design Space, watch this helpful video training series I made. If you're on an iPhone or iPad, here's how to download and upload SVG files to the Cricut Design Space app. Click on your uploaded mandala earring design from your uploaded images. Click on "Insert Images" to bring the earring design into your canvas. This brings the earring cut shapes into Cricut Design Space. You will see in the Layers panel, this design has five layers. One will cut from faux leather and the other four will cut from heat transfer vinyl or foil iron-on. (If you'd like to use glitter iron-on in your earrings, I recommend using glitter iron-on for the top layer only.) I suggest recoloring each layer on your canvas now to resemble the faux leather and vinyl colors you've chosen for your earrings. If you want to use only two or three different colors of heat transfer vinyl, you certainly can. You can preview how your vinyl layers will look as you change their colors on the canvas. Be sure to alternate the layer colors so you don't have two layers that are the same color next to one another. To recolor the layers, click on a layer, click and hold the CTRL button (Windows) or Command button (Mac), and click the matching layer to also select it. Then click on the color swatch icon on the top menu bar and select a new color. This will recolor both matching layers at once. Repeat for each layer. This will help you keep track of your design layers as they cut. Click on the green "Make It" button. The mat preview screen will show all the cutting mats separated by color on the left-hand side. It is not necessary to mirror any of the mats in this project. Scroll down and click on the faux leather teardrop shape mat. Make a note of the size material the shapes will need to cut from (in this case, about 3 inches wide and just under 3 inches high). Click the "Continue" button. Note: Cricut Explore Air 2 users will need to turn the dial to "Custom" before choosing Faux Leather (Paper Thin). Cricut Joy users can also cut faux leather! See this tutorial, How to Make Earrings with the Cricut Joy, for specific instructions for Joy users. On the Material Selection screen, choose Faux Leather (Paper Thin) as the material setting. If you don't have this material setting as a favorite, click "Browse All Materials" to search for it and select it. Then select "More" from the Pressure dropdown menu. Now cut a piece of faux leather just slightly larger than the size you noted in the mat preview screen. Cutting the faux leather to size helps it stick better to the mat, giving you much better cuts! Place it "pretty side" down on a purple mat and press it down all over with your fingers. Then tape the faux leather down on all sides with blue painter's tape. Move the Cricut's star wheels off to the side before starting to cut. Load the mat into the Cricut by pressing the double arrows button. Press the C button to begin the cut. After the cut is complete and before unloading the mat, use a weeding tool to carefully lift the edge of the faux leather shape to see if the cut was complete. If not, press the C button again to repeat the cut. Unload the mat and remove the faux leather teardrops. You can trim any stray fuzzies with small curved scissors. Note: If you're wondering what you can put on the back of faux leather earrings, either to make the back more attractive or to make the earring stiffer, check out my YouTube video on What To Put On The Back of Faux Leather Earrings for four different faux leather earring back techniques! Back in Cricut Design Space, click on the first vinyl mat that will cut. Hover over the mat preview to see a larger view of the cut shapes on the mat. Note what size vinyl piece you'll need to completely cut both shapes on that layer. Cut a piece of heat transfer vinyl just slightly larger than the size you noted. Note: I suggest cutting all of the vinyl pieces at once. To do that, scroll through the remaining mats in the mat preview screen, note the size required for each one, and cut the vinyl pieces. To cut the heat transfer vinyl mats, choose the material setting which corresponds to your chosen material: Vinyl or EveryDay Iron-On, Foil Iron-On, or Glitter Iron-On. I leave the cut pressure at Default. Load the first mat into the Cricut and press the C button to begin the cut. When the cut is complete, unload the mat again and remove the vinyl piece. Using a sharp tool or a weeding tool, weed the mandala shape by removing all of the excess vinyl away. Carefully cut the two vinyl shapes apart and set the weeded shapes aside. Continue cutting each mat one at a time. Be sure to change the material setting if the material changes. Once all of the vinyl layers and the faux leather earring backings are cut and weeded, it's time to press the mandala layers onto the earrings. Use an Easy Press Mini or Cricut Easy Press, a heat pressing pad, and a Teflon sheet or piece of parchment paper for this step. Begin by placing the bottom vinyl layer onto one of the faux leather teardrops. Line it up so it fits perfectly on top of the teardrop shape. Do one earring at a time. Then cover the HTV with the Teflon sheet or parchment paper. I used the Easy Press Mini on the lowest heat setting. If you are using an Easy Press, I recommend setting it to 280 degrees. Note: Since we are layering the vinyl, it's important not to press each layer for the full recommended time. Press each layer just long enough for it to adhere to the layer below, usually about 5-10 seconds. Press firmly over the cover sheet. Don't press too hard, or else the faux leather texture may flatten out. Remove the cover sheet and while keeping the faux leather shape flat, peel away the vinyl's clear cover sheet (this helps keep the vinyl from wrinkling). Repeat this process for the bottom layer on the second earring. Then return to the first earring and press the second layer. Alternate earrings until all of the layers are pressed. Place the Teflon sheet or parchment paper over the layered earring and press one more time for about 5 seconds. If your faux leather is curling slightly, place the warm, pressed earrings under something flat like a book for a few minutes to flatten them out. I like to make the earring holes in faux leather earrings by punching a hole after the earrings are completely assembled. I use a 1/16" hole punch to make the earring holes, but if you don't have a 1/16" hole punch, you can use the sharp end of your weeding tool to make a hole. Be careful that your earring hole isn't too close to the edge of the earring. Punch the hole in one earring and then the other. Easy, peasy! Now it's time to assemble your earrings! You'll need small jump rings, earring hooks, and two pairs of flat-nose pliers. To connect the earring hooks to the mandala earrings, you’ll first need to turn the bottom loop on the fishhook sideways so your earrings will hang correctly. See the example image below to see how the orientation of the earring hook has to change so your earrings will hang straight. You’ll do this using one pair of flat-nose pliers. While holding the hook firmly between two fingers, grip the entire earring loop between the pliers and twist your wrist 90 degrees. Repeat with the second earring hook. Now open the jump ring to slide the mandala earring and the earring hook on. Using two pliers, grip each side of the jump ring, making sure the opening in the jump ring is facing up (the twelve o’clock position) Rotate one wrist forwards or backwards, so the jump ring creates an opening but doesn’t bend out of its circular shape. When the jump ring is open, slide the layered mandala earring onto your jump ring. Then slide the earring hook onto the jump ring. Pay attention to which side is the front of your earring as you do this to be sure your earring and hook are both facing the right direction. Then twist your wrist in the opposite direction to close the jump ring again. If it doesn't close completely, open the jump ring and try again until the two ends of the jump ring meet. If you don't want to use earring hooks, jump rings, and jewelry making tools, you can still make these earrings! You can use earring hooks called Ball Ear Wire Hooks that just slide into the earring hole, no jump ring required. They are available on Amazon and also at many craft and jewelry stores. That's it! The layered mandala earrings are complete! I've designed three layered mandala patterns for you to try! I hope you'll find one you love. Here are all three faux leather mandala earring designs together. Here is how the layers for the other two Cricut earring designs are stacked: All three design files will be in the download folder, just choose your favorite! The great thing about these earring designs is the variation possibilities are endless, based on the colors you choose. You can see below how different all the earrings look based on the pattern and color selection. So much fun! These earrings would make fantastic gifts, too. I really hope you'll try making this layered mandala Cricut earring project! If you liked this project and want to see more of my Cricut earring tutorials, I hope you will hop over to my blog and read my post, How To Make Patriotic Feather Earrings With a Cricut. This is a fun and easy earring project, and you can grab my free SVG cut file and whip up those earrings with any color faux leather you'd like, in no time! If you don't wear earrings, like Jennifer, you'll be happy to know that faux leather crafting isn't limited to just making earrings! I love to make keychains with faux leather, too, and this keychain project is one of my reader favorites: How To Make Glitter Letter Keychains. Lastly, if you love fun earring designs that just make you smile as much as I do, I hope you'll check out my Ice Cream Cone Keychain tutorial here. I also have a YouTube video for this project, which you can see here. Thank you so much to Amy Romeu for designing these super cute Cricut earrings for JenniferMaker! As an Amazon Associate and member of other affiliate programs, I earn from qualifying purchases.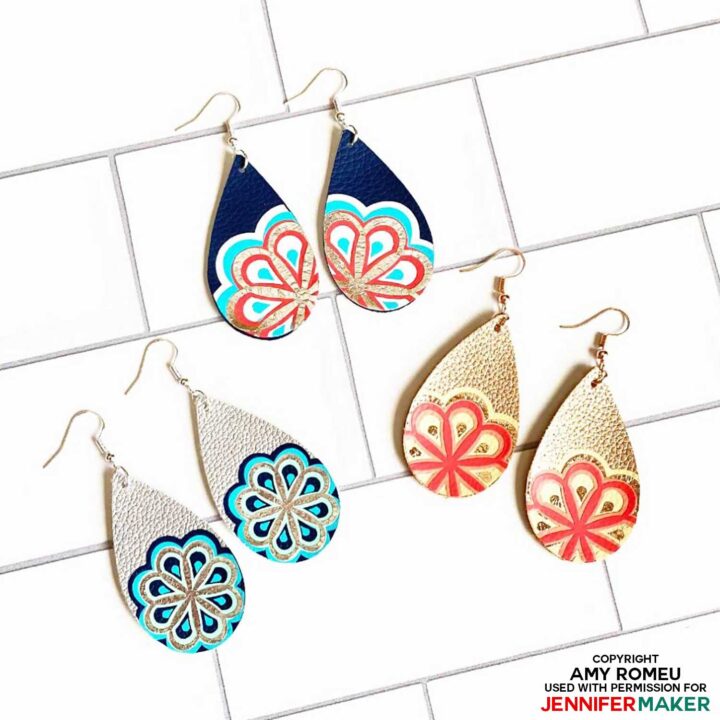
Layered Mandala Earrings
Materials
Tools
Instructions
Step 1: Get the Layered Mandala Earrings Design
Step 2: Prepare the Layered Mandala Earrings Design for Cutting
Step 3: Cut Your Materials

Step 4: Assemble the Layered Mandala Cricut Earrings


Step 5: Show Off Your New Layered Mandala Cricut Earrings
Notes
Recommended Products

Get the free SVG files to make Layered Mandala Cricut Earrings
Aren’t these just SO pretty? Amy did such a great job with her Cricut earring design! And I’d love to see your Layered Mandala Earrings! Please share a photo in our Facebook group or tag me on social media with #jennifermaker.
And here are more earring designs I think you’ll love!


Love,

Want to remember this? Save this Layered Mandala Cricut Earrings tutorial to your favorite Pinterest Board!


These earrings are so clever and totally gorgeous (and I’m not even a female)! Talk about inspiration!!!