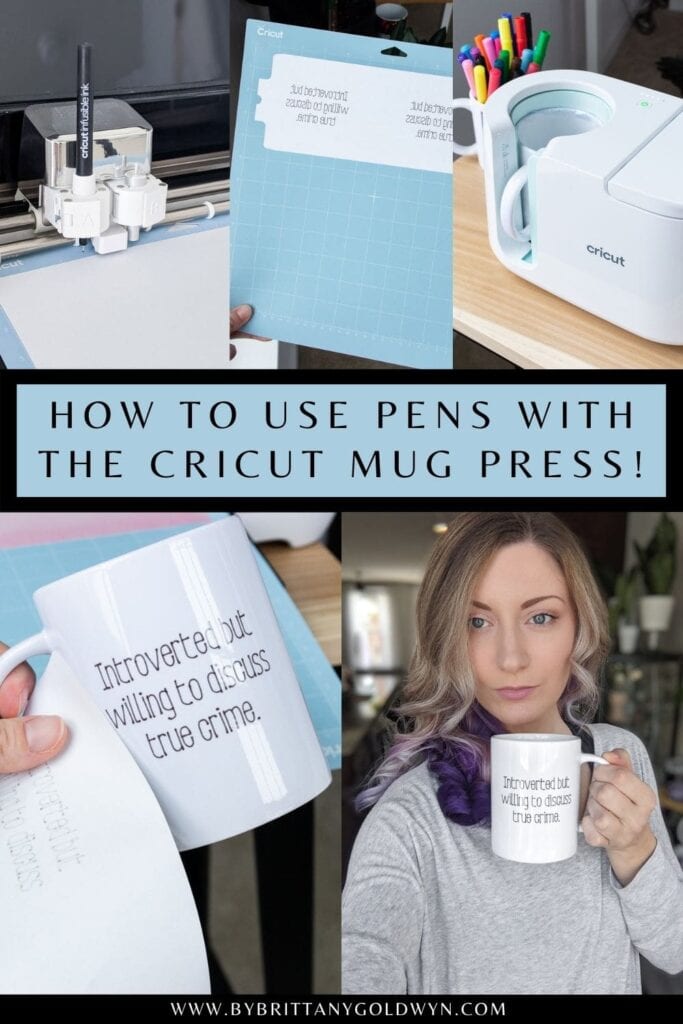
Looking for information about how to use the Cricut Mug Press? I’ve got you! I’m sharing everything you need to know about using this brand new machine to create gorgeous professional-quality custom mugs that will last a lifetime. This post is sponsored by Cricut and originally appeared on bybrittanygoldwyn.com.
Looking for information on the brand new Cricut Mug Press?
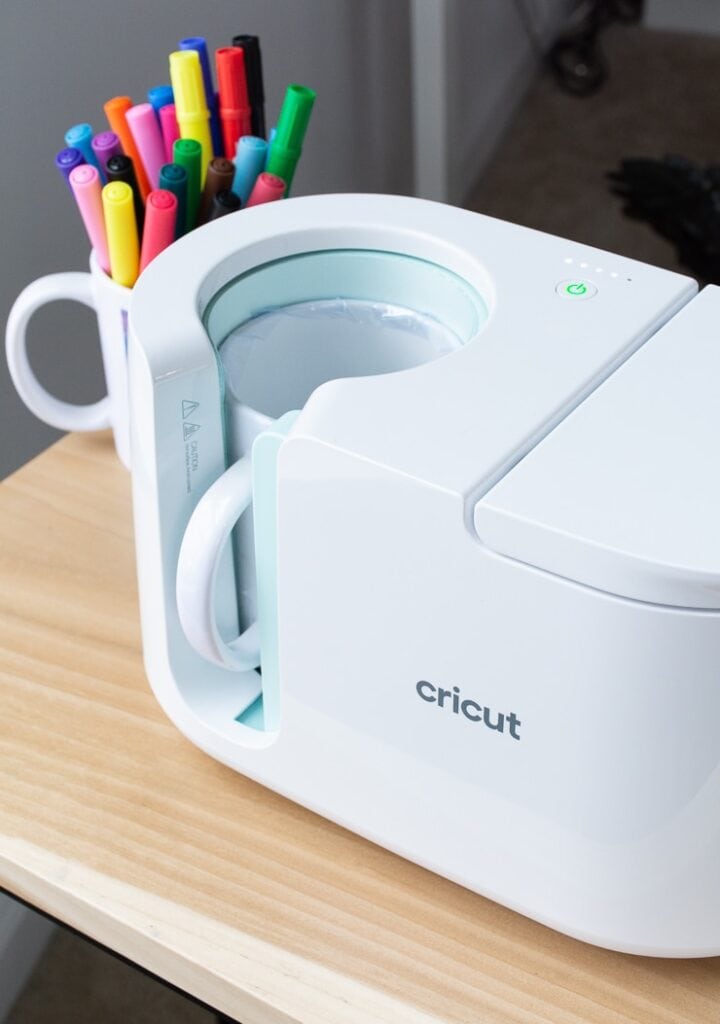
Hey guys! I am beyond excited to be working with Cricut on the launch of their brand new product, the Cricut Mug Press! Today I am going to share a thorough review of the product, including how to use it to create professional-quality mugs with custom designs at home.
This revolutionary piece of equipment will be the perfect addition to your lineup of Cricut supplies. It works perfectly with any machine, and it’s an investment worth making if you like Cricut mug crafts. Here’s why.
What is the Cricut Mug Press and why should I get it?
The Cricut Mug Press will help you create seamless, infused designs in minutes. Adhesive vinyl is great, but when you apply it on mugs, it leaves you with the “sticker” look. You can see the raised edges around the design, and the design sits on top of the mug. That means that it can peel, flake, and fade over time as you wash it. (And you should wash them by hand—not in the dishwasher.)
The Cricut Mug Press works with Cricut Infusible Ink to infuse the design into the mug. That means that the design looks totally professional and seamless. It becomes part of the mug. The process is the same as using an EasyPress and Infusible Ink on Cricut Infusible Ink blanks.
If you’re new to this process, you’ll want to check out my writeup all about Cricut Infusible Ink and how to make custom coasters with it. You can also check out my other Infusible Ink posts about how to mix and match Infusible Ink transfer sheets on a kids t-shirt, how to make a personalized Infusible Ink tote bag, and how to make baby bodysuits personalized with Infusible Ink.

What makes the Cricut Mug Press different from other mug presses?
Unlike other mug presses on the market, the Cricut Mug Press is compact and looks great sitting on a desk or table. As someone who doesn’t have a dedicated craft room, I can certainly appreciate that. I love how Cricut products in general look great sitting out on my shelves.
The Cricut Mug Press is also easier to use than traditional mug presses. While other mug presses have complicated temperature settings and controls, the Cricut Mug Press has “just-right, one-touch” temperature settings that have been rigorously tested by the Cricut team, as well as auto-off features. It’s made with DIY use in mind.
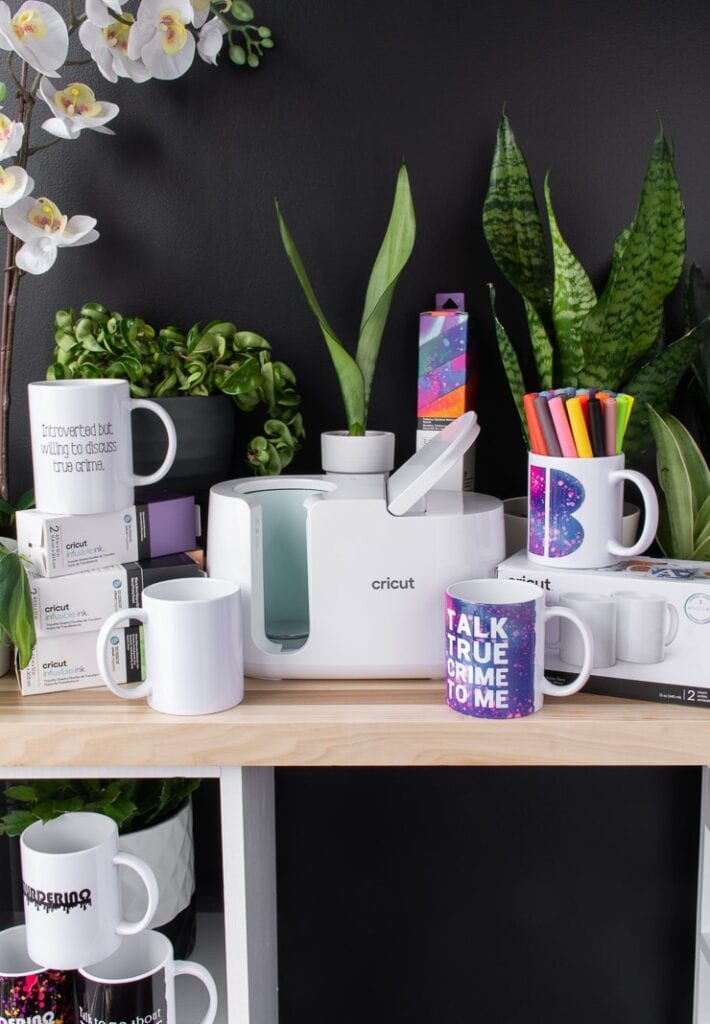
When you use a Cricut mug with the Mug Press and Infusible Ink, you’re left with a permanent, vibrant transfer that will never peel, crack, or fade. It looks like something you bought in a store that used a big professional mug press to make it…because despite its small size, the Cricut Mug Press does give you professional-quality results!


Do I have to use Cricut-brand mugs with the Cricut Mug Press?
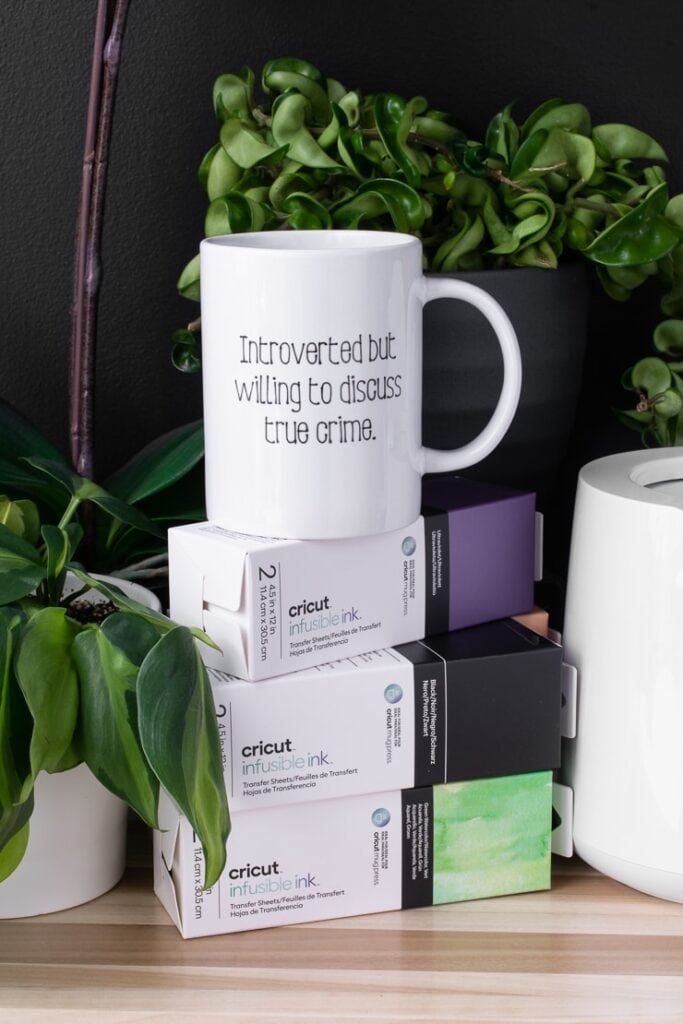
Like all other products in the Cricut Infusible Ink line, Cricut recommends using Cricut-brand blank mugs for the best results. That’s because those are the blanks they have tested and tweaked for the best results.
I’m always a fan of saving a buck when I can and have experimented with non-Cricut-brand blanks for Infusible Ink projects . However, the Cricut-brand mugs are the way to go for this press. They’re been tested and perfected for flawless transfers, so you won’t waste materials.
The mugs are very reasonably priced, too. And they come in two sizes. You can even buy them in bulk if you are planning to make a bunch of mugs for an occasion or to sell. Check out the mug blank options on Cricut’s website here.

What transfer materials can I use on Cricut Mugs?
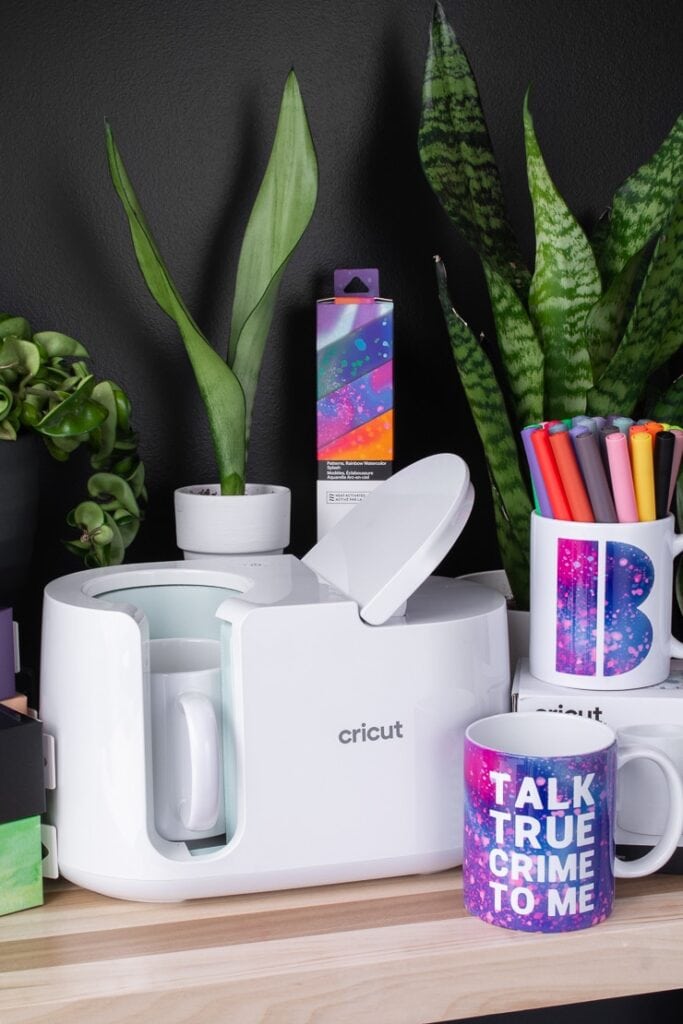
You can use Infusible Ink Transfer Sheets, Pens, and Markers with the Cricut Mug Press. Other sublimation materials will also work, but the Cricut Mug Press isn’t optimized for them. And I will be honest—I don’t have experience working with other sublimation materials either.
Cricut also rolled out a line of Infusible Ink sheets designed specifically for the mugs—I’ll be using them in this tutorial. This is great because it means less waste. If you’re like me, you hate wasting any material at all!
You can also use regular Cricut Infusible Ink transfer sheets that are cut down to size or the Infusible Ink pens and markers on paper. I’ll also show you guys how to use the mugs and mug press with those options.
Keep in mind that if your design doesn’t stick to the mug by itself, you’ll need to use heat-resistant tape. I find that this is generally good to have around for iron-on projects to ensure everything stays put as well.
It is especially important to have when working with Infusible Ink sheets because they are prone to “ghosting.” That’s when you start a transfer and then move the blank or transfer sheet juuuust a hair. It results in a smudged, ghost-like effect on your transfer, ruining the otherwise crisp and vibrant look.


PROJECT ONE: How to make a gorgeous custom mug with mug press Infusible Ink transfer sheets
Alright, now it’s time to really dig into how to use the Cricut Mug Press to make a gorgeous custom mug. First I’ll walk you through some of the very first mugs I made with my press, proving it is super easy to use!
For these mugs, I used the right-sized Mug Press Transfer Sheets. After we walk through this tutorial, I’ll show you guys a few other methods to make mugs in the press. Oh—and all of the mugs are true-crime-themed, so if you’re a true crime fan, you can grab ALL of the projects in Design Space!
Here’s what I used:
- Cricut Mug Press
- Mug blank
- Cricut Explore Air 2
- True Crime Lover project in Design Space
- Infusible Ink Mug Press transfer sheet
- Cutting mat
- Heat-resistant tape
- Lint roller
- Heat mat
And here’s how to use the Cricut Mug Press!
Step 1: Design the mug in Design Space
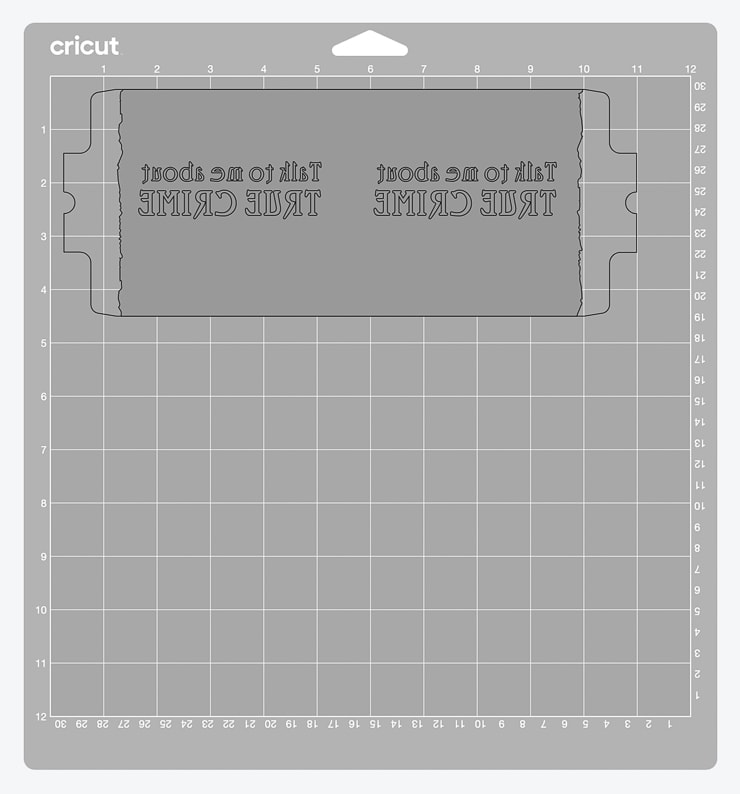
First I designed my mugs in Design Space. Cricut has a variety of ready-to-use template sizes that you can use to create your designs. They have a variety of different edges (scalloped, ripped, straight, etc.) and sizes for both the small and large mugs.
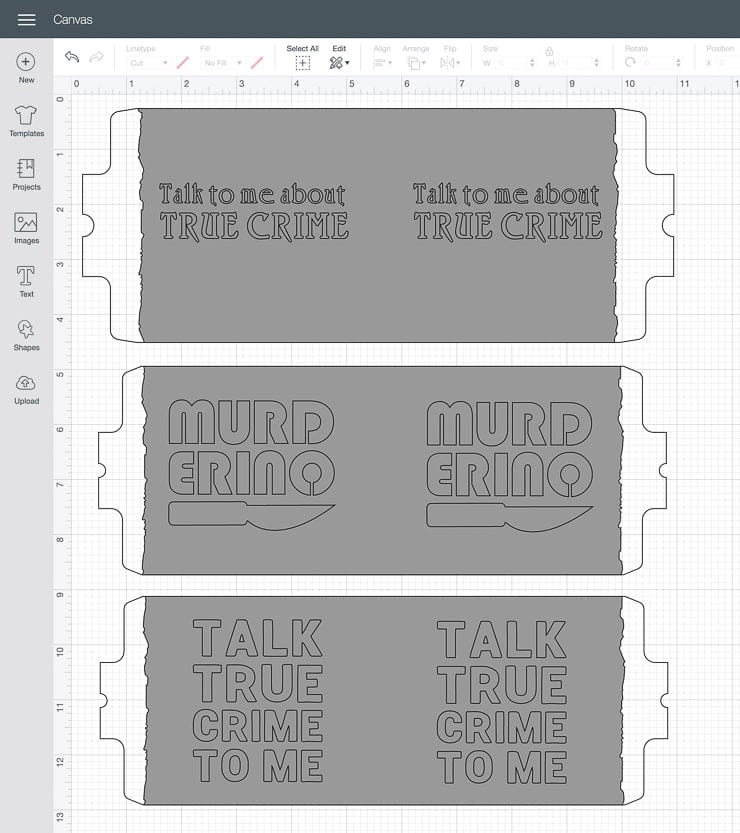
Simply navigate to this Ready to Make project link and select your mug size and speciality effects. Then get to designing! Since I am making a true-crime-themed set, all of my mugs were designed with that in mind. You can grab them all in Design Space, but here are the designs I made with this method:
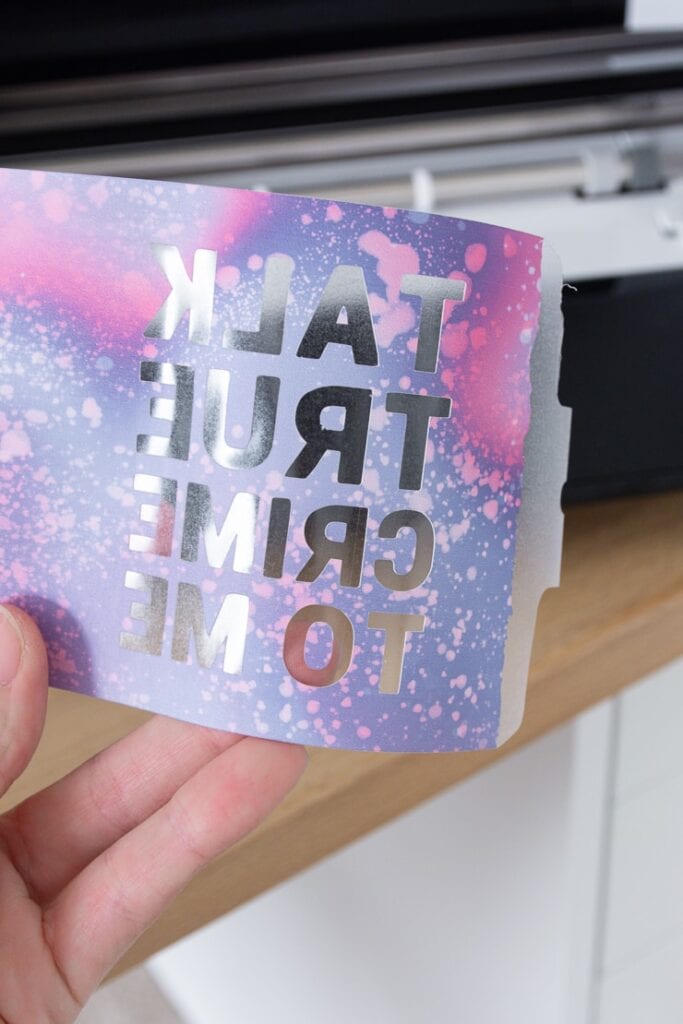
- TALK TRUE CRIME TO ME
- Talk to me about true crime
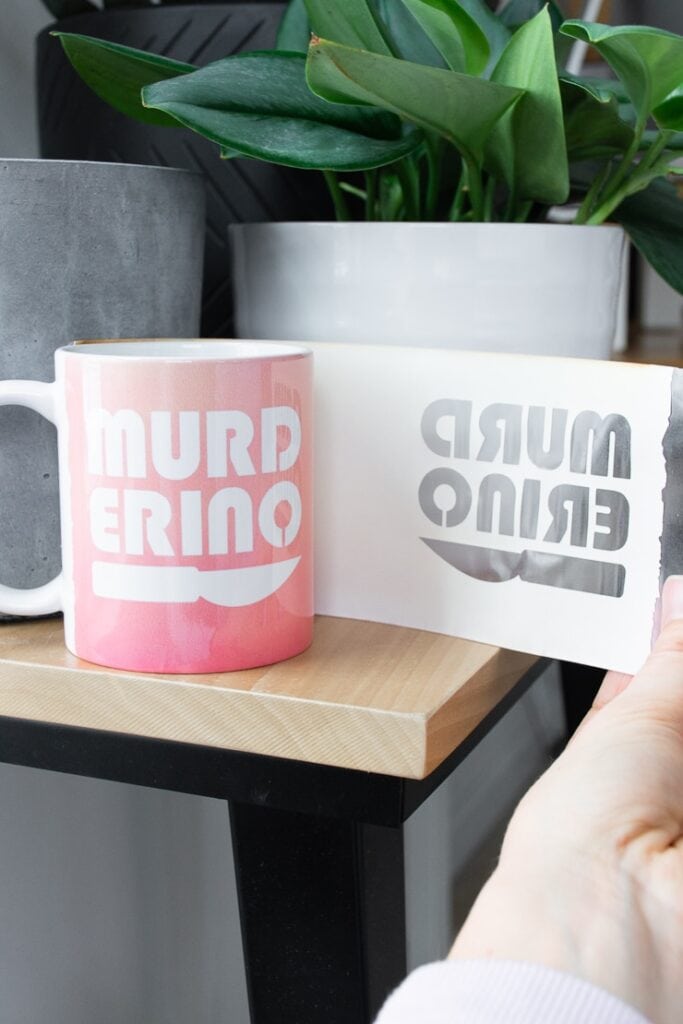
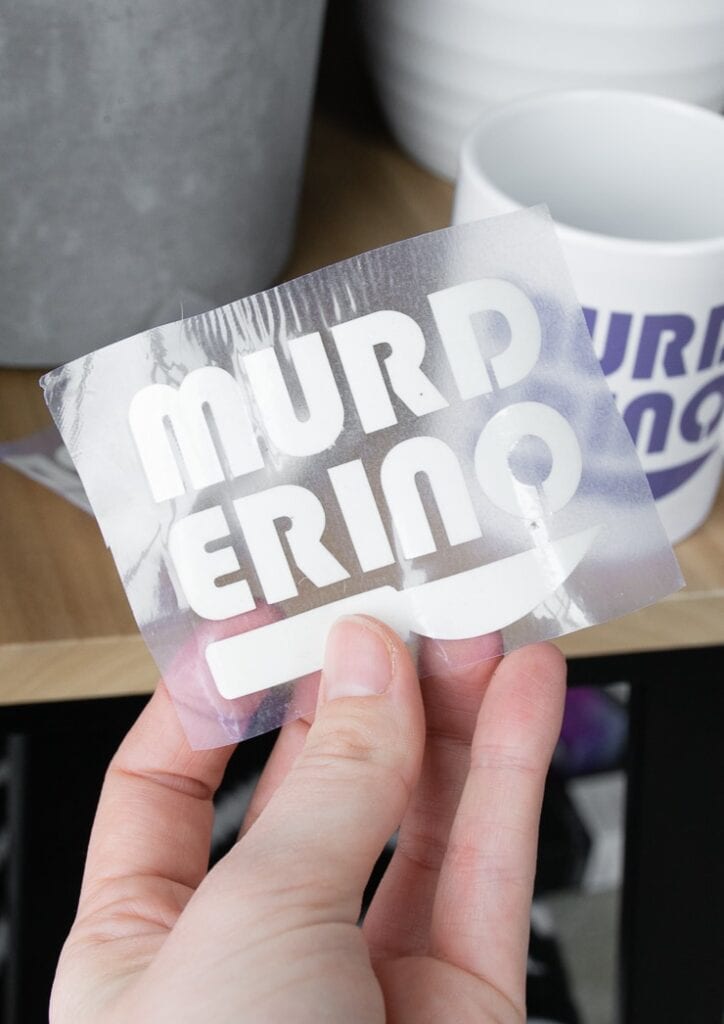
- MURDERINO
No before you all think I am totally messed up because you don’t know what a “murderino” is, allow me to indoctrinate you into the “My Favorite Murder” true crime cult. A murderino is someone who loves true crime.


I spent hours upon hours watching Law and Order (mostly SVU, but all of them really) growing up. I have always loved true crime. And podcasts have allowed us to be in the absolute TRUE CRIME GLORY DAYS. One of the first really big true crime podcasts was MFM, and MFM followers call themselves “murderinos.”
Obviously I want everyone to know I’m huge fans of the hosts Karen and Georgia, so I decided to make myself a mug. I used the small mug template with the ripped edge for this one. I used the same template for the “TALK TRUE CRIME TO ME” mug and the large one for the “Talk to me about true crime” design.
A few thoughts on designing mugs…
Design sizing and dimensions for the mug
When you select the small or large mug template in Design Space, it will populate on your canvas. Do not alter the size of the Ready to Make mug template—it is the perfect size. Simply use it to design your mug.
The mug templates all have three different parts: the top layer, which is what you’re putting your design on; the bottom layer that looks like an outline with two “tabs” on the ends, which will be the liner, and the red “mug guides.”
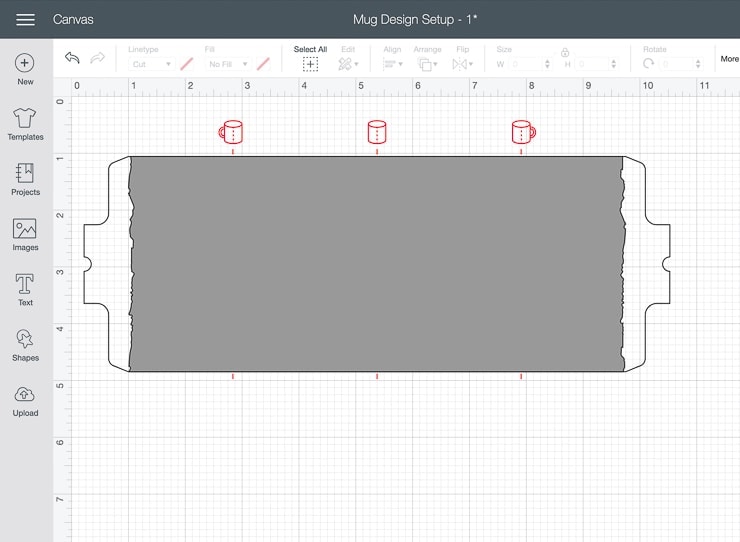

When you cut your design out, your machine will use this template to cut the liner entirely out around the outline of the bottom layer (the liner). This is super convenient because it creates a nice sticky surface to help apply the design to your mug. More on that in a bit.
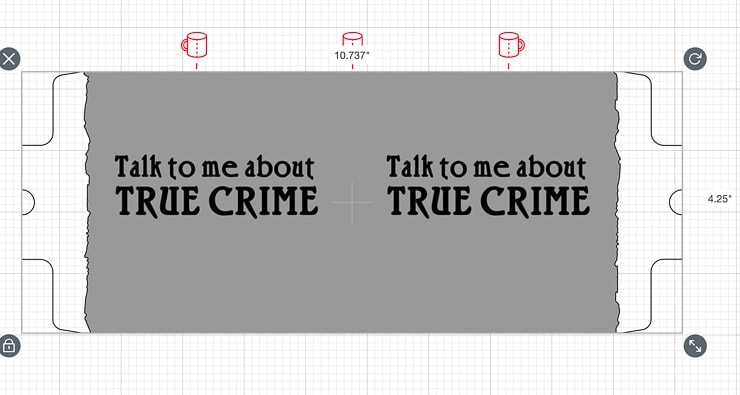
The Cricut Mug Press is designed for transfers on the outer cylindrical surface of the mug only, and designs can be applied up to ½” from the handle. Don’t get any closer to the handle or else the design transfer could be uneven or faded.
Here are the maximum measurements for designs on mugs:
- Small mug: 8.75 in x 3.79 in (22.2 cm x 9.6 cm)
- Big mug: 8.75 in x 4.25 in (22.2 cm x 10.8 cm)


Setting up your designs
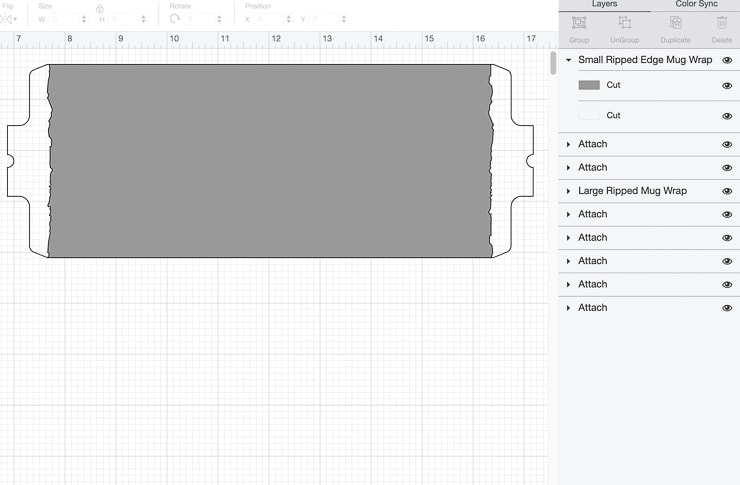
While setting up your designs on the templates, you can use the little red “mug guides” to help show you exactly where the image or text will be after your transfer. Once you’re happy with the design, make sure to select all and use the “attach” feature to ensure nothing moves.
You could also slice your design out of your mug, but this is more complicated. It requires you to ungroup the two elements of the mug template and slice the design out of the top layer only. That’s because you don’t want your machine to cut the design all the way through the liner, and you can’t slice more than 2 layers at once.
If slicing sounds like a foreign language, you can check out my post about how to slice text and objects in Design Space. It’s honestly easiest to just put your designs on top of the template and attach everything together, though.

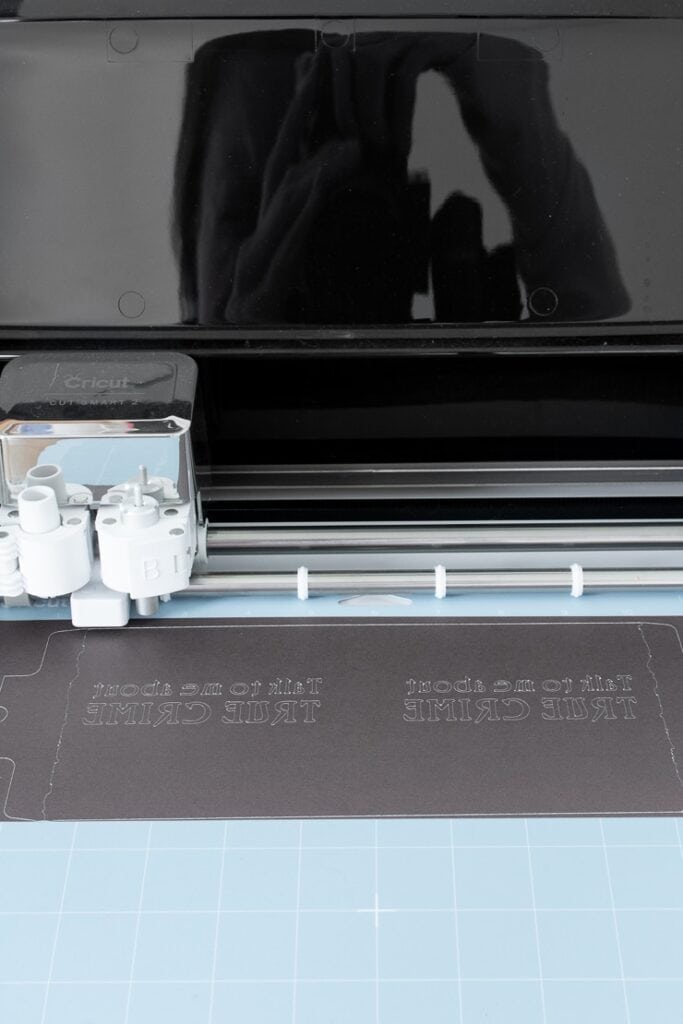
Step 2: Cut the design
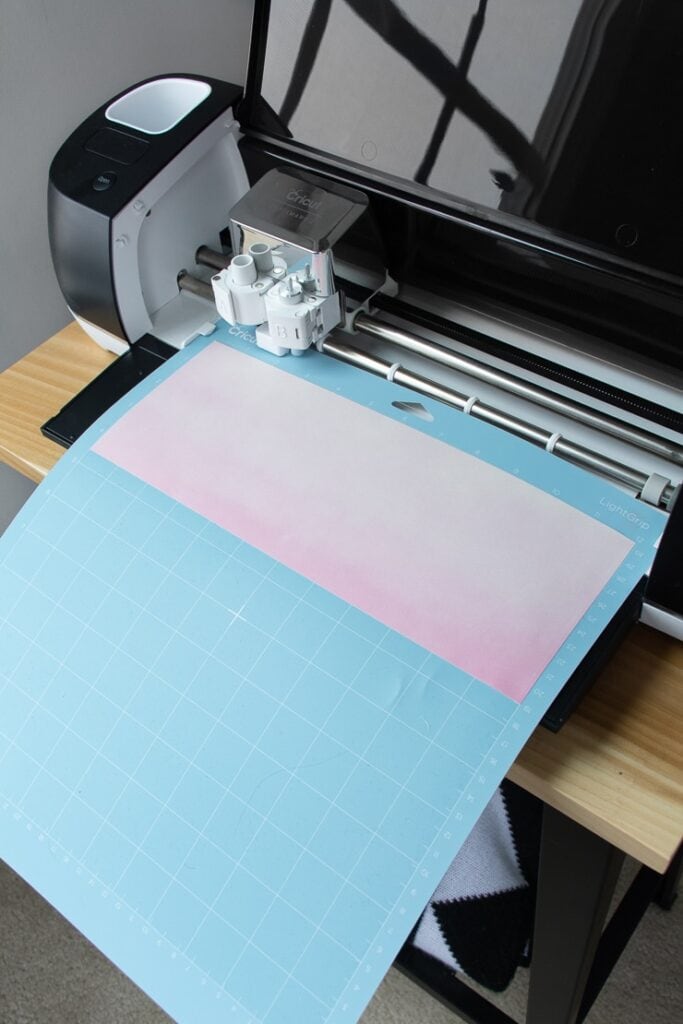
I cut my design on my Cricut Explore Air 2, but Infusible Ink is compatible with the Maker and the Joy as well. Also—make sure to mirror your design before cutting it! I used the new Infusible Ink transfer sheets that are specifically sized for Cricut Mug designs.
As with other Infusible Ink projects, you won’t need a weeding tool. Simply roll the cut design so the cut lines begin to “crack” and break away. Remove the negative space from the design. Also remember to remove the transfer sheets from the “tabs” on the end of the liner.


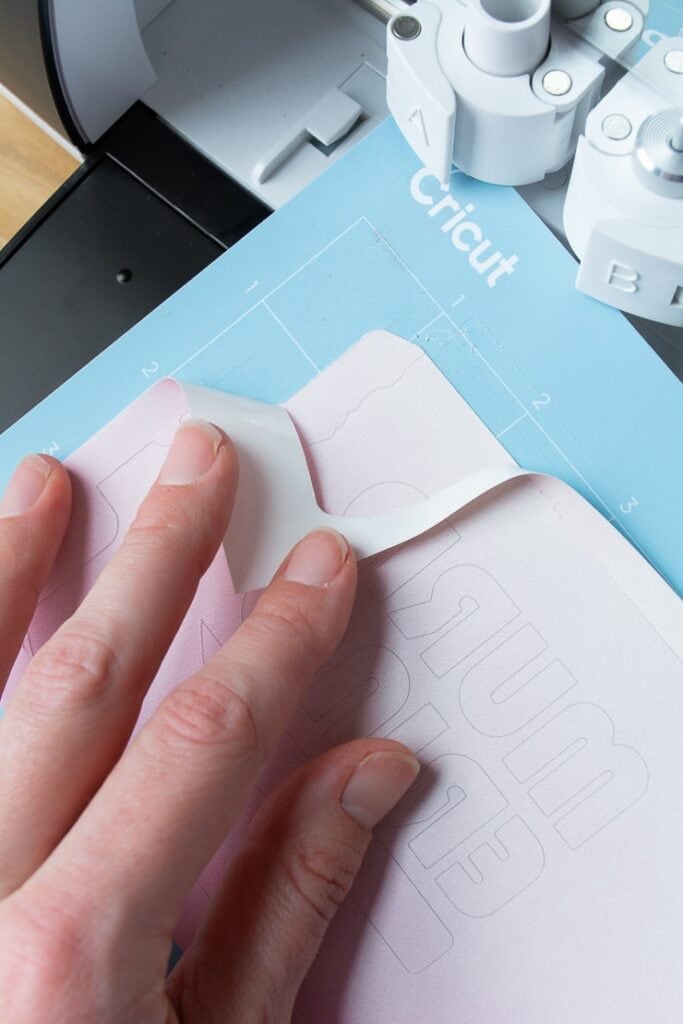


Step 3: Apply the design
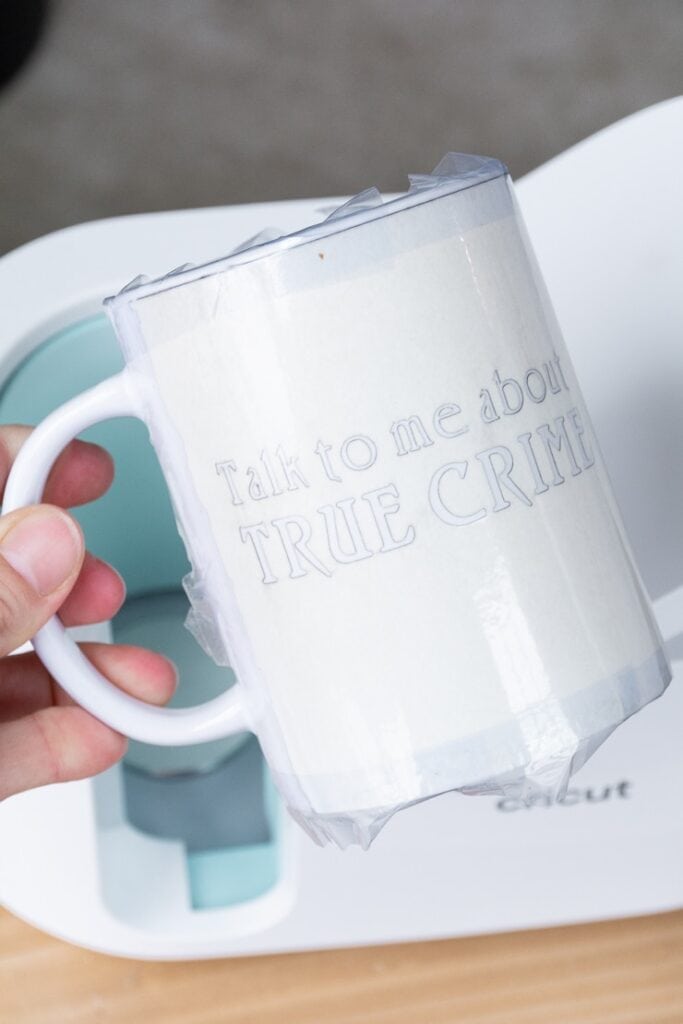
Cricut recommends using heat-resistant tape to help adhere your design to the mug, and this is especially important for mugs like the ones I’m making here. That’s because the ink covers the entirety of the mug (other than the design area), so you want to make sure you have a super tight seal.
Use a lint roller to clean off the mug, and then position the transfer sheet as appropriate on the mug. This can take a bit of getting used to, but I sat the mug in front of me on my desk with the handle facing away from me.
Then I positioned the liner, taped one end in place, and wound the transfer sheet around the mug firmly to tape the tail end in place. This also ensures that everything stays level—use the desk as your guide!
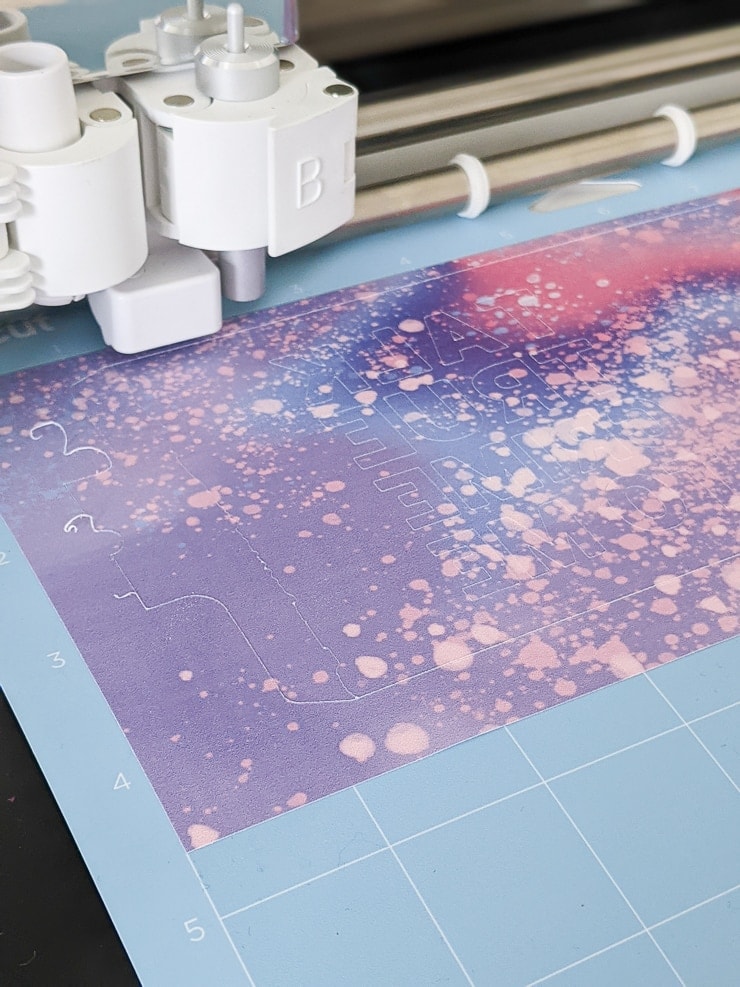
The most important area to tape on these full-mug designs are all along the base and all along the top. That’s because—once you sandwich the mug into the press—any extra loose space between the sheet and the mug can result in a poor transfer in those areas. Here’s an example of what I mean.


Step 4: Transfer the design using the mug press!
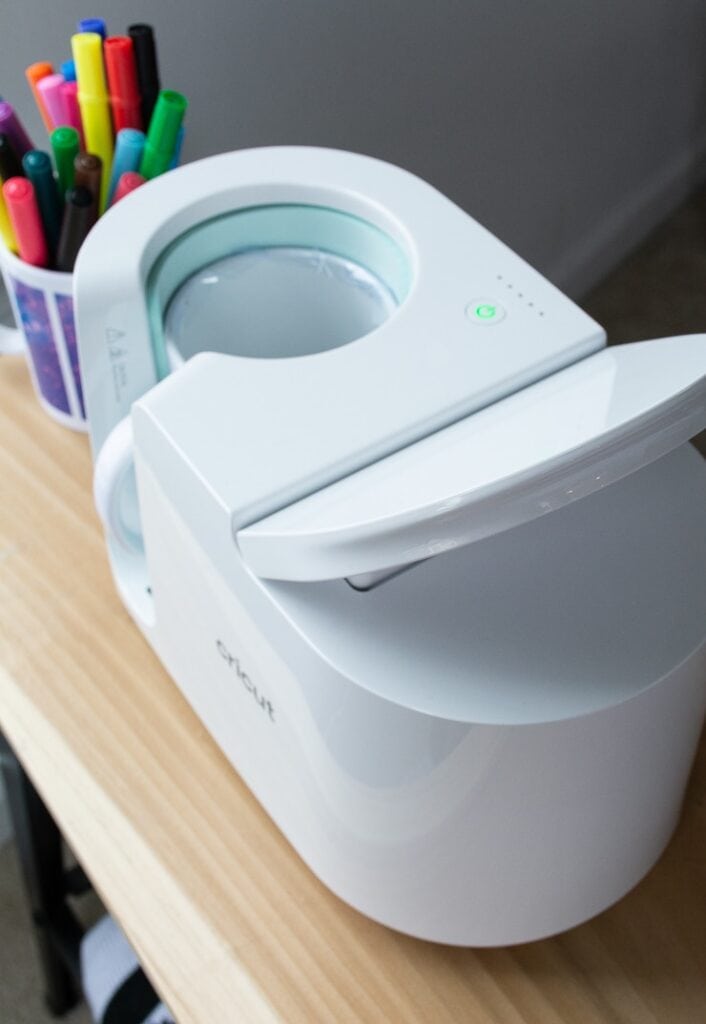
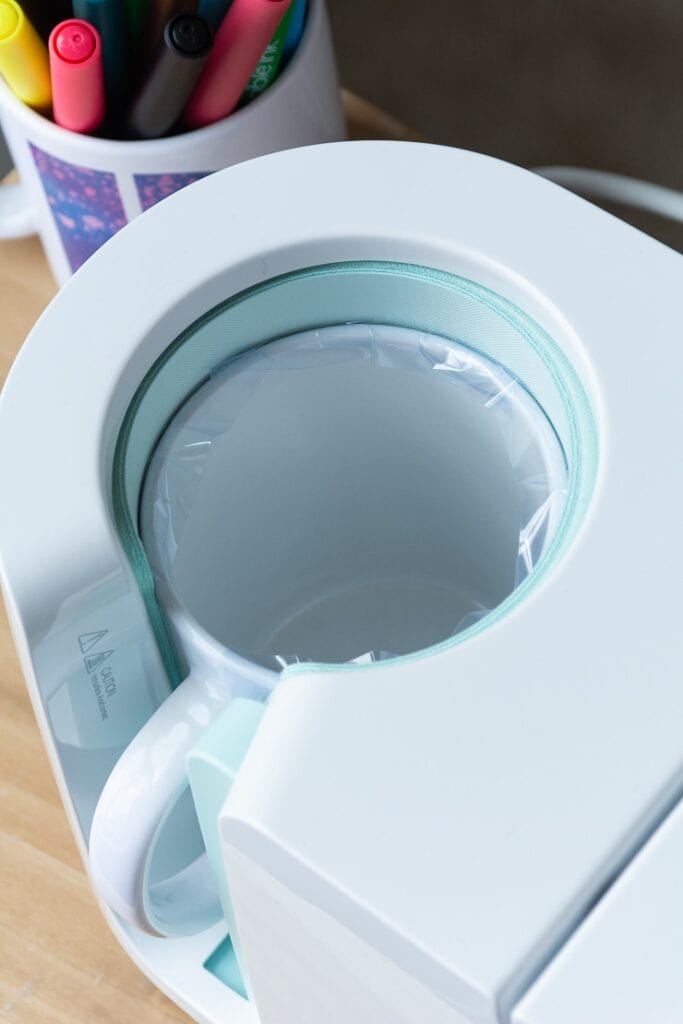
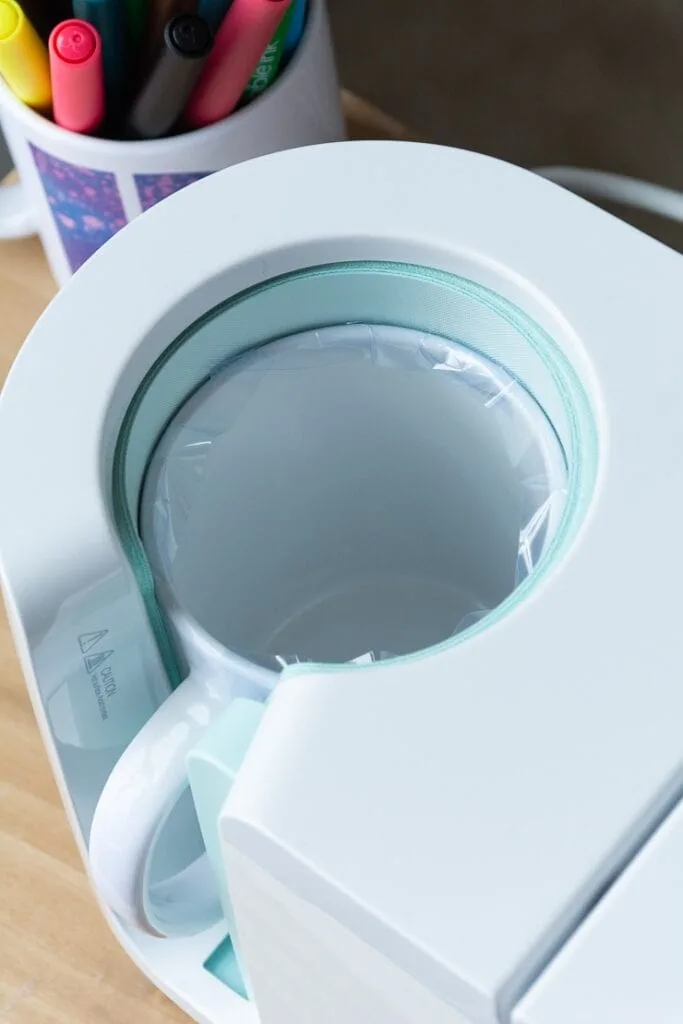
Once you’re all taped up and ready to go, turn on your mug press. It will beep when it is fully heated. Slide the mug in and push down on the big right-hand lever to sandwich the inner turquoise area of the press around the mug.
It takes about 6 minutes to complete the Infusible Ink transfer on a mug. However, this can vary a bit depending on the temperatures of the mug and room. But don’t worry, you don’t have to do anything—the mug press decides all of this for you! One less thing to worry about.
It will beep when the press is done. Take the mug out—it will be very hot, but the handle will not—and let it cool for 15 minutes on a heat-resistant surface. I used my EasyPress mat, which I find is generally handy to have nearby when working with any kind of heat craft. It’s like a big pot holder.

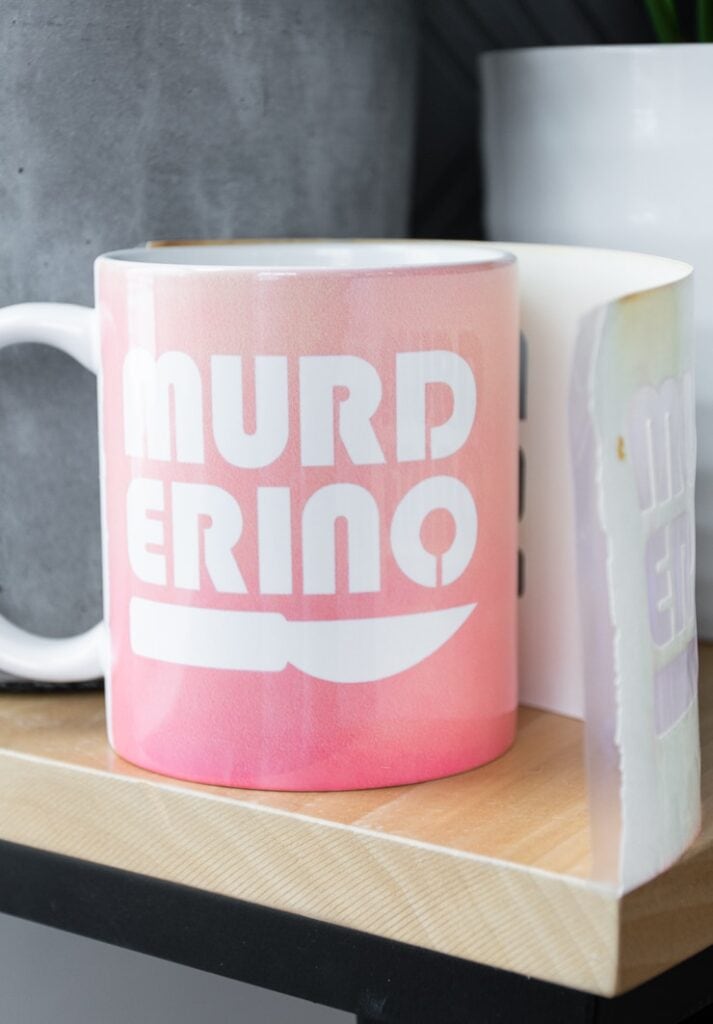
Step 5: Remove the tape and transfer sheet
And this is the real fun part. Remove your tape and Infusible Ink transfer sheet to reveal your design. Like other Infusible Ink transfers, you should notice that the colors are MUCH more vibrant after transfer!


Considering a new Cricut machine? Check out my detailed Cricut machine overview comparing the Joy, Explore Air 2, and Maker, as well as my post about three easy projects you can make with the Cricut Joy!
PROJECT TWO: How to make a mug with a positive-space design
For this project, I’m going to show you have to make a mug using a smaller “positive space” design. For this project, you aren’t cutting the design out of the transfer sheet—the design itself will be the transfer sheet. Make sense?
Basically, in the last project, the design was the “negative space,” or the space you weeded out of your transfer sheet. The design was white, while the majority of the mug took on the color and pattern of the transfer sheet. In this one, it’s the opposite!
Here’s what I used:
- Cricut Mug Press
- Mug blank
- Cricut Explore Air 2
- True Crime Lover project in Design Space
- Infusible Ink transfer sheet appropriately sized
- Cutting mat
- Heat-resistant tape
- Lint roller
- Heat mat
And here’s how I made these mugs!
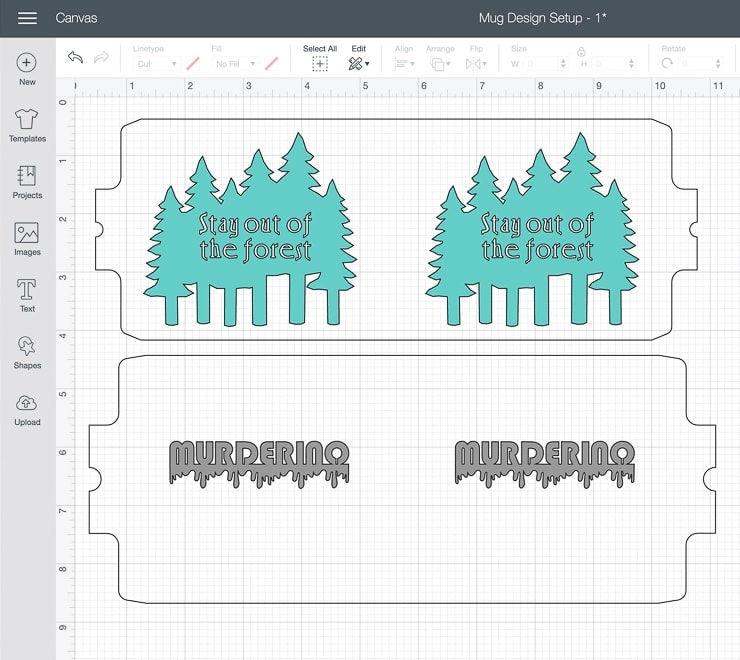
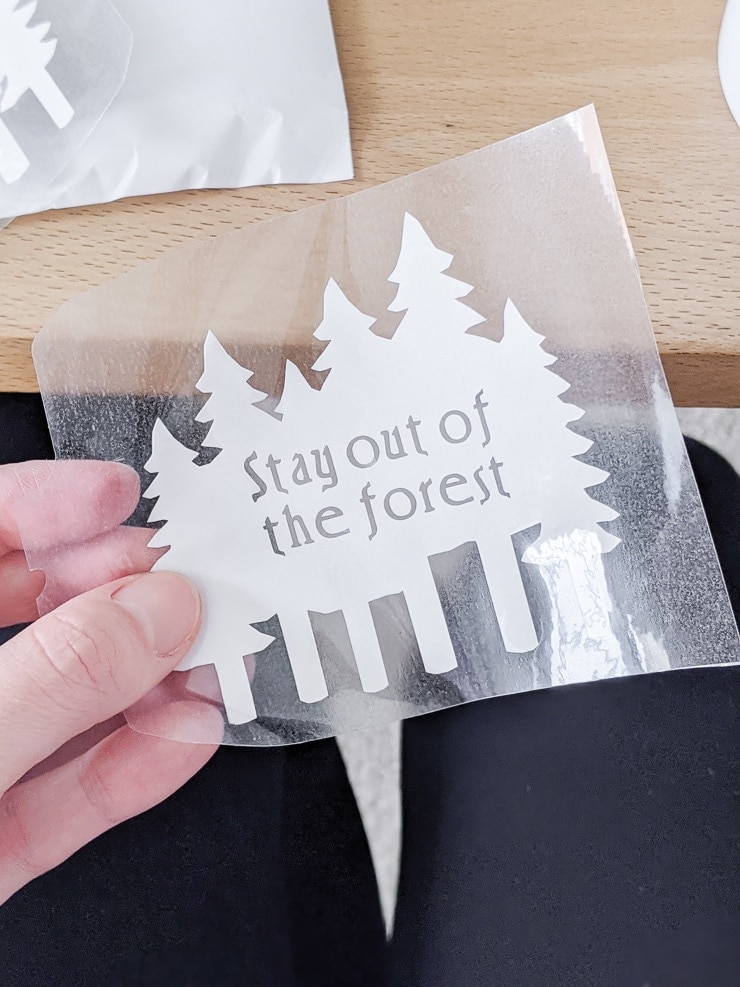
For this method, I’m making two different “murderino” mugs and one “stay out of the forest” mug (another MFM reference). One is a positive-space design of the murderino mug I made in the first project. The other is a totally different design. You can also access these designs in the True Crime Lover Design Space project.
Step 1: Create the design
These designs are a bit easier to design. To create mine, I ungrouped the top and bottom layers of the mug template and deleted the top layer. You can also just size a design and cut it out individually.
I liked using the bottom layer of the mug template because it helped me determine sizing and placement. If you want to do this and then delete the bottom layer before cutting, you can do that too. Make sure you keep in mind maximum design sizing outlined in the first project.


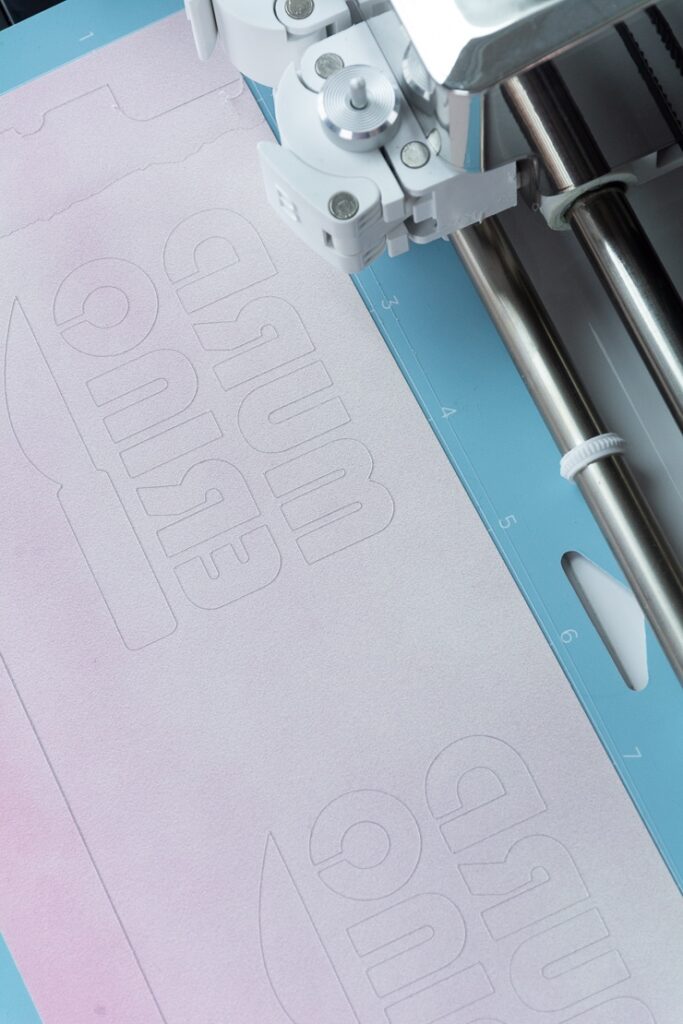
Step 2: Cut and weed the design
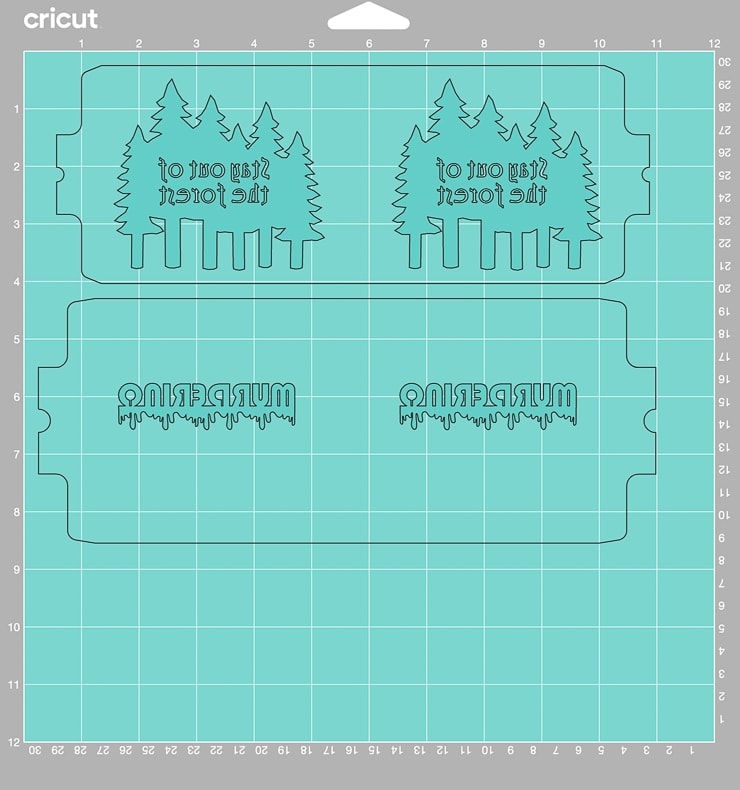
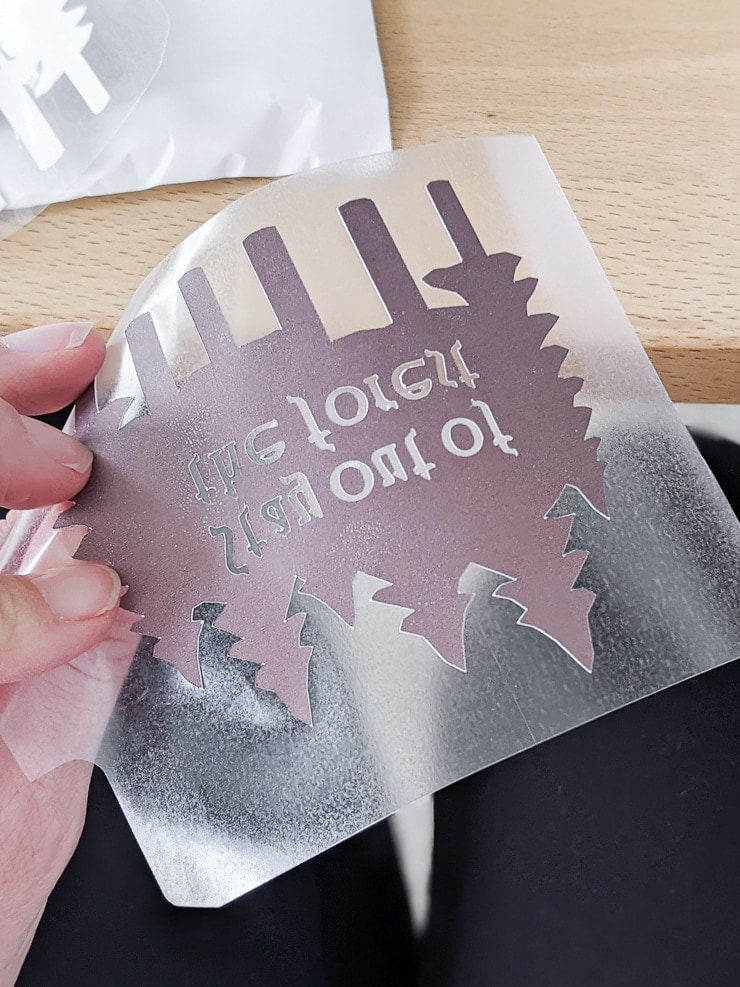
Don’t forget to mirror! Cut and weed the design. Remember, the negative space in this design is the stuff in and around the design. Not the design itself.


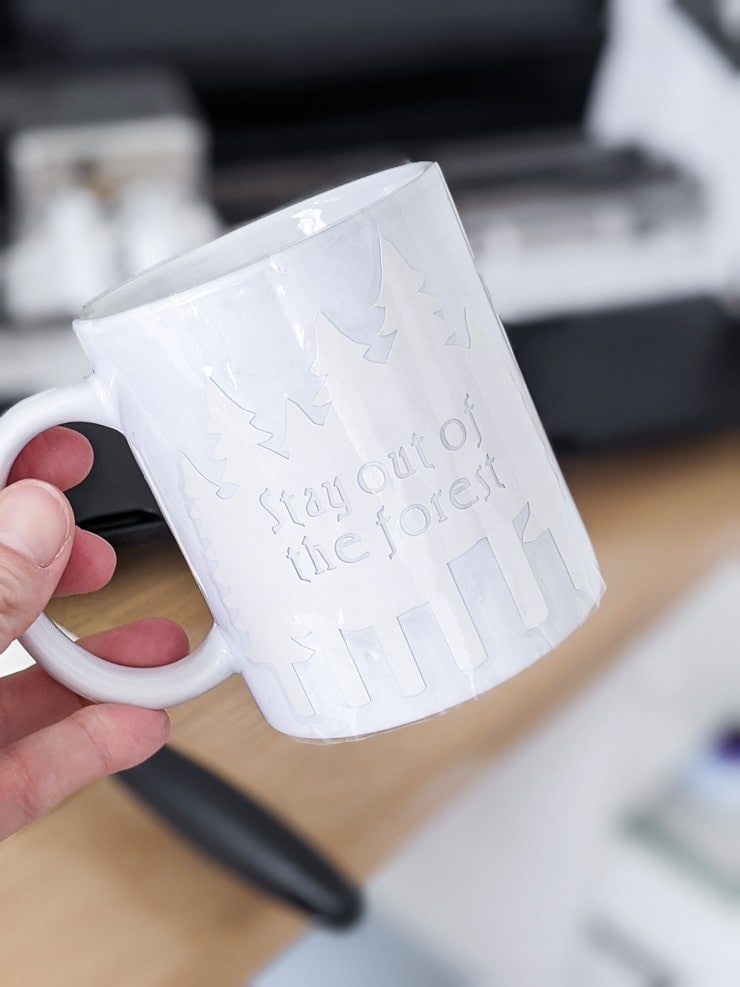
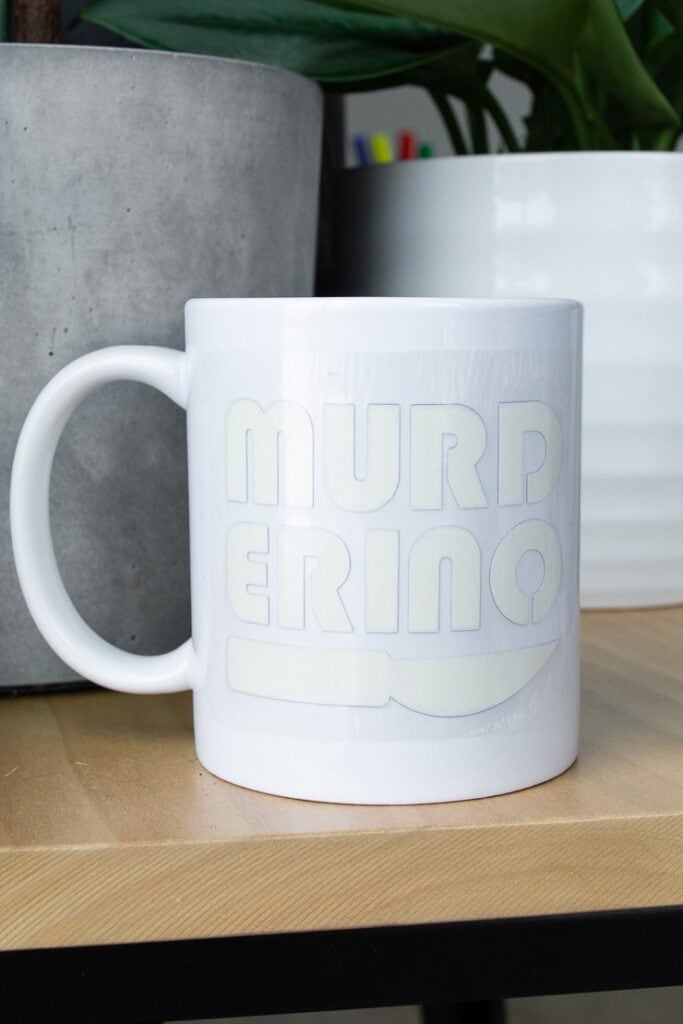
Step 3: Prep the mug and tape the design
Use a lint roller to clean the mug. Cleaning your mug is super important for this type of design since there is more white space and more areas for imperfections to show. Then tape the cut design onto the mug.
If you cut the liner out, you can just wrap it around the mug and tape as necessary. If you just cut the design out—which means a lot less Infusible Ink waste!—you can place and secure with heat-resistant rape.


Step 4: Transfer the design!
Transfer the design as outlined in project #1 using the mug press. When the press beeps, take the mug out and set it on a heat-protected surface to cool. Remove the tape and design liner to reveal your pretty mug!


PROJECT THREE: How to use Infusible Ink pens and markers with the Cricut Mug Press
The last of the three projects illustrates how to use Cricut’s Infusible Ink pens or markers to make a custom mug. This project is a bit different than the others because it includes barely any cutting and no weeding!
Here’s what I used:
- Cricut Mug Press
- Mug blank
- Cricut Explore Air 2
- True Crime Lover project in Design Space
- Black Infusible Ink pen
- Piece of laser copy paper
- Cutting mat
- Heat-resistant tape
- Lint roller
- Heat mat
And here’s how I made a custom mug with an Infusible Ink pen!
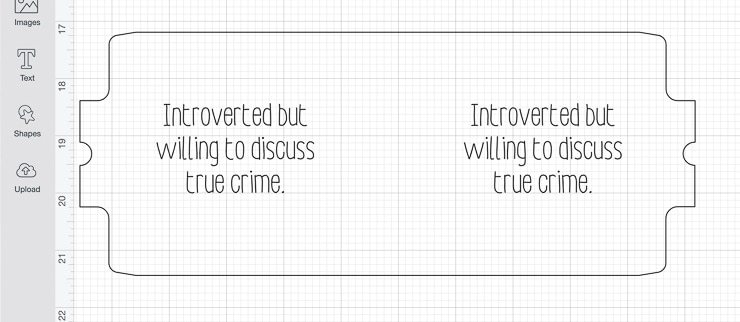
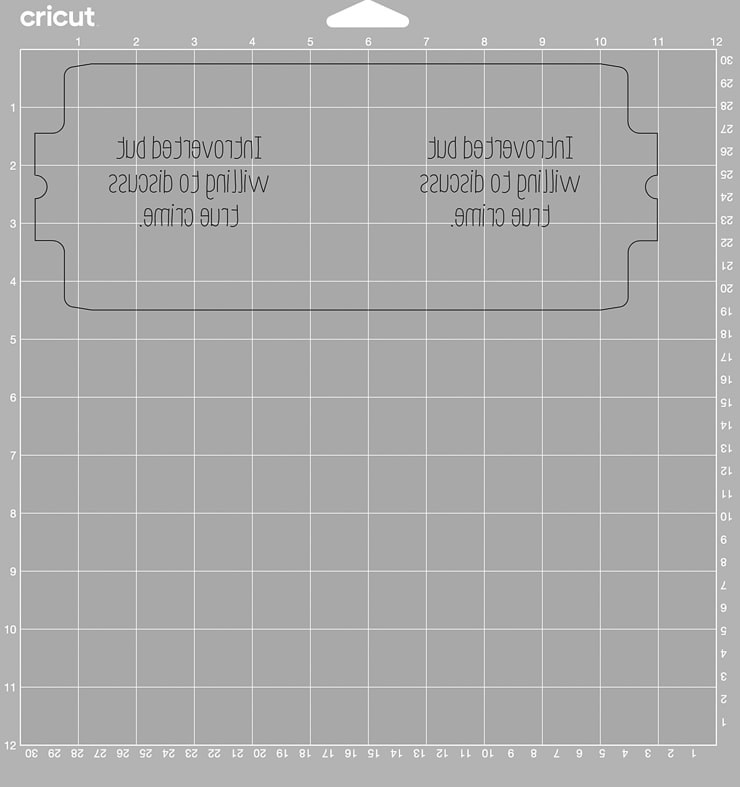
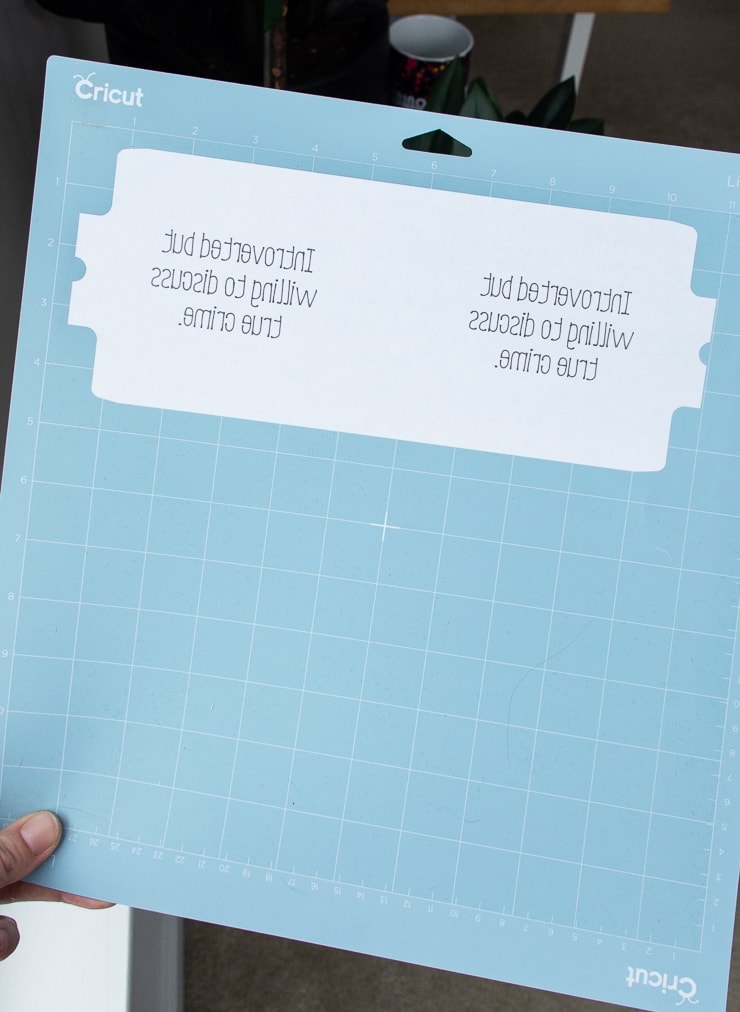
For this method, I just did one design. I did a play off of the introvert cut files I did a few years ago and made an “Introverted but willing to discuss true crime” mug. Pens and markers are perfect for text-heavy mugs you still want to be legible.
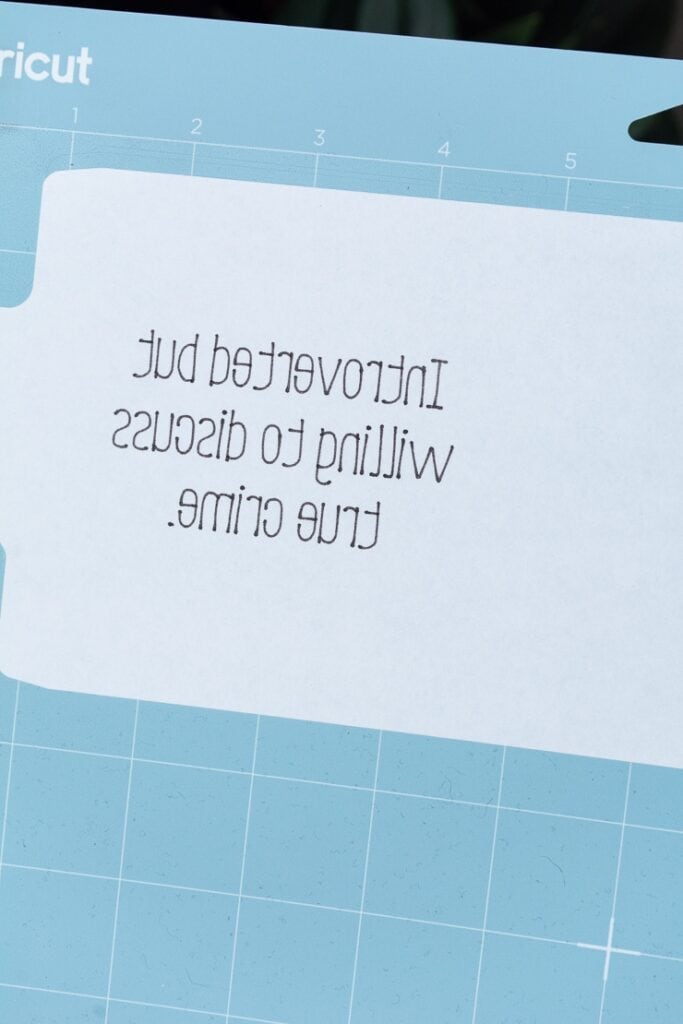
Step 1: Cut and draw the design
I ungrouped the premade mug template and just kept the bottom layer of the template. This is the layer that is usually the plastic Infusible Ink liner. Then I added the text “Introverted by willing to discuss true crime” and set it to “draw” instead of “cut.”
Don’t forget to mirror! I had my Explore Air 2 do all the work next—it wrote my text using a black Infusible Ink pen and then cut out the bottom layer of the template so it was perfectly sized for the mug.


Step 2: Clean and tape the mug
Next I cleaned the mug off with a lint roller and used heat-resistant tape to tape the paper onto the mug. I added additional tape along the top and bottom to keep everything secure.


Step 3: Transfer in the mug press!
The only different step you need to take to transfer Infusible Ink pens/markers on copy paper is to add butcher paper. Adding three layers of butcher paper is necessary to prevent the ink from leaking through your copy paper and getting on your mug press’s heat plate. Tape these in place after you position and secure your design.
Like the previous two mugs, I turned my mug press on and then popped my mug in, pushing the handle down to secure the heat plate around the mug. When it beeped, I removed the mug, let it cool, and removed the paper and tape.
You can also just have your Cricut cut out the template and do free-hand drawing, too. I’m not that talented…but it seems like an amazing option if you’re good with a pen or marker!


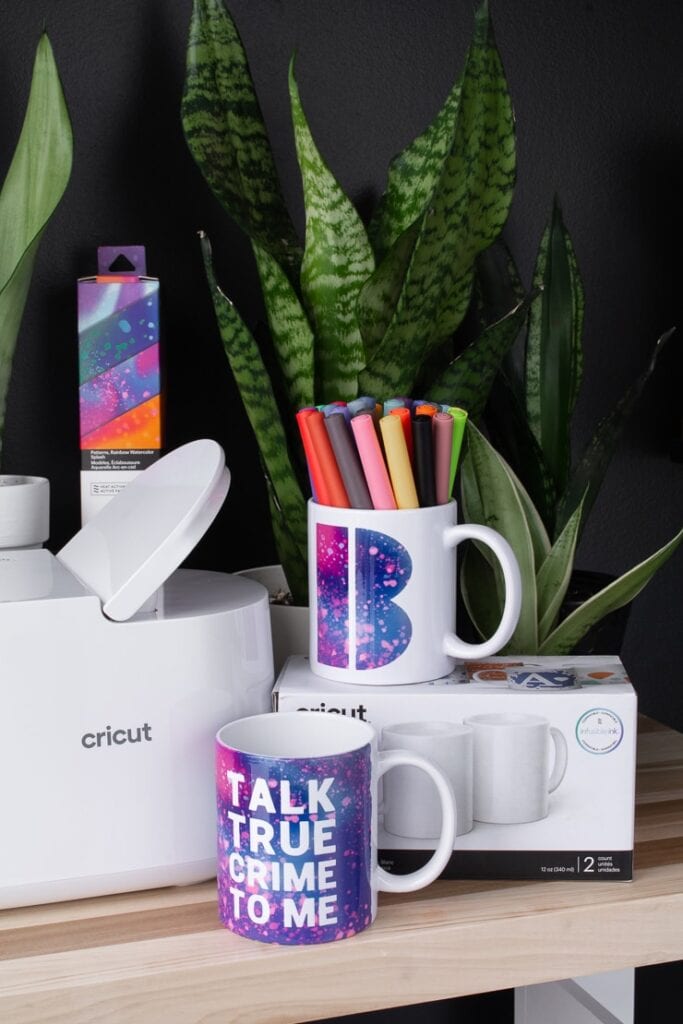
And here are some gorgeous glamour shots of all of my finished mugs!
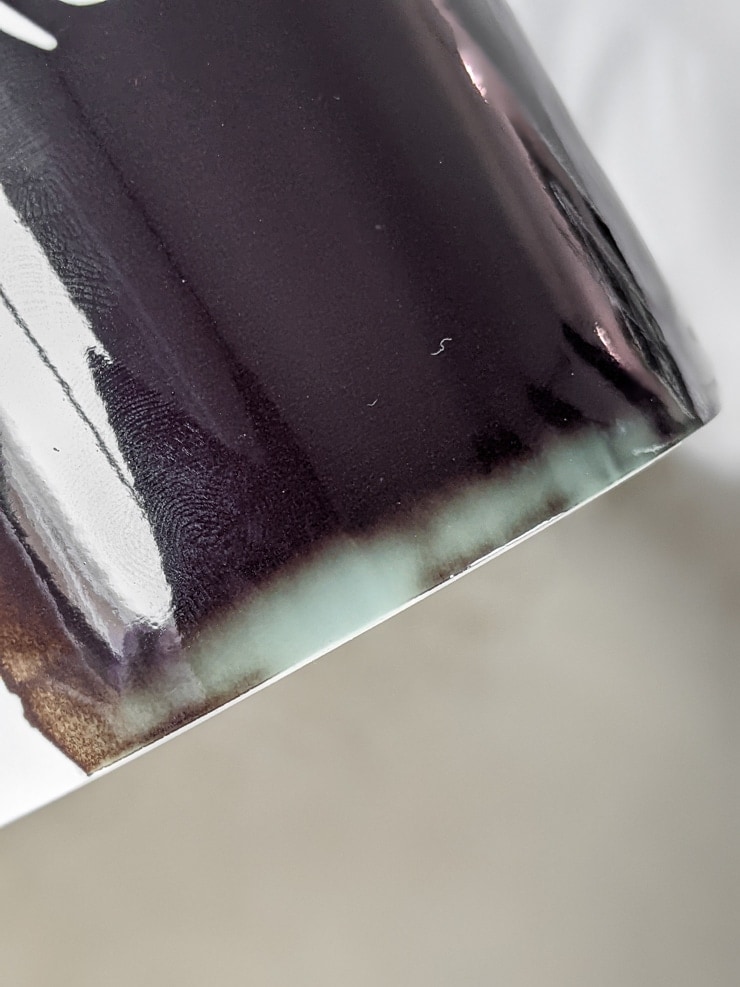
I was so impressed with this machine. It’s really so idiot-proof. Out of all of the mugs I made, I only made an error on one. And that was ghosting due to neglecting to add heat-resistant tape along the bottom of the design. I am blown away by these results!


Other things you might be wondering about the Cricut Mug Press…
Can I use an EasyPress with the mugs and Infusible Ink?
No—do not use the EasyPress with Cricut mugs and Infusible Ink. The flat heat plate on the EasyPress is designed for flat, even surfaces, not curved mugs. It will result in uneven transfers and possibly even burns. The Mug Press protects you from the heated area and ensures even transfers.
Can I use iron-on vinyl or HTV in the Cricut Mug Press?
No, the Infusible Ink transfer process requires very high heat, and this heat can burn or melt the iron-on/htv material. This could damage the Mug Press’s heat plate.
How much is the Cricut Mug Press and where can I get it?
The Cricut Mug Press retails for $199, and you can find it at Cricut.com, Michaels, Joann, Hobby Lobby, Target, HSN, Walmart, and Amazon.
Pin my post about how to use the Cricut Mug Press!