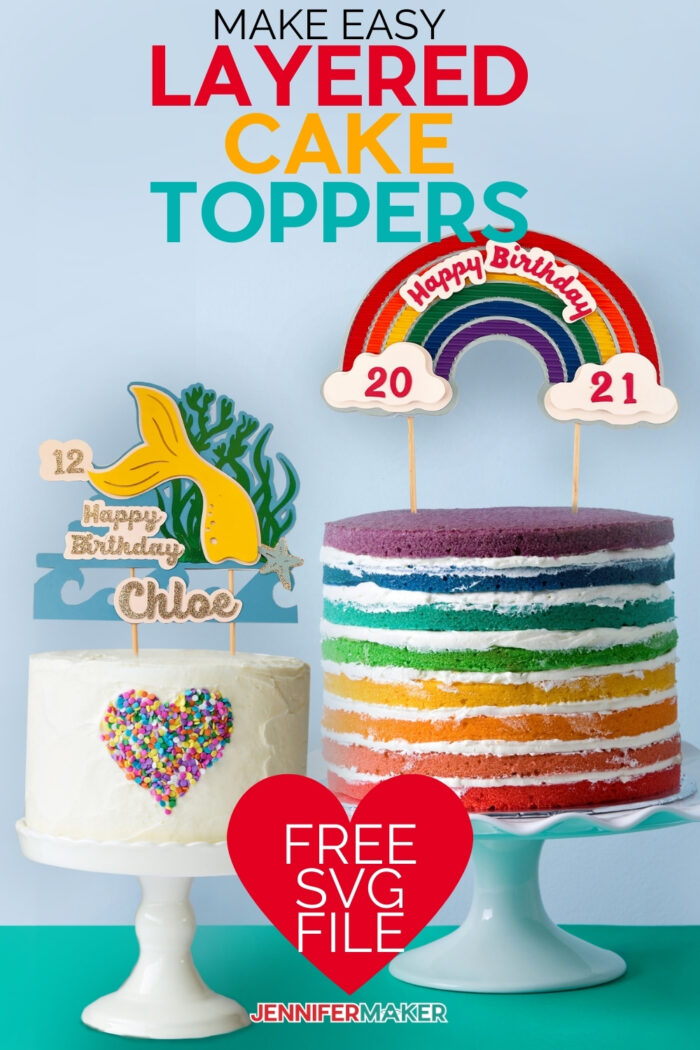
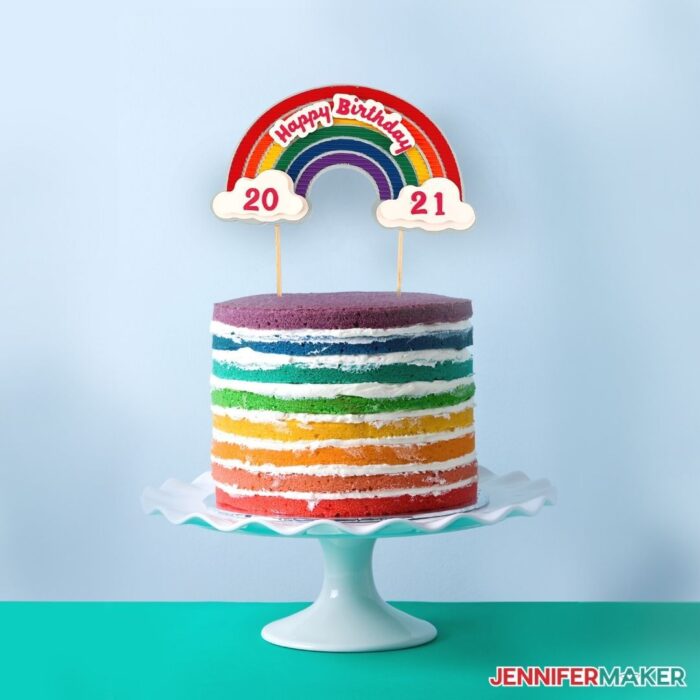
Learn how to make these cake toppers with layered designs, which can be a fun and unique way to decorate your cake! These customizable decorations are a great way to spotlight that special person!
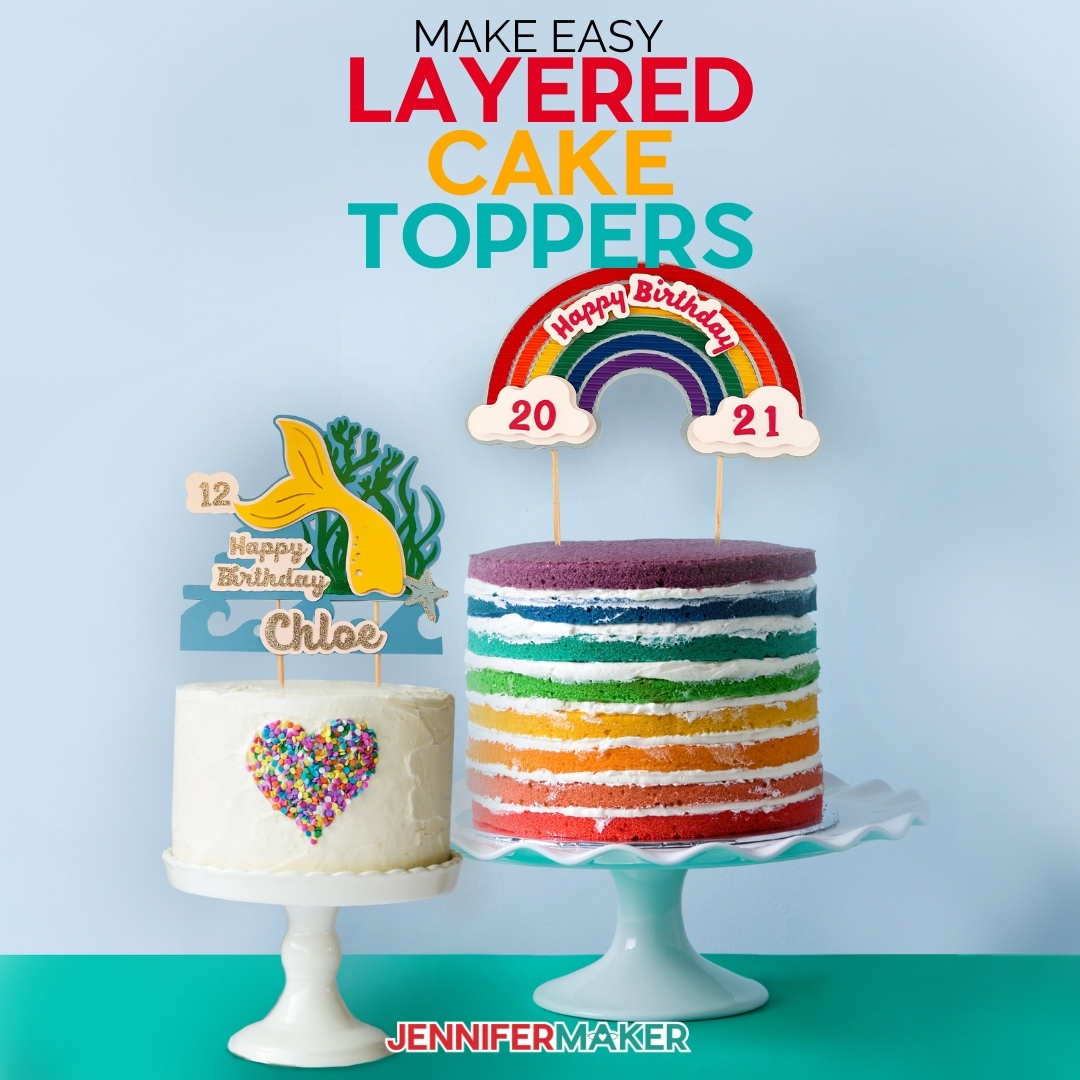
Cake toppers are quite the trend these days based on all the questions I see in my Facebook groups, and I know many of you want to make your own cake toppers. Last year I shared my original cake topper design, which is a great place to begin if you’re new to cake toppers. But there are many other styles and different ways to make custom cake toppers, including (but not limited to) acrylic cake toppers, shaker cake toppers, balsa wood toppers, and multi-layered cake toppers. So today I want to show you how to make layered cake toppers — one with a mermaid theme, and one with a pretty rainbow theme — in this DIY cake topper tutorial.

First, what is a custom cake topper? A cake topper is a decorative design on wooden skewers that you can push right into the top of a cake to instantly give it some pizazz without spending a fortune for a custom made cake design or the expensive acrylic versions of commercial cake toppers. Making a cake topper with fun layers is the way I can add a splash of color and and a unique spin to a store-bought or homemade cake. I think they look particularly great on a tall cake,
So I thought it was high time to make cake toppers with layered designs for you to personalize. A custom cake topper is perfect for a birthday party, an engagement party, a wedding reception, and really any special occasion. But I suspect most of us just want toppers for birthday parties, so we have two great ideas you could use for your next party!
To make these adorable personalized cake toppers, you will need several pieces of cardstock. Depending on how you want your cake toppers to look, you can use patterned or solid colors or a variety of both. These are so much fun to customize and you can use whatever paper you want to coordinate with your party theme. I think glitter card stock paper is particularly fun here!
I used 65 lb. cardstock and a foam backer to create more stability, but you can also use heavy cardstock to create this same effect. There is a lot of flexibility here! Just keep in mind, if you choose to use a lighter cardstock, the poster board will be very helpful in stabilizing your cake toppers.
Note that I am not using Cricut chipboard, balsa wood, or another thick material like that — not only are these materials hard to cut, but the layered design of this custom cake topper means it’s just not necessary.
To keep your cake topper layers together, I love using foam dots to provide a fantastic 3D effect. If you don’t have any foam dots, no worries — they’re great to have but not required. Any tacky glue will work to adhere your cake topper layers together. As a matter of fact, I use tacky glue throughout this project as well. There are certain elements I don’t want raised, such as the seaweed on the mermaid cake topper or any of the letters. So ideally, you want to have both kinds of adhesive on hand.
This is the perfect Cricut project, and I used my Cricut cutting machine to cut the cards and envelopes, along with the fine point blade, the scoring stylus or scoring tool, and a green Standard Grip cutting mat. You can also make this with the Cricut Explore or the Cricut Joy (if you resize it down to fit your mat).
Finally, you need the right font — something easy to read and cut is ideal here! I am sharing the font I used for my cake toppers in the supply list below.
Let me show you how to make these DIY custom cake toppers with layered designs! This post contains some affiliate links for your convenience (which means if you make a purchase after clicking a link I will earn a small commission but it won’t cost you a penny more)! Read my full disclosure policy.
Materials to Make Your Own Cake Toppers with Layers
View my Amazon shopping list with the exact items we used to make this Cricut cake topper project!
- Eight (8) pieces of 8.5″ x 11″ 65-80 lb. cardstock of your choice, size and color (I used this patterned paper for the mermaid)
- Tacky glue or precision art glue (I don’t recommend a glue stick or hot glue gun)
- Two (2) eight inch wooden skewers (also known as bamboo skewers)
- (Optional) 3D Foam Dots
- (Optional) Poster Board for backing
- (Optional) Glitter Glue for decorating
- (Optional) Font used in this design
- (Optional) Spray Adhesive
- Cricut Standard Grip Mat (green)
- Cricut Weeding Tools
- A way to cut your cardstock for the cake topper (I used the amazing Cricut cutting machine — you can use the Cricut Explore Air, Cricut Maker, or even the Cricut Joy)
- Design #312 – My free cake topper templates (available in my free resource library—get the password at the bottom of this post
How to Make a Cake Topper with Cricut
Layered Cake Topper
It's fun to make your own cake toppers, and an easy way to decorate a cake! Combining layers with foam dots will make your design so fun and interesting and your topper will be the talk of the party!
Materials
- Rainbow Cake Topper: 8 1/2" x 11" Cardstock (Rainbow Colors)
- Rainbow Cake Topper: 12" x 12" White Glitter Cardstock
- Mermaid Cake Topper: 8 1/2" x 11" Patterned Cardstock
- Mermaid Cake Topper: 8 1/2" x 11" Cardstock
- Mermaid Cake Topper: 12" x 12" Yellow Glitter Cardstock
- Mermaid Cake Topper: 8 1/2" x 11" Green Glitter Cardstock
- Tacky Glue or Precision Art Glue
- Wooden Skewers ( I used 8 inch bamboo skewers)
- 3D Foam Dots
- Poster Board for backing (Optional)
- Glitter Glue (Optional)
- Spray Adhesive (Optional)
- Design #312 - Layered Cake Topper SVG/DXF/PDF (available free in my resource library)
Tools
Instructions
STEP 1: GET MY LAYERED CAKE TOPPERS DESIGNS
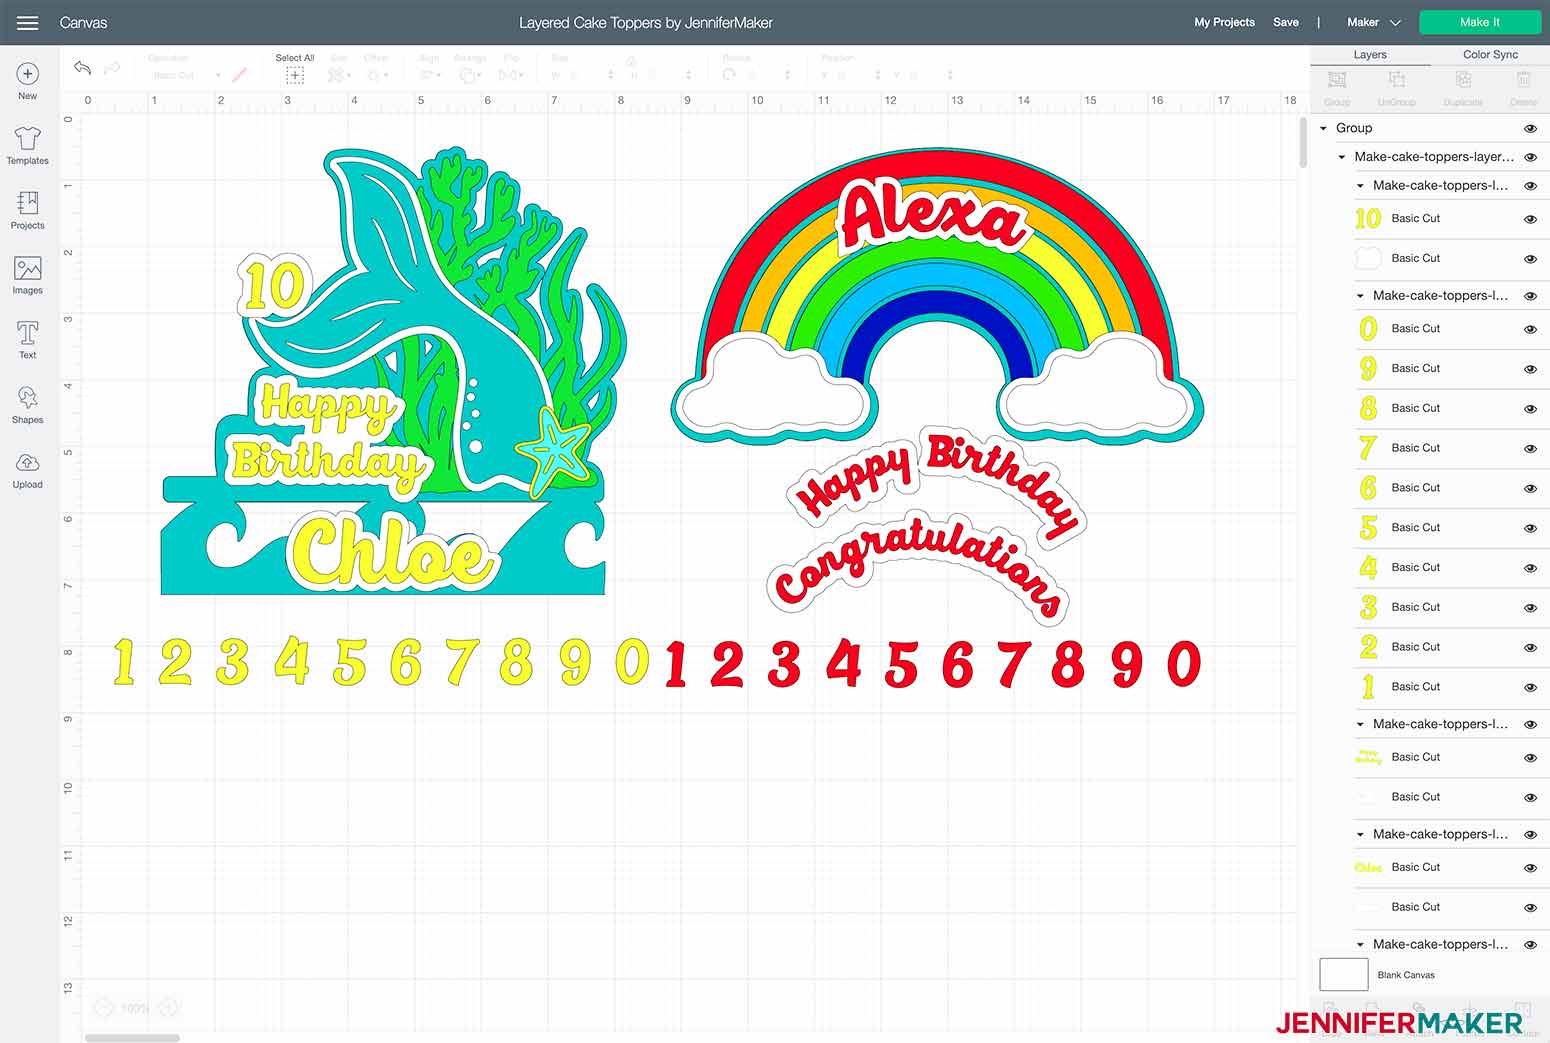
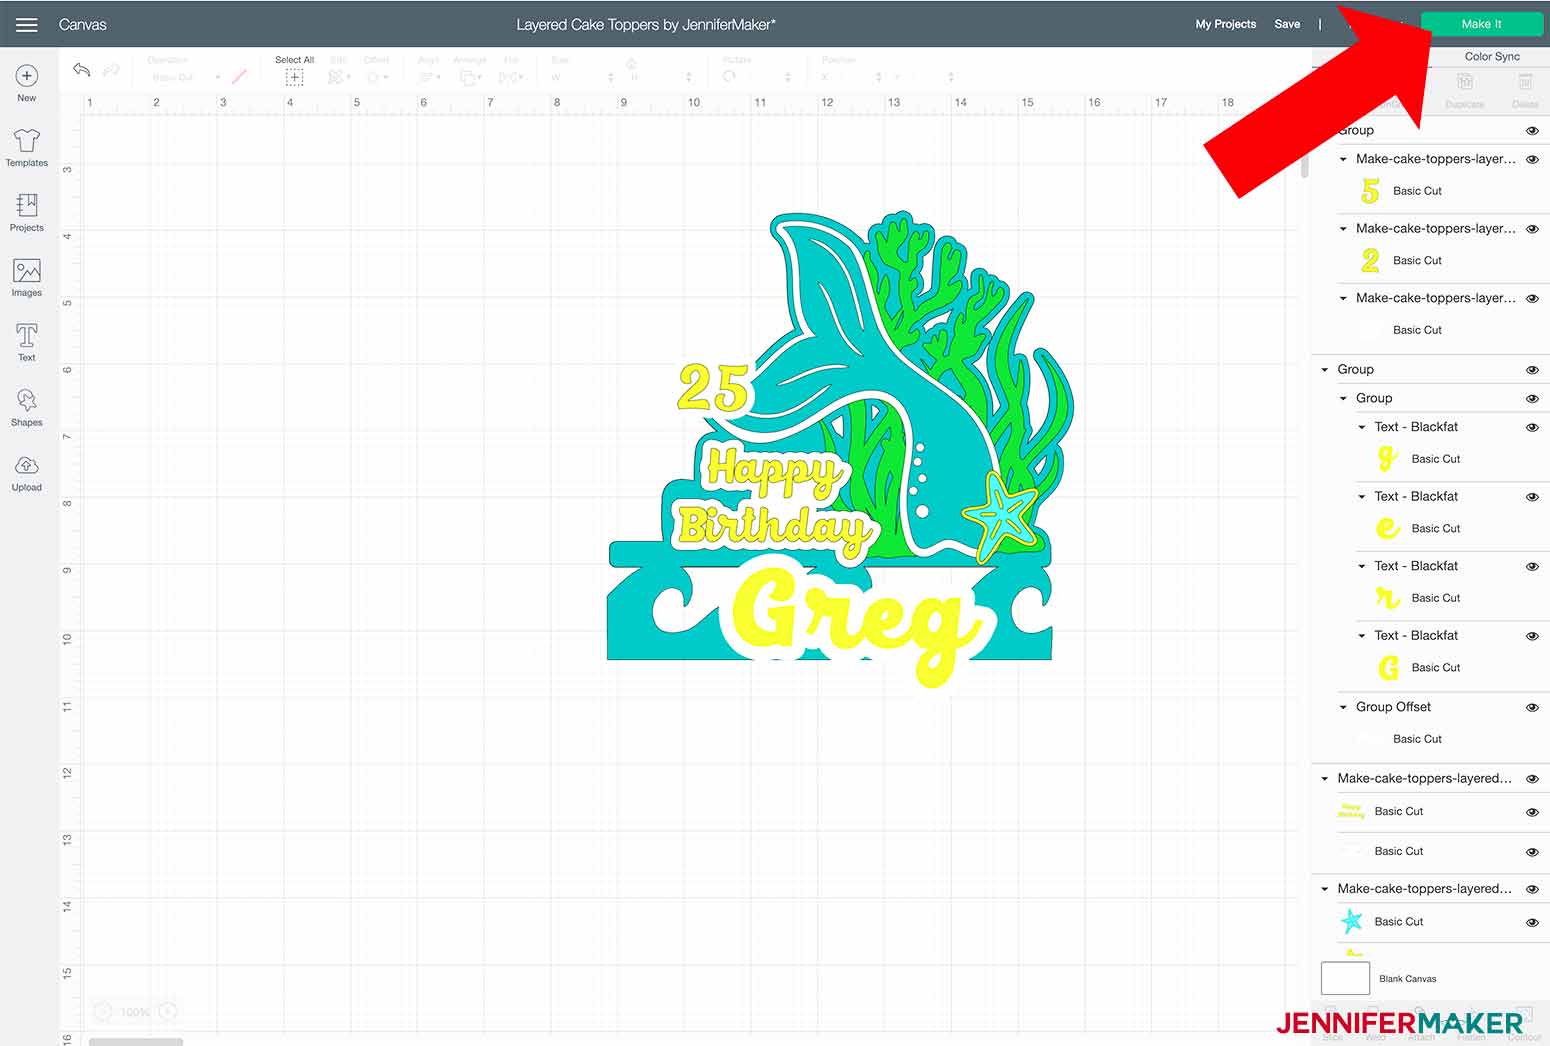
First, download Design #313 from my free resource library — this is my Layered Cake Toppers design. If you are going to cut your own cake topper on your cutting machine, upload the file to your design software. Here is what my Layered Cake Toppers file will look like in Cricut Design Space:
Tip: If you are not sure how to upload an SVG cut file to the Cricut Design Space, watch this helpful video training series I made. If you are on an iPad or iPhone, here is how to download and upload SVG files to the Cricut Design Space app.
STEP 2: PERSONALIZE YOUR LAYERED CAKE TOPPER USING OFFSET IN CRICUT DESIGN SPACE
I want to show you how to personalize your custom cake topper using the Offset feature in Cricut Design Space, but please note that Offset is on Design Space for Desktop only, and it's still in beta so it may not work for everyone.
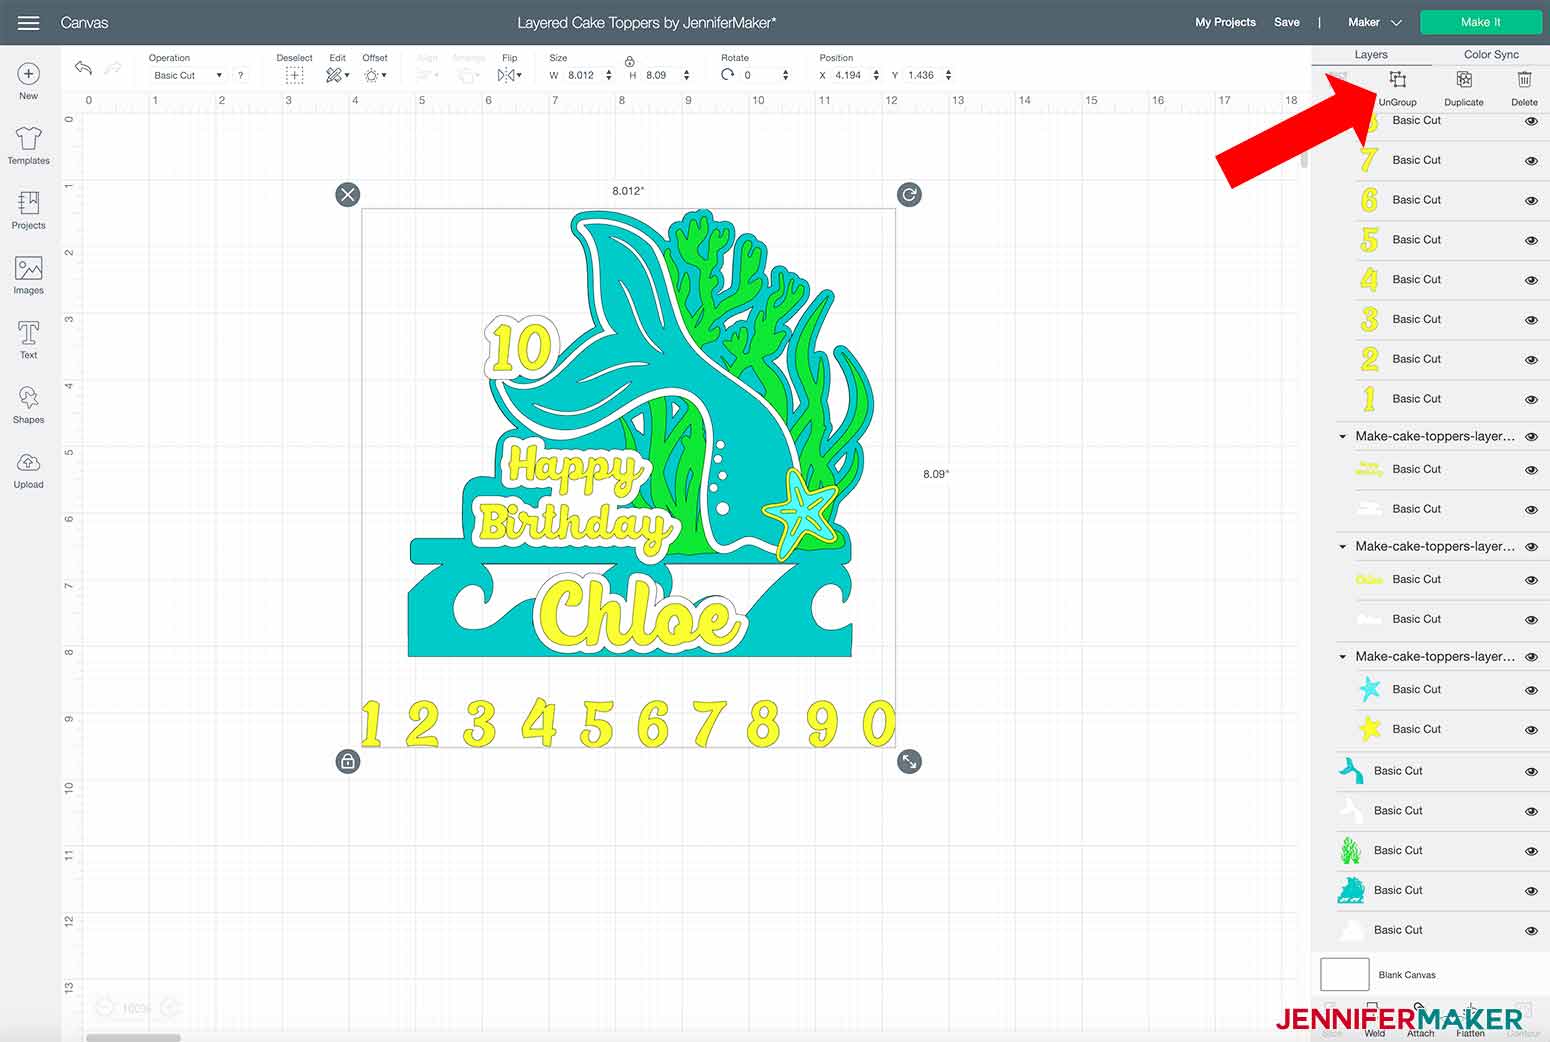
Let's start creating by ungrouping the designs in the Layered Cake Topper SVG. To ungroup the SVG, select the design and click on the Ungroup button at the top of the Layers panel.

Next, choose the design you want to create and hide or delete the one you don't need. To hide or delete click on the "eye icon" next to the one you don't want to use in the Layers panel on the right.
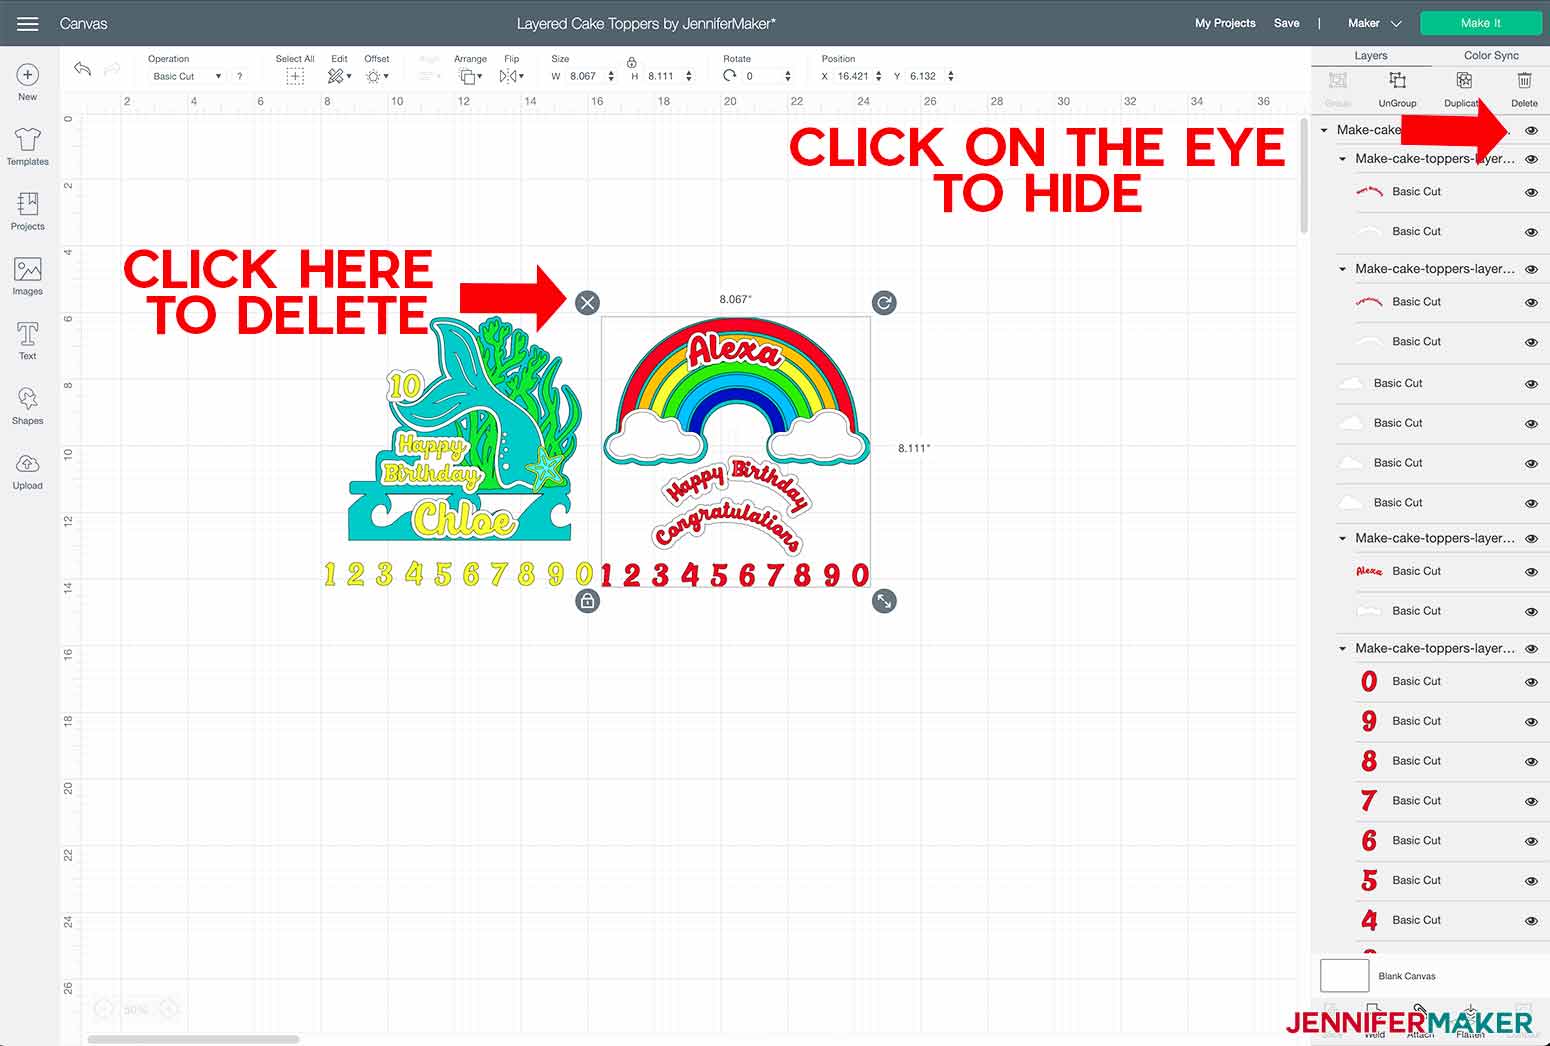
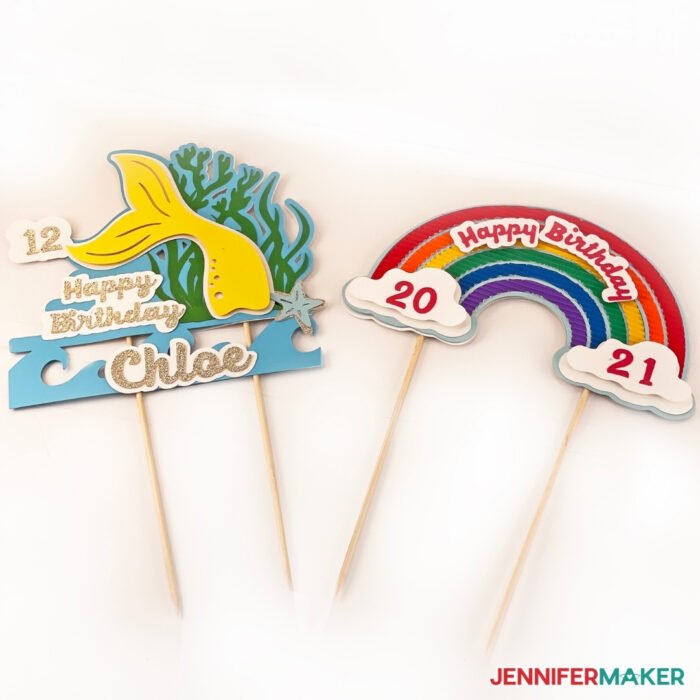
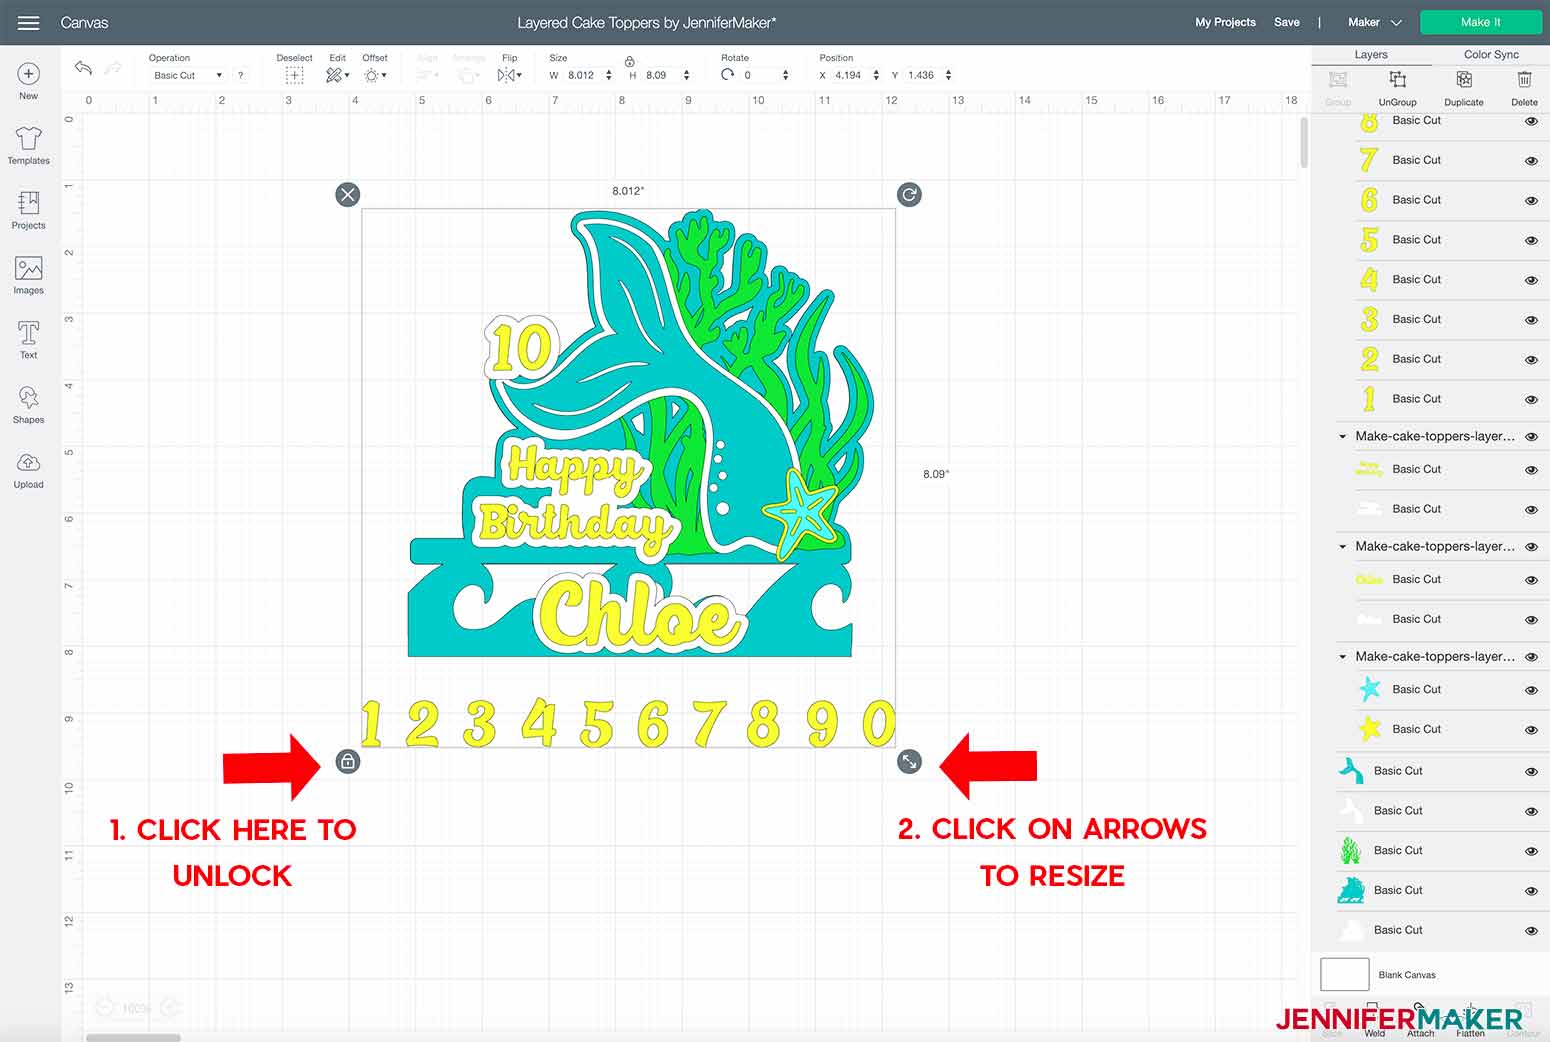
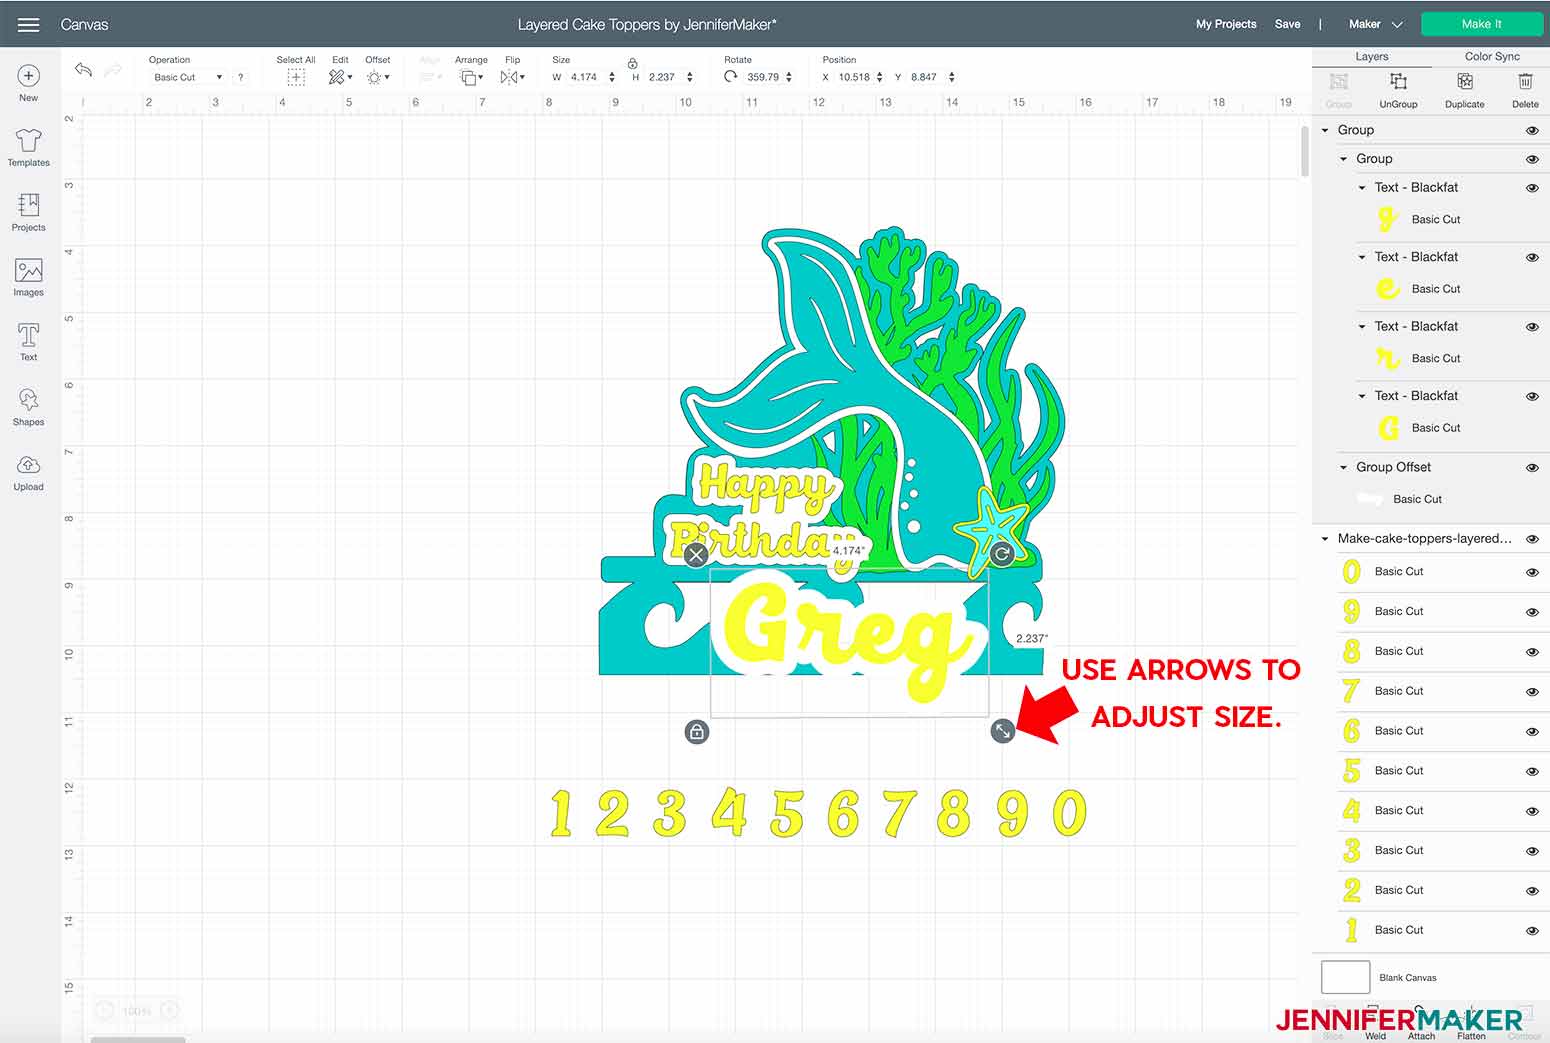
Let's start with the Mermaid Layered Cake Topper. I have sized this cake topper at about 7" wide x 6.75" high. If you choose to resize the design to meet your needs, make sure to hit "Group" first in the Layers panel so that all of the elements of the design will change size together.
Then click on the "Lock" on the bottom left-hand side of the bounding box to unlock the design which will allow you to resize. Next click on the "arrows" on the bottom right and click and drag to change the size. Once you are happy with the size you can "Ungroup" again to personalize.
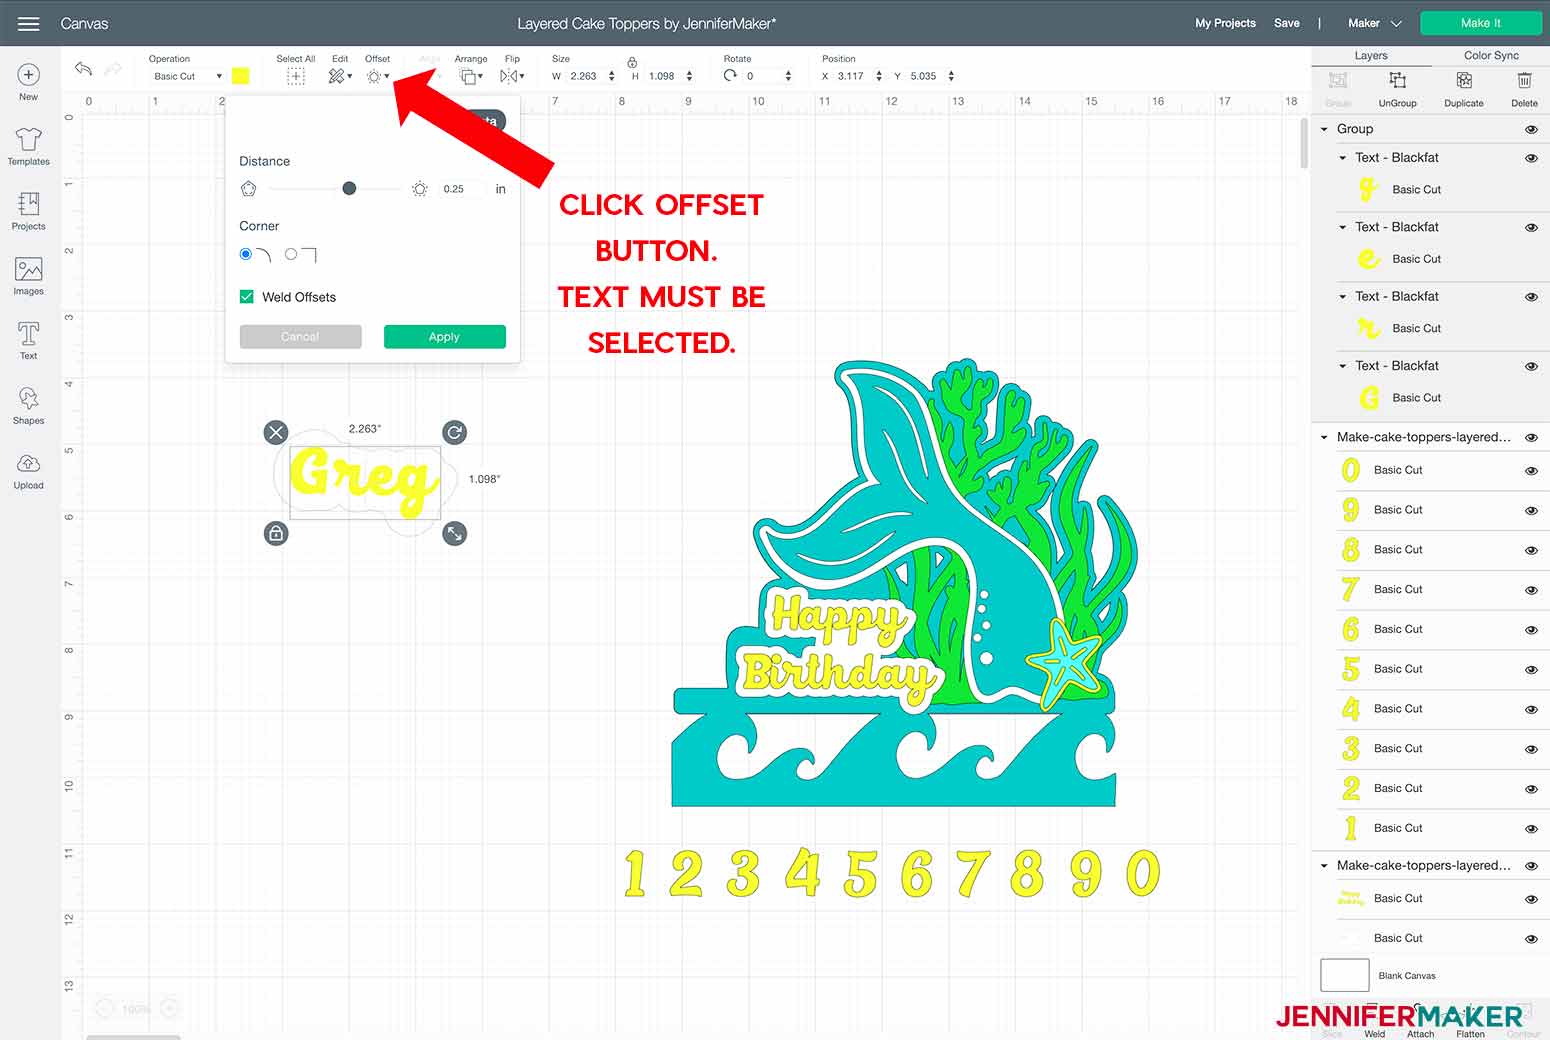
Of course you will want to personalize your layered cake topper with the name of your celebrant. You will notice that I have offsets around the text on the cake topper. If you want to create offsets for your text, we can now do this in Design Space with the new Offset tool. Yay! We are all doing a happy dance now that we can create offsets in Cricut Design Space! We now have a way to easily create offsets. The new Offset tool allows us to create outlines both inside and outside of our text, images and even shapes.
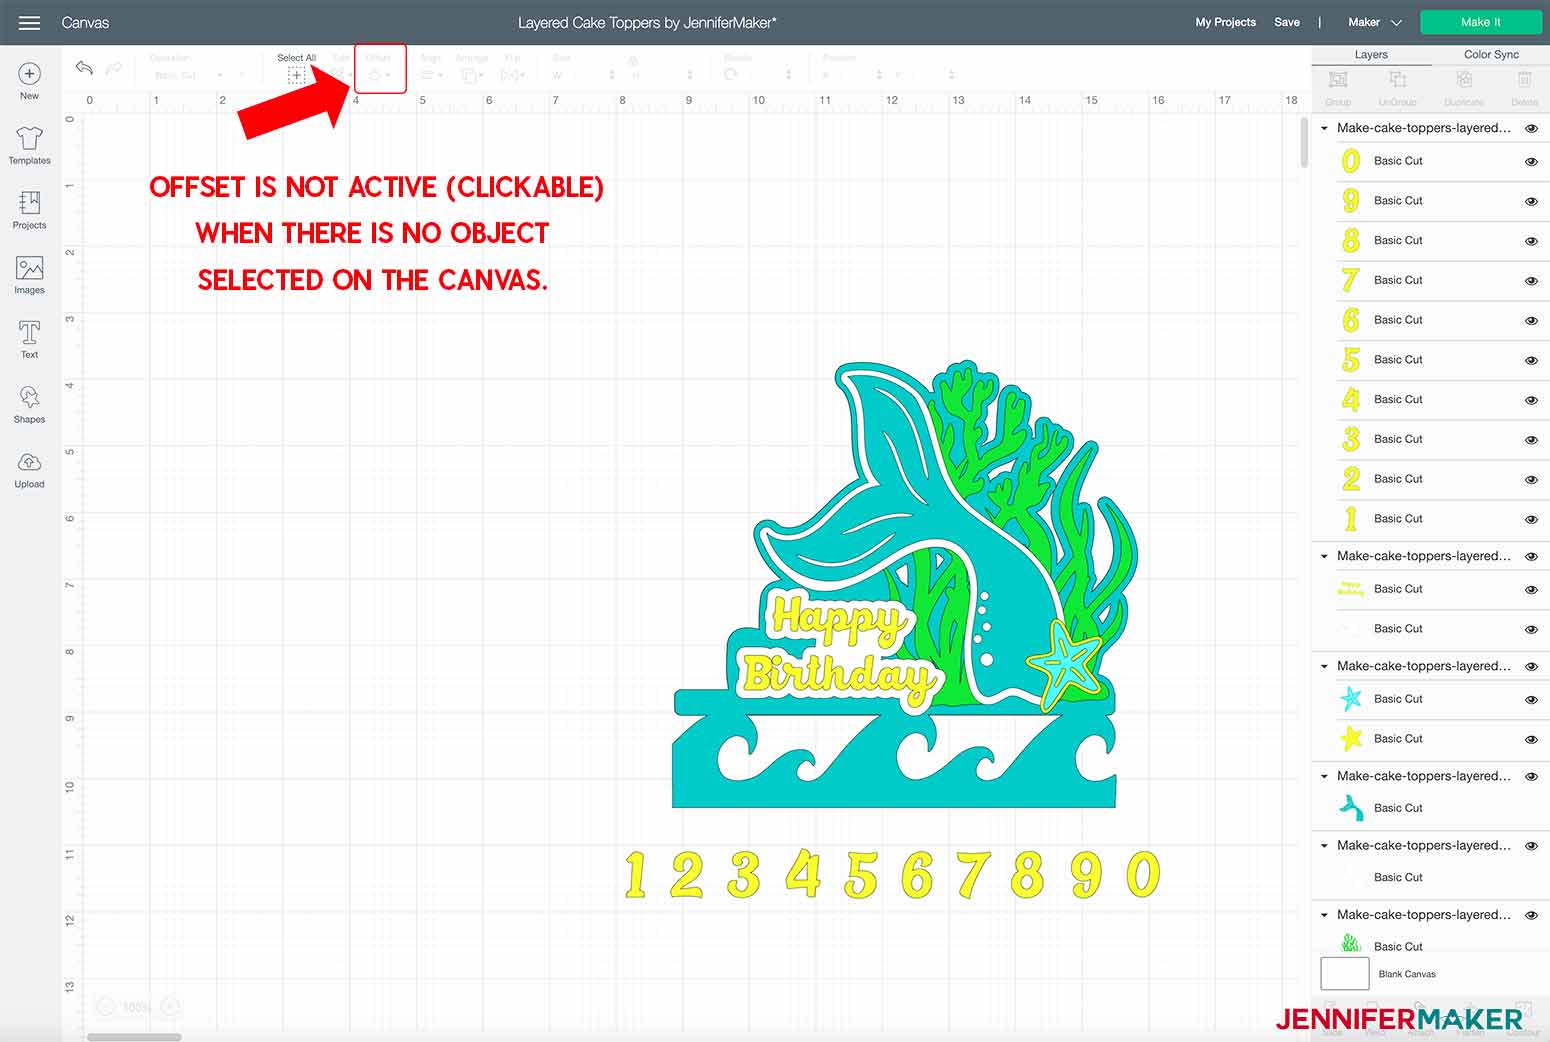
We can find the Offset button in the top menu bar of Design Space in between the Edit and the Align buttons.
TIP: The Offset button will not be active (clickable) until you have an object selected on your canvas.
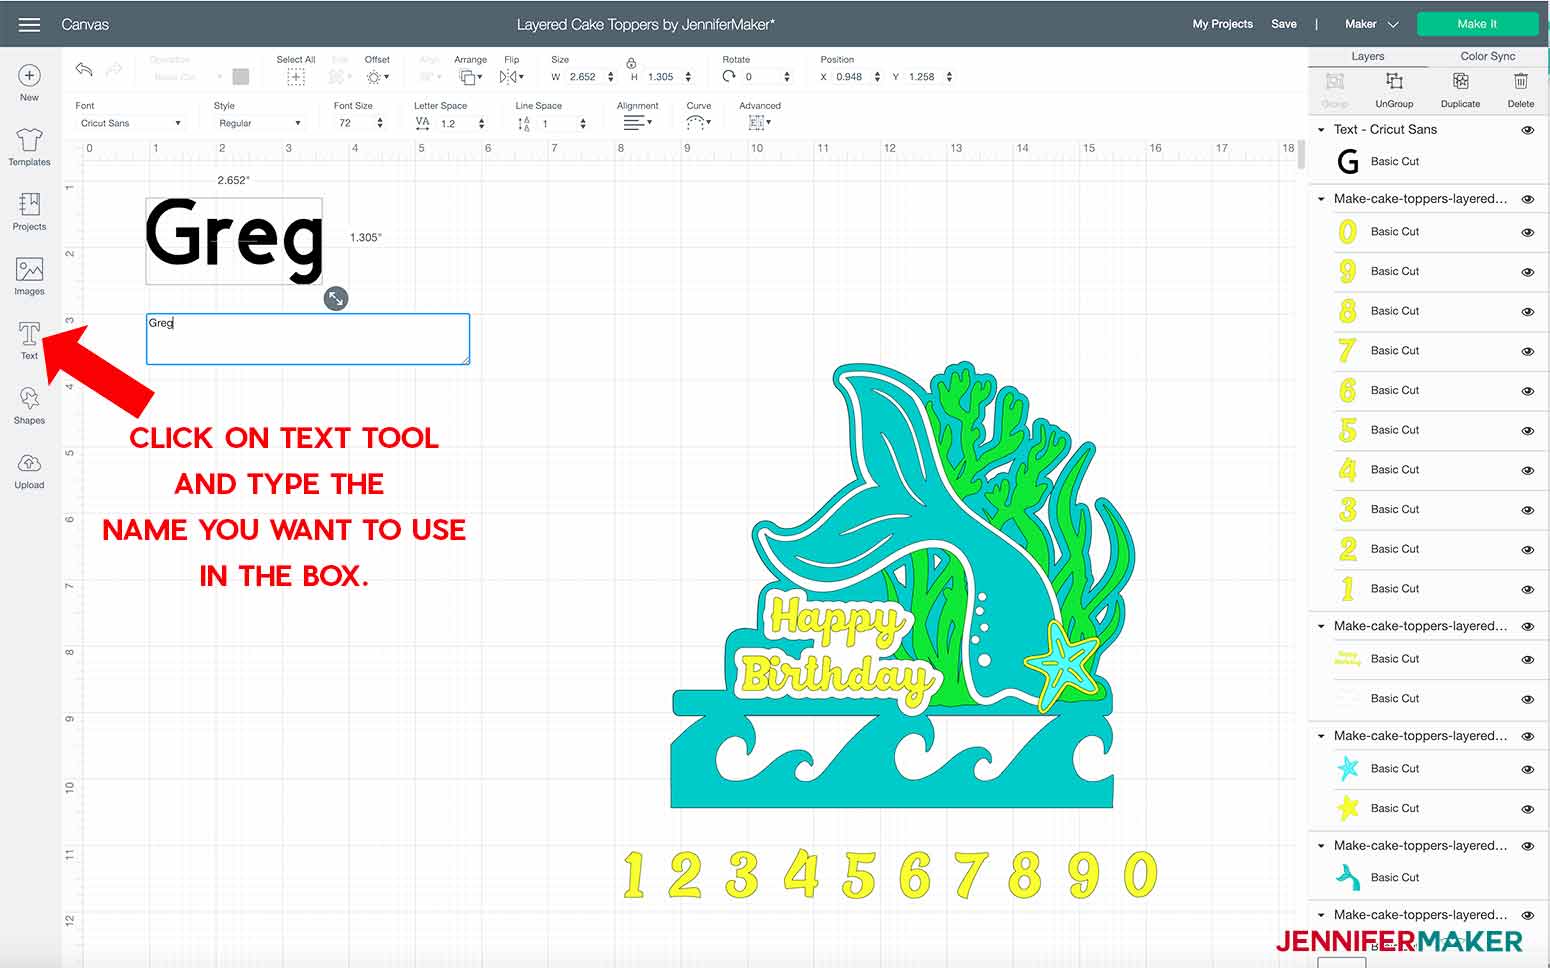
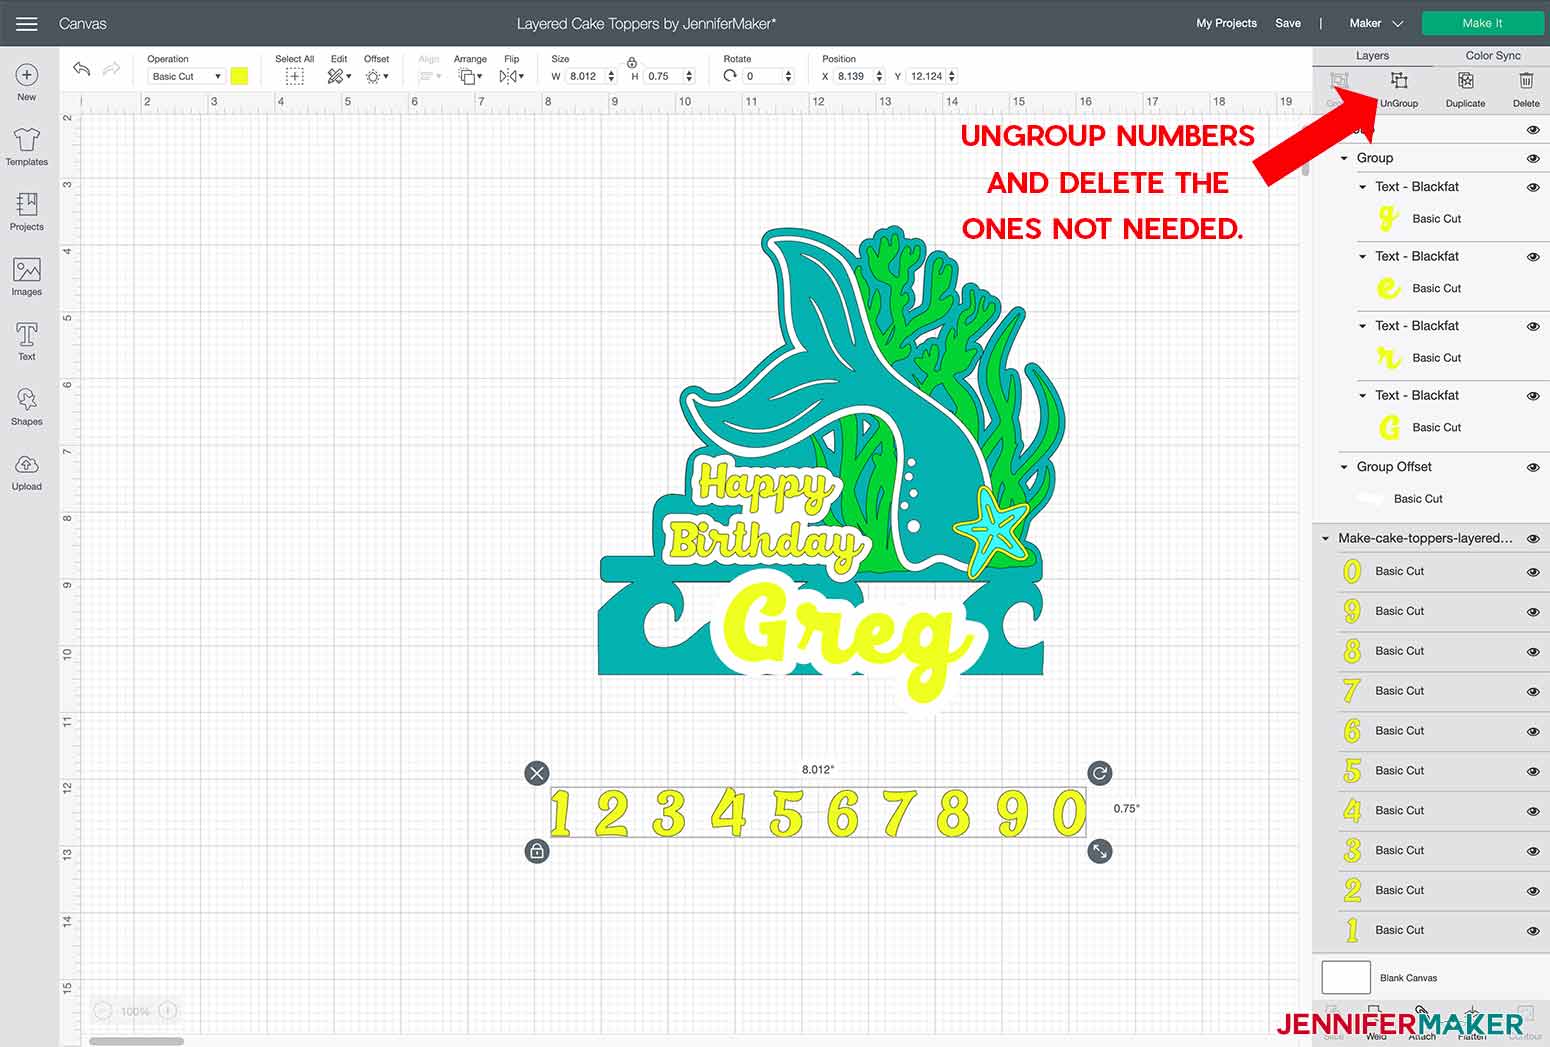
Since we are working with text for our cake layers, I will demonstrate using the new Offset functionality with text on the Mermaid Layered Cake Topper. Check to make sure you have ungrouped the design and delete or hide the objects you do not want. I am going to delete the name on this topper and add a new name. I will also delete the numbers that are on the topper as well so I can change them. First, I will type in my new text. You can use any font that you would like to use for this part of the design. Using the Text tool, I typed the name I wanted to personalize my layered cake topper with.
After I typed the name and it was still selected, I changed the font. To do this I clicked on the down arrow under the font menu on the upper left-hand side of the screen and selected my desired font. I used the Letter Spacing button to adjust the space between the letters.
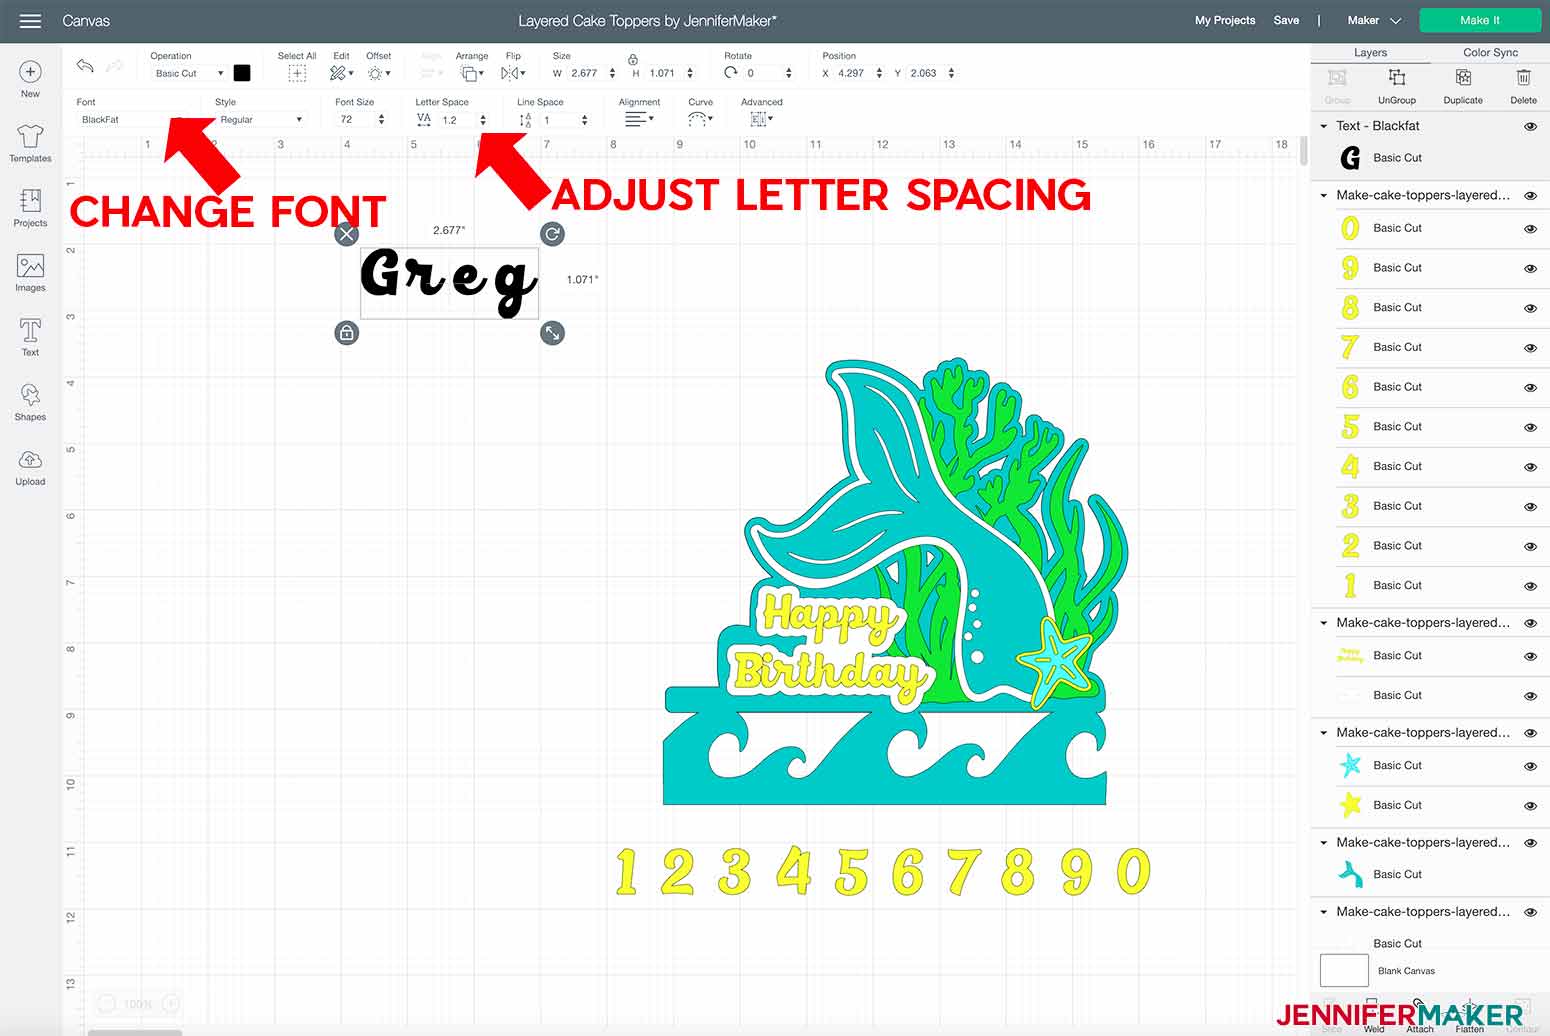
Once the letters are close enough, you can ungroup the text to fine tune the spacing. This allows you to move each letter individually so you can get everything just right.
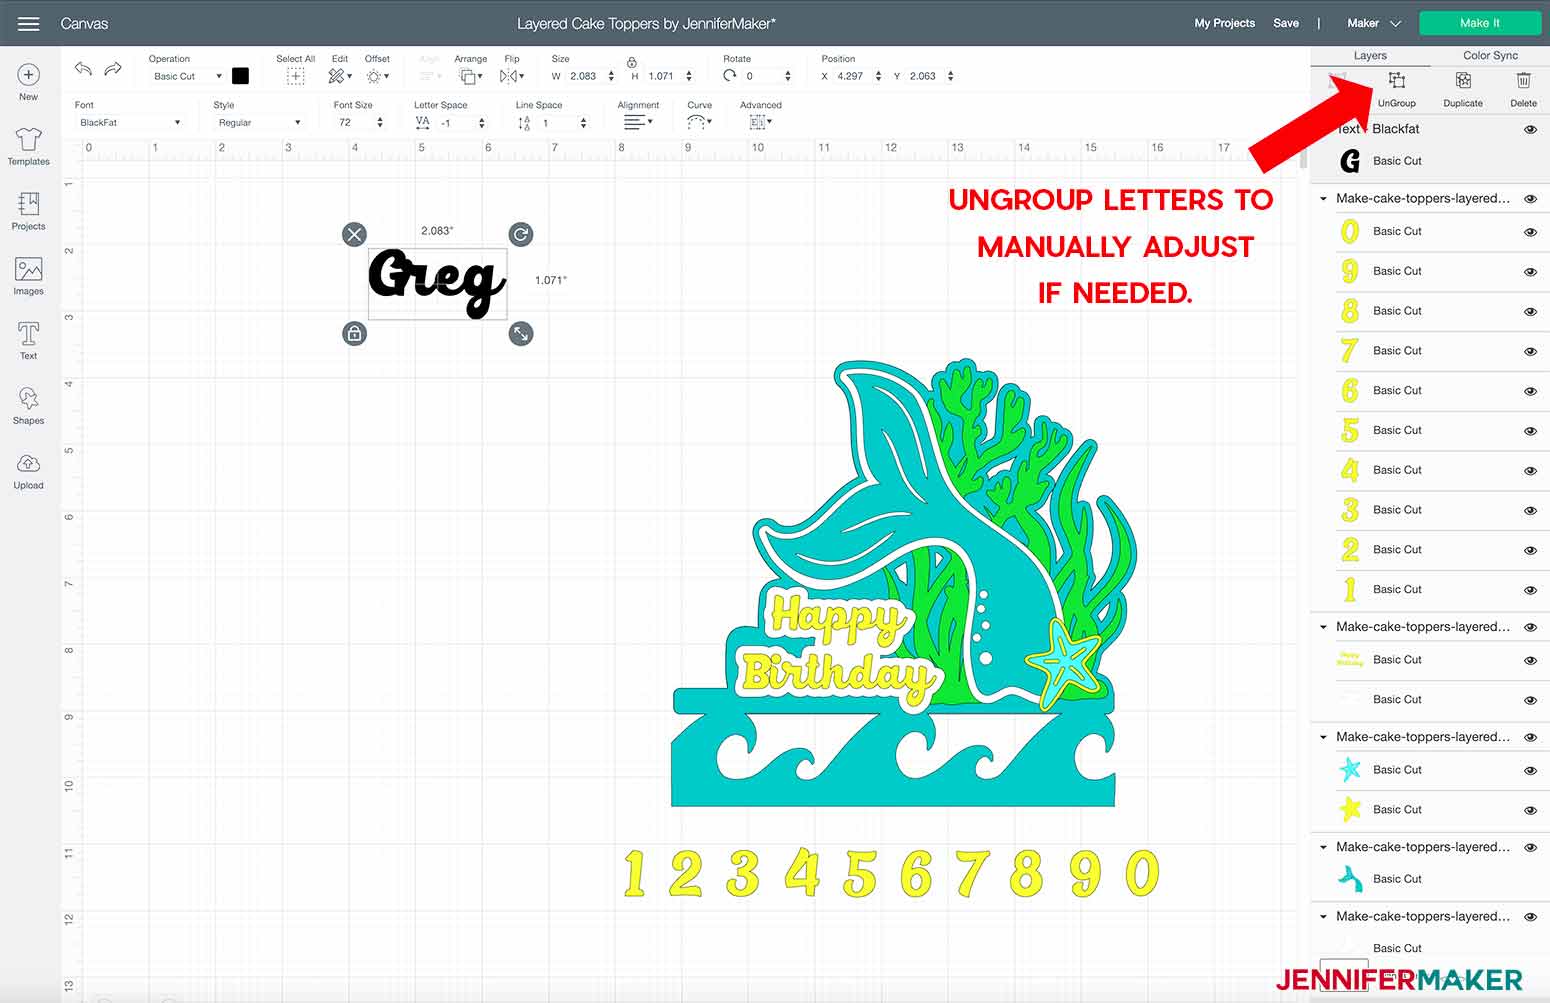
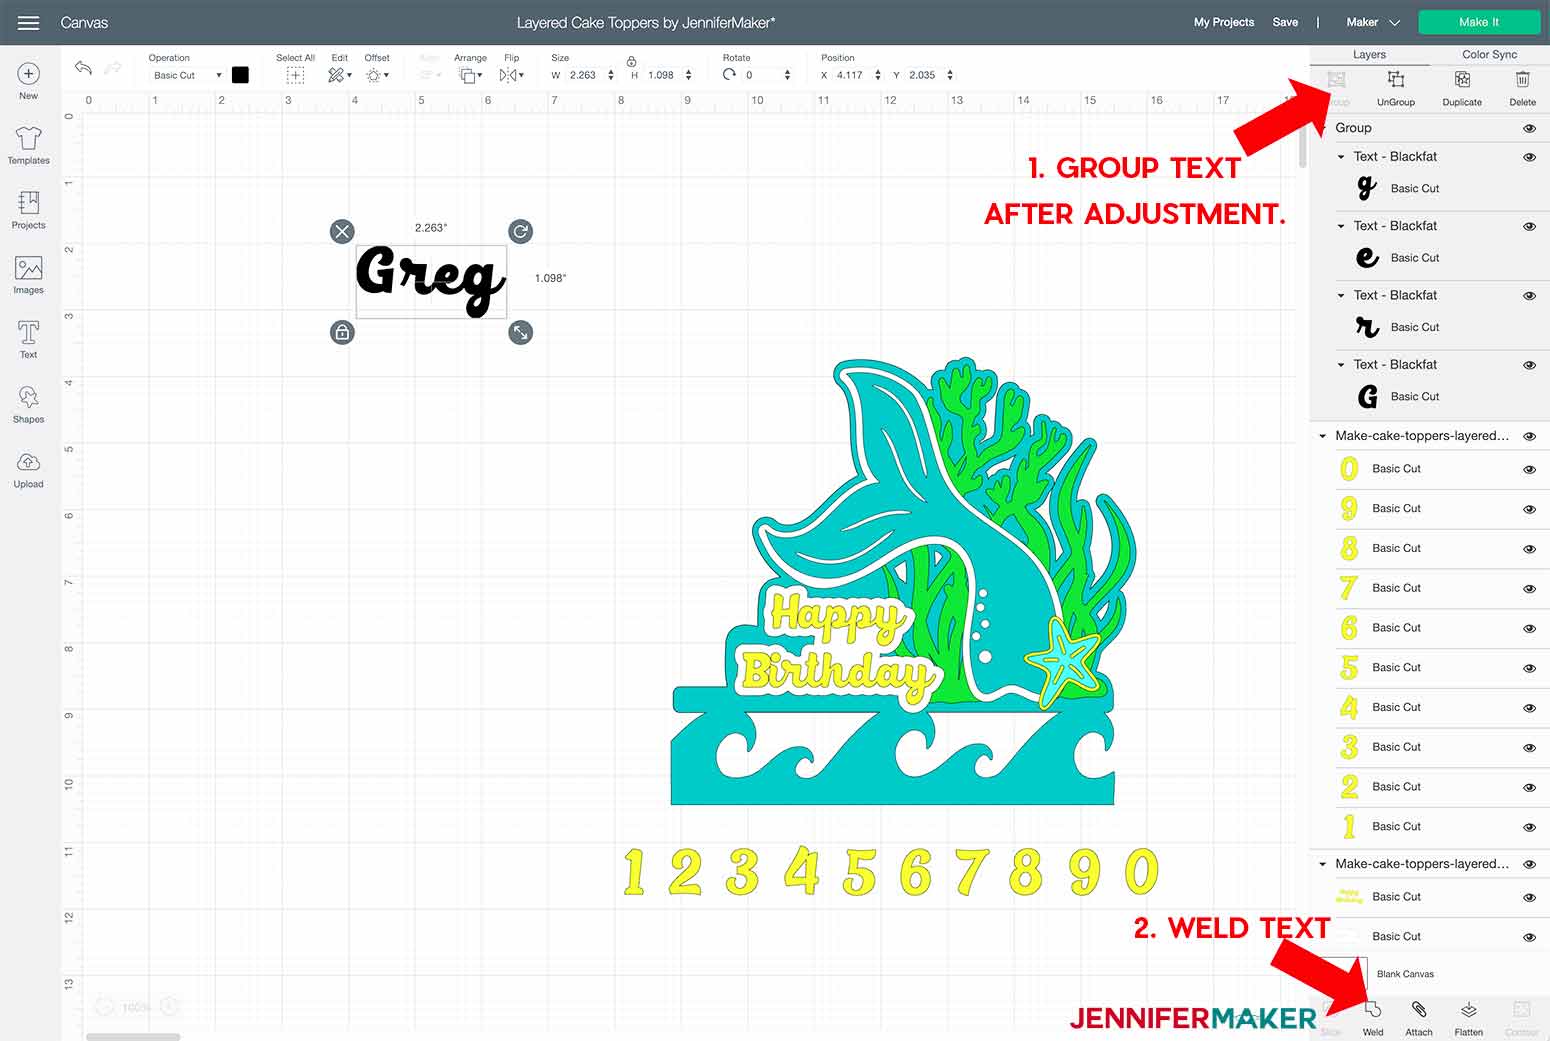
Now that I am happy with my spacing, I grouped and welded the text while it was still selected.
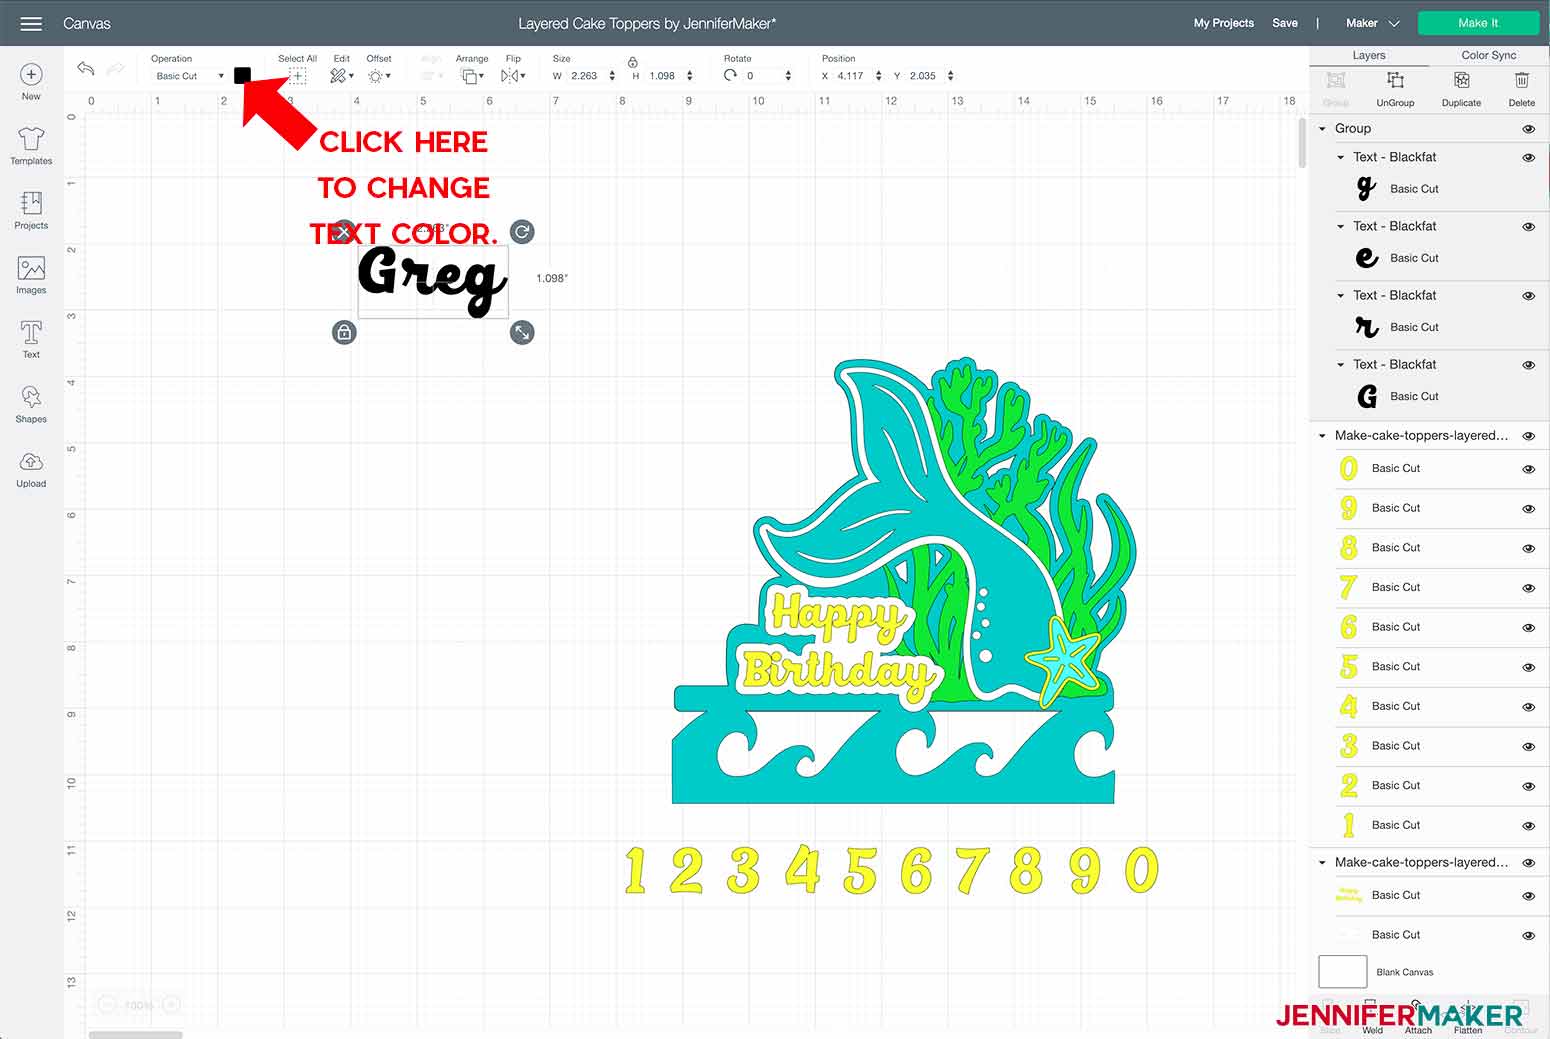
In Design Space the default color for text is black and I wanted to change that. To change the color of the text, while the text is selected, click on the color picker box to the right of the Operations button and select the color of your choice.
Now we are ready to add the offset. With the text selected, click on the Offset button and you will see the offset added to your design. Remember, if the Offset button is not clickable, you don't have the object that you want to add the offset to selected. When I first clicked on the offset, a .25 offset was added to my text. I wanted a bit smaller of an offset, so I clicked on the circle on the slider bar and slid to the left a bit to get a smaller offset. Be sure to click the Apply button to accept your the offset once you are happy with it.
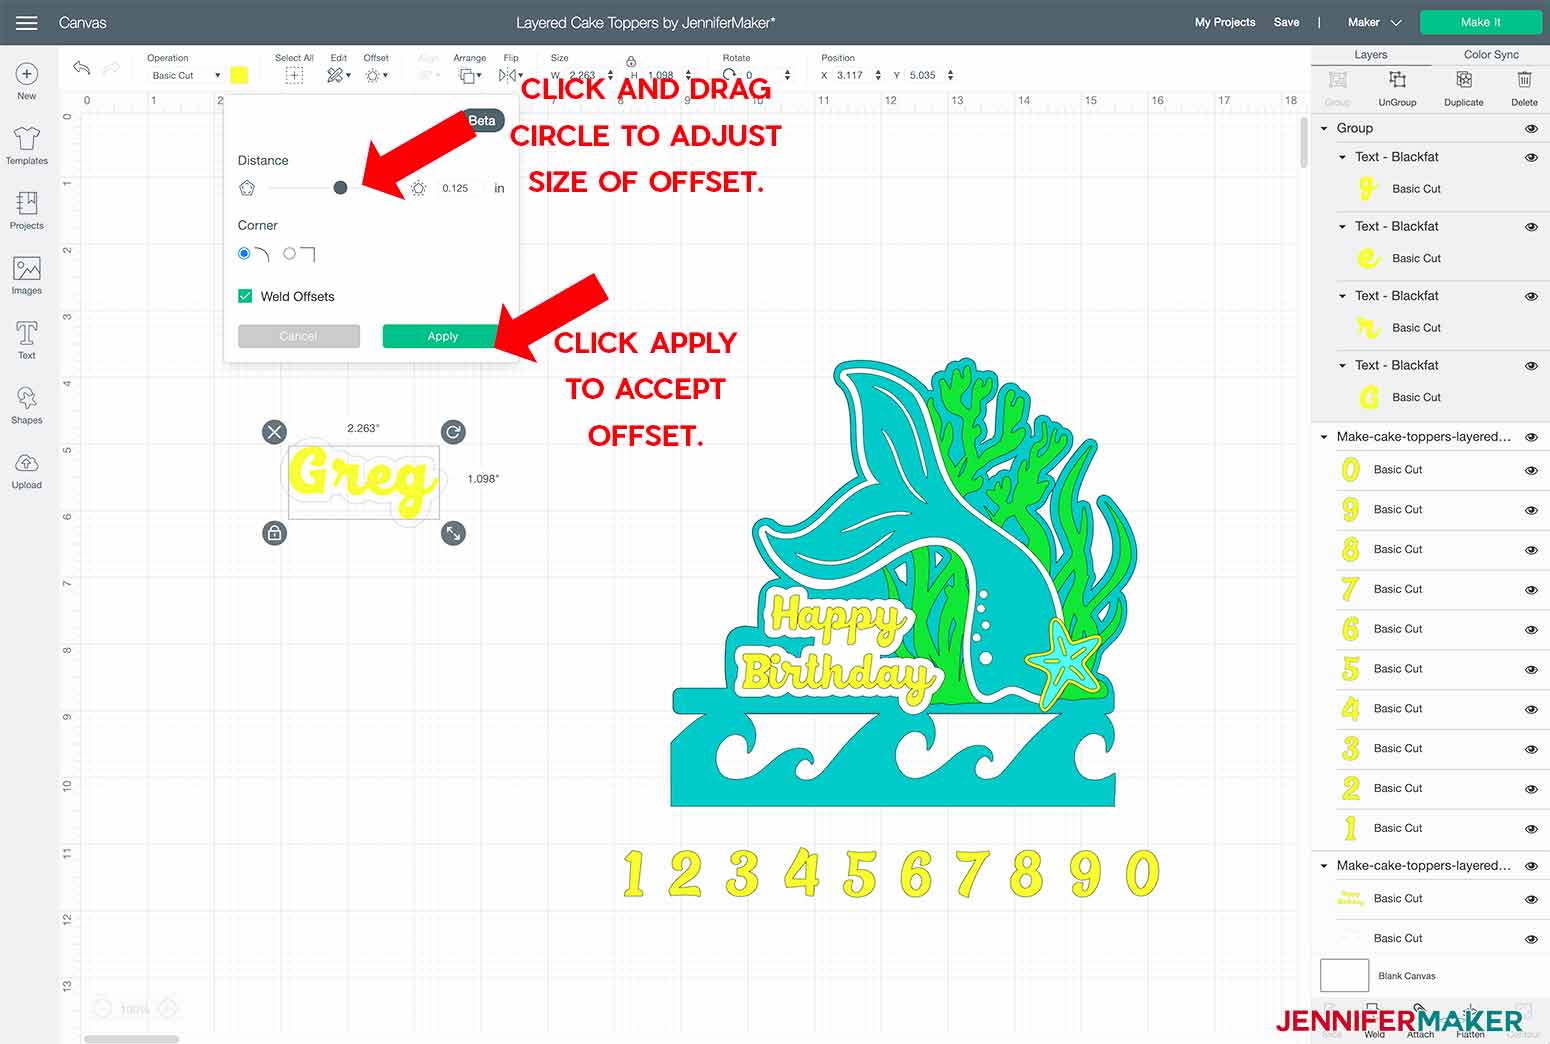
TIP: If you change your mind on the offset size after you have clicked apply, you will not be able to change the offset distance. You will need to delete that offset and add a new offset set to your desired distance.
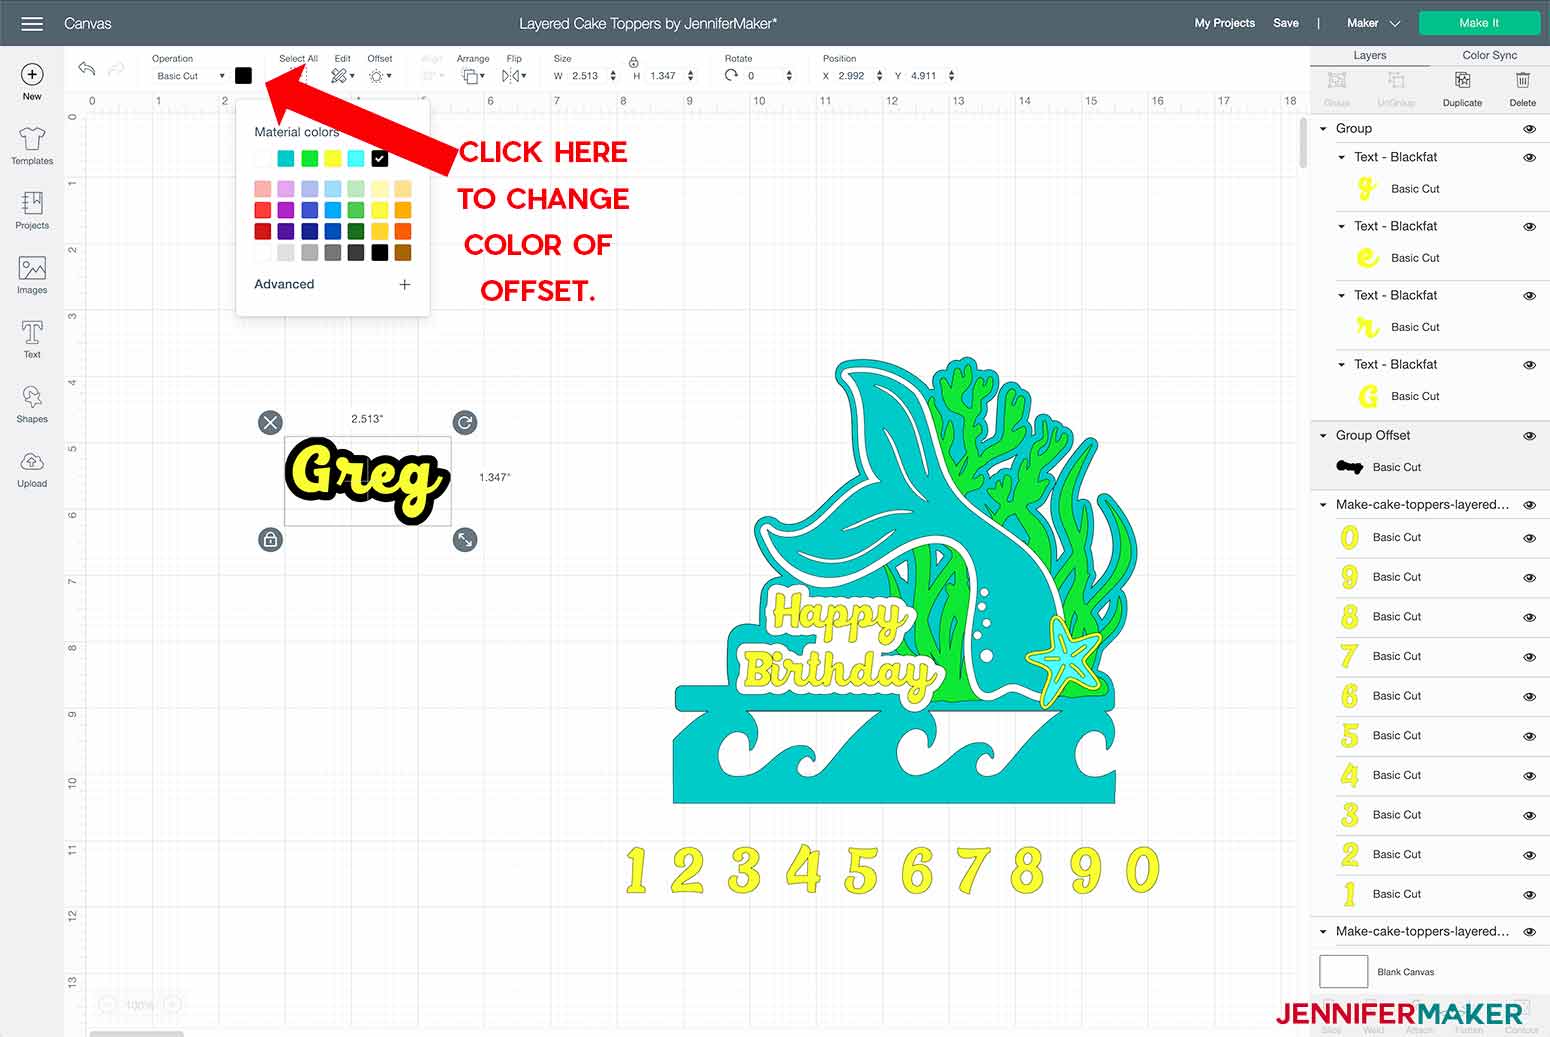
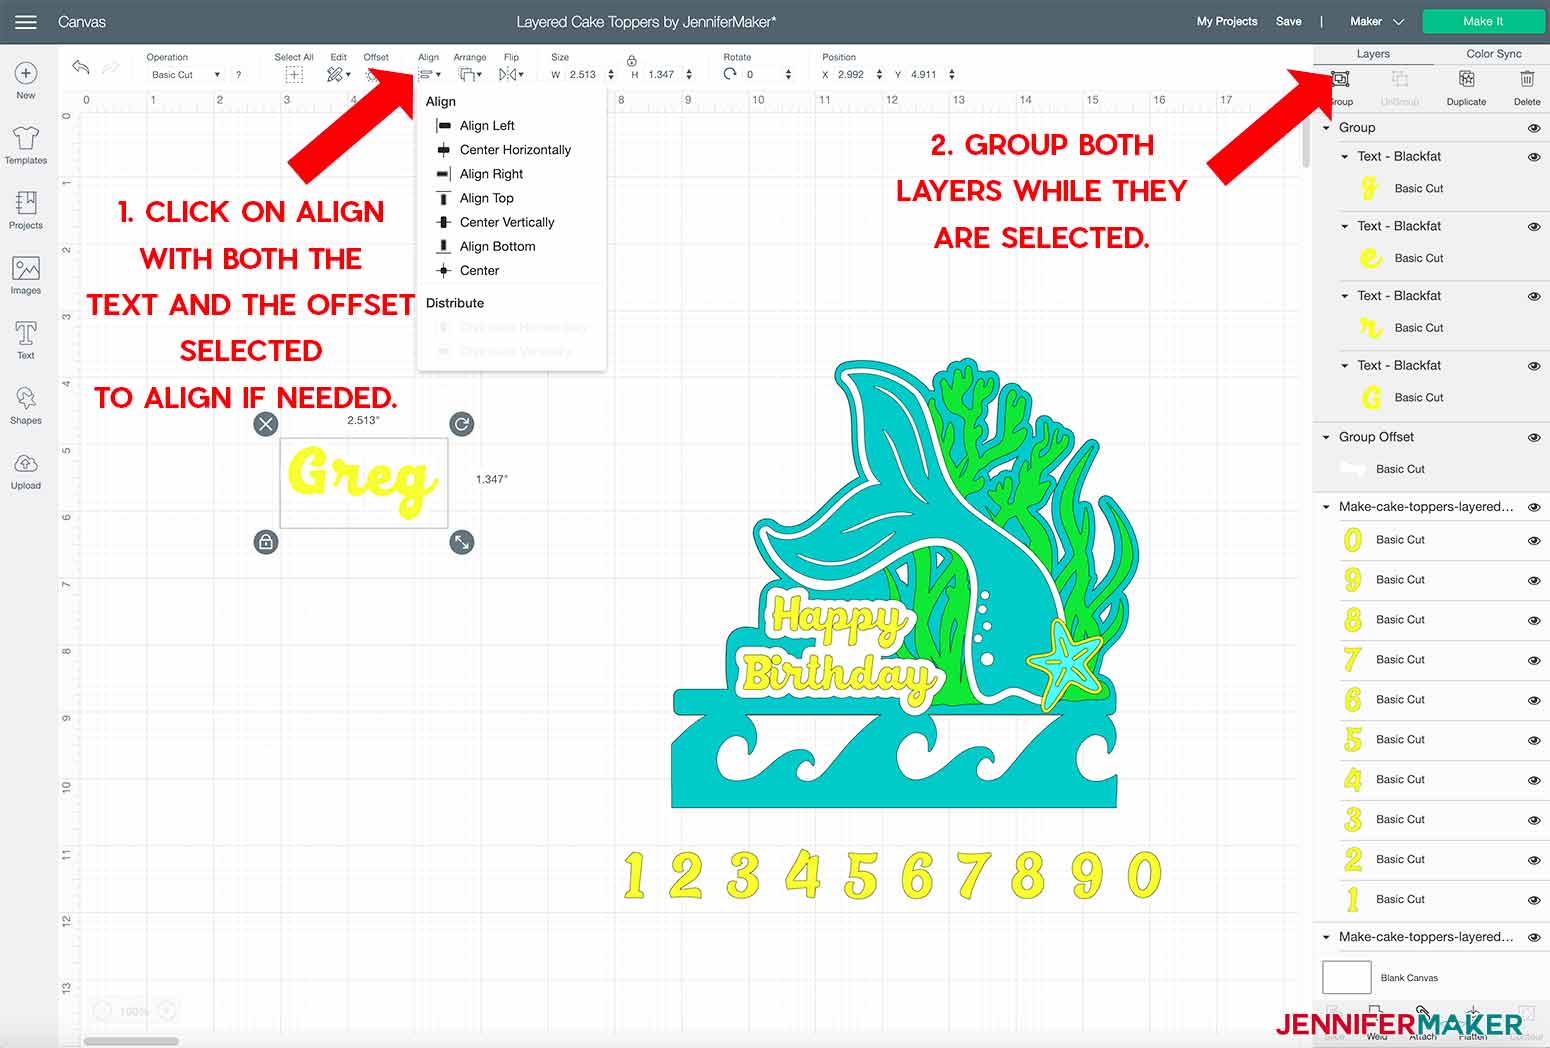
To change the color of your offset, click on the box to the right of the Operation button in the top menu bar and choose your offset color from the color picker. With both the outline layer and the text layer selected, you can use the Align button in the top menu to center them horizontally and vertically if needed. Once you are satisfied with how the offset and text look, group the two layers together while they are both still selected.
Size the image to fit in place on the cake topper by selecting the image and using the arrow in the lower right hand corner. Remember you can also unlock the lock in the bottom left hand corner to adjust the size if you like.
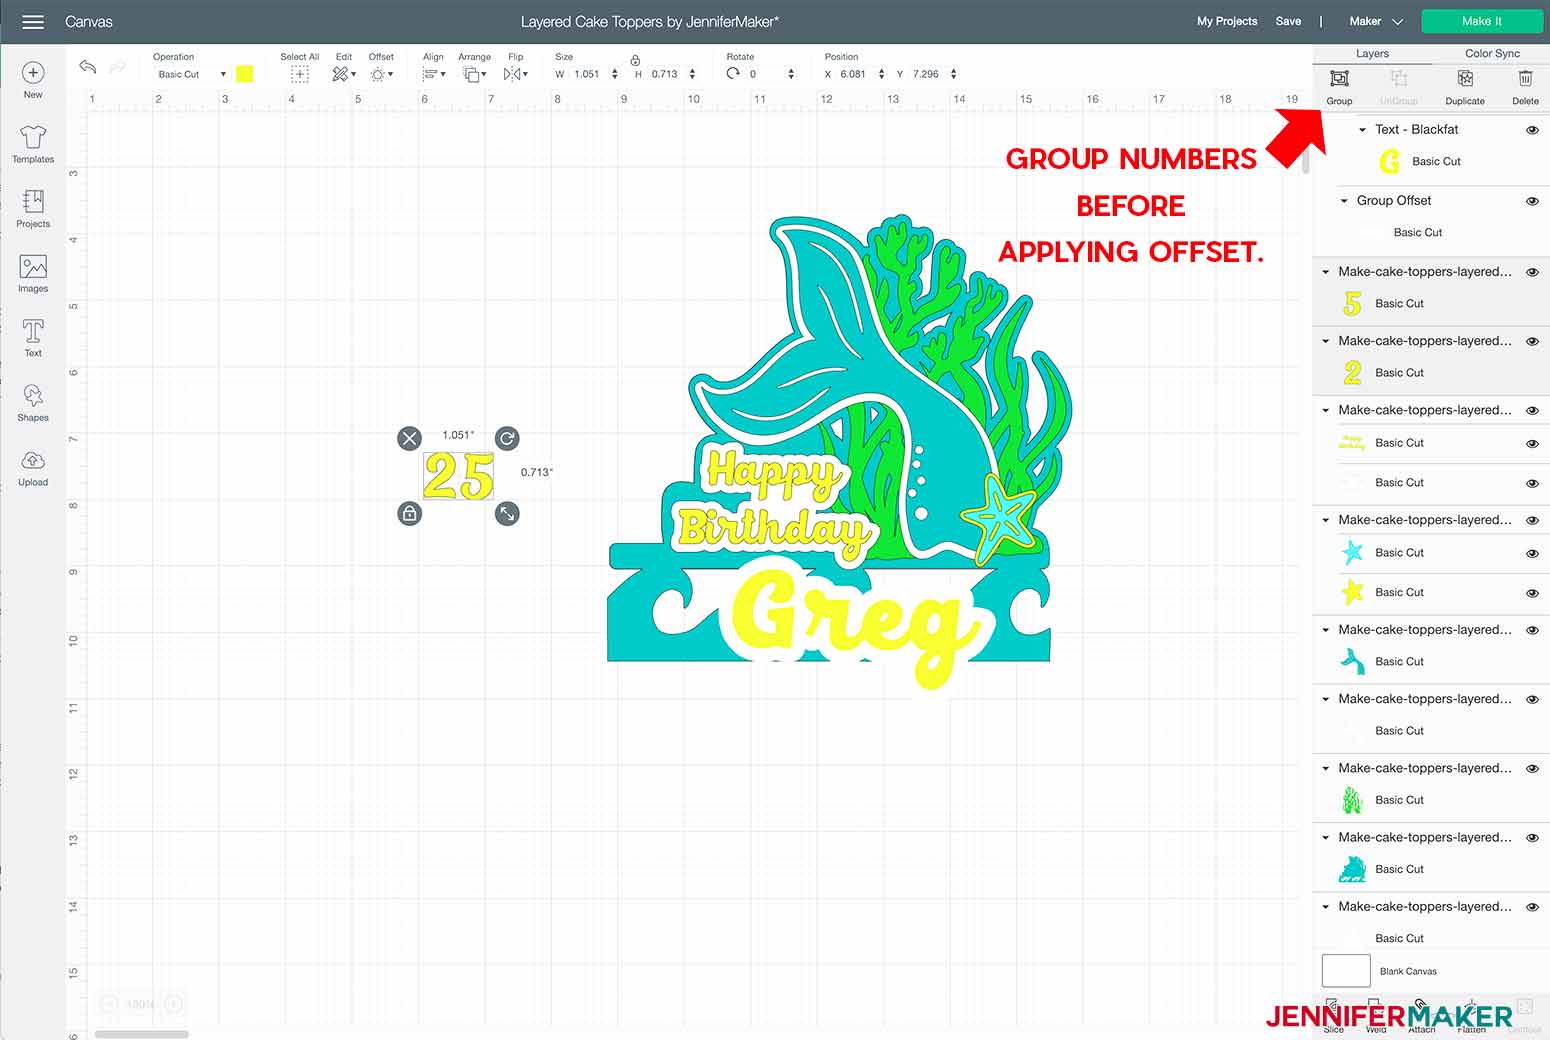
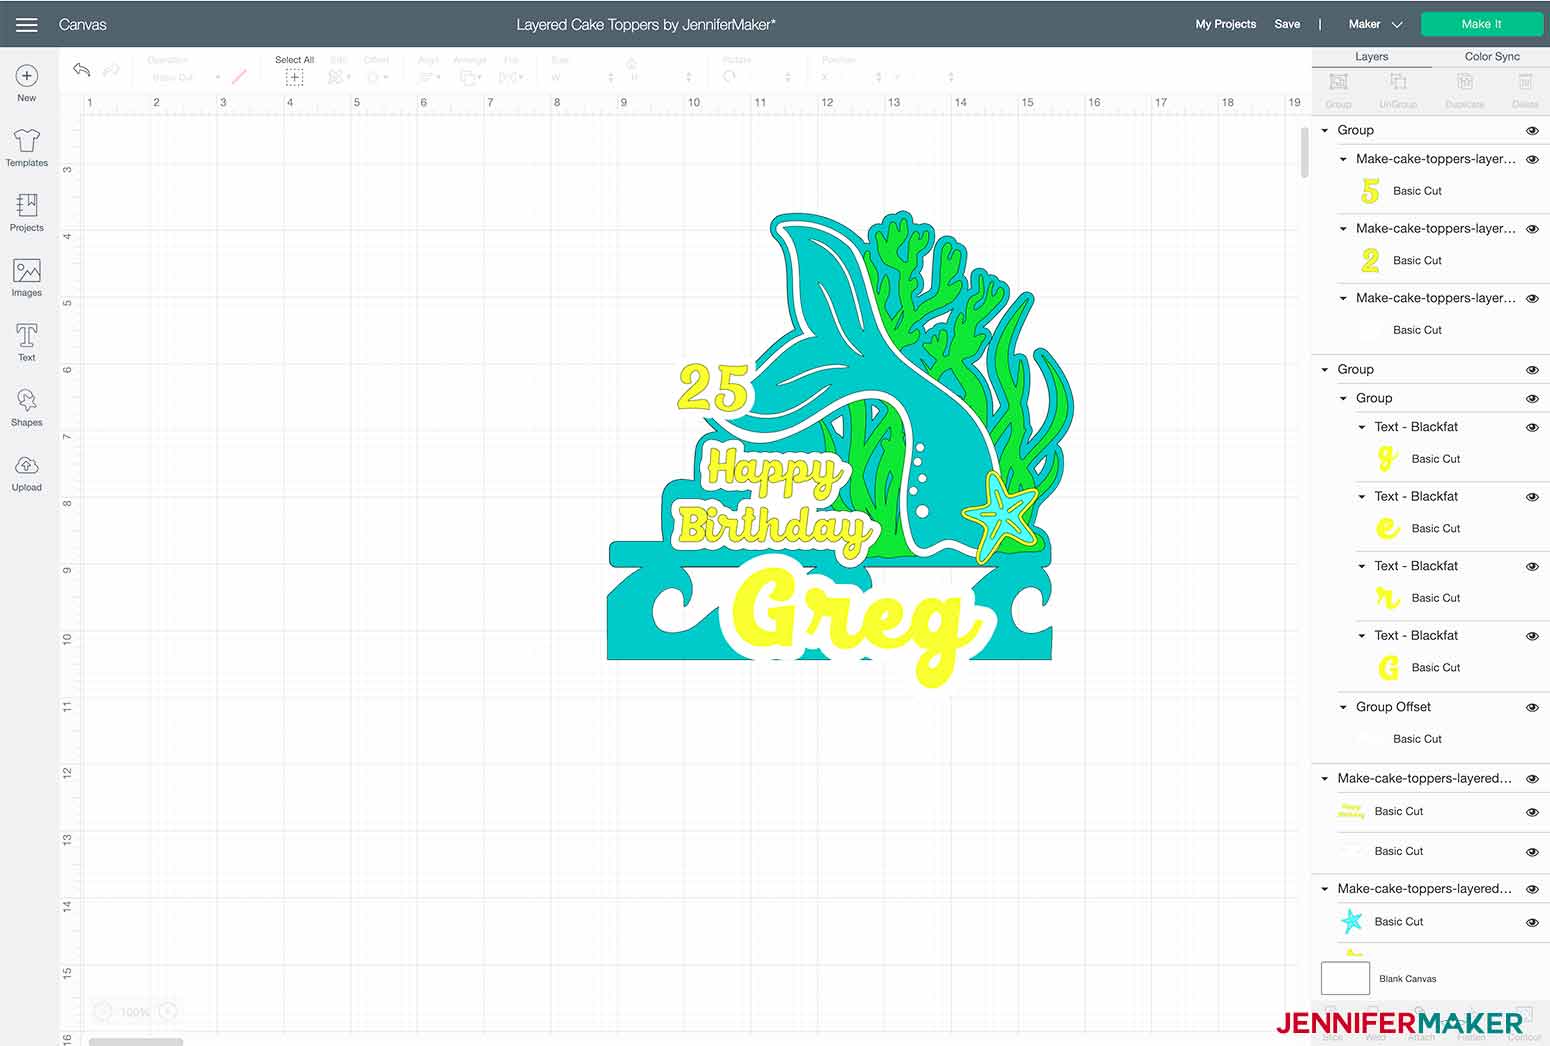
To add the celebrants age, I ungrouped the number set provided in the design and selected the number(s) needed. Delete or hide the remaining numbers from the design before cutting. Follow the same process from above to create an offset, set the offset color, align and size to put in place.
TIP: If you are using more than one number, group those numbers together before creating your offset so that your offset will be based on the set of numbers and not each individual number.
Once the design is ready to cut, and you have decided on paper colors, the fun begins.
STEP 3: CUT YOUR CAKE TOPPER LAYERS ON YOUR CRICUT
Now that I have all my edits completed, I am ready to click the "Make It" button in the upper right hand corner of Design Space.
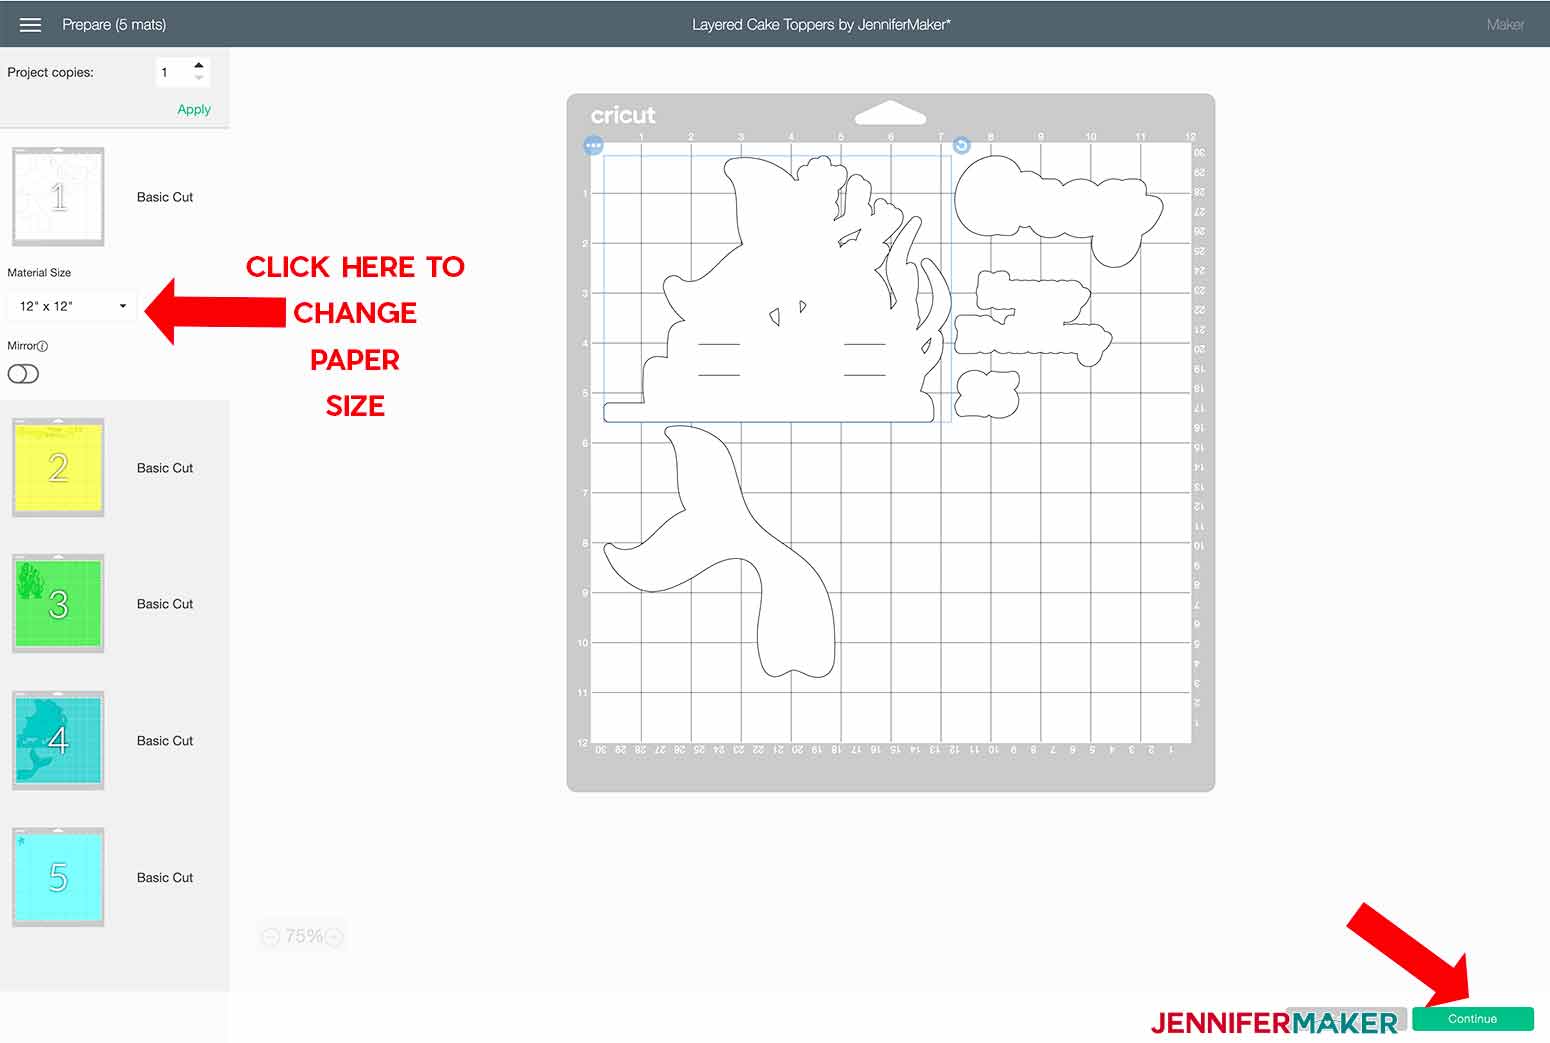
On the Preview screen, make sure to select the correct size of paper you are using on each mat so that your design cuts properly and and nothing gets cut off. Click the Continue button.
Next, make sure you have the right cutting machine selected and choose the Base Material setting needed for the material you have chosen. I used 65 lb. cardstock for most of my cuts so I used the Light Cardstock setting. Medium Cardstock would also work here. However, when I cut the glitter cardstock I used the Glitter Cardstock setting for my Base Material.

I always select "More" Pressure to assure my cuts are nice and clean.
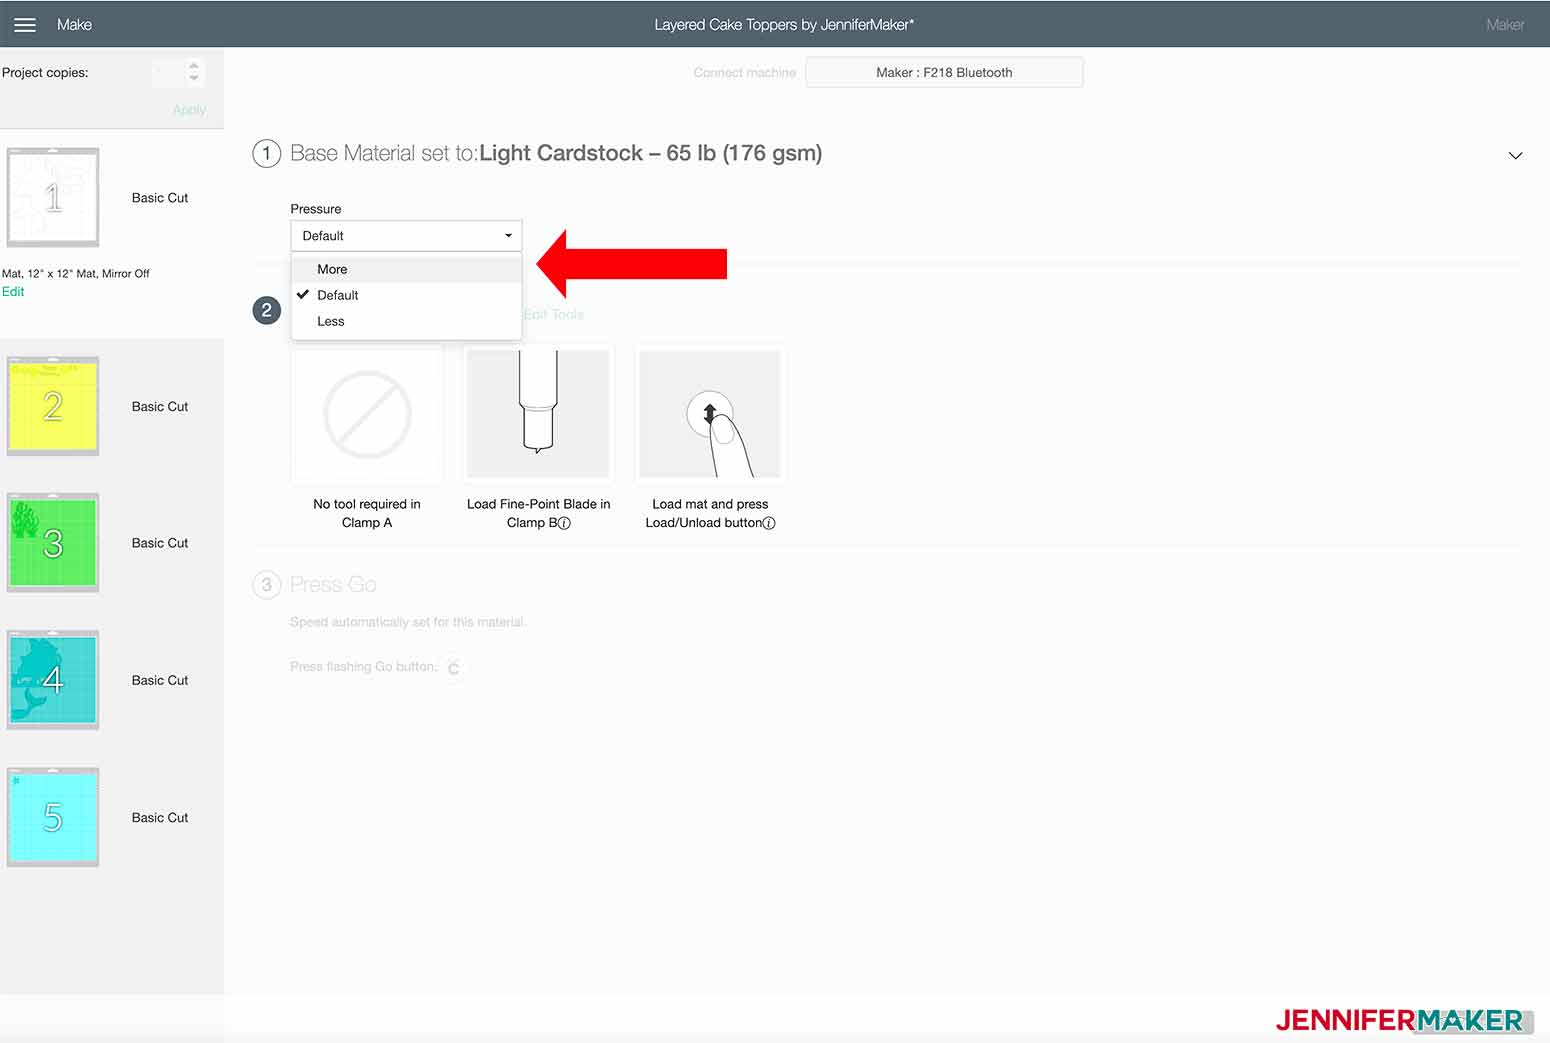
Load the mat into your machine and press the flashing button to cut your design.
STEP 4: ASSEMBLE YOUR LAYERED CAKE TOPPER
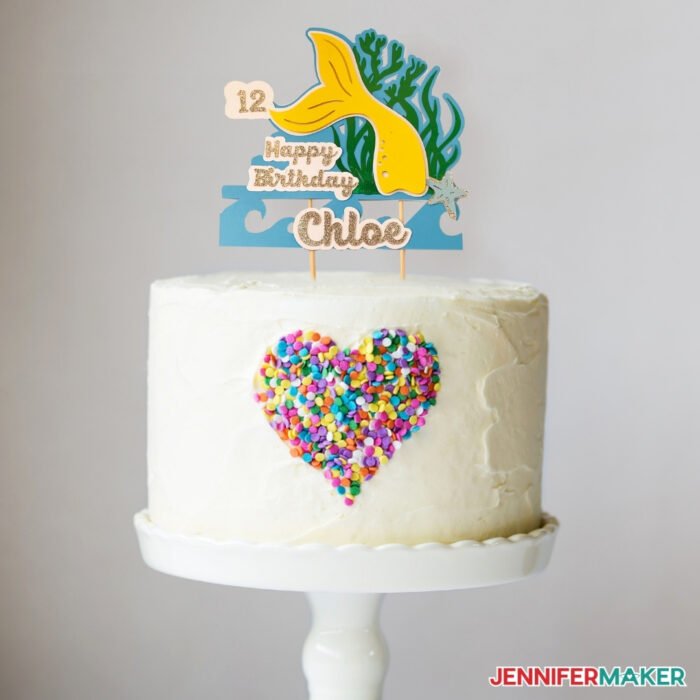
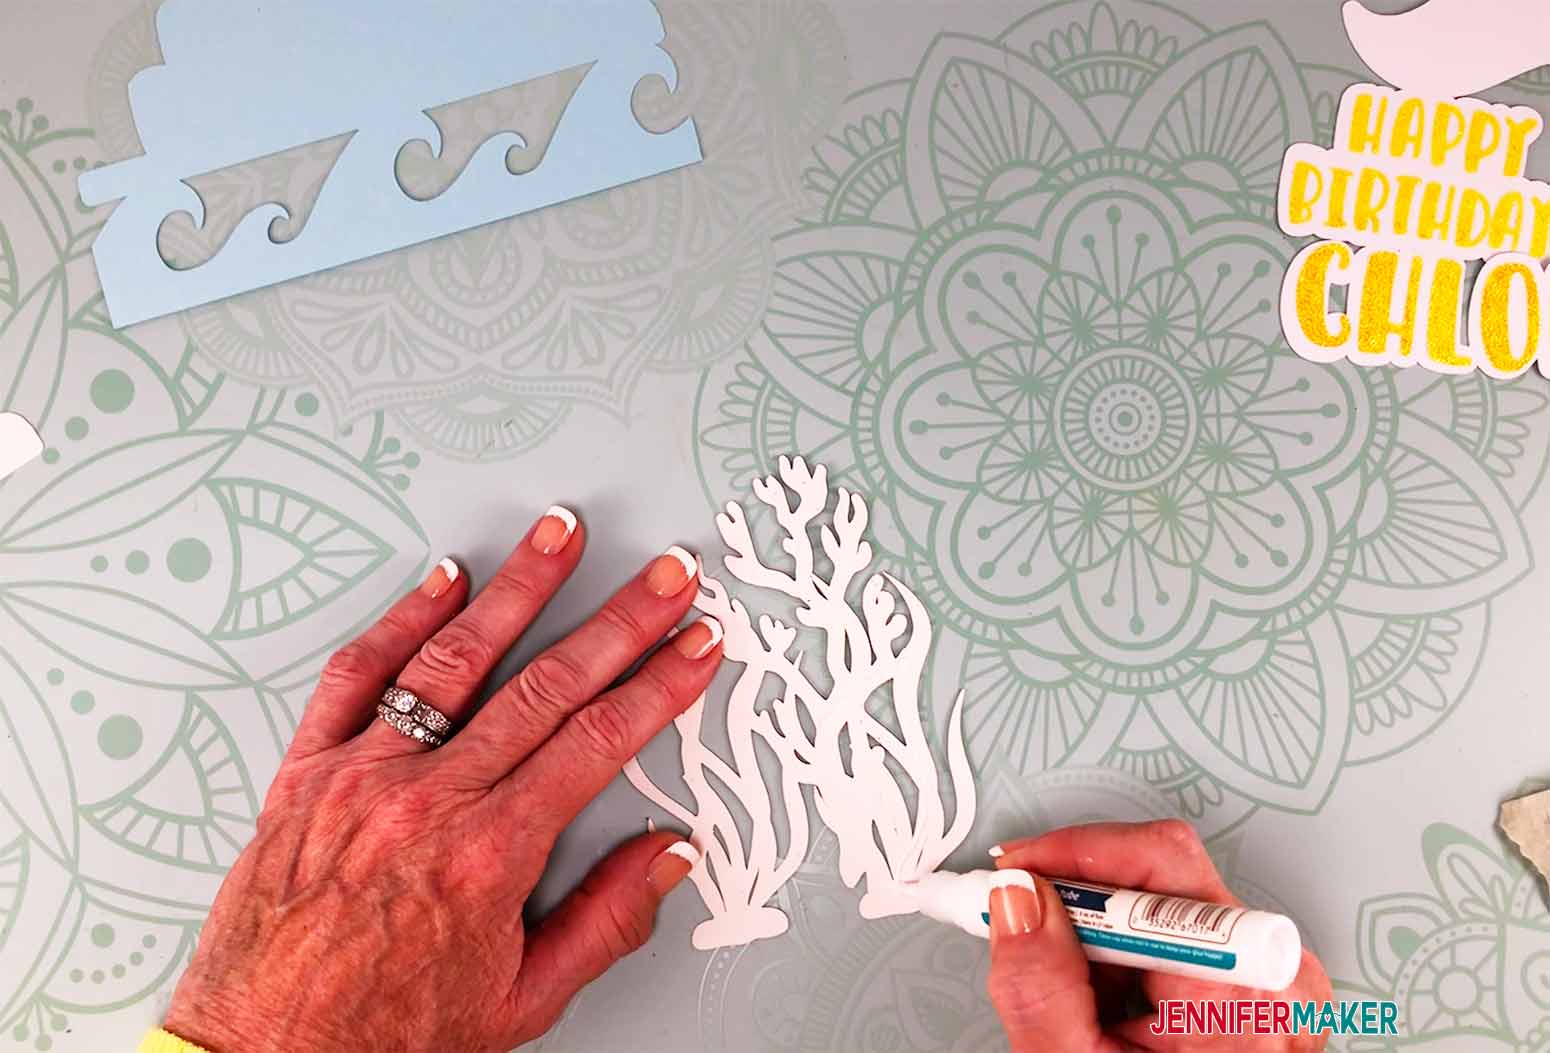
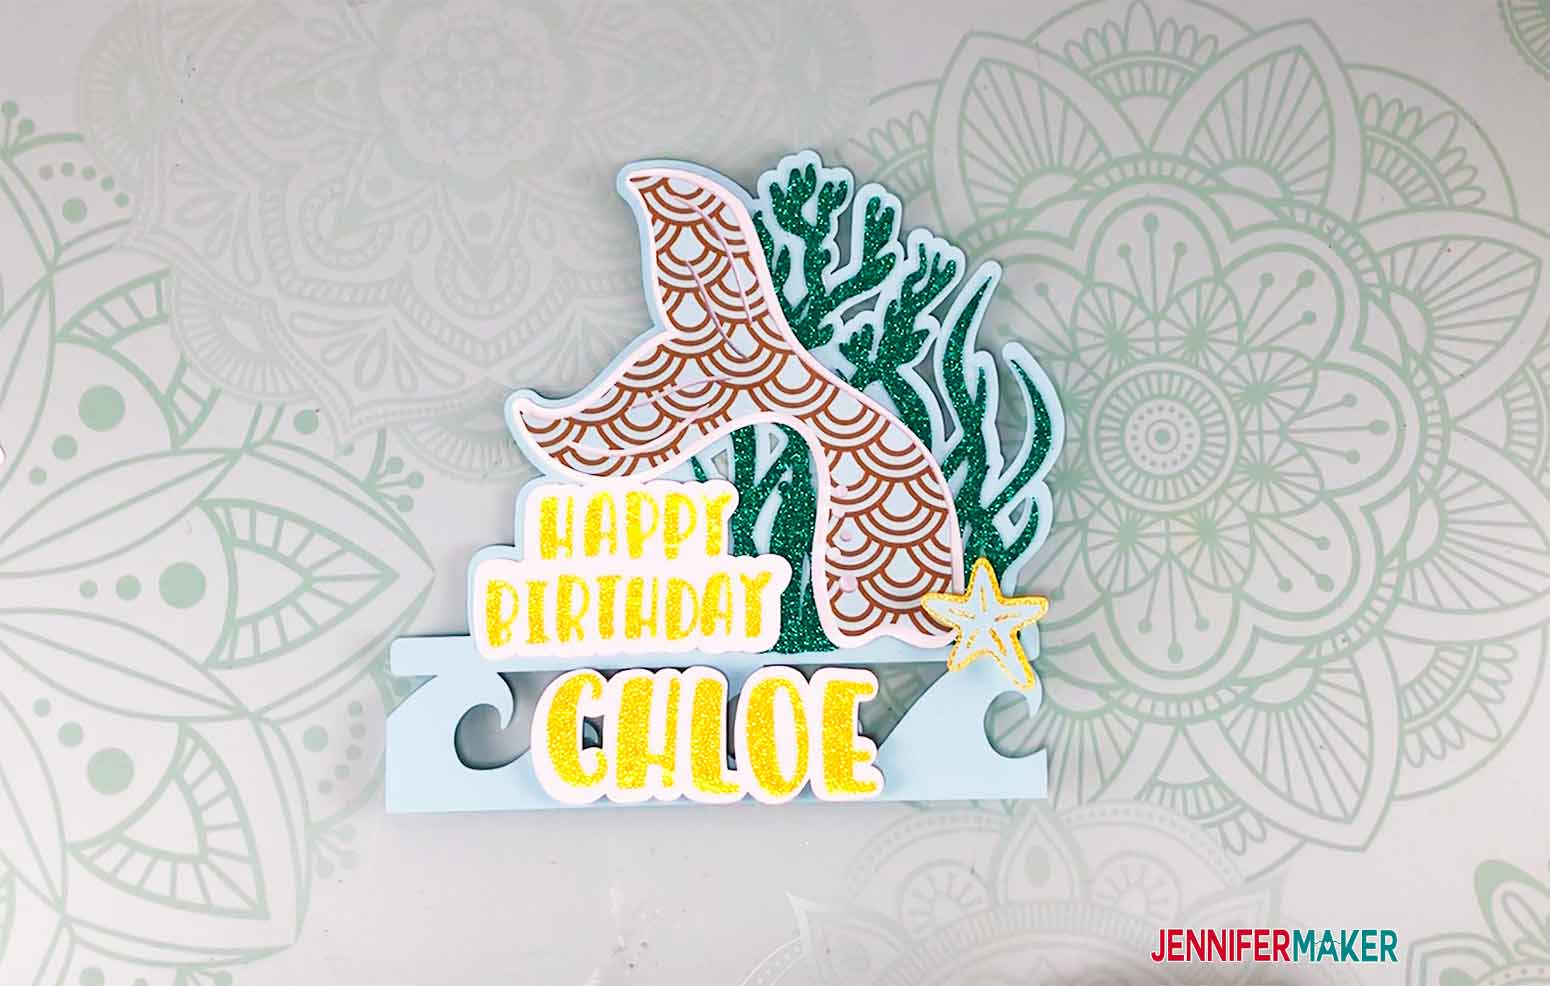
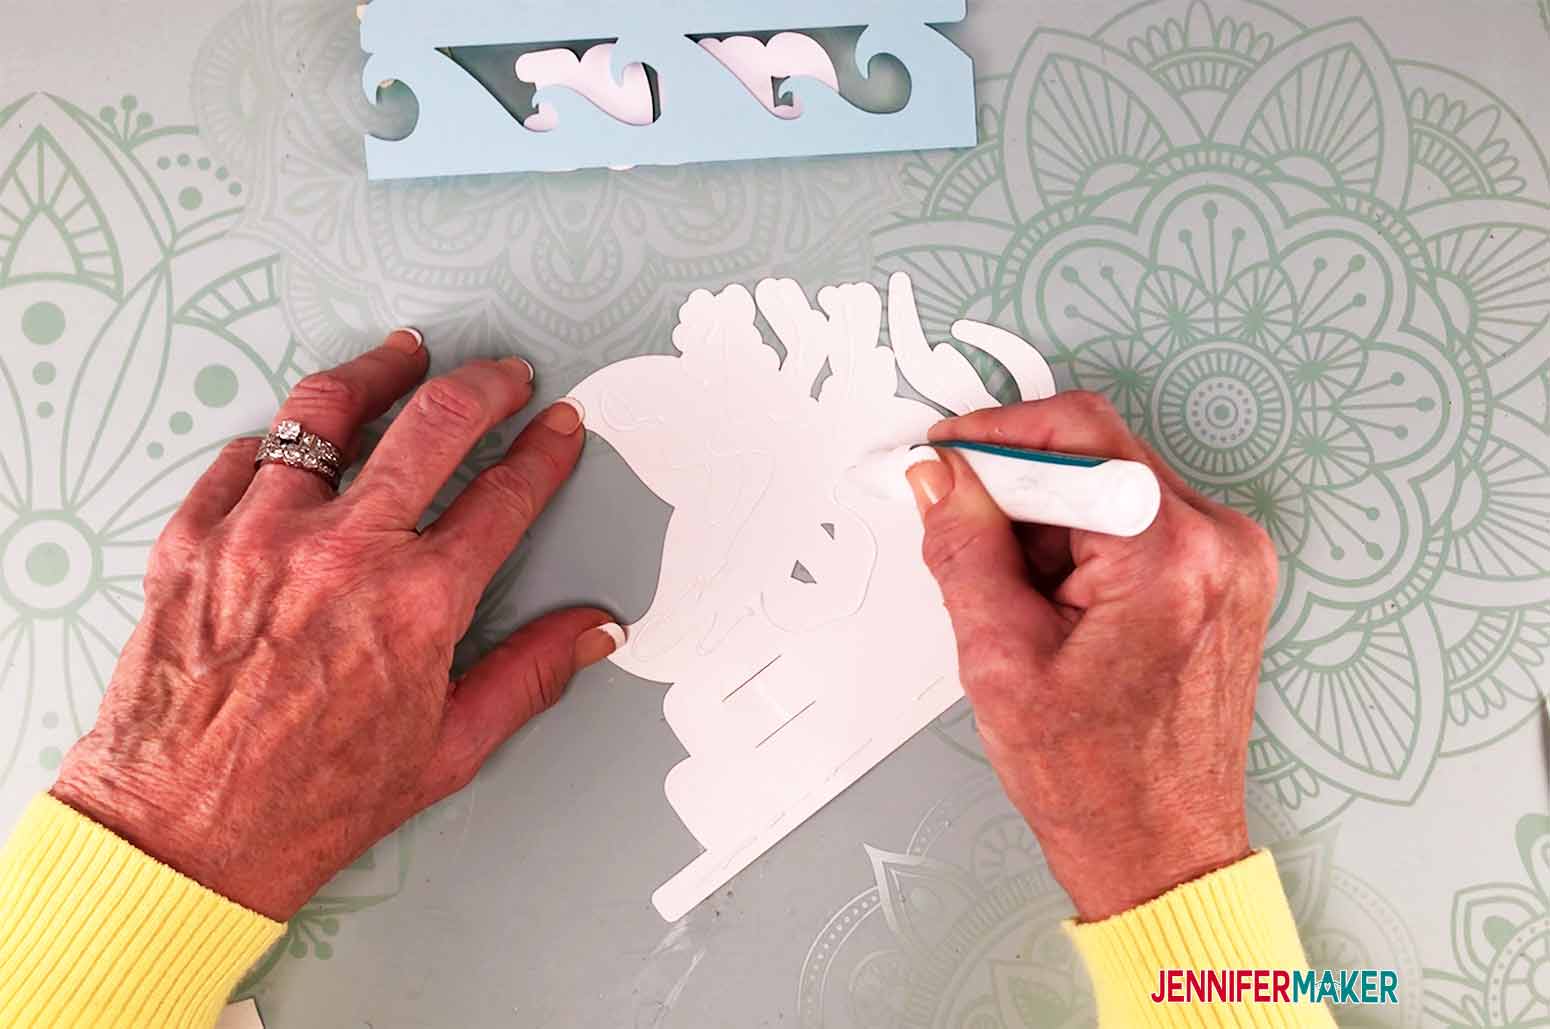
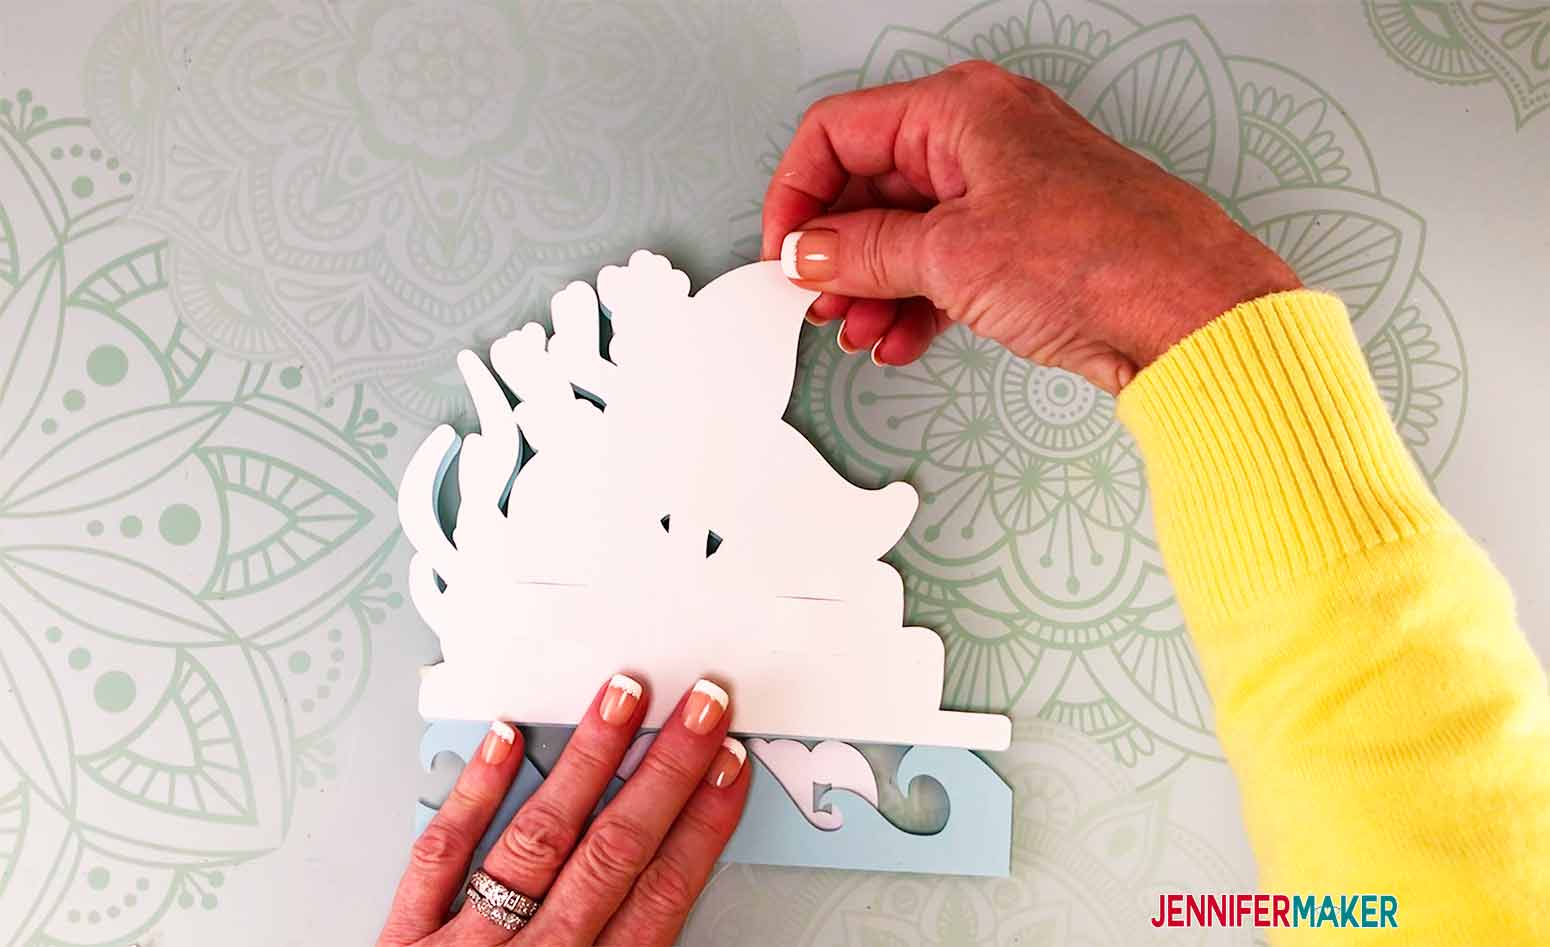
For the Mermaid Layered Cake topper, I first assembled the seaweed onto the solid background (not the backer layer with the cuts for the skewer). Apply glue sparingly onto the seaweed and place onto the background, leaving a bit of a border around the seaweed.
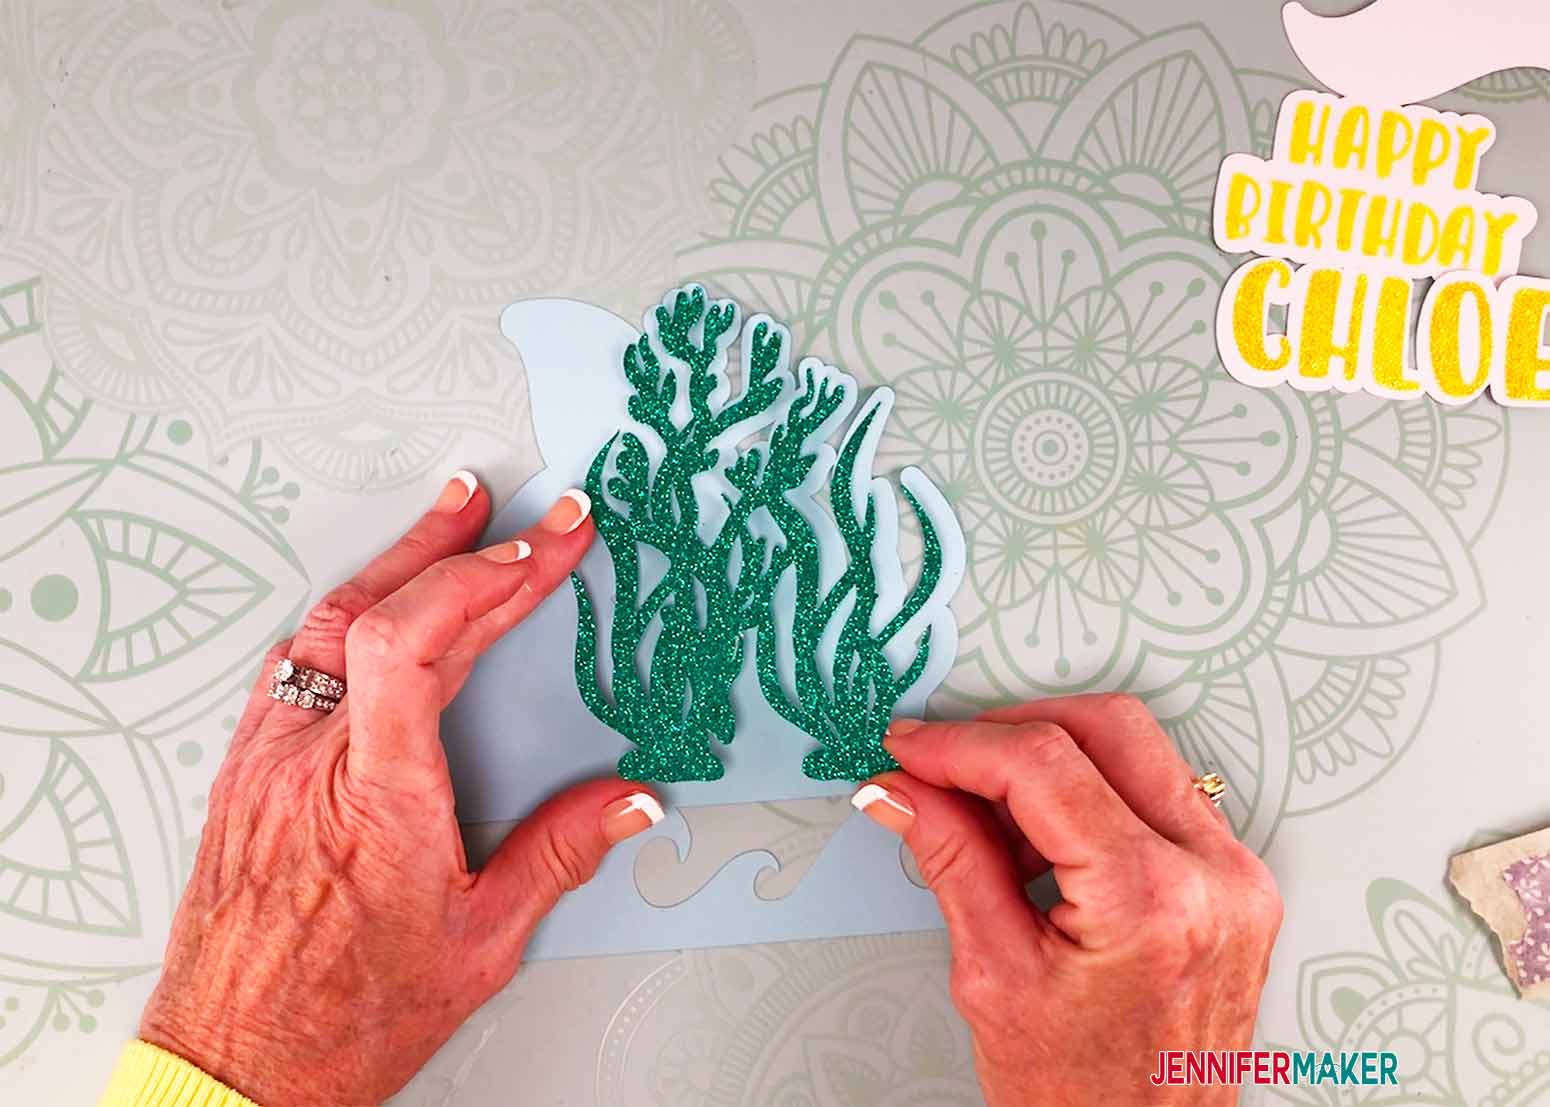
Next I applied the white layer for the tail over the top of the seaweed, again leaving a bit of the background border around the tail. I then applied a small amount of glue to my Happy Birthday lettering, applied the lettering to its offset and glued the pieces to the solid background as well. I also glued my celebrants name to its offset and set it aside for attachment later.
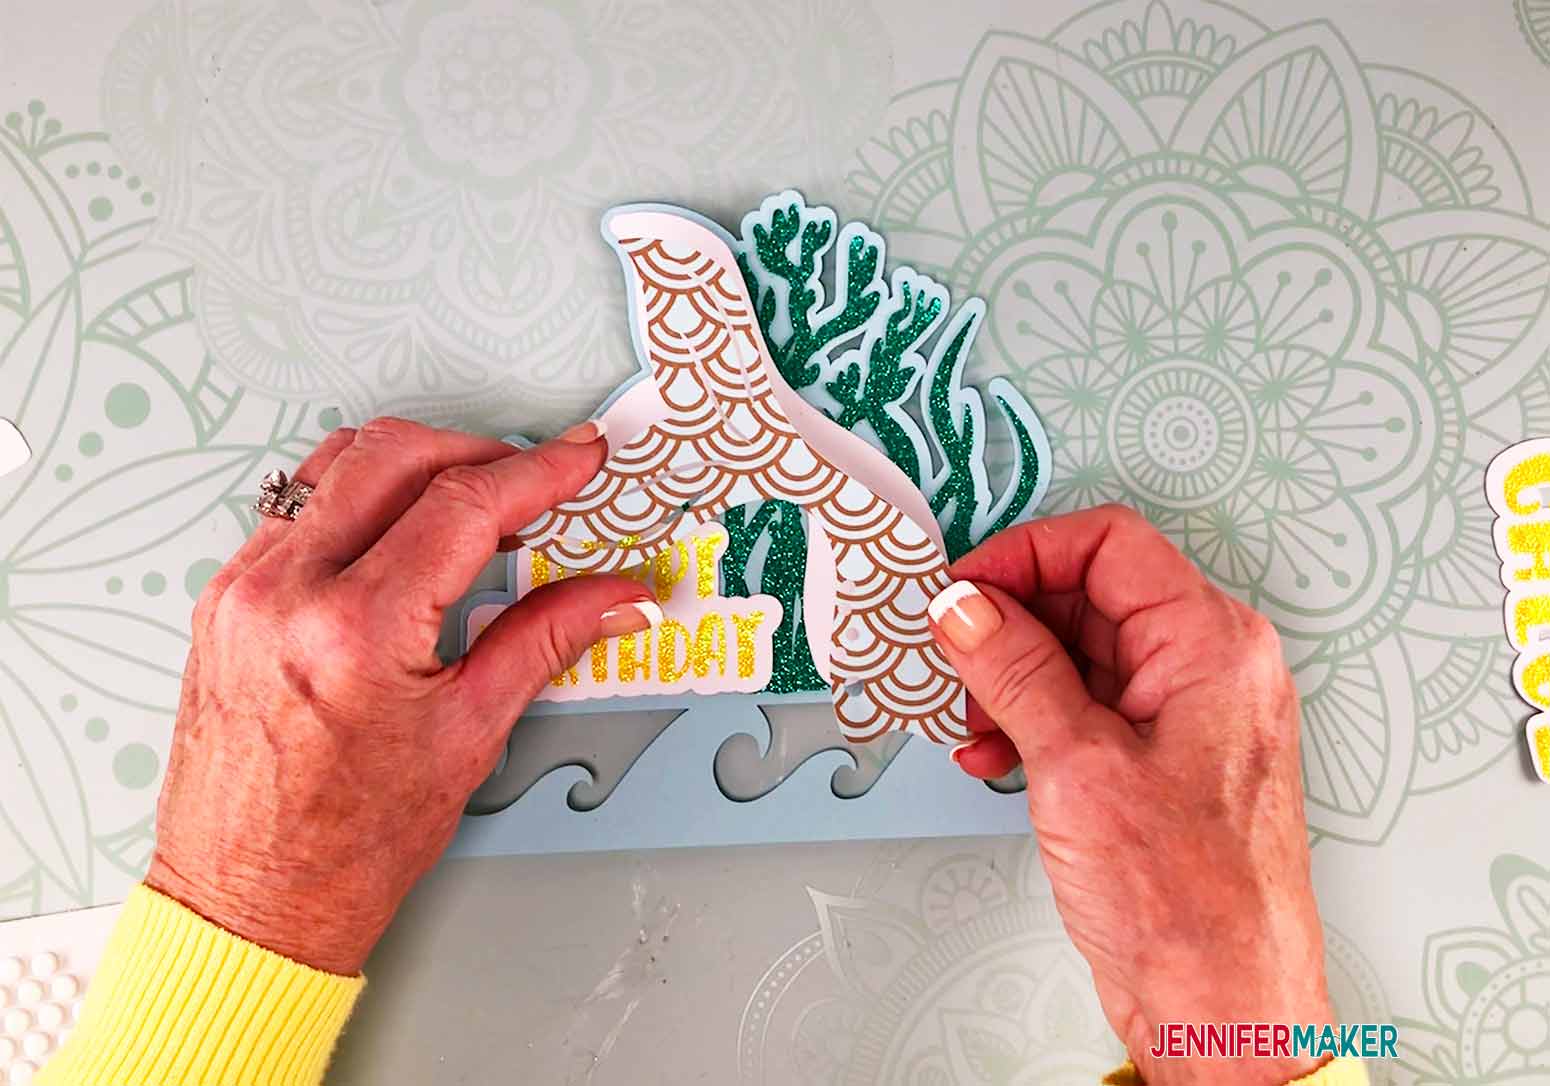
I applied the patterned layer of the tail to the topper using foam dots to give the topper some dimension. Place the foam dots on the back of the tail, remove the paper backing from the foam dots and place the tail in place.
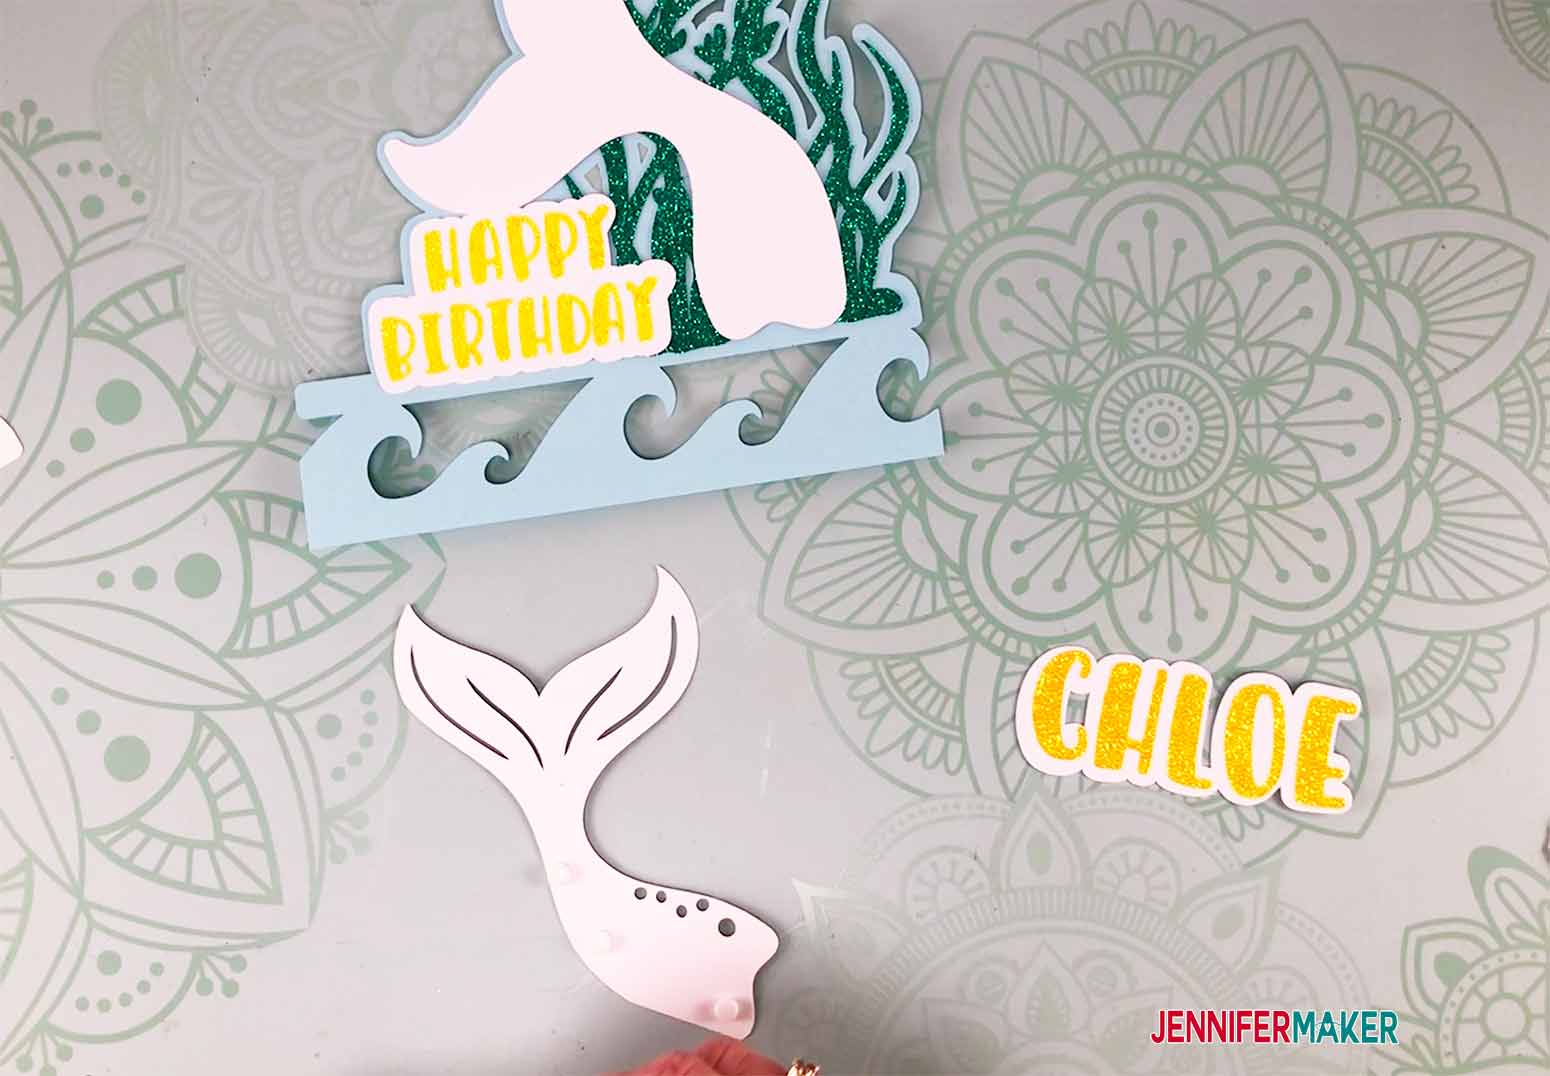
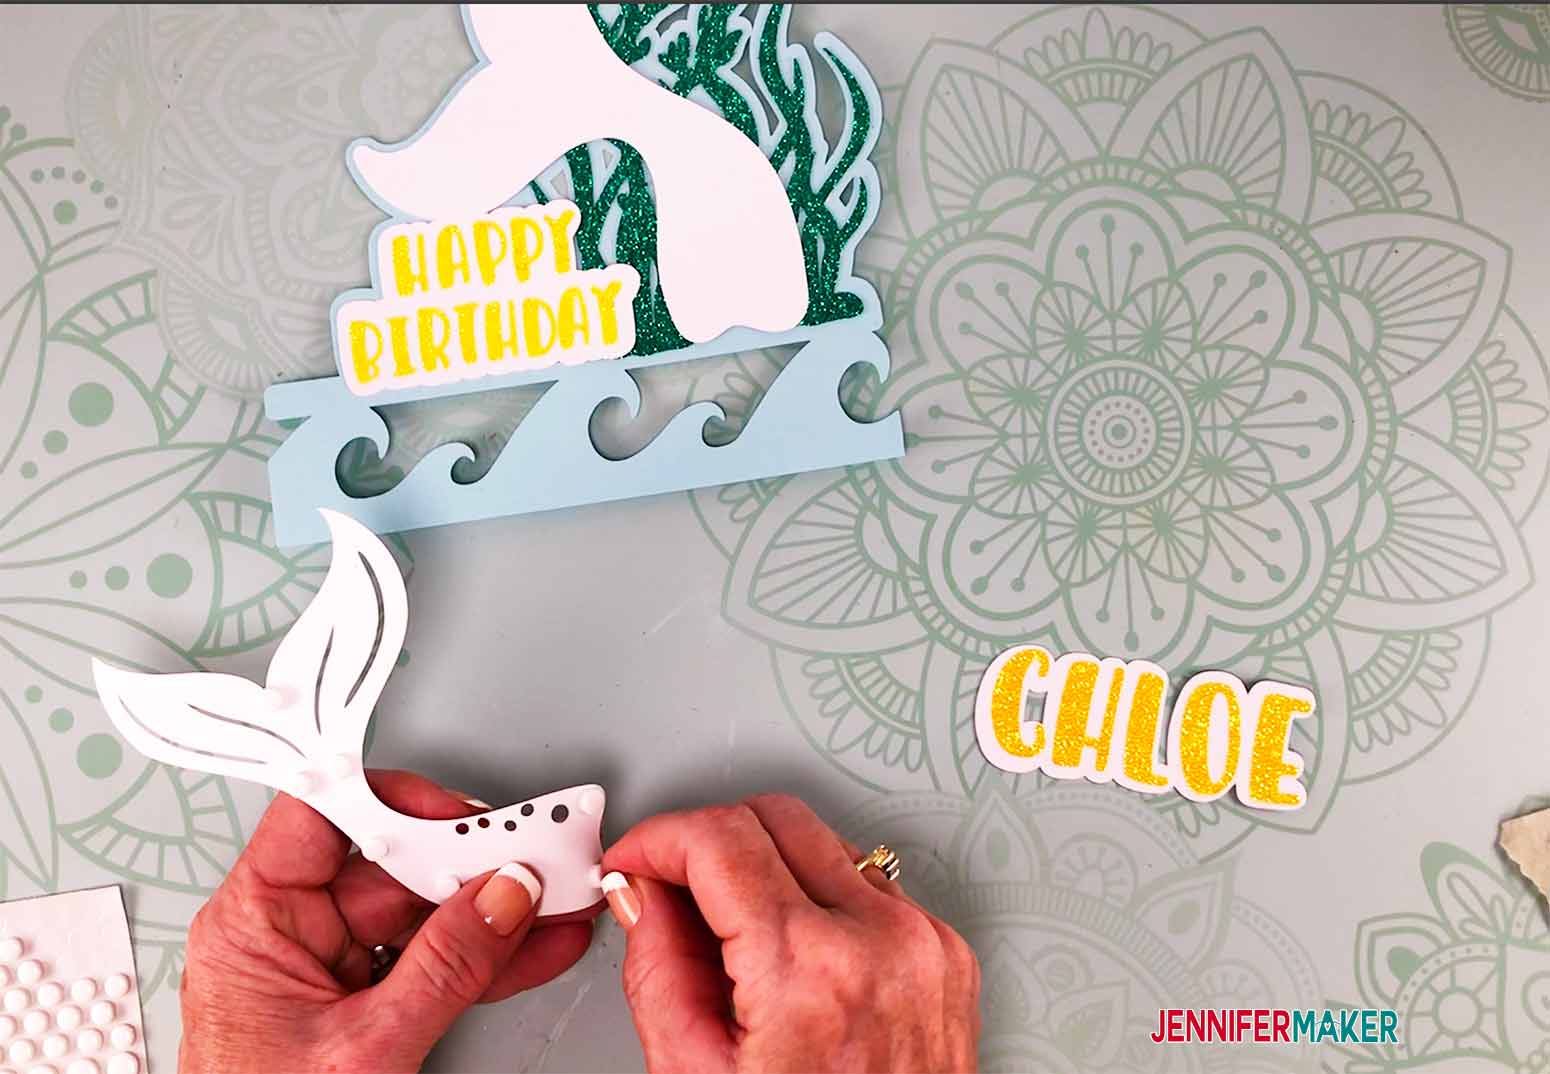
Once the tail is in place, I put the celebrants' name on the topper. Again, I used foam dots on the back of the offset to make it pop off the topper. Apply the foam dots as before, remove the paper backing from the dots and center the celebrants' name on the wave part of the topper.

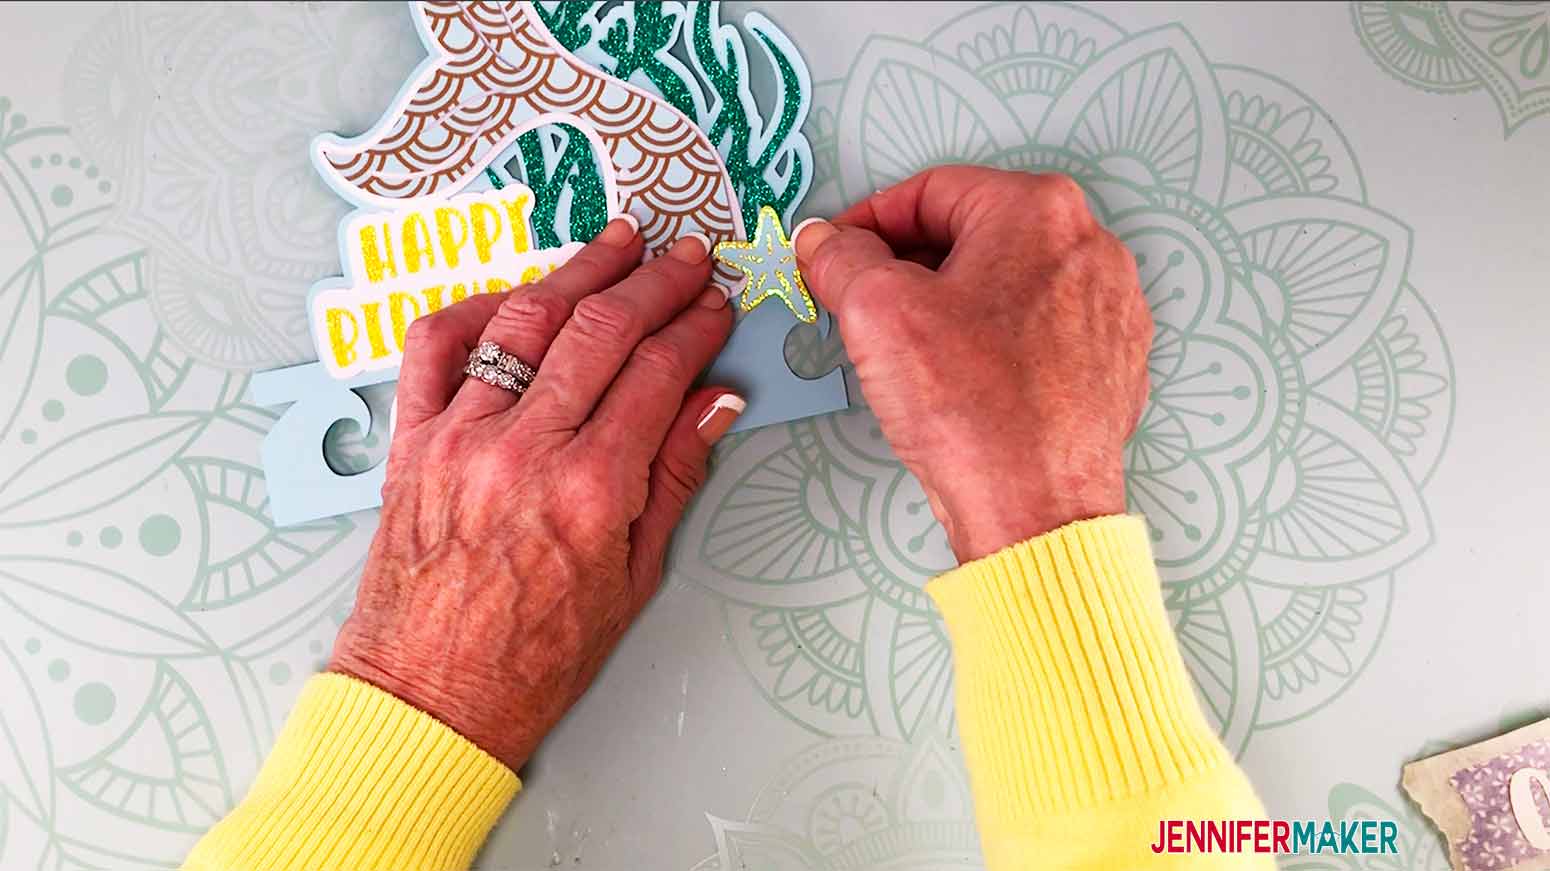
The last piece I added to the front of the layered cake topper is the cute starfish. First glue the two layers together, then again use foam dots to apply it to the topper. I stacked two foam dots on top of each other for the starfish, as it needed some extra height to rise above the mermaid tail.
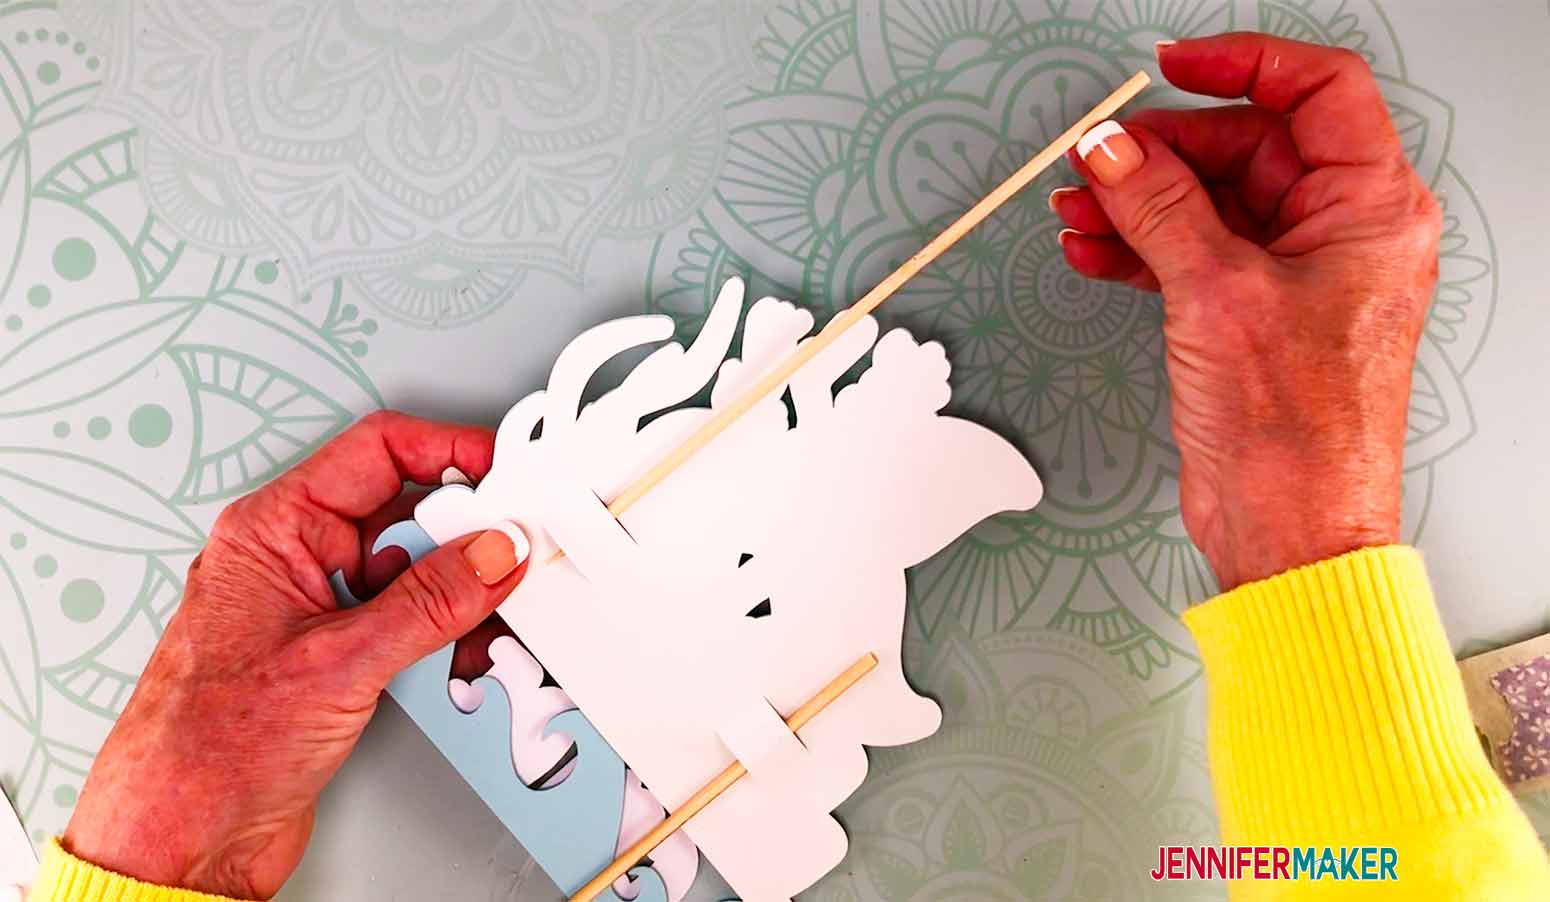
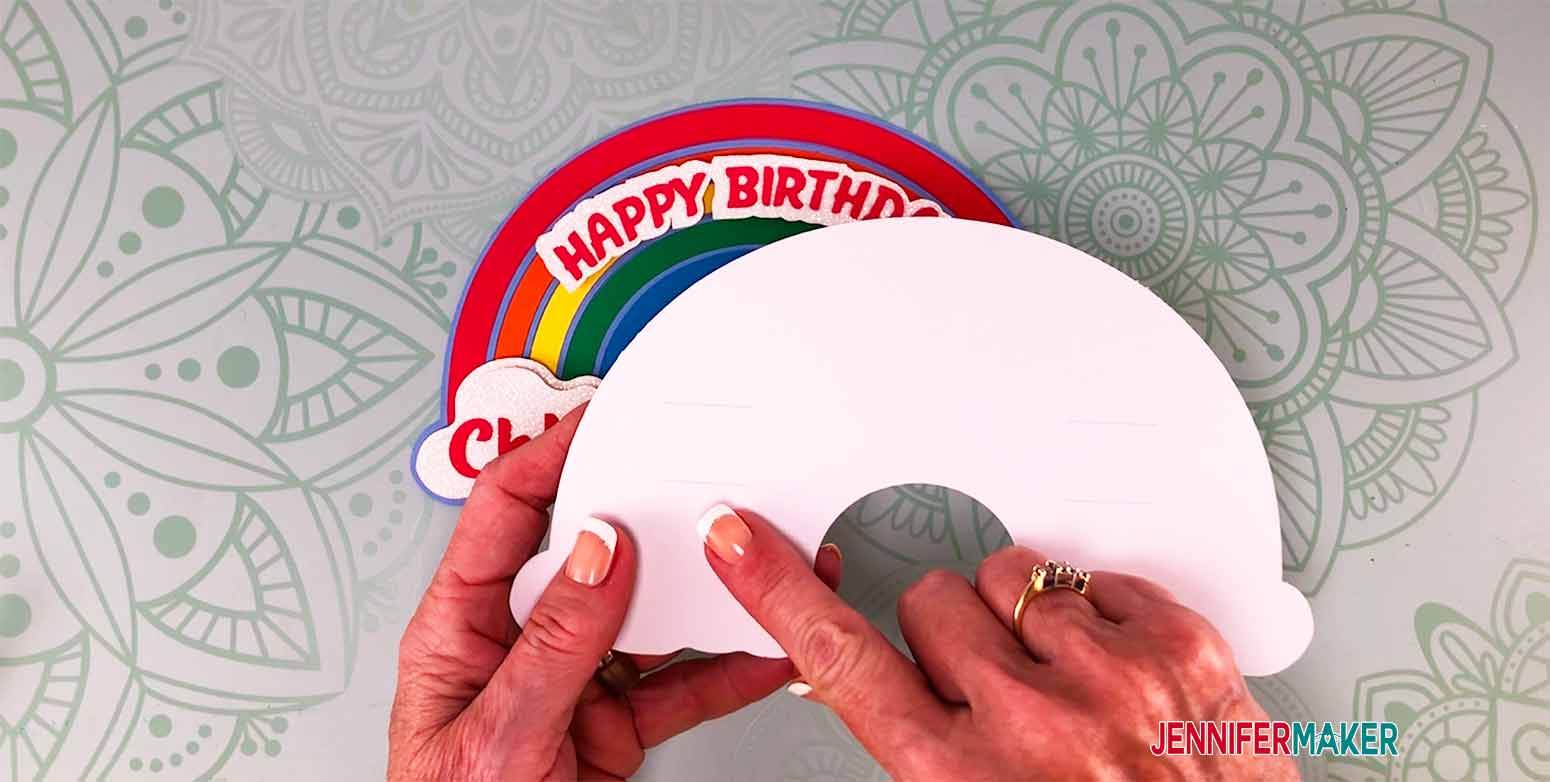
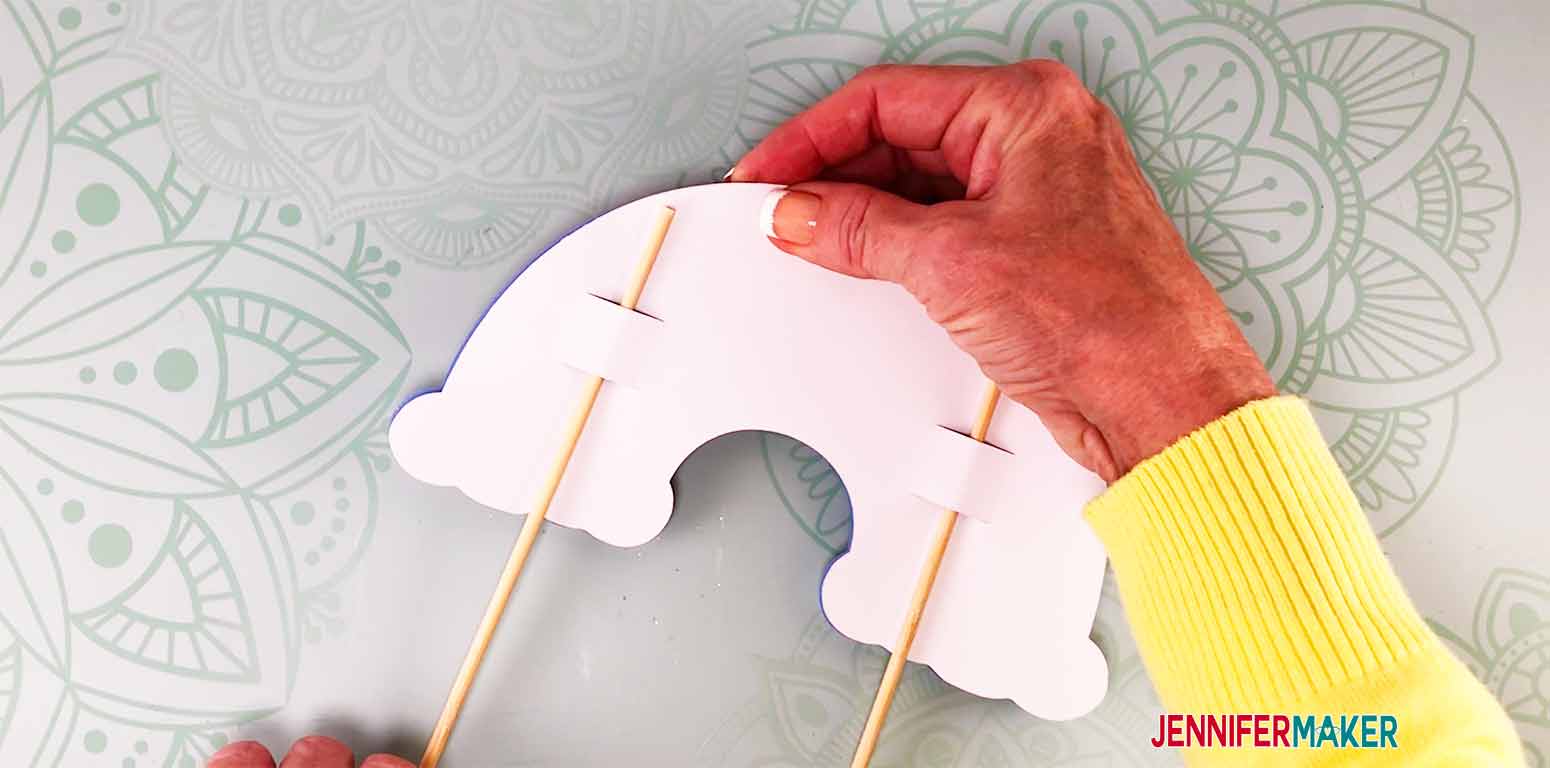
This topper is almost complete! The last thing to do is to put the backer onto the topper. You will notice that the backer has some horizontal cuts on each side of it. These are for the skewers to slide through. Apply glue to the backer, being careful to glue around these cuts. You want them to be free so you can easily slide the skewers into the back once it is glued in place. Place the backer piece in place pressing it down well. Once the glue has dried well enough, slide the skewers into their slots. I didn't glue the skewers in place at this point because I wanted the freedom to be able to adjust the height of the topper once I placed it on the cake.
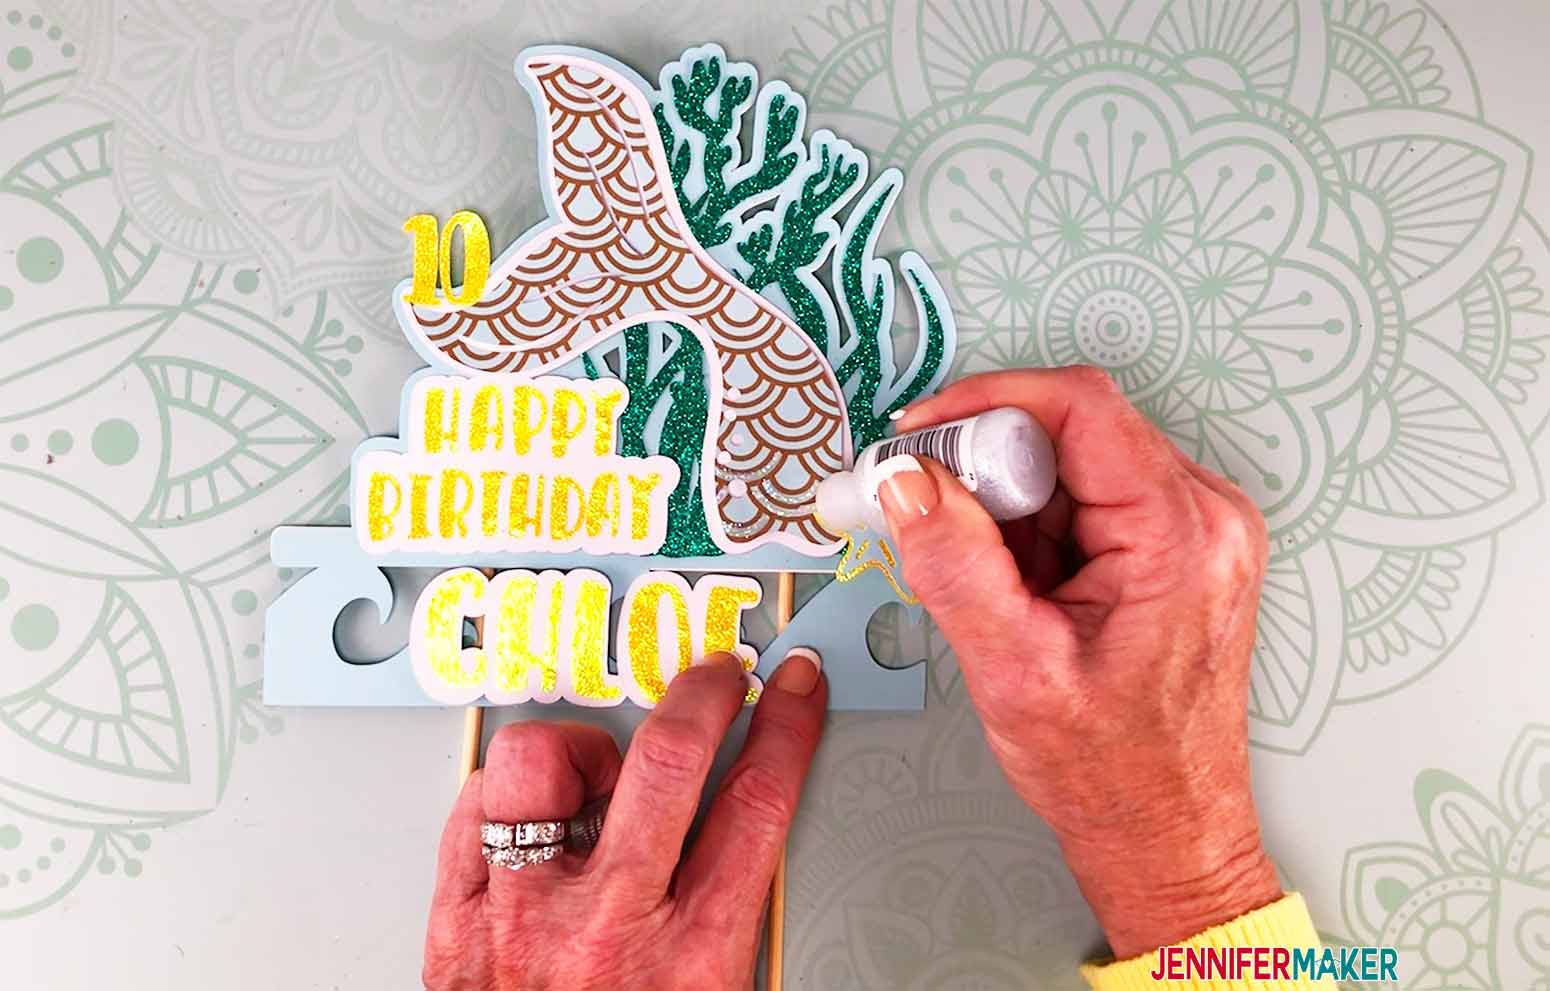
As an optional step, I added a little glitter glue to the mermaid tail, which was just the fun touch it needed. Also, I placed the celebrants' age, that I had created an offset for above, to the end of the mermaid tail. However, you may place that wherever you desire.
And look how cute!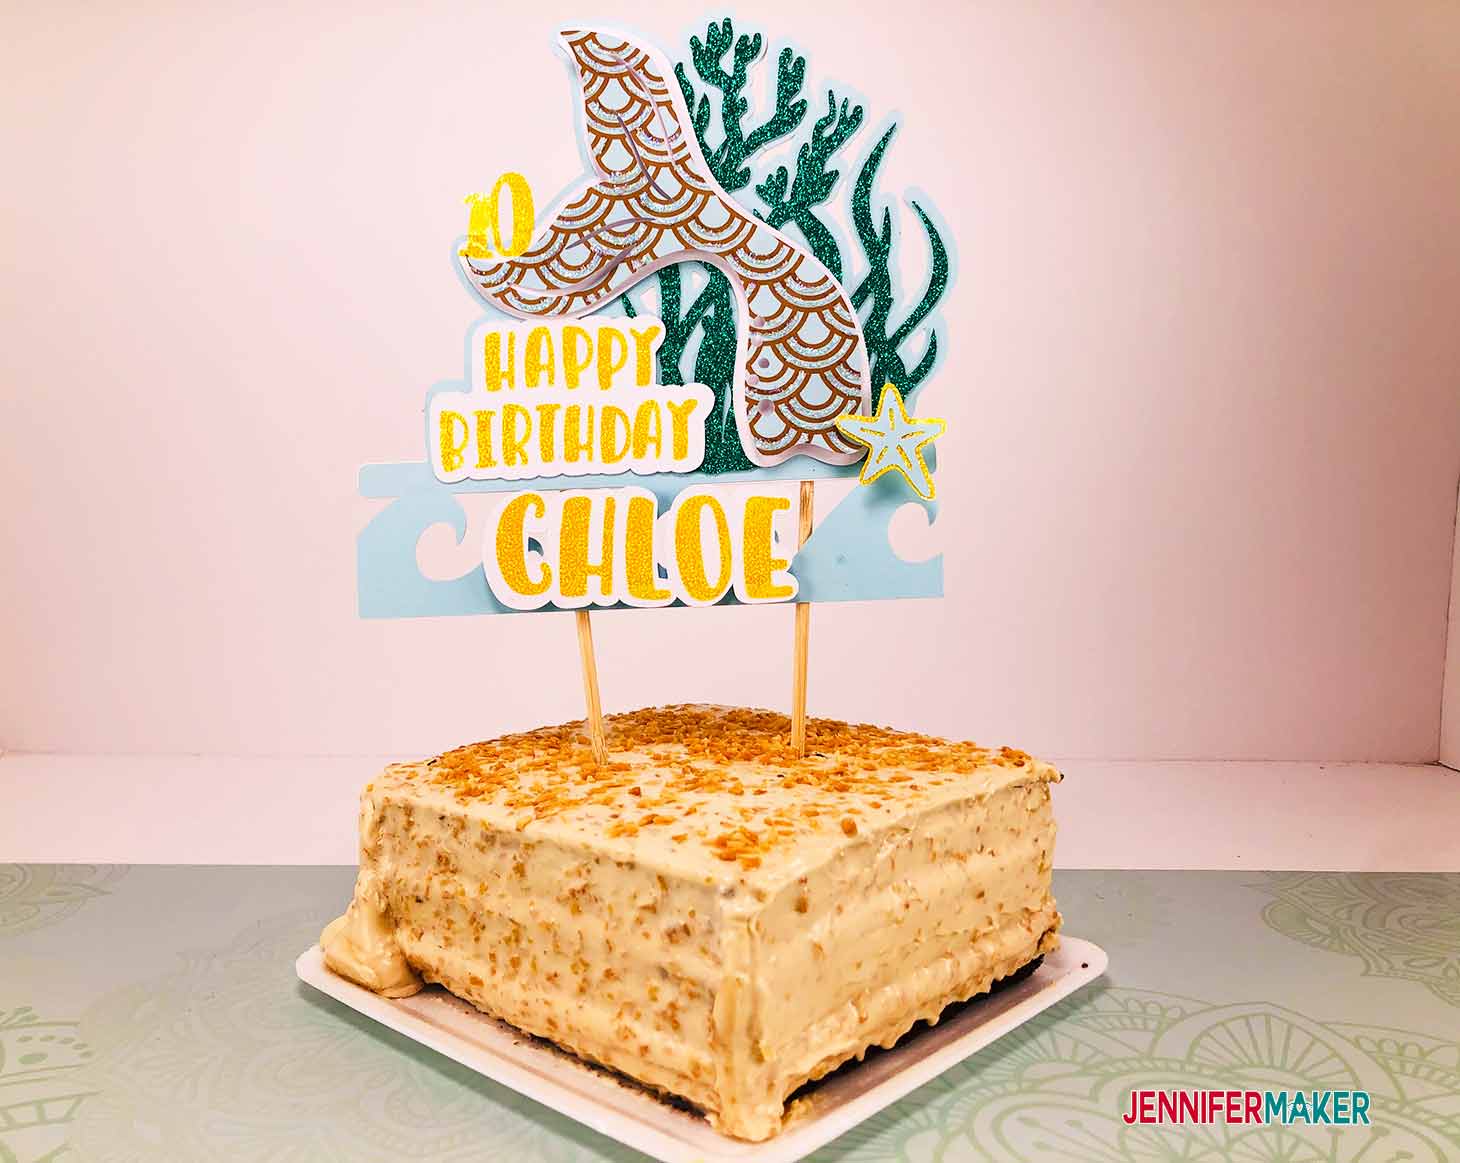
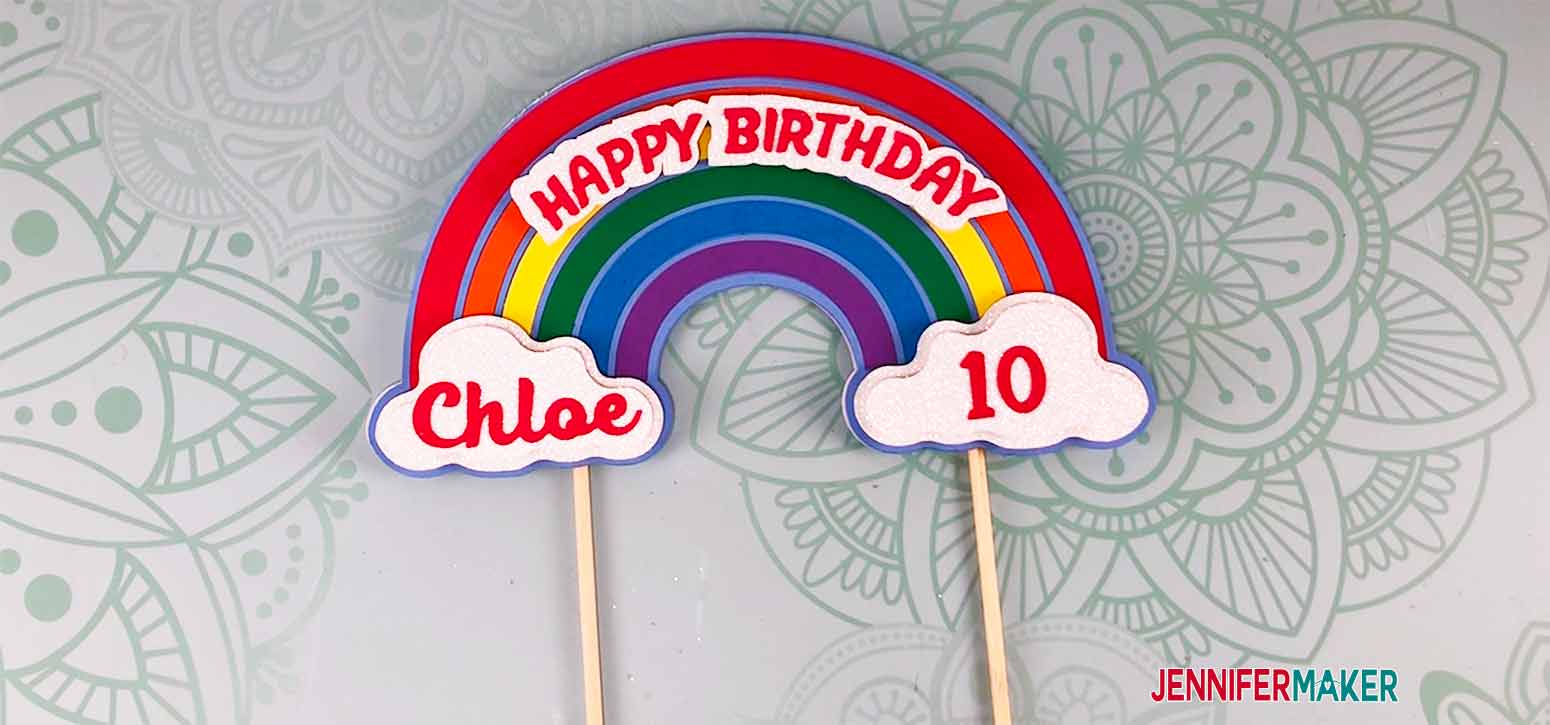
Next we'll assemble the Rainbow Layered Cake Topper. The preparation steps to cut it out are the same as the Mermaid Layered Cake Topper. I have sized this topper at about 8" wide x 4.50" high. If you choose to resize the design to meet your needs, you will want to do that now, before you ungroup the design. Otherwise, go ahead and ungroup the design as shown above.
You can now personalize your cake topper just like we did for the Mermaid Cake Topper Design.
Once you have all your edits completed, click the "Make It" button and follow the same process we did in Step 3.
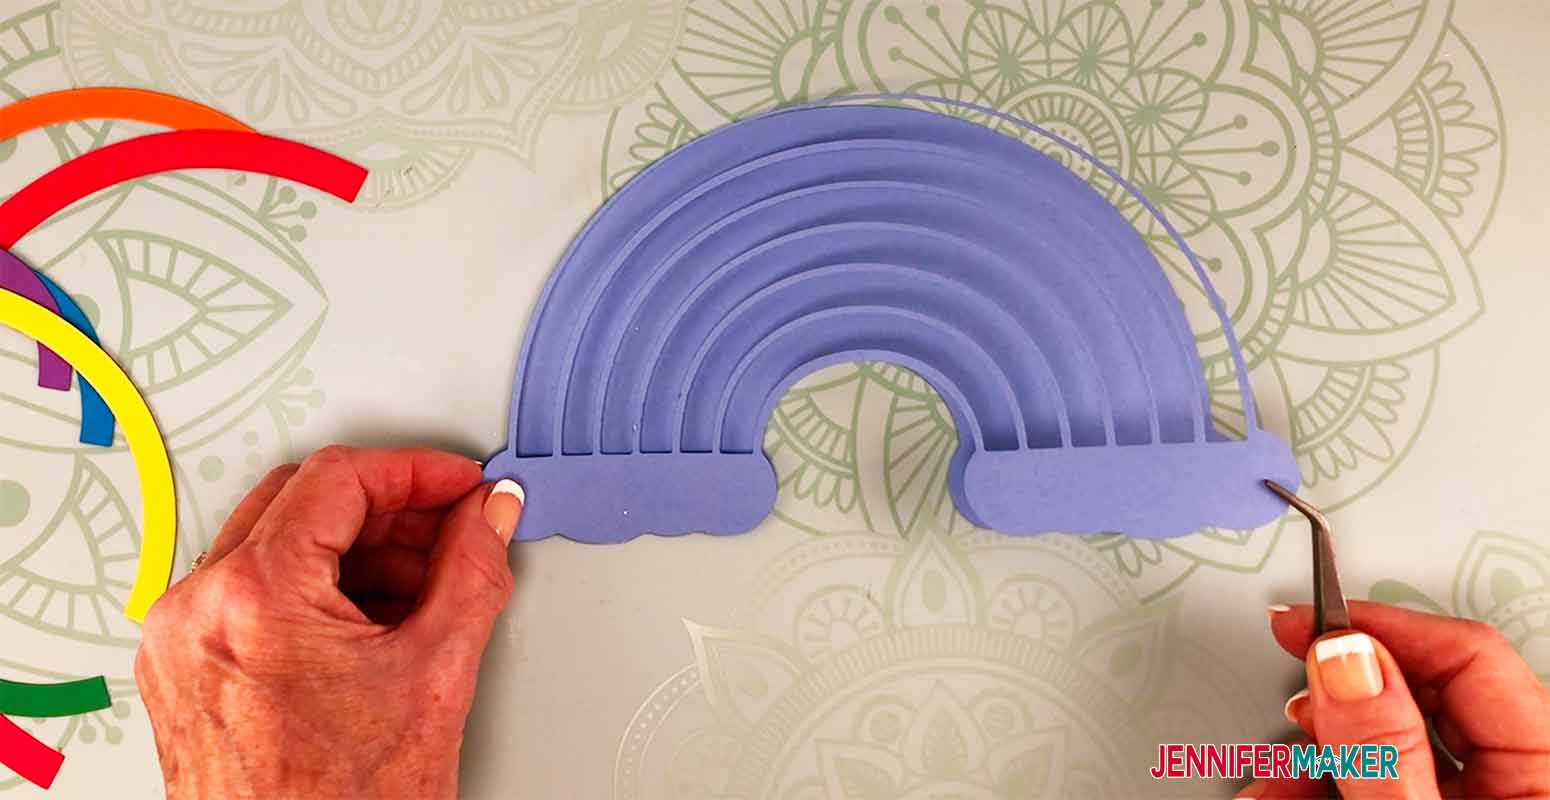
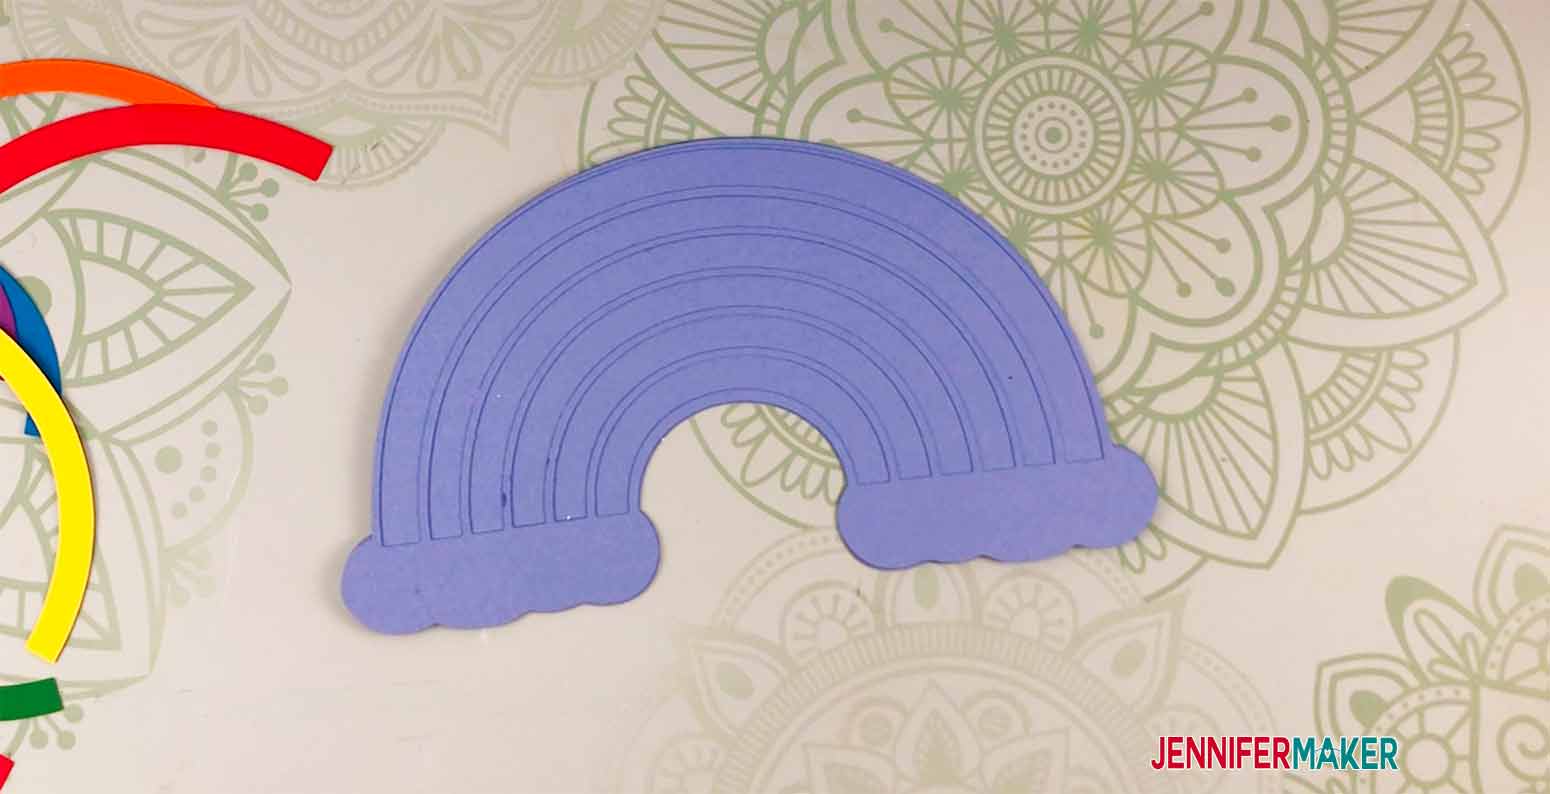
The first step in assembling the Rainbow topper is to glue the rainbow outline to its corresponding back.
TIP: It's a good idea to figure out which side of the outline piece gets the glue! I lined them up before applying glue to make sure I was putting the glue on the right side. I chose to use adhesive spray on my outline, however you can use any type of glue. 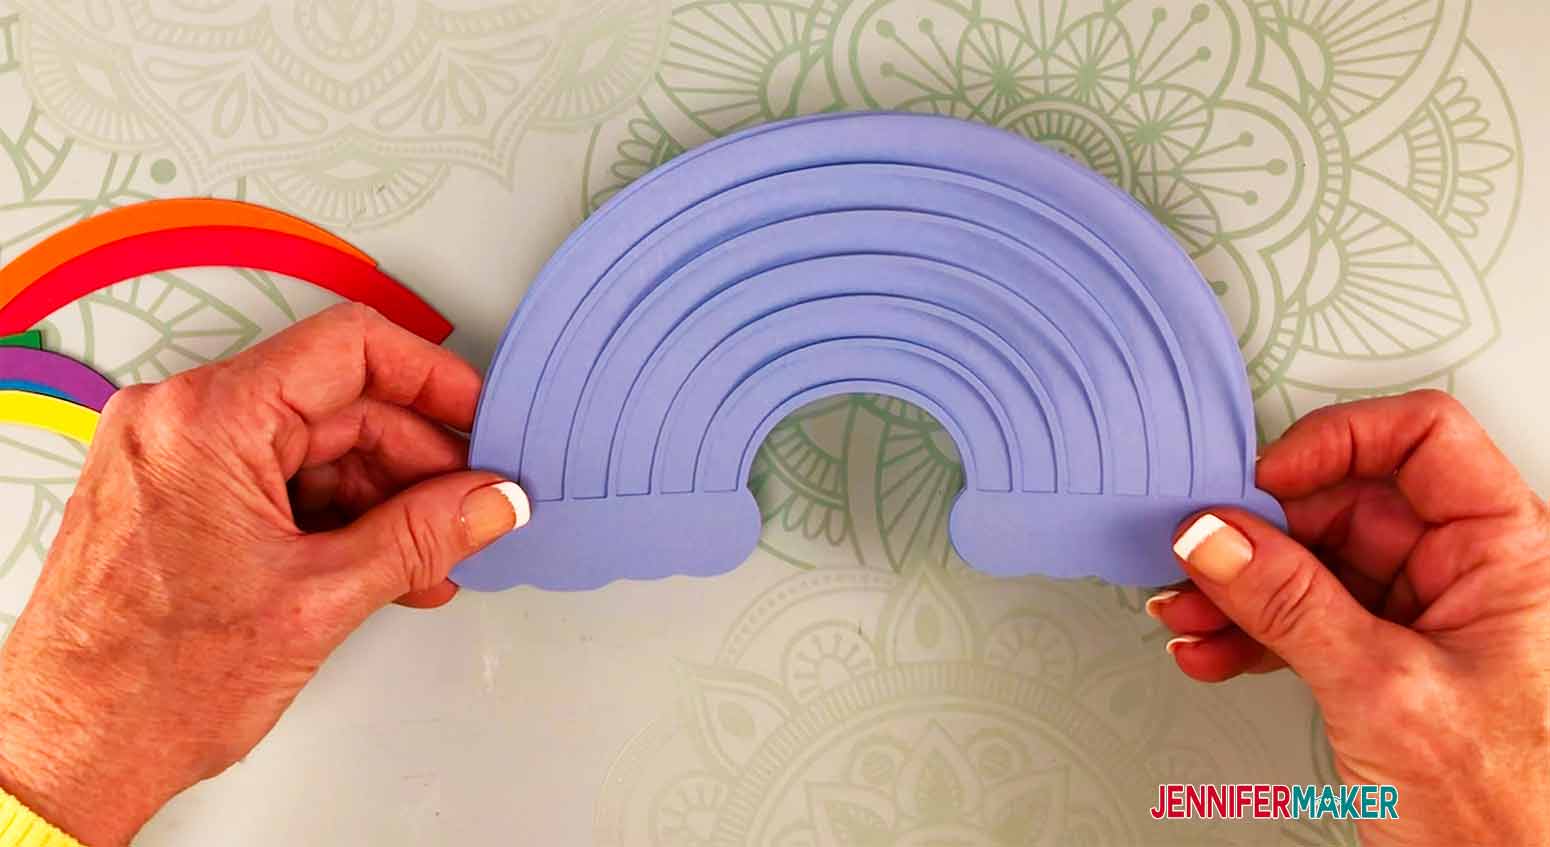
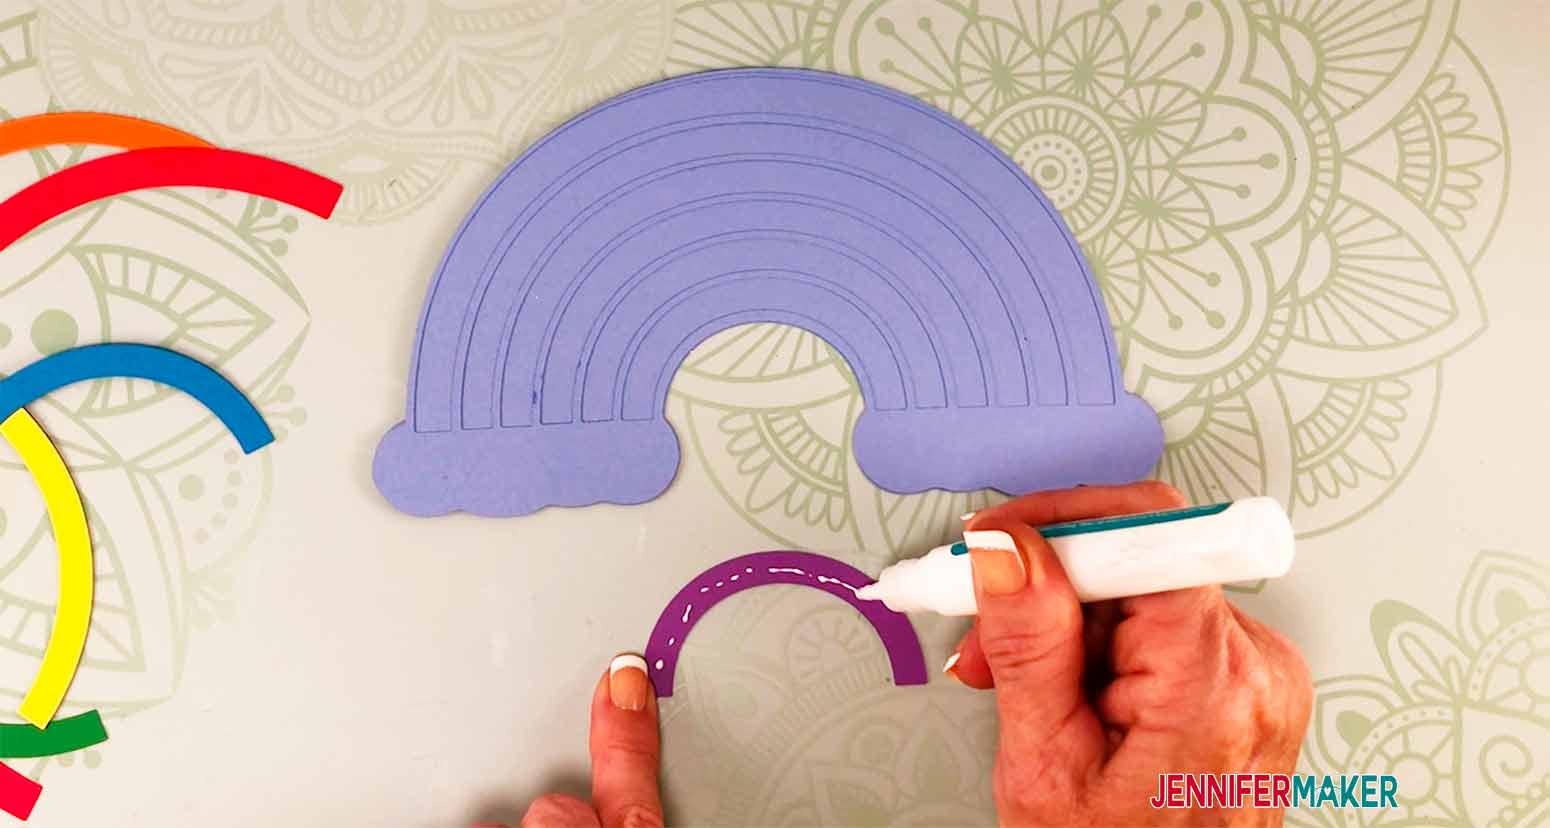
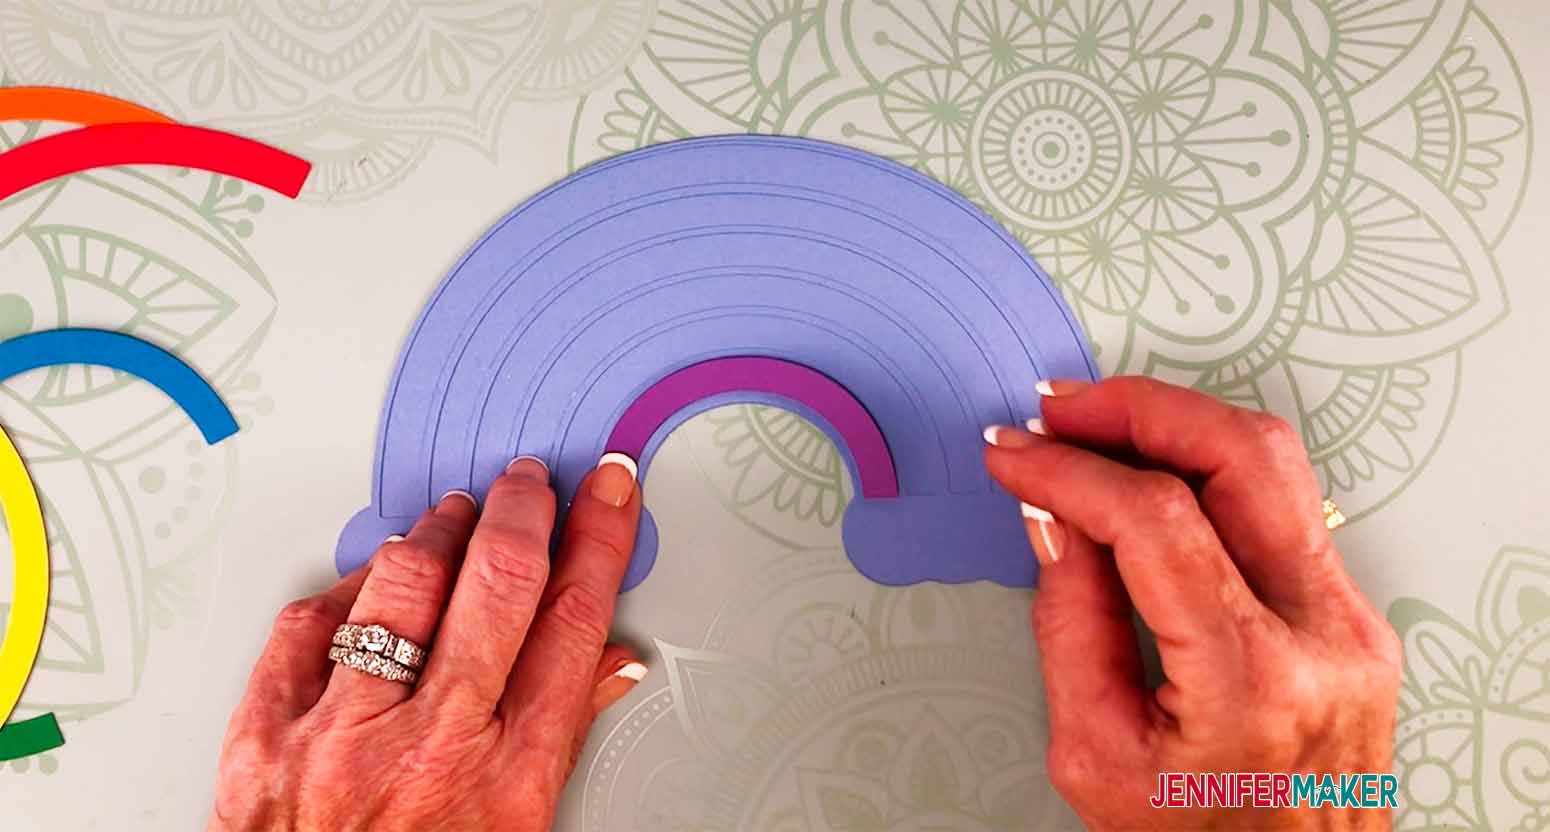
Now the fun begins! Add each rainbow color! It is just like putting together a puzzle. Apply glue sparingly to each rainbow piece and glue it into its place on the rainbow.
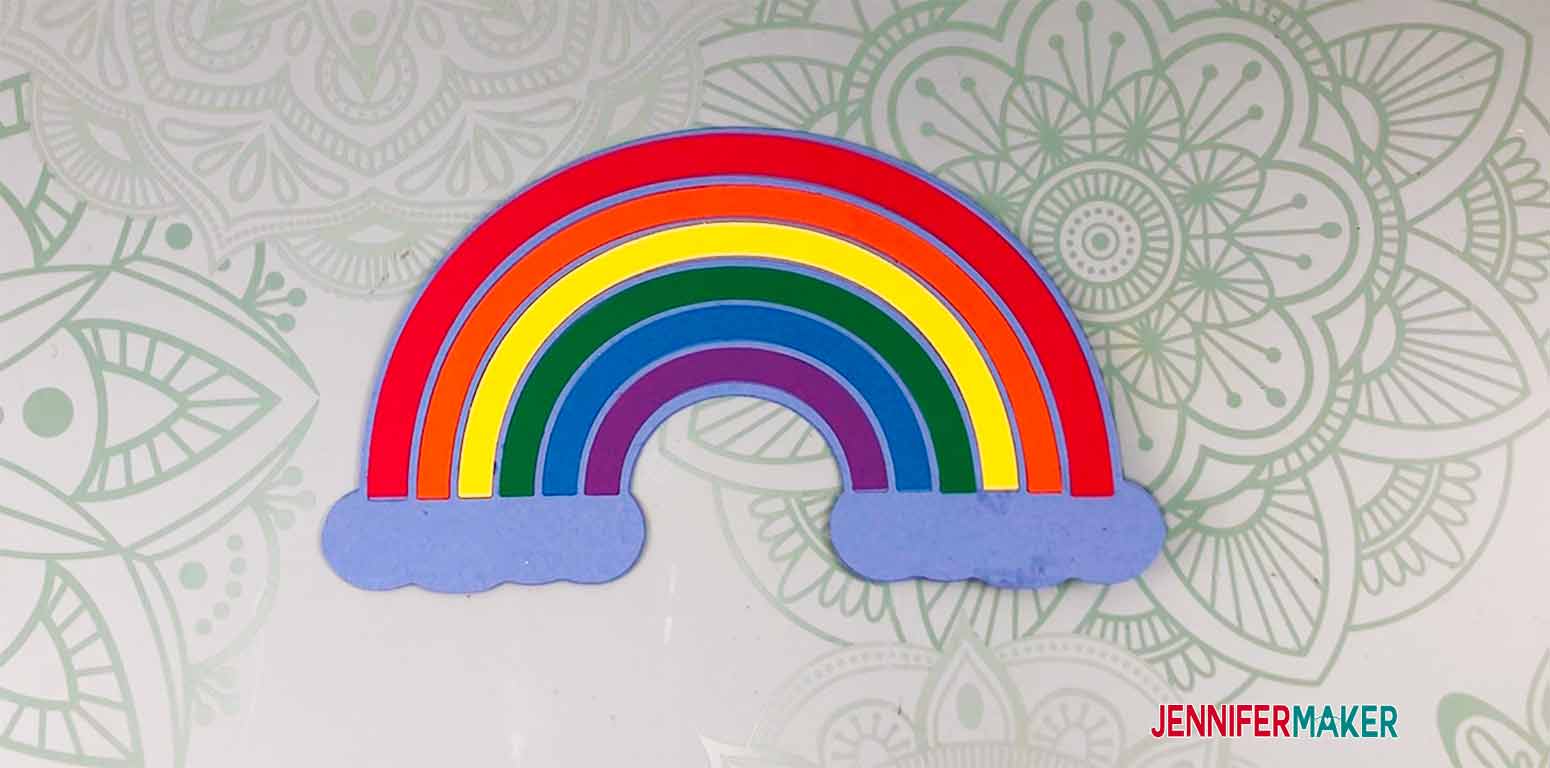
Next I added each of the clouds. Again, you will line them up so there is a little border of the blue around each cloud. I glued the first layer of clouds to the rainbow and then layered the smaller clouds on top of them using foam dots, just as we did above for the Mermaid Cake Topper. Apply the foam dots, remove the paper and place the clouds in place.
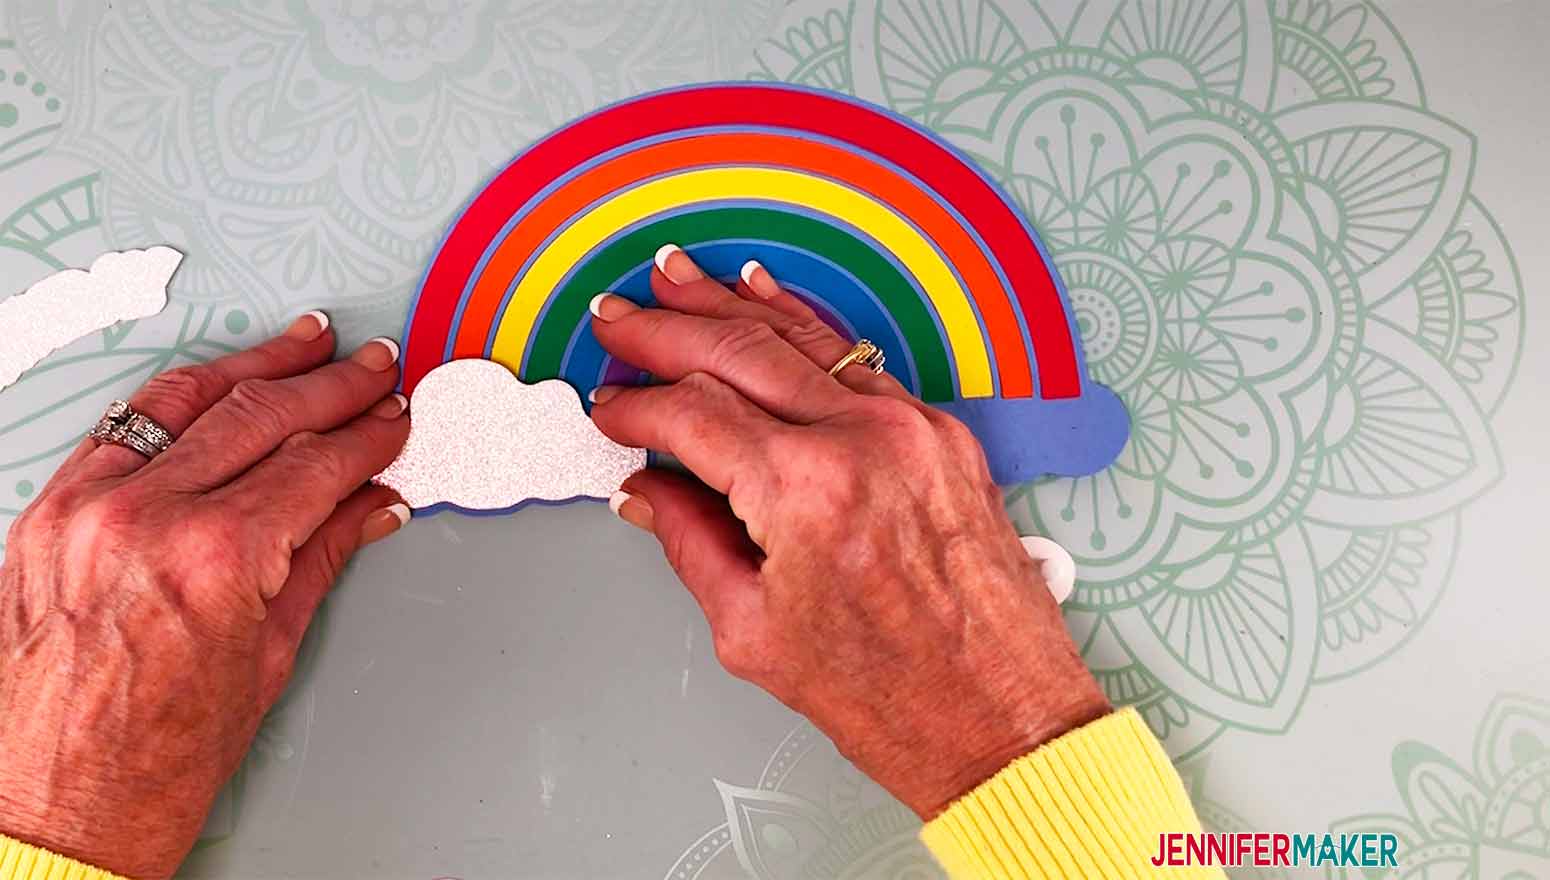
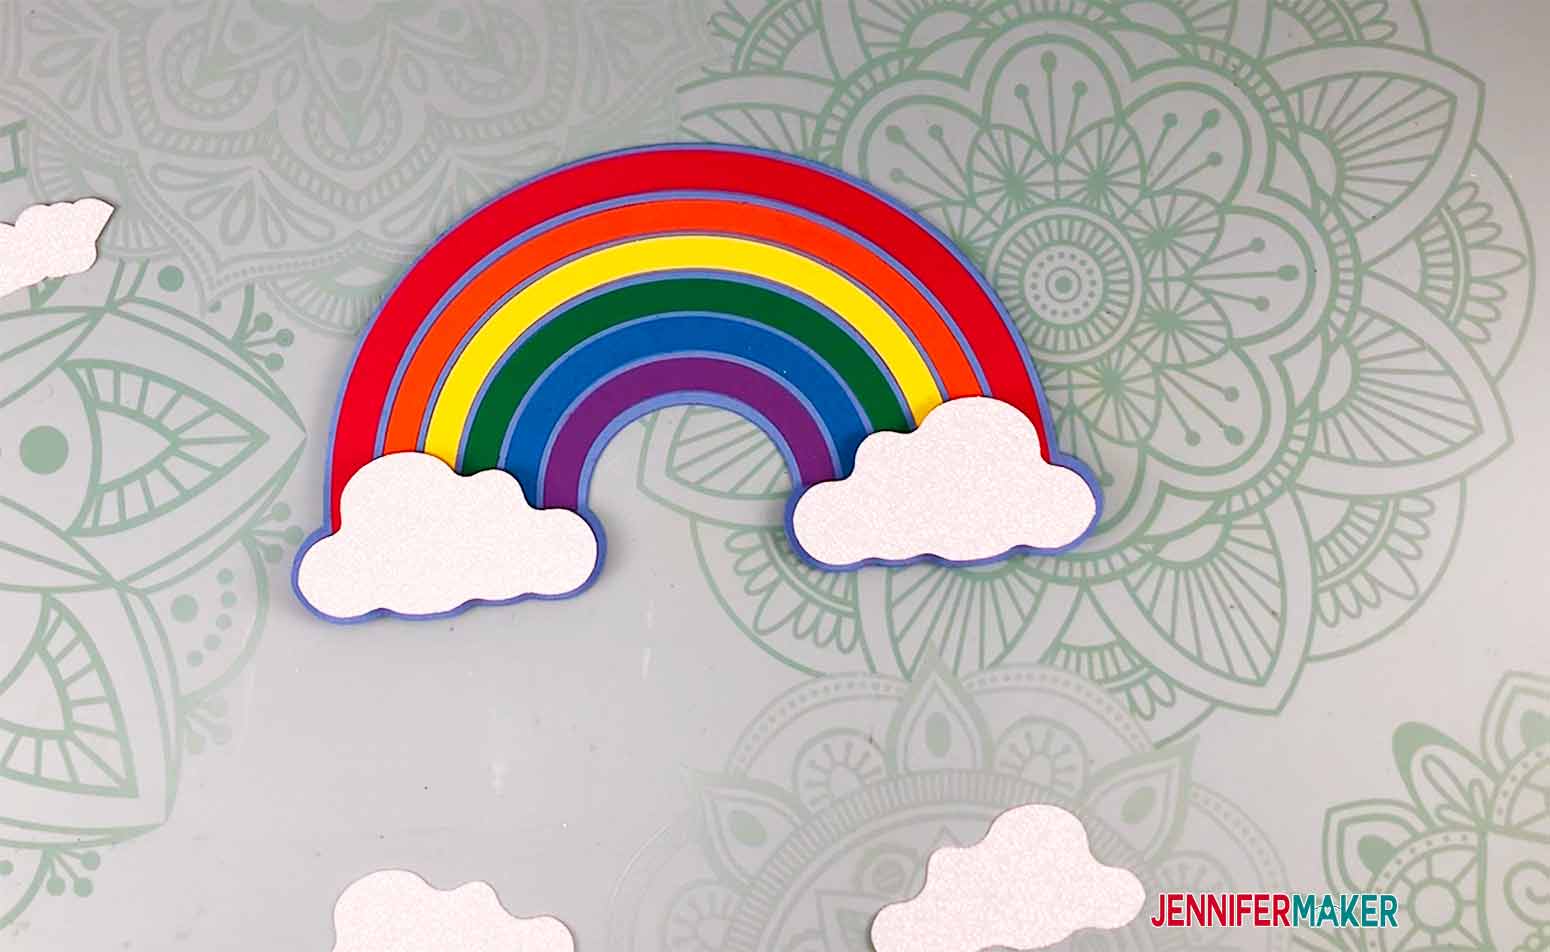
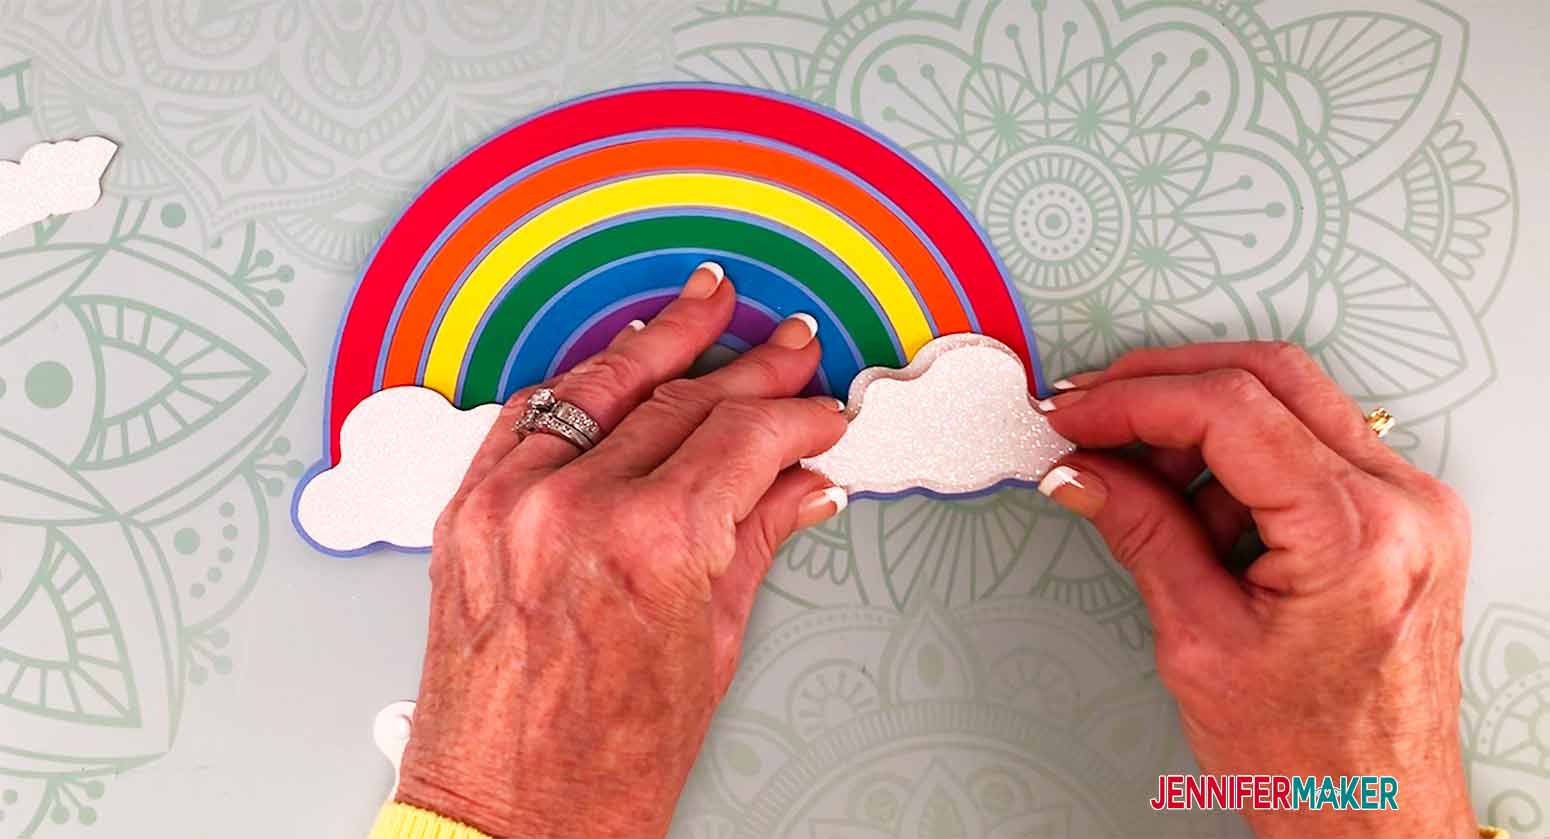
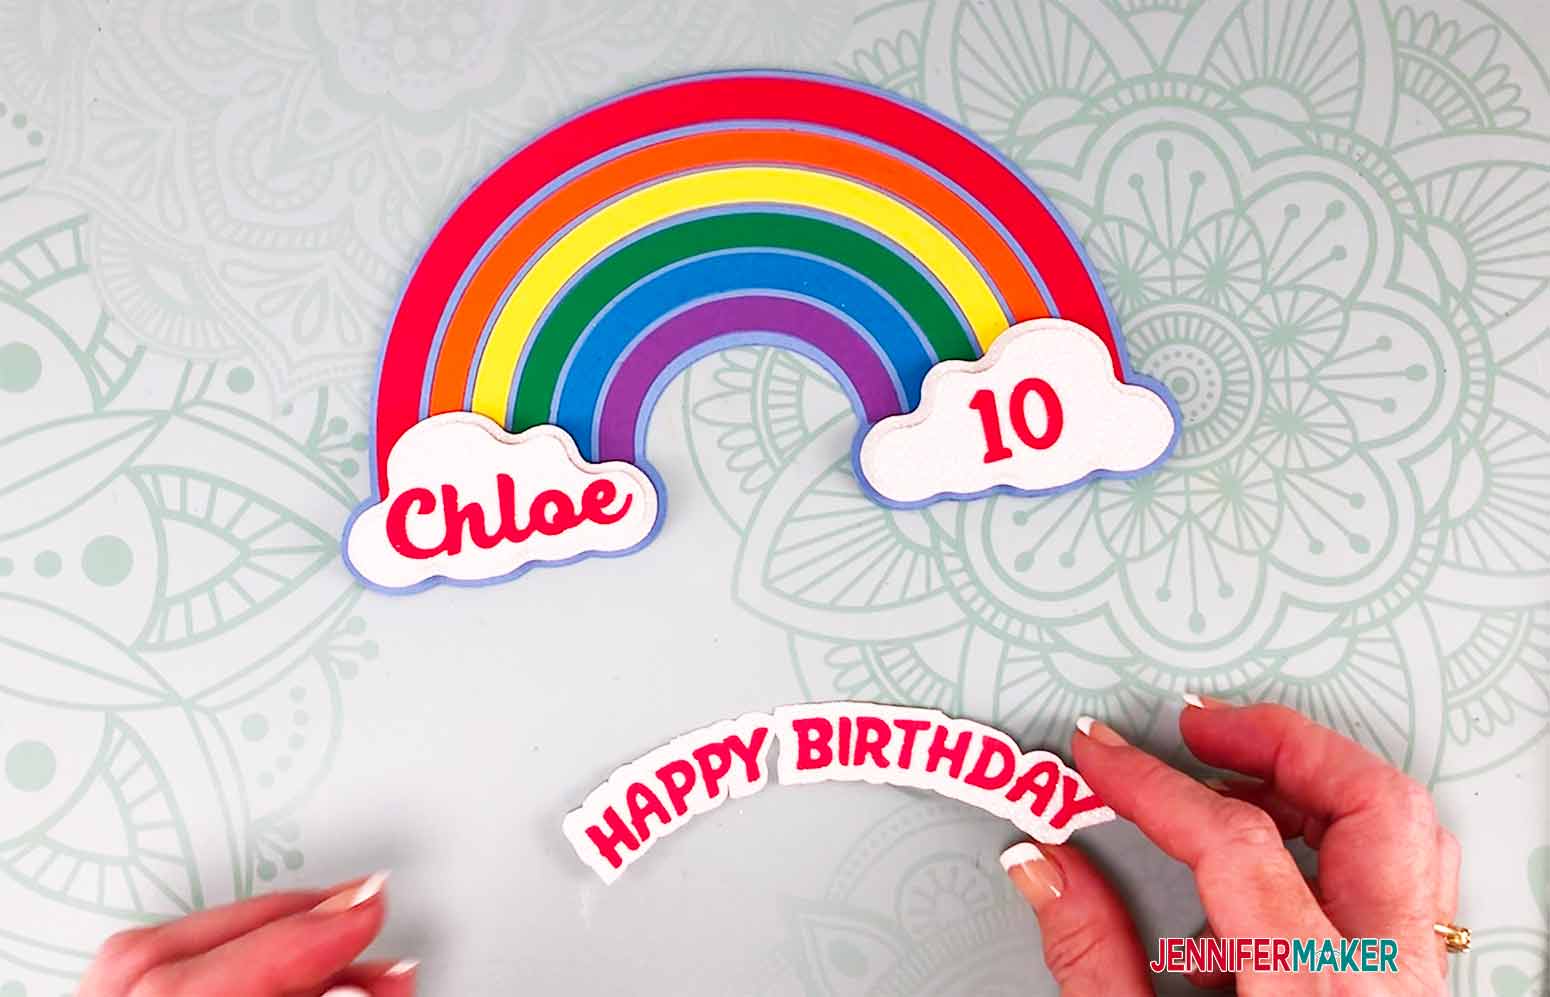
I personalized my topper by adding the celebrants' name and age to the clouds on each side. Of course you can put them wherever you like.

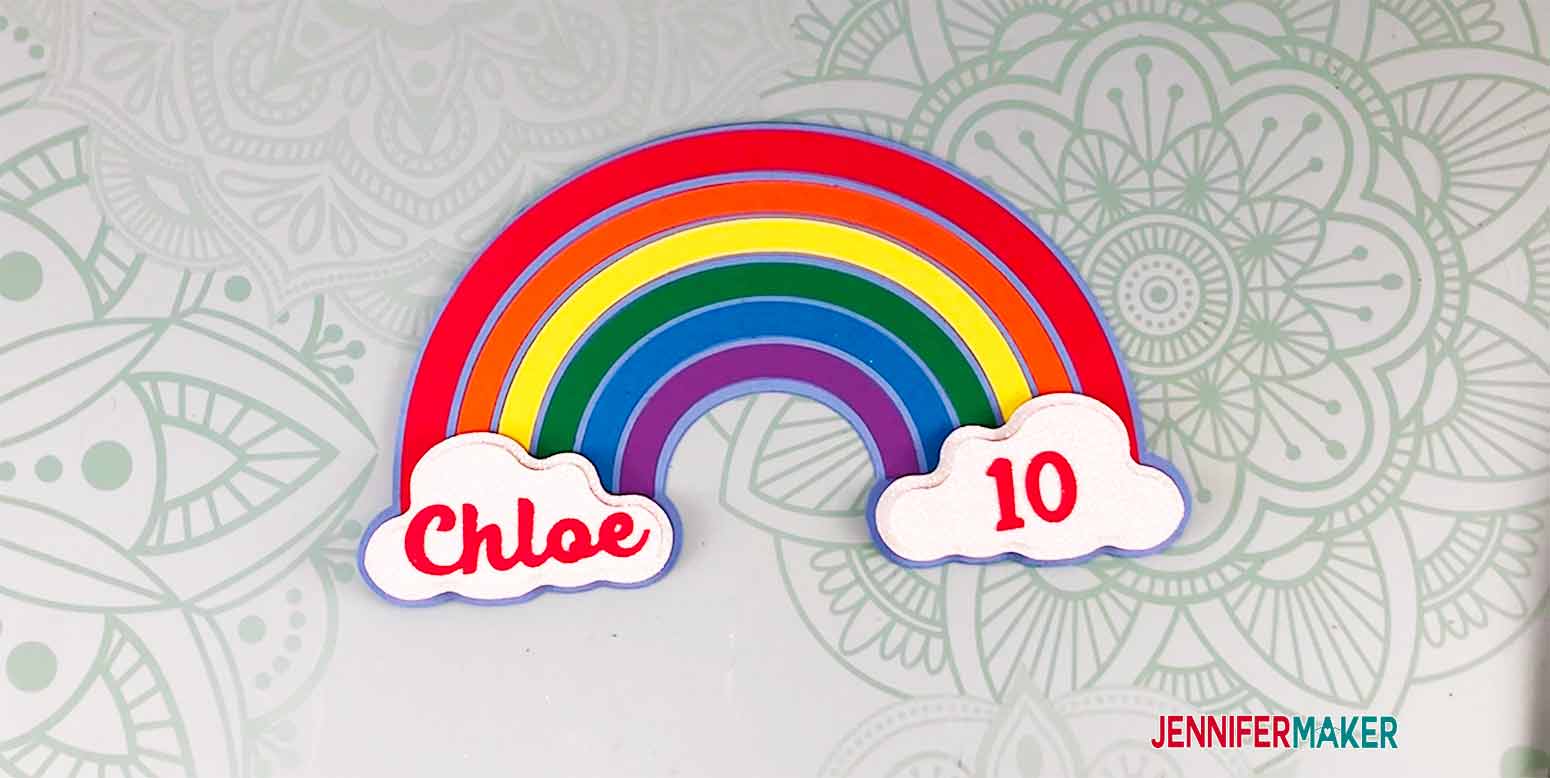
I also glued Happy Birthday to its offset and then used foam dots on the back of the offset to adhere it to the rainbow. The curve of the offset for the Happy Birthday and the Congratulations included in the file were cut to fit right above the green rainbow.
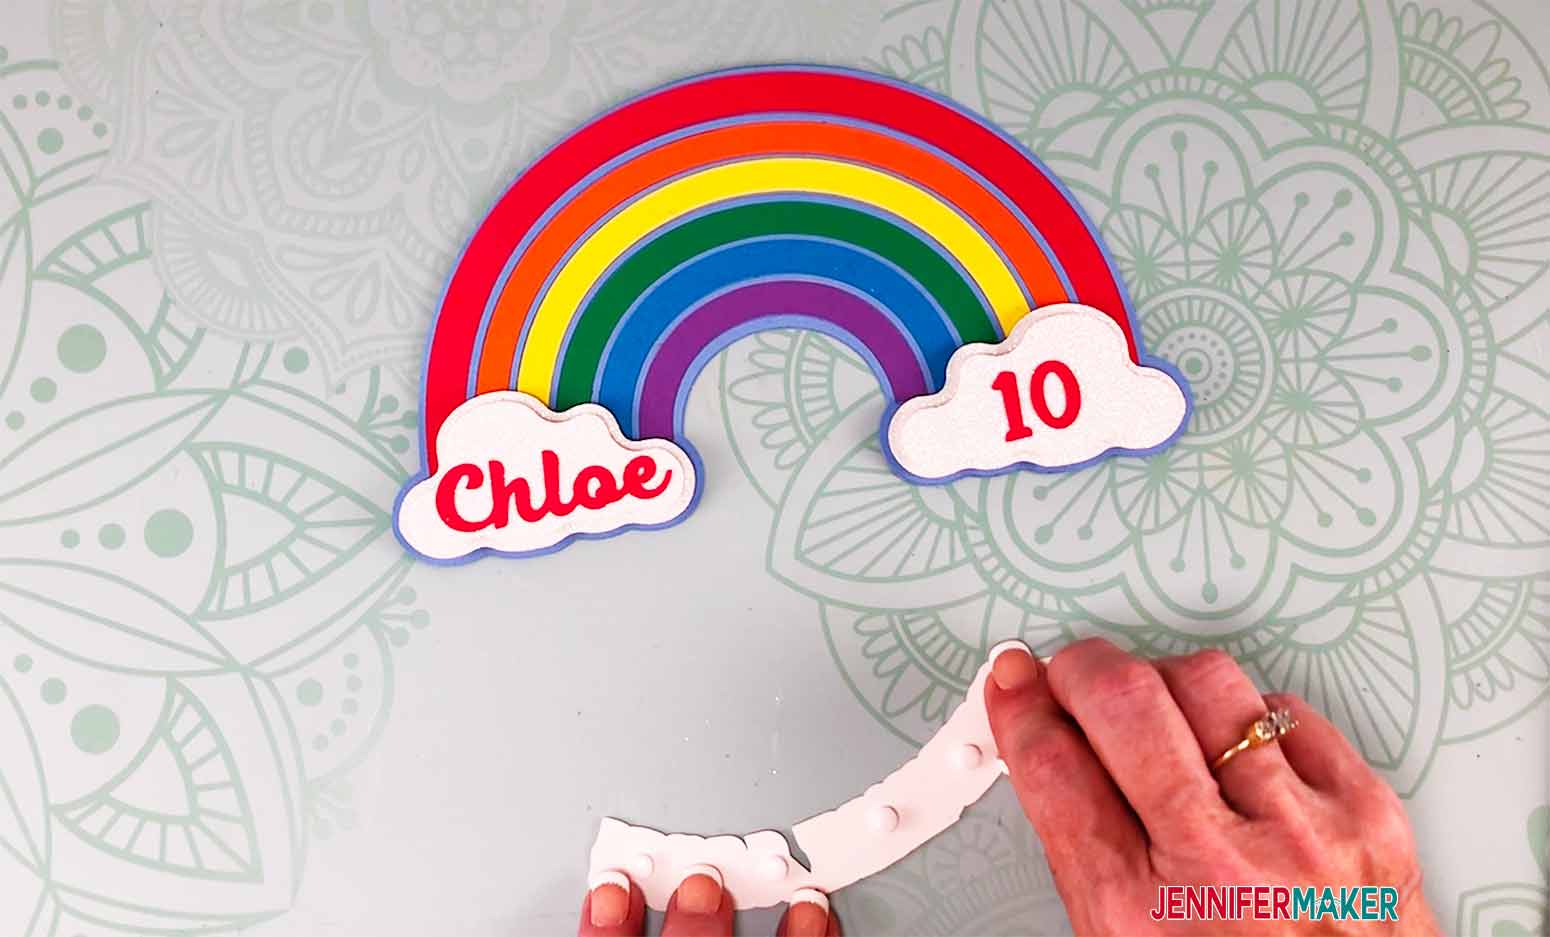
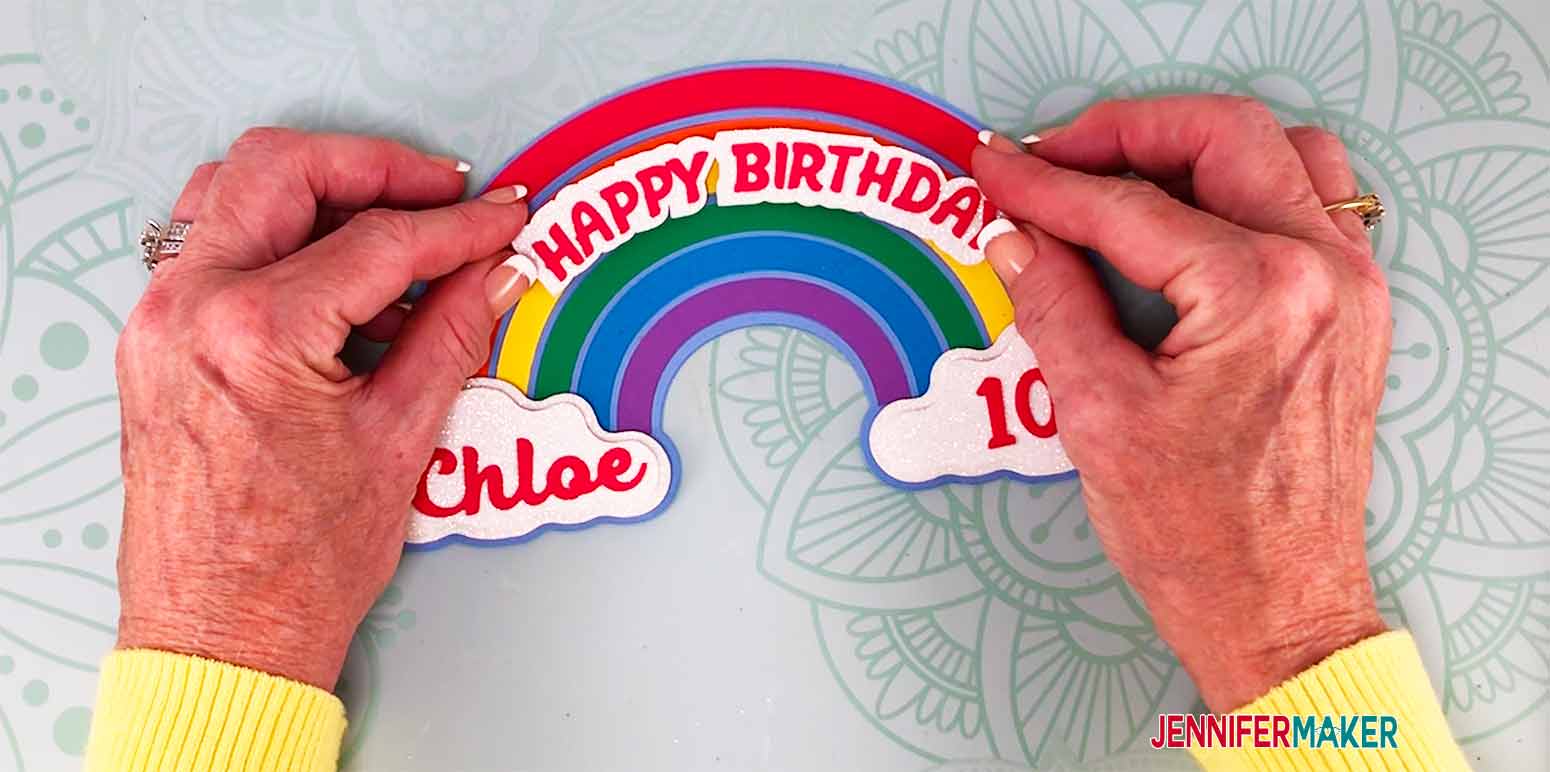
All that is left is to glue the backer onto the topper and add the skewers. And we do that exactly like we did the Mermaid Cake Topper above.

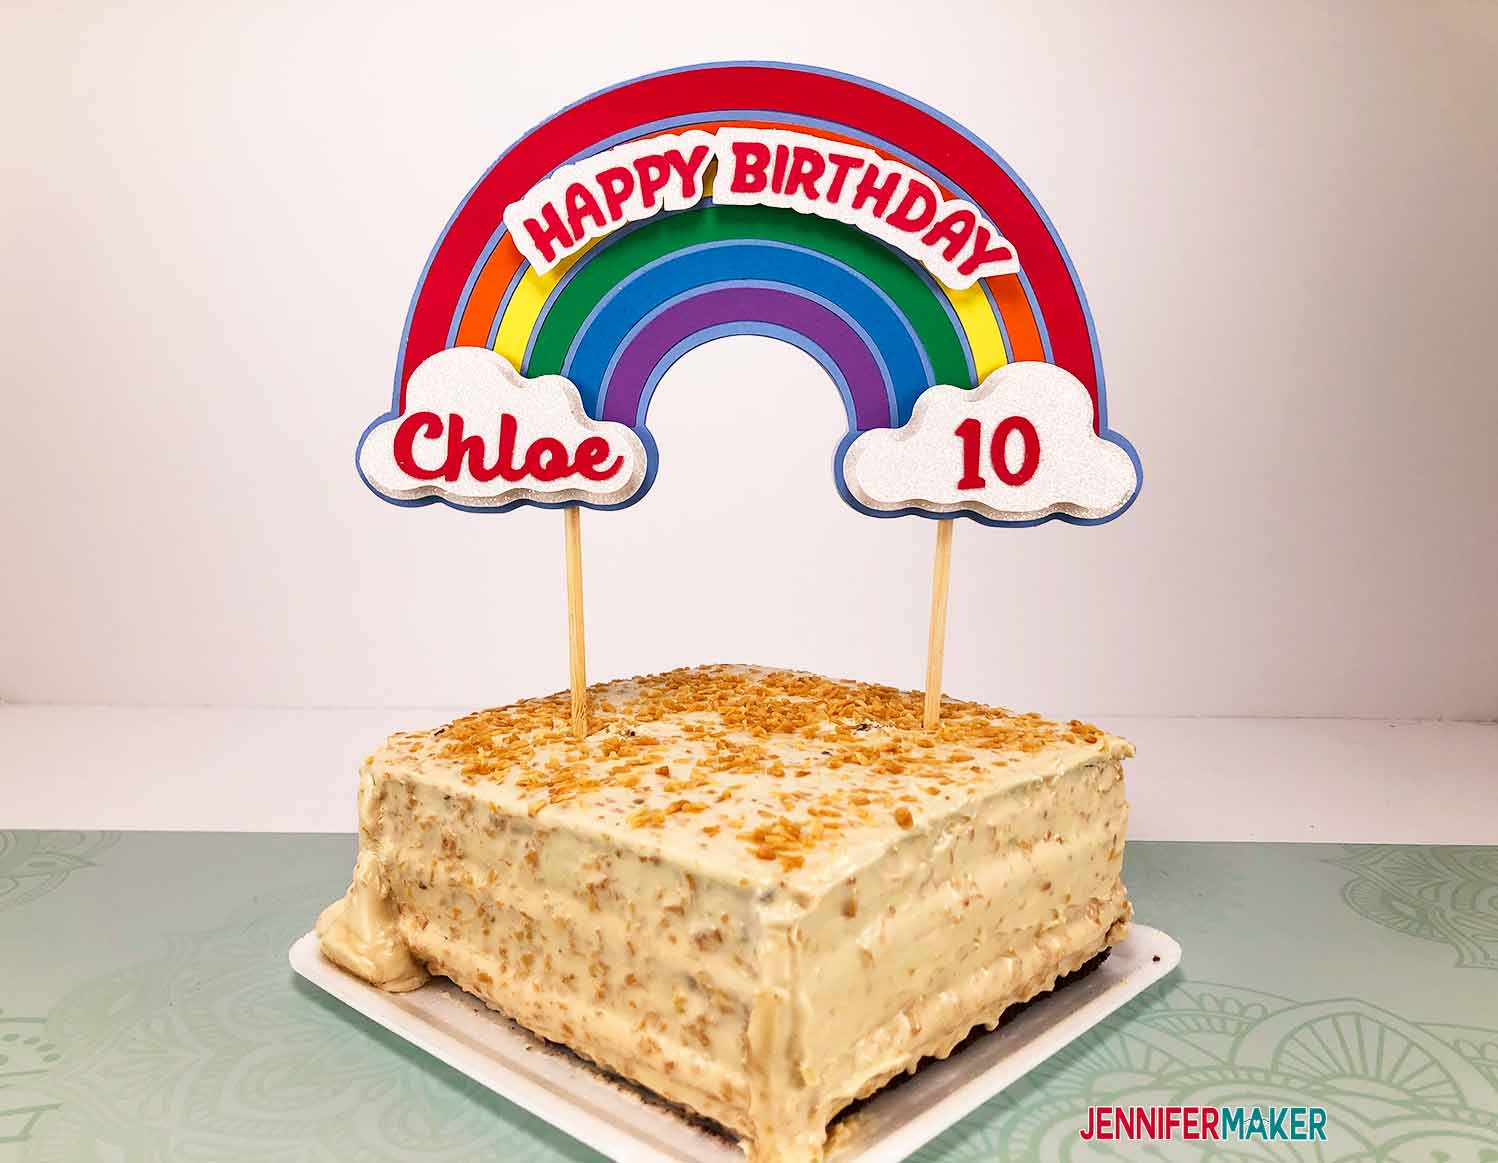
STEP 5: SHOW IT OFF!
Customer cake toppers are such a cute, fun way to decorate a cake!
Notes
Design Font: Blackfat Script
Finished cake topper sizes:
- Mermaid Cake Topper: 7" W x 6.75" H
- Rainbow Cake Topper: 8" W x 4.50" H
Recommended Products
As an Amazon Associate and member of other affiliate programs, I earn from qualifying purchases.

Answers to Your Questions About How to Make Cake Toppers with Layered Designs
Q: What other material can I use for these personalized cake toppers?
These offer up so much flexibility! You will want material less than 2.0mm in order to fit into the Cricut machine. Poster board, Kraft board, or cardboard are all options to use as well! You may be able to use Cricut chipboard as well, but for that you’d also need the knife blade, strong grip mat, and painter’s tape, AND you’d want to only cut the back layer from it, as the other layers with fine cuts are too intricate for chipboard. You could also use adhesive vinyl and transfer tape for the name and year if you wanted, too!
Q: Can I use the Cricut Joy machine?
Yes, both cake toppers can be cut on the Cricut Joy, but you will need resize both of my designs to fit your mat, and the rainbow themed cake topper is going to need less resizing than the mermaid themed topper. For the Joy you will want to make it no bigger than 4.25″ on the shortest side.
Q: Can these cake toppers be cut with wood, like maybe a veneer?
Yes if you have a Cricut Maker, you can definitely try these with wood! I would not recommend balsa wood, however, as the details are too intricate for balsa.
Q: Can I cut a cake topper by hand?
Yes, you can cut this project by hand. All my files have a printable PDF file for hand cutting with a craft knife.
Q: Can I edit any name or any phrase on the design?
Yes, the printable step by step process tutorial shown above shows you exactly how to change the name and year on the cake topper. If you need a simpler cake topper, check our my original cake topper!
Q: Can you design other happy birthday images, a cake topper for a baby shower, or other custom topper designs?
Please let us know at our project request link so we can keep track of your requests.
Q: My cardstock keeps tearing when I am cutting. What am I doing wrong?
Is your mat sticky enough? Have you checked your blade for debris? Are you using high quality cardstock? Are you using the right cut settings? Check out my guide to Cricut cutting problems that addresses many of the common problems!
Q: How do I separate the layers of the custom cake topper design SVG cut file?
All you need to do is select the design then tap “Ungroup” to separate the layers.
Q: Can I cut this design in fondant?
No, the Cricut machines are NOT food safe! Please do not put fondant in your Cricut.
Q: How else can I use my Cricut for cake decorating?
Why not make some paper flowers? I think they look gorgeous on a cake!
Get my free SVG files to make Custom Cake Toppers
I’d love to see YOUR custom cake toppers with ALL the layers! Please share a photo in our Facebook group or tag me on social media with #jennifermaker.
Love,

Want to remember this? Save this Layered DIY Cake Topper Tutorial to your favorite Pinterest Board!