

Bias calculator, formula and cheat sheet
Article may contain Amazon & affiliate links. As an Amazon Associate I earn from qualifying purchases at no additional cost to you.
Are you trying to determine the required amount of fabric for making bias tape? Or perhaps you need a reliable binding calculator to determine the amount of bias your fabric will yield? Look no further! This straightforward bias calculator is incredibly useful. It provides a detailed formula and a convenient continuous bias binding chart, making your life even easier!
Bias Calculator
Now that you know how to make your own bias tape without a bias maker and how to create miles of continuous bias binding it’s time to learn how to calculate the fabric requirements for making a certain amount of bias tape or binding and also how much bias binding your fabric will make. This bias calculator is super easy to use and very handy, making your sewing projects a lot faster and easier.
This bias calculator comes with the actual formula and a very easy to use and helpful continuous bias binding chart to figure out your bias needs in a blink of an eye! The formula in my bias binding calculator will help you figure out how much fabric you will get from yardage from fabric square and how much bias you get from the fabric you own.
Check out the bias series!
- Making bias tape without bias maker
- Making bias with a bias maker
- How to make continuous bias binding
- Sewing single fold bias
- How to sew double fold bias tape
- How to join bias strip ends
- Sewing mitered corners with bias tape
So with this cool bias tape tape calculator you won’t be left approximating but you’ll be able to determine exactly how much bias is needed for the piece of fabric you’re working with for a quilt or sewing project and also how much fabric is needed to create that continuous bias strip needed to finish your project. This way you won’t end up buying too much or too little fabric when going to the fabric store.
I totally understand how this math thing seems like such a bugger but honestly, sewing and quilting require a great deal of math so we better get used to the idea, learn this bias calculator by heart and simply move over! Sewing will be so much more enjoyable once you get pass this point.
But no worries! If my continuous bias binding calculator is just not your cup of tea, you can always refer to my bias binding cheat sheet.
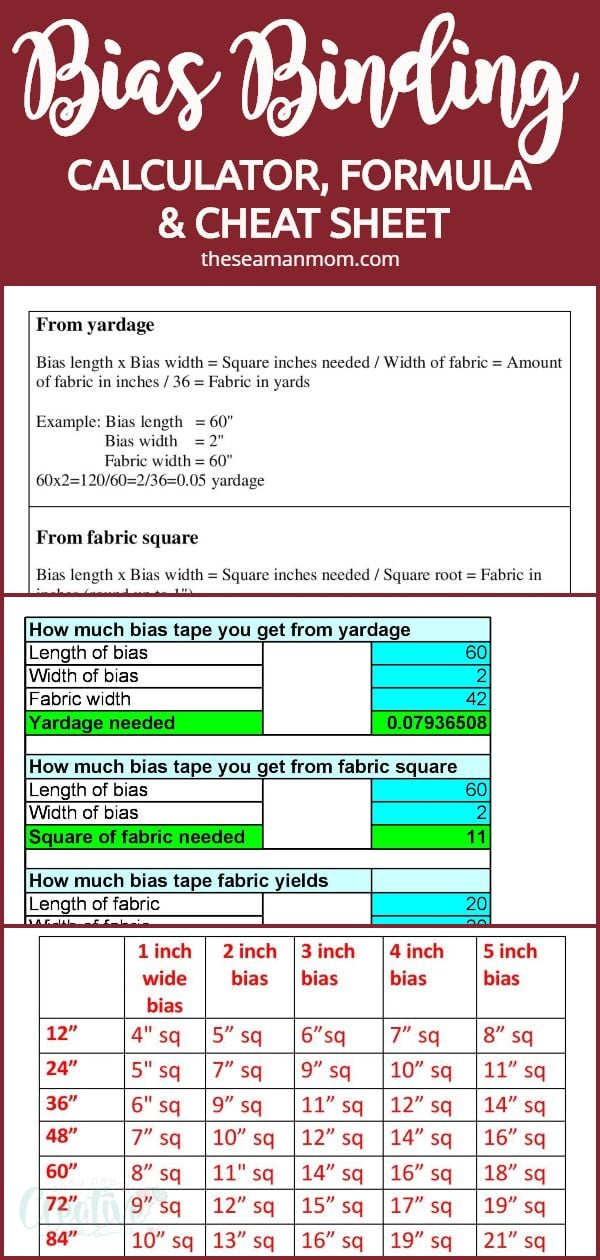
Tu sum it all up, in this tutorial you will find a bias calculator formula, bias calculator excel file (where you can insert your own measurements and the file will automatically calculate the bias for you) and a bias tape chart for the most common bias.
Purchase the calculator formulas and the cheat sheet here!
Bias binding calculator
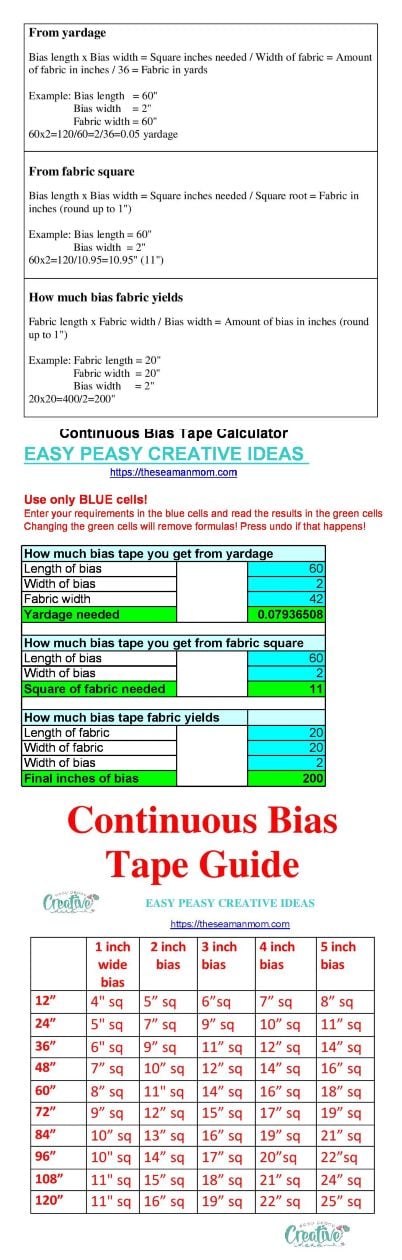
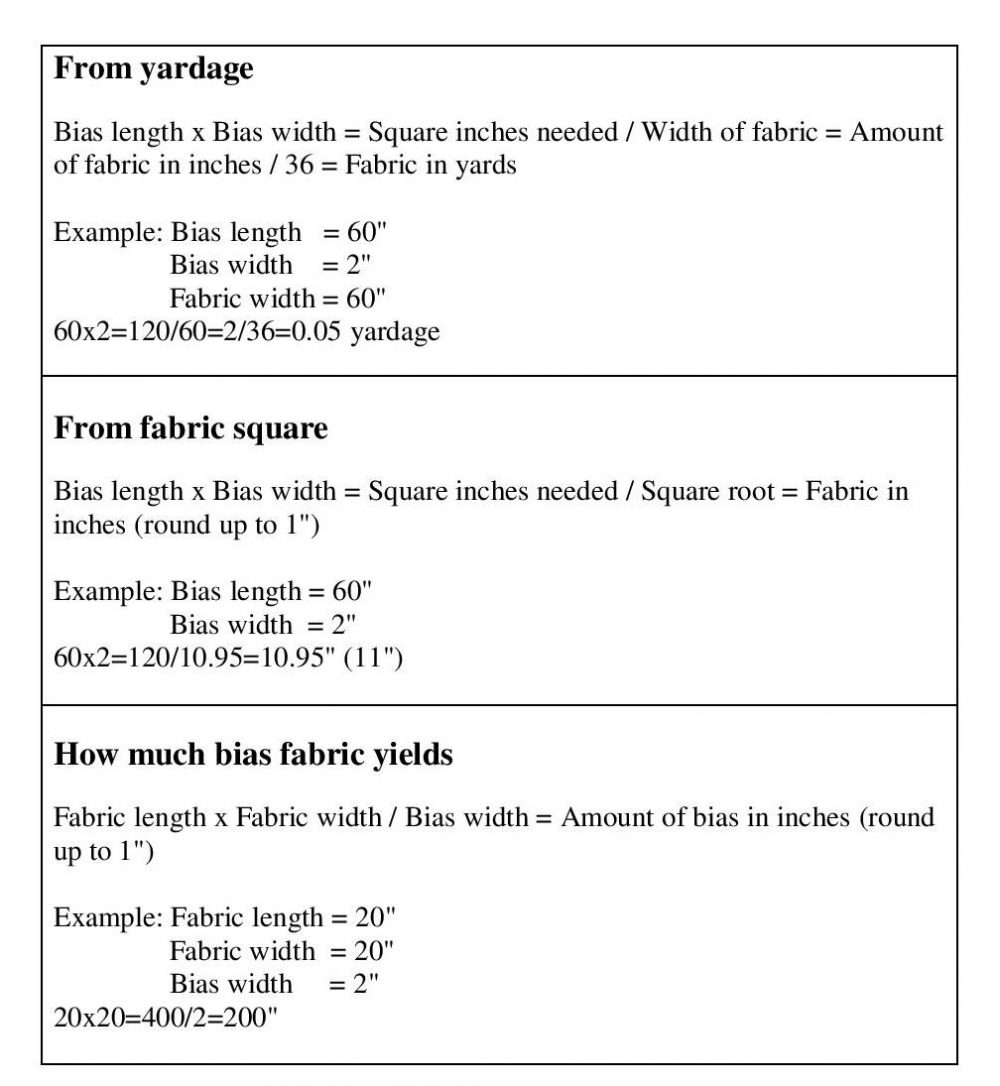
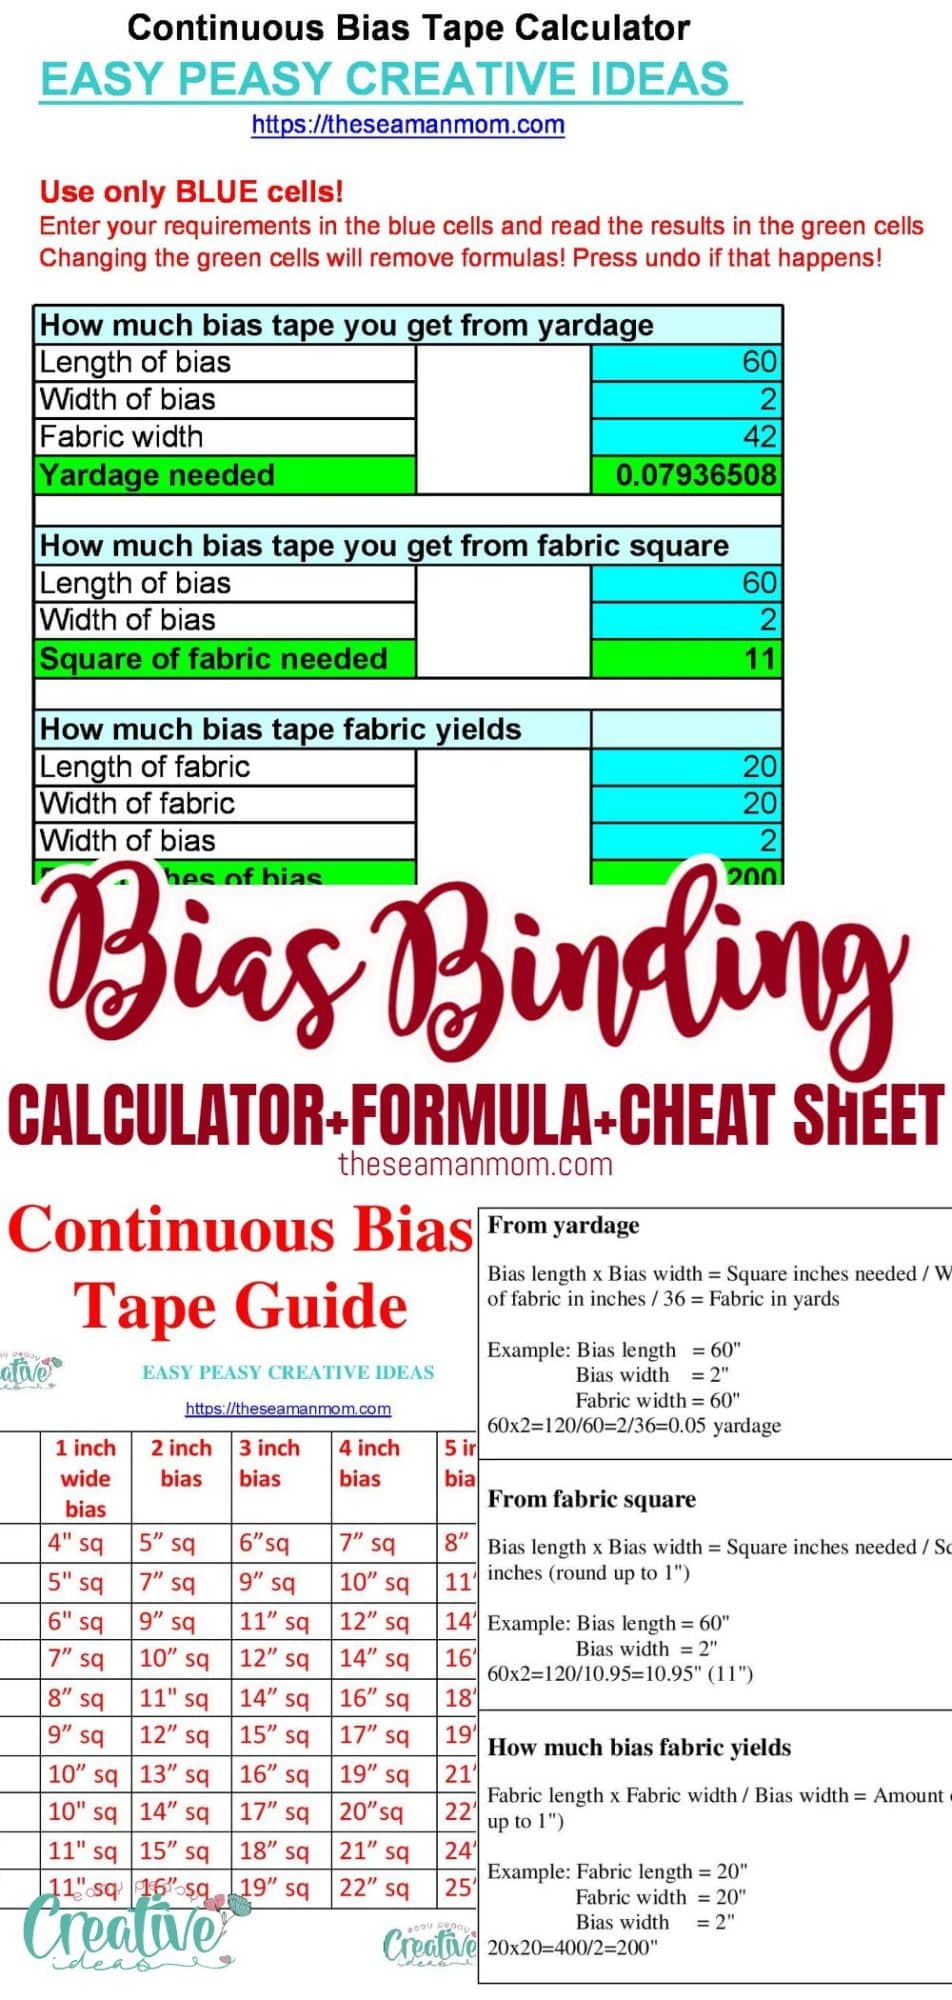
Continuous Bias Formulas
With these formulas, calculate the amount of fabric needed, through a few different ways.
From yardage:
Bias length x Bias width = Square inches needed / Width of fabric = Amount of fabric in inches / 36 = Fabric in yards
Example: Bias length = 60″
Bias width = 2″
Fabric width = 60″
60×2=120/60=2/36=0.05 yardage
From fabric square
Bias length x Bias width = Square inches needed / Square root = Fabric in inches (round up to 1″)
Example: Bias length = 60″
Bias width = 2″
60×2=120/10.95=10.95″ (11″)
How much bias fabric yields
Fabric length x Fabric width / Bias width = Amount of bias in inches (round up to 1″)
Example: Fabric length = 20″
Fabric width = 20″
Bias width = 2″
20×20=400/2=200″
Purchase the PDF formulas here!
Pin the formulas
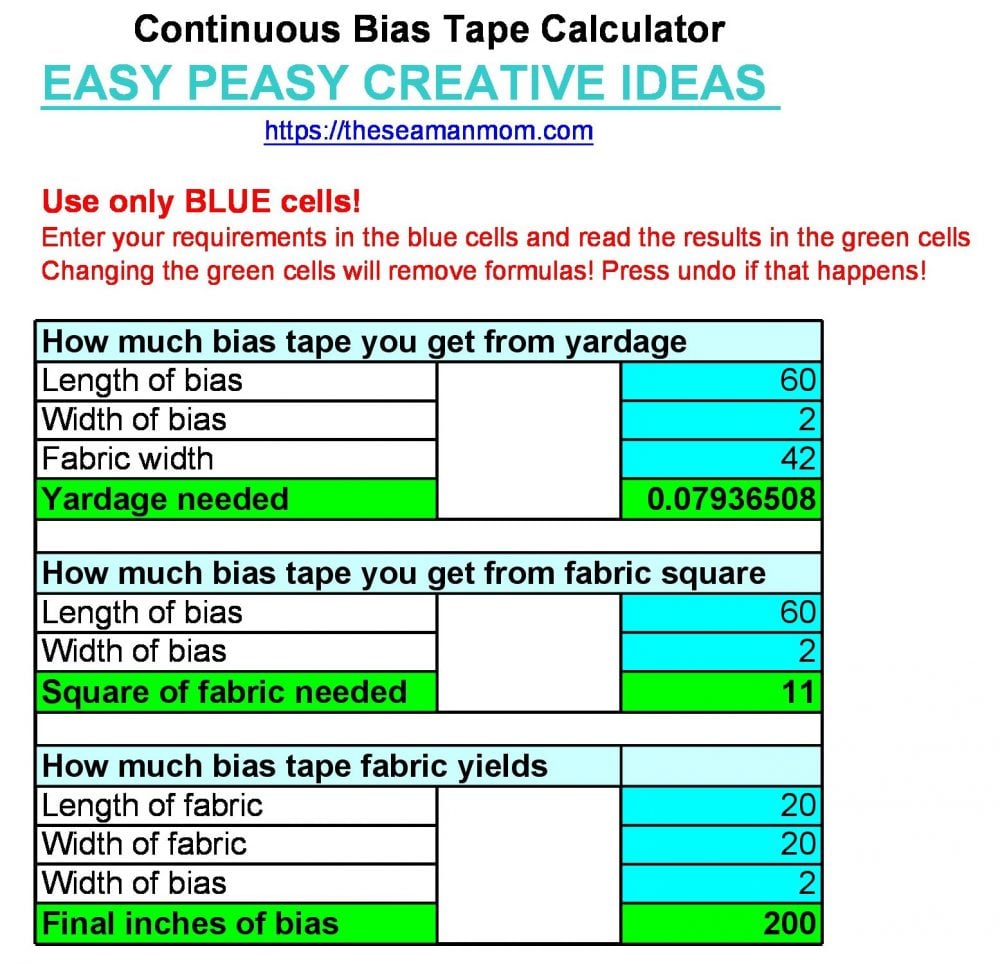
Continuous Bias Binding Excel Calculator
In order to be able to use the file, download it to your computer first.
Please note the excel file is super easy to use but make sure you enter your figures in the blue boxes only and read the results in the green boxes. I’ve protected all cells except for the blue cells to make it safer to use the file, but just in case the protection is not working, please bare in mind to only use the blue cells. If an accident happen and you end up inserting your measurements in the green boxes simply press “Undo”.
Also let me know if you’re having troubles accessing the file through the link below.
Pin the bias calculator
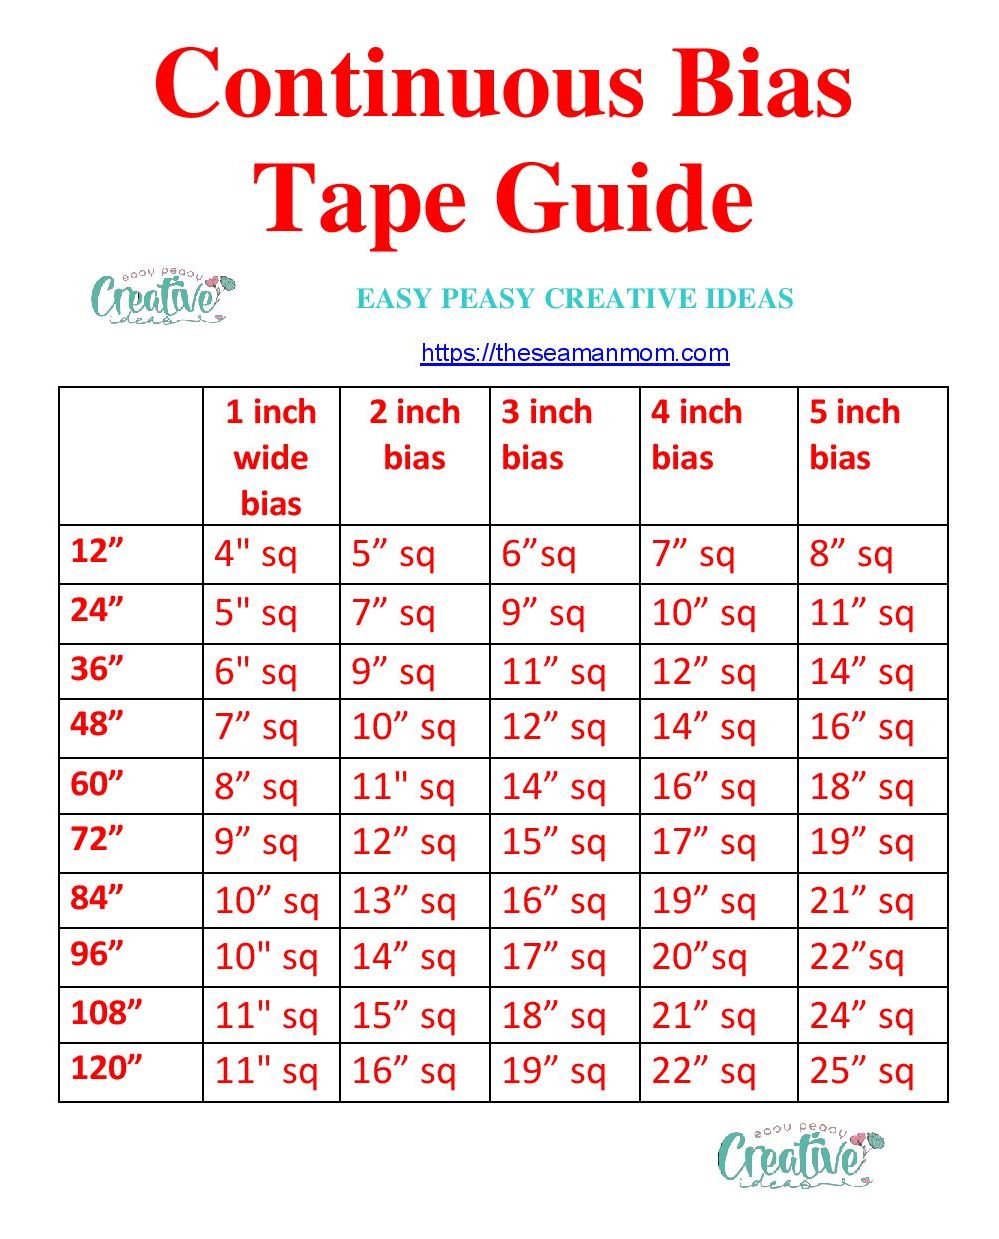
Continuous Bias Tape Cheat Sheet
Don’t you like using the excel calculator? Or maybe you need something you can slip in your bag when you go shopping for fabric? Then I’ve got a guide for you. This cheat sheet allows you to calculate any amount of tape from 1 to 5 inches wide and from 12 to 120 inches long. Pin and print this table next to your sewing machine!
Purchase the cheat sheet here!
Pin the bias guide
How much bias binding can you make from a fat quarter?
A fat quarter is a term used in quilting and refers to a specific cut of fabric that measures 18 inches by 22 inches. Depending on the desired width of your binding strip, you can make approximately two to three strips from one fat quarter.
How wide do I cut fabric for binding?
The width of your fabric strips for binding will depend on personal preference and the project requirements. The most common widths used for continuous bias binding are 1/2 inch, 3/4 inch, and 1 inch. However, wider or narrower strips can also be used depending on the desired look and purpose of the project. If you are a quilter you might find that on some quilts, wide strips of binding look better, depending on the design of the blocks.
When measuring and cutting your fabric strips, it is important to remember to add seam allowance to the strip width. This is typically 1/4 inch on each side for a total of 1/2 inch added to the width of the binding strip.
Tips for cutting the perfect binding
- Use a ruler and rotary cutter for accurate measurements and straight edges.
- If using a directional fabric, consider the direction of the print when cutting your strips to ensure it is facing the right way on your project.
- Always measure and cut a test strip to ensure the desired width before cutting the rest of your fabric.
- To avoid wasting fabric, consider using leftover scraps from previous projects as long as they are large enough for your desired width of binding strips.
- Consider using a bias tape maker for easier and more precise folding of your strips.
With these tips and techniques, you can easily calculate and create continuous bias binding for all your sewing projects. Whether it’s for a quilt, garment, or other craft project, this method will result in a professional-looking finish that will hold up over time. Experiment with different widths and fabrics to find the perfect binding for your project.
I hope you enjoyed my bias calculator tutorial. If you get to use either one of the formulas, the excel file or the cheat sheet and find them useful I’d love to know so please leave a comment below.
Pin to save for later
Most popular sewing projects:
- Tips for sewing a round hem
- Corded bag handles
- Flutter sleeve dress pattern
- How to laminate cotton fabric


ABOUT PETRO
Hi, I’m Petro, author and founder of Easy Peasy Creative Ideas. Sewist, crafter, avid DIY-er, foodie, photographer, homemaker and mommy to one. I’m an expert at coming up with quick, clever sewing tips, recycling crafts and simple, easy recipes! You can find my ideas featured in reputable publications such as Country Living, Good House Keeping, Yahoo News, WikiHow, Shutterfly, Parade, Brit & Co and more. Thanks for stopping by and hope you’ll stay for a while, get to know me better and come back another time. Stick around for real fun projects! Read more…