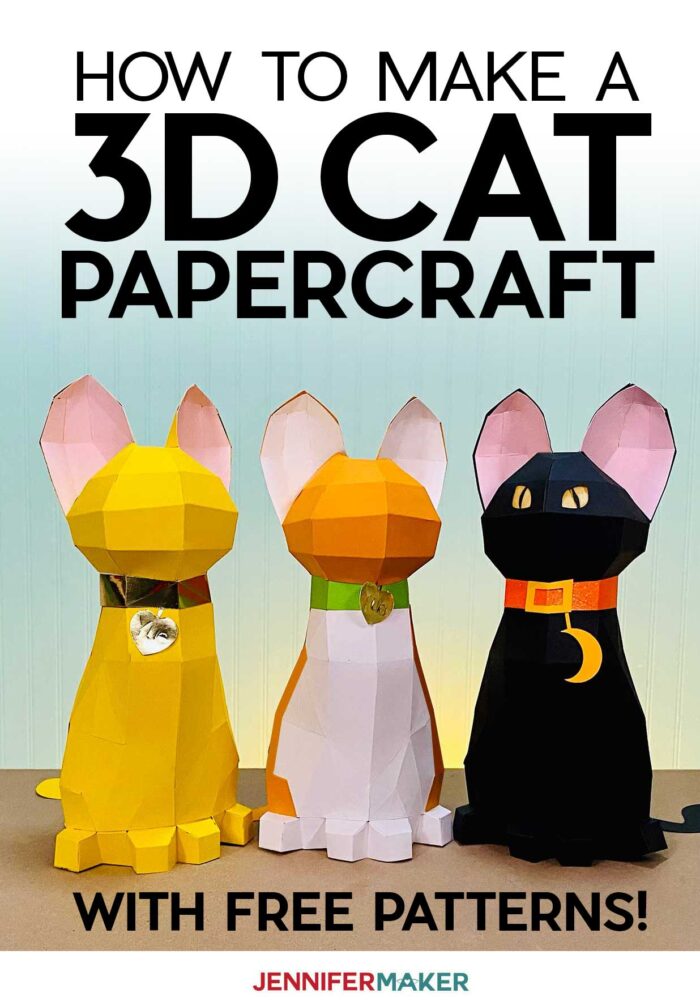
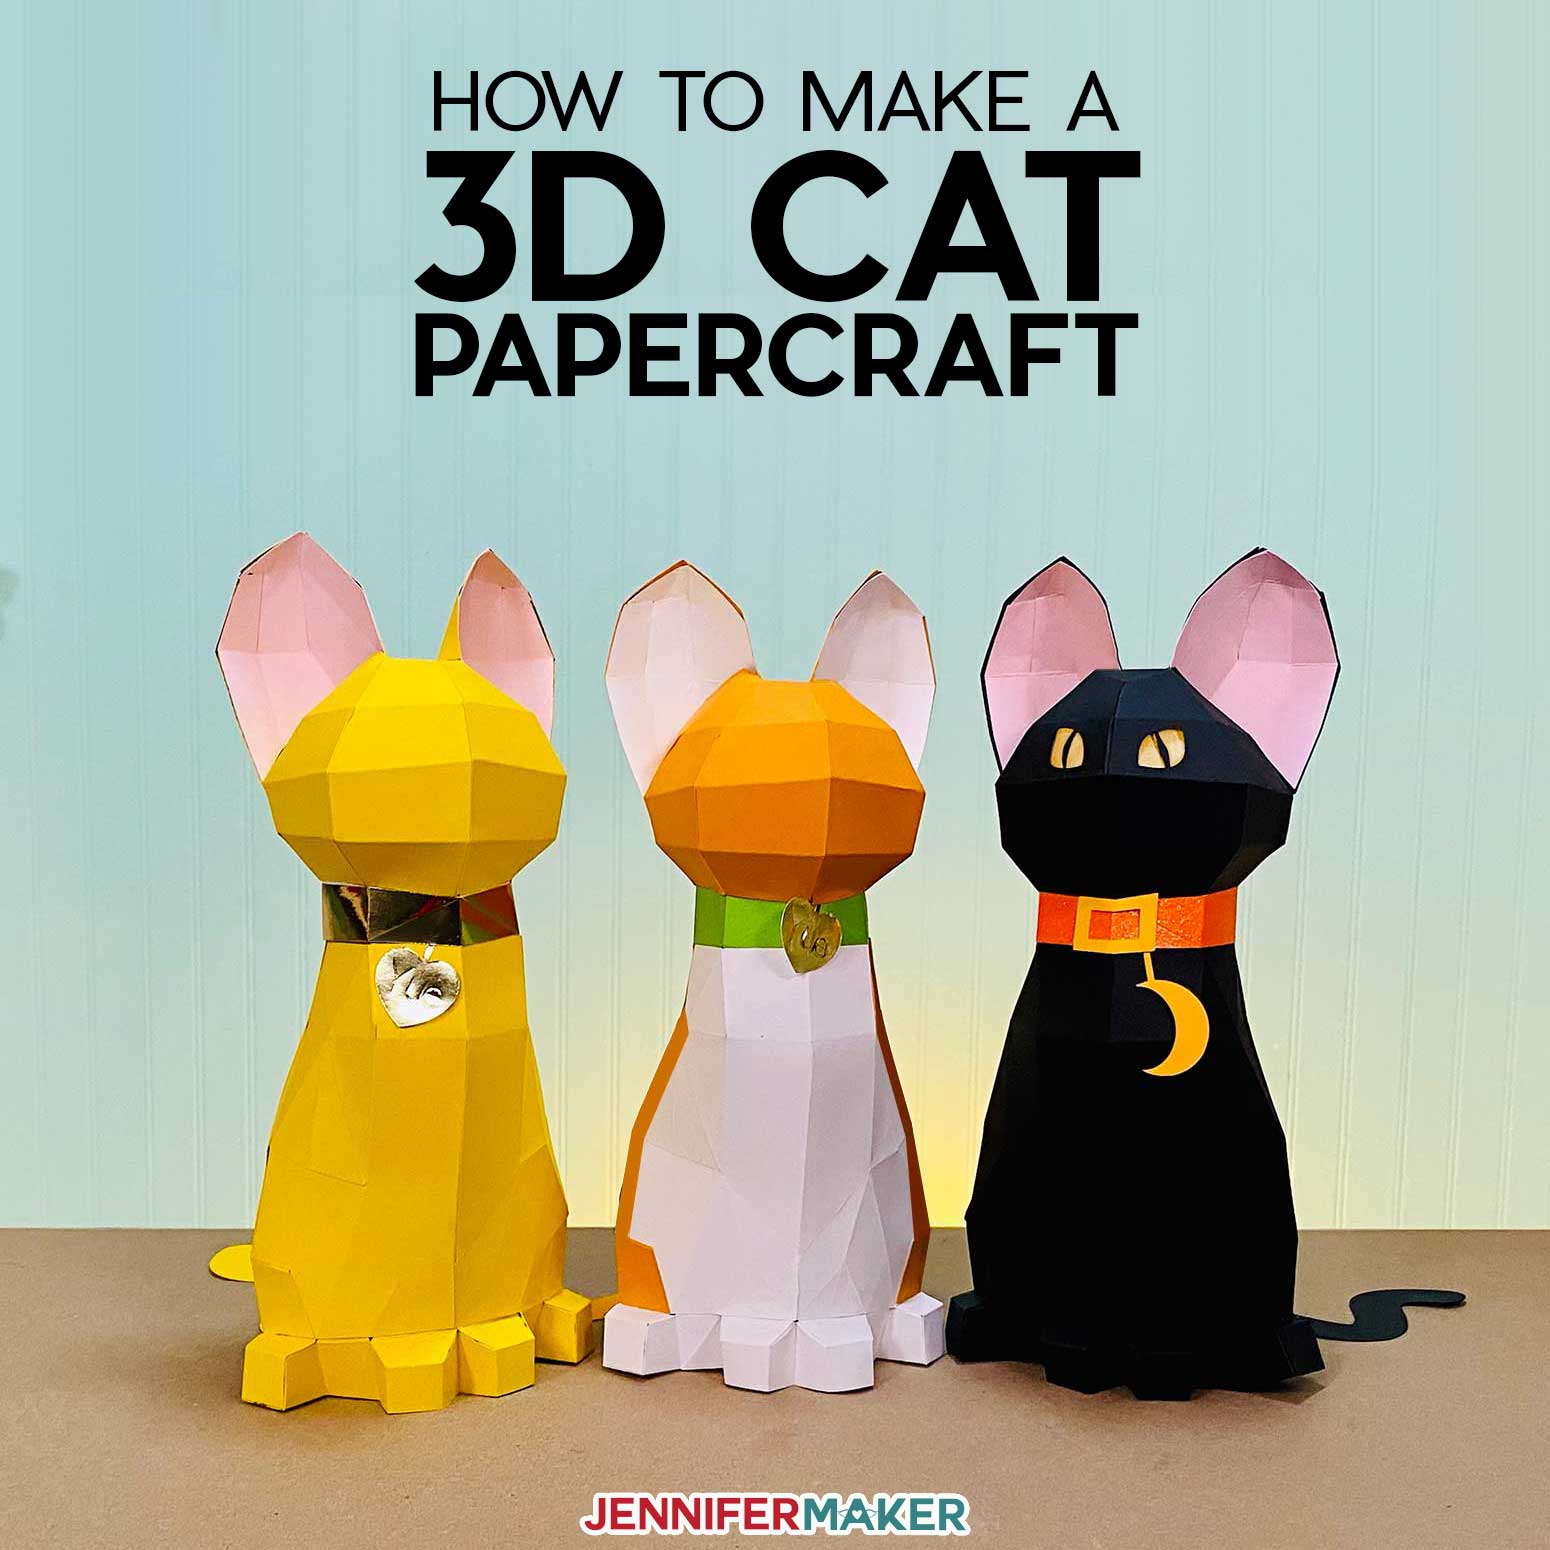
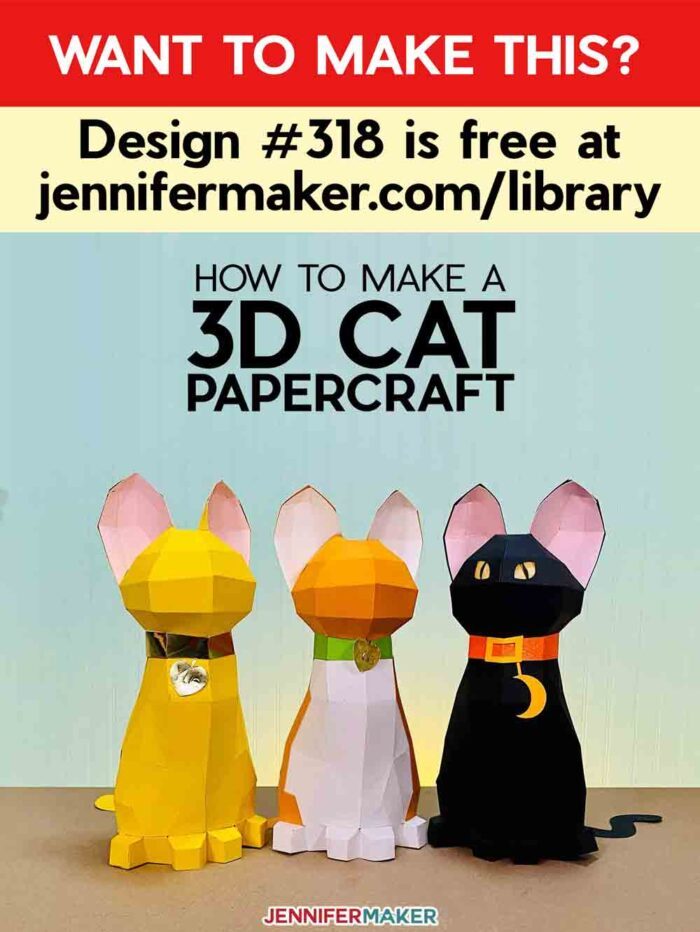
Learn to make this adorably cute 3D cat papercraft completely out of cardstock!
My daughter Alexa has been wishing for a cat for a long time now. Eventually, she got tired of hoping I’d get one and created her own — from paper! My talented daughter “sculpted” this cat in Blender, and from there I turned it into a 3D papercraft that we can cut from just a few sheets of cardstock! And to make it as easy as possible to assemble, I’ve numbered every tab and included a start point and a full step-by-step tutorial.
Watch me assemble the 3D paper cat in my step-by-step video:

It’s truly amazing what you can make from paper! This low-polygon kitty cat is made by cutting the pattern on the cardstock, creasing it along the folds where indicated, and then glueing or taping the parts together in the right spots.
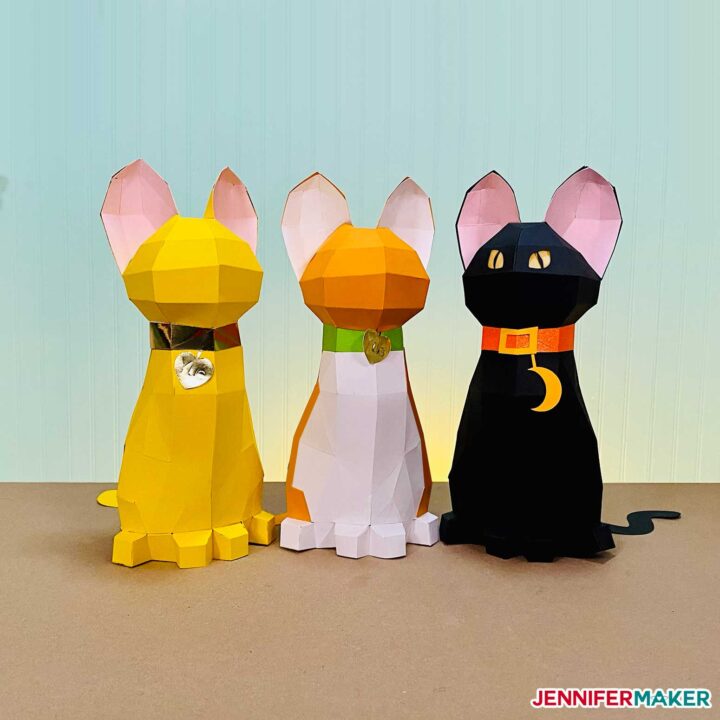
The easiest way to make a 3D papercraft like our cute cat is to use a cutting machine, such as a Cricut. I’ve included three patterns you can cut with a Cricut — a simple cat, a “tuxedo” cat (which lets you pick different colors for different parts of the body), and a black cat … fun for Halloween!
For glue, I highly recommend a good quality glue with a precision tip so you don’t get too much glue on your project. And be cautious of dark or black papers, as glue messes will show up easier on those — you may want to use double-sided tape on those instead.
You’ll also want a scoring tool of some kind, either a scoring stylus or a scoring wheel. Both work just great!
My daughter named this cat “Yue” which means moon in Mandarin, which she’s studying in high school. But you can name yours whatever you wish!
Let me show you how easy it is to make this 3D cat papercraft! This post contains some affiliate links for your convenience (which means if you make a purchase after clicking a link I will earn a small commission but it won’t cost you a penny more)! Read my full disclosure policy.
Materials to Make a 3D Paper Cat
- Two (2) sheets of 12″ x 12″ 65 lb. cardstock for the cat body (I used a lemon drop yellow)
- One (1) sheet of 12″ x 12″ 65 lb. cardstock for the cat ears and neck (I used pink lemonade)
- One (1) sheet of 8.5″ x 11″ cardstock for the collar and tags (any color or texture, I used a foil cardstock)
- Cricut pen with a .04 fine tip (use a black pen on most light or medium cardstocks, or a silver gel pen on black and dark cardstocks)
- (Optional) Swedish Fish Candy
- Tacky glue (I used Bearly Art Precision Glue) -or- Scor-Tape
- (Optional) LED tealight to put inside your Halloween cat
- Cricut Blue LightGrip Cutting Mat, 12×12
- Cricut Scoring Stylus (Explore or Maker) or Scoring Tool (Maker only)
- Cricut XL Scraper
- A method to cut your cardstock – I used the amazing Cricut Maker but you can also use the Cricut Explore
- Design #318 – My free SVG/PDF/DXF design files are available in my free resource library – get the password by filling out the form at the bottom of this page
How to Make Your Own 3D Paper Cat
3D Papercraft Cat
Learn how to make a 3D paper cat with this numbered papercraft! See the full Amazon shopping list!
Materials
- Two (2) sheets of 12" x 12" 65 lb. cardstock for the cat body (I used a lemon drop yellow)
- One (1) sheet of 12" x 12" 65 lb. cardstock for the cat ears and neck (I used pink lemonade)
- One (1) sheet of 8.5" x 11" cardstock for the collar and tags (any color or texture, I used a foil cardstock)
- Tacky or art glue (a precision tip will give you more control over your glue)
- -OR Scor-Tape double-sided adhesive tape (not as strong, but less messy)
- Cricut pen with a .4 fine tip (use a black pen on most light or medium cardstocks, or a silver gel pen on black and dark cardstocks)
- (Optional) Swedish Fish candy
- Design #318 - My free 3D cat SVG/DXF/PDF is available in my resource library (get a password below)
Tools
Instructions
STEP 1: GET THE 3D CAT PATTERN
Start off by getting the 3D Cat pattern from my free resource library — look for design #318. The ZIP file contains SVG files for cutting on a Cricut or another cutting machine, DXF files, and printable PDFs for cutting by hand.
There are three different designs: a solid-color SIMPLE cat, a multi-color TUXEDO cat, and a fun, glowing-eyed HALLOWEEN cat that you can use with an LED tealight. In this tutorial, I will show you how to make the simple solid color cat. The other two designs are cut and assembled in the same manner. Note that if you want your ears, collar, tag, and belly to be all different colors, you'll want to use the "tuxedo" design which has every element on its own layer.
STEP 2: CUT OUT THE CAT PIECES
I will show you how to cut this using a Cricut Maker cutting machine, but you can also cut it on a Cricut Explore or cut it by hand.
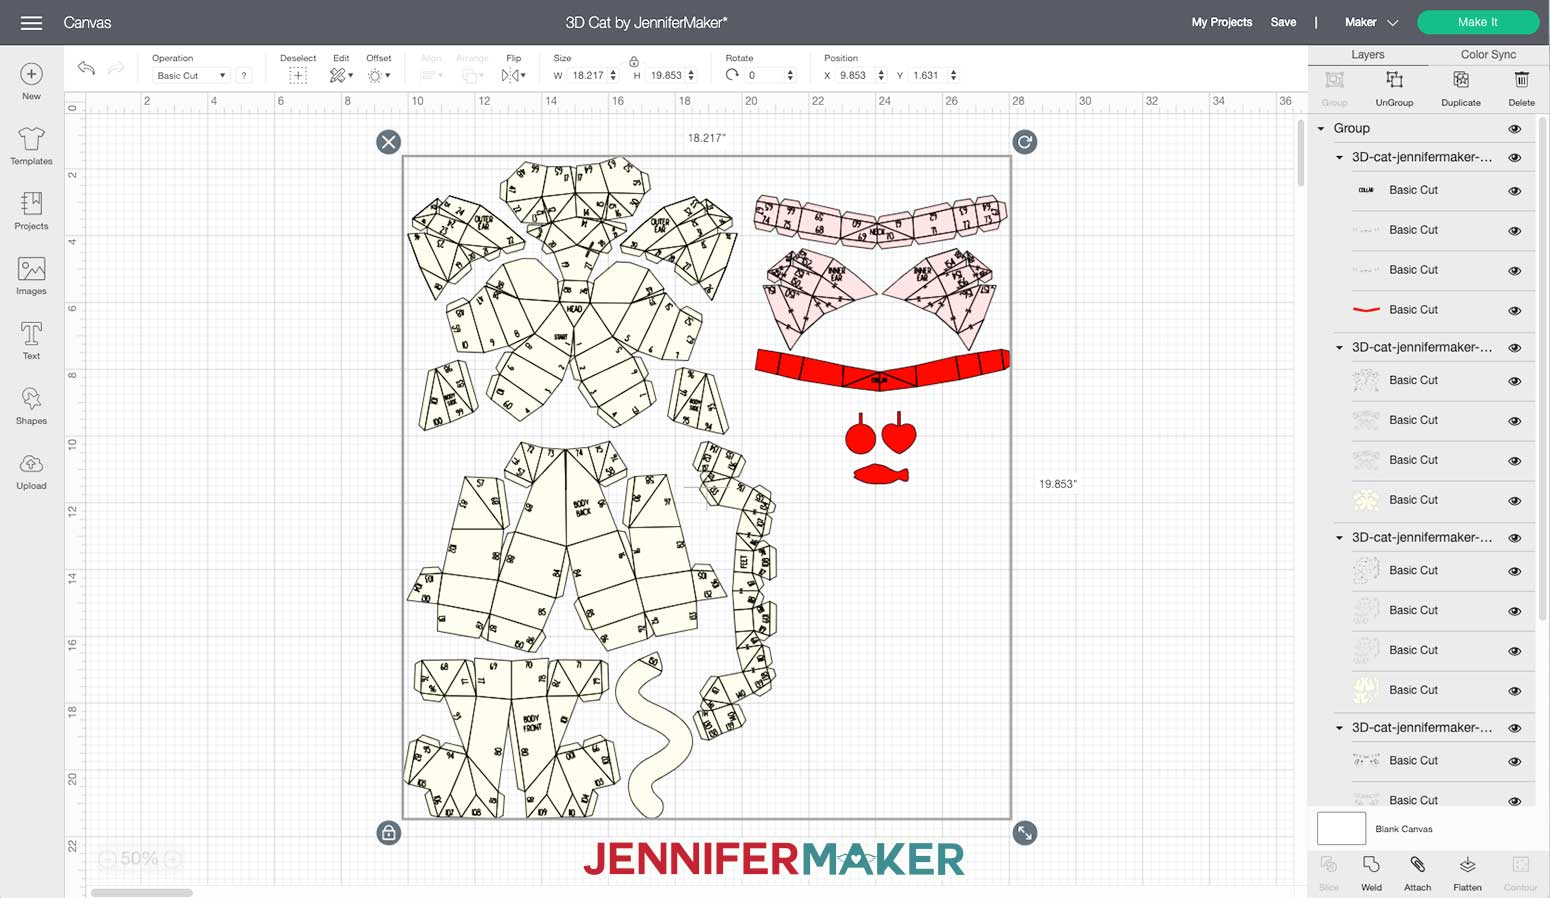
Start by unzipping and uploading the SVG of your choice to Cricut Design Space. This is what my simple solid-color 3D Cat file looks like when uploaded to Cricut Design Space:
TIP: If you are not sure how to upload an SVG cut file to Cricut Design Space, watch this helpful video training series I made. If you are on an iPad or iPhone, here is how to download and upload SVG files to the Cricut Design Space app.
While we try to pre-set score/pen lines and attach them to their base layers for you, it's not always a guarantee they will come in that way when you upload them. When you upload the file and add it to the Canvas, check the layers — if you see score and pen lines pre-set, you're good to go. If everything is a "Basic Cut" then that means you need to set your score/pen lines and attach them to their base layers.
HOW TO SET SCORE AND DRAW LINES
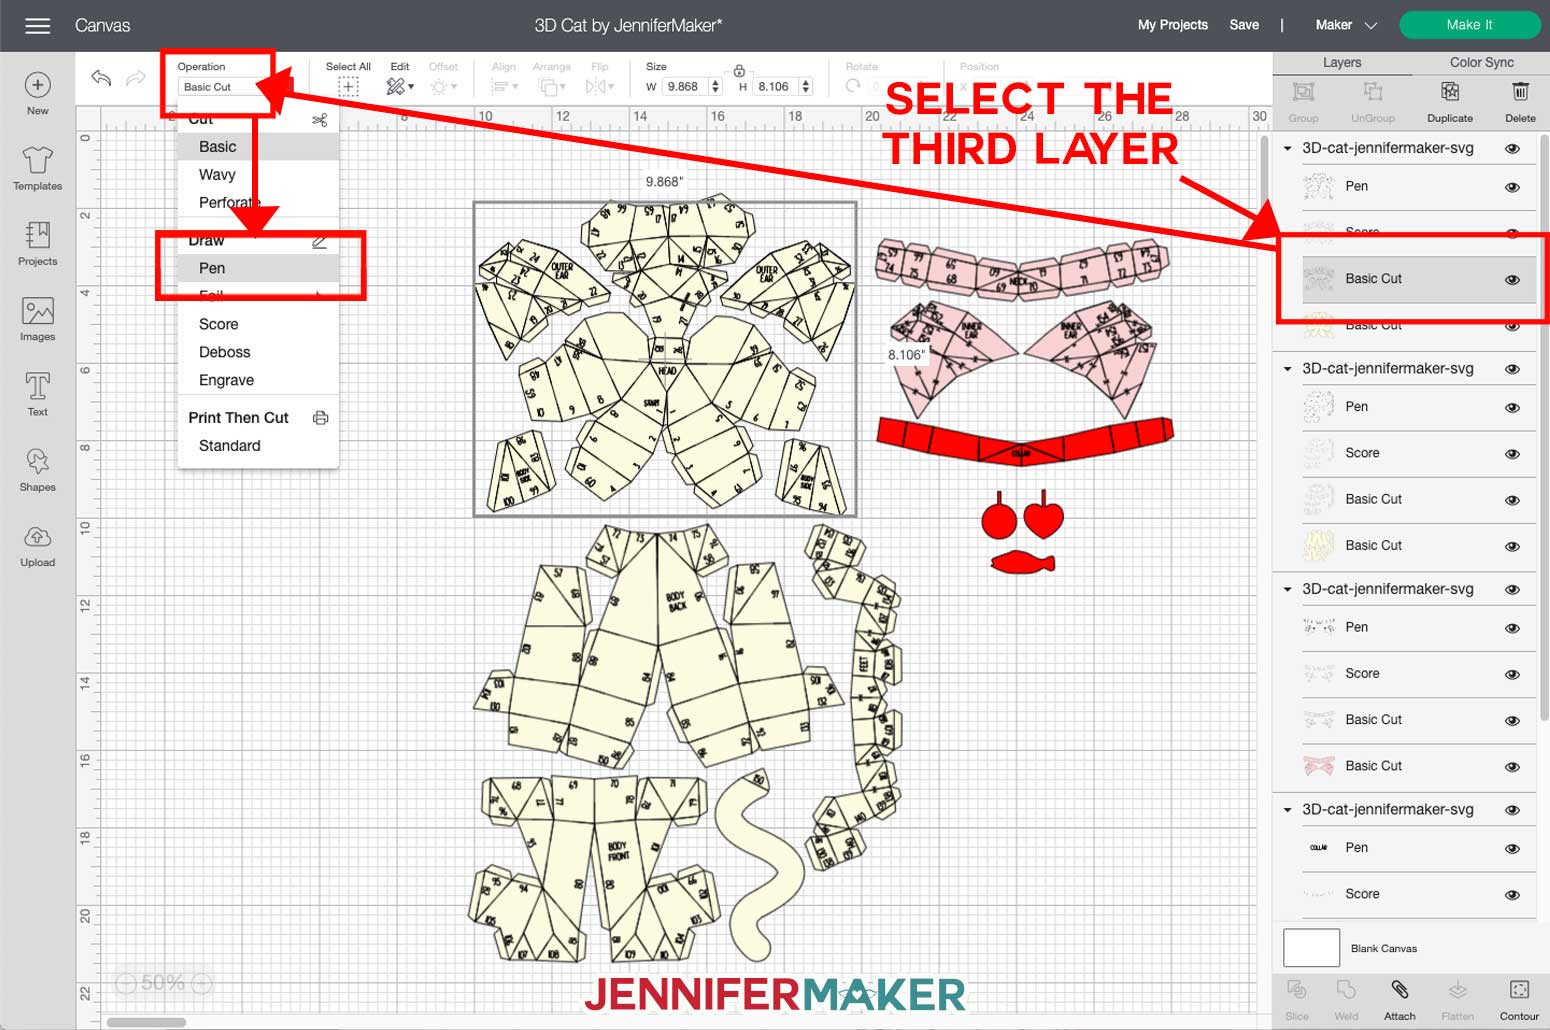
To set score/pen lines, first select the cat pattern on the Canvas, then click Ungroup until you have four individual groups. In each of the four groups, the top layer is the pen layer, the middle two layers are pen or score layers (your choice), and the bottom layer is the base (cut) layer.
Tip: The middle two layers can be both score layers, or one of those middle layers can be a draw layer and the other can be a score layer. You get to decide. Choose to make one a draw layer if you want to see your score lines better (this was my choice). Choose to make both score layers if you want your score to be really deep and strong (good choice for those using the scoring stylus instead of the scoring wheel). Doubling up on your score layer like this is a good way to inprove the depth of your score lines.
To begin, identify a pen layer, select it in the Layers panel, then go to Operation and choose "Pen." Do this for all pen layers in all groups (remember, it's the top layer).
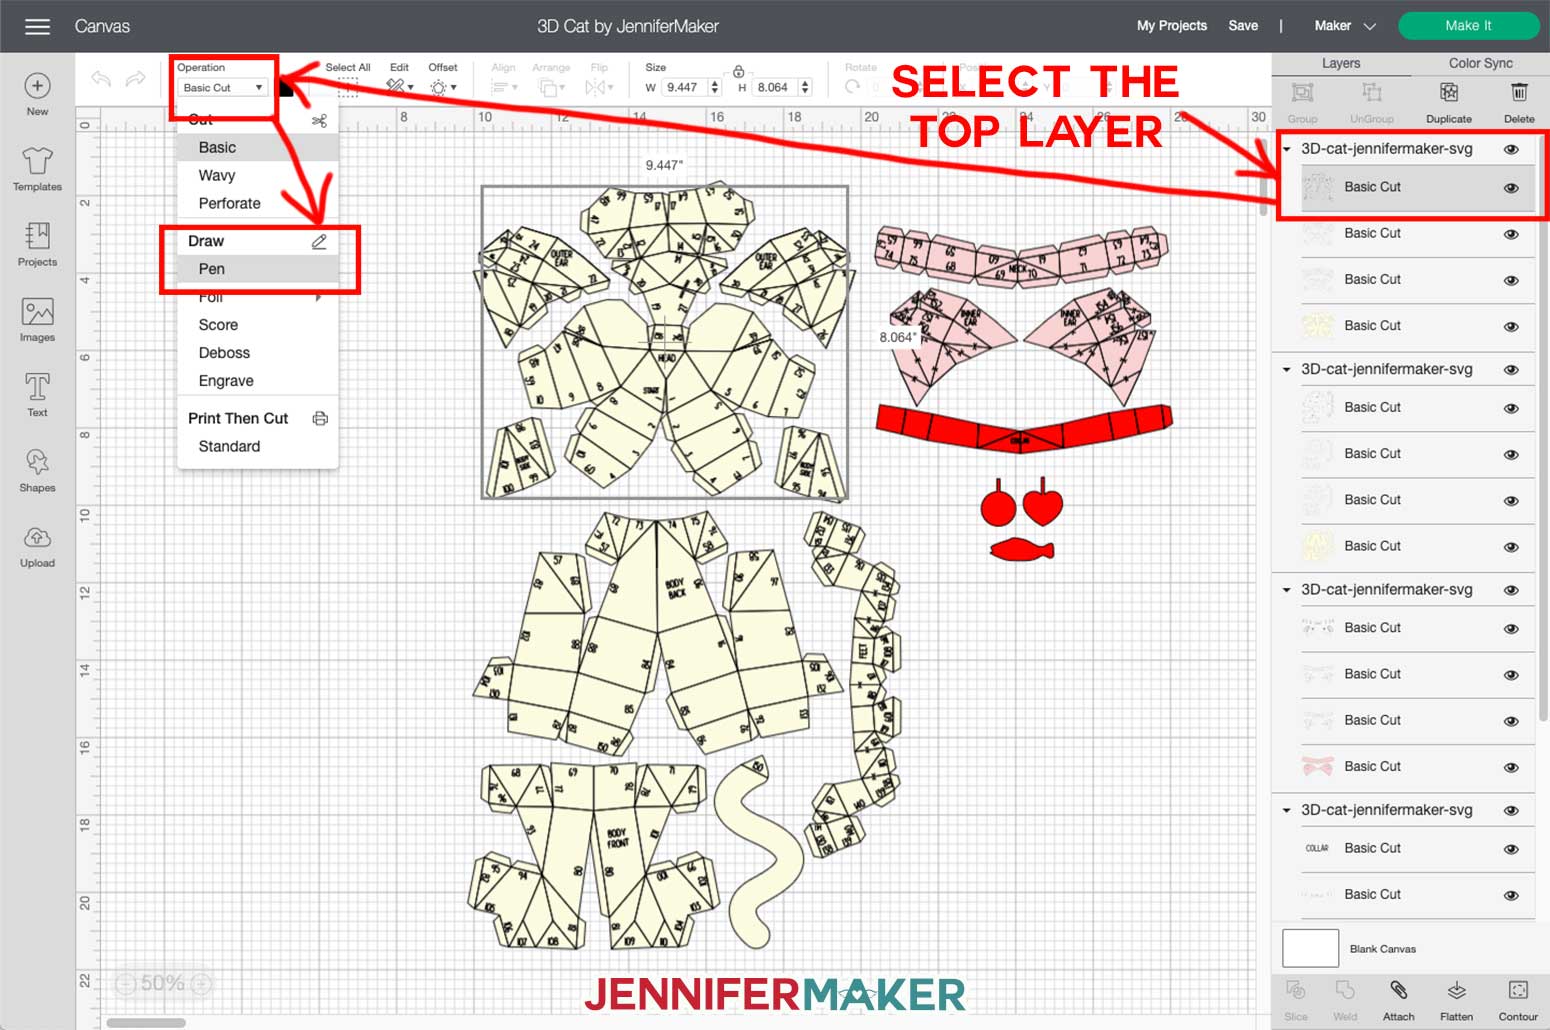
Identify a score layer, select it in the Layers panel, then go to Operation and choose "Score."
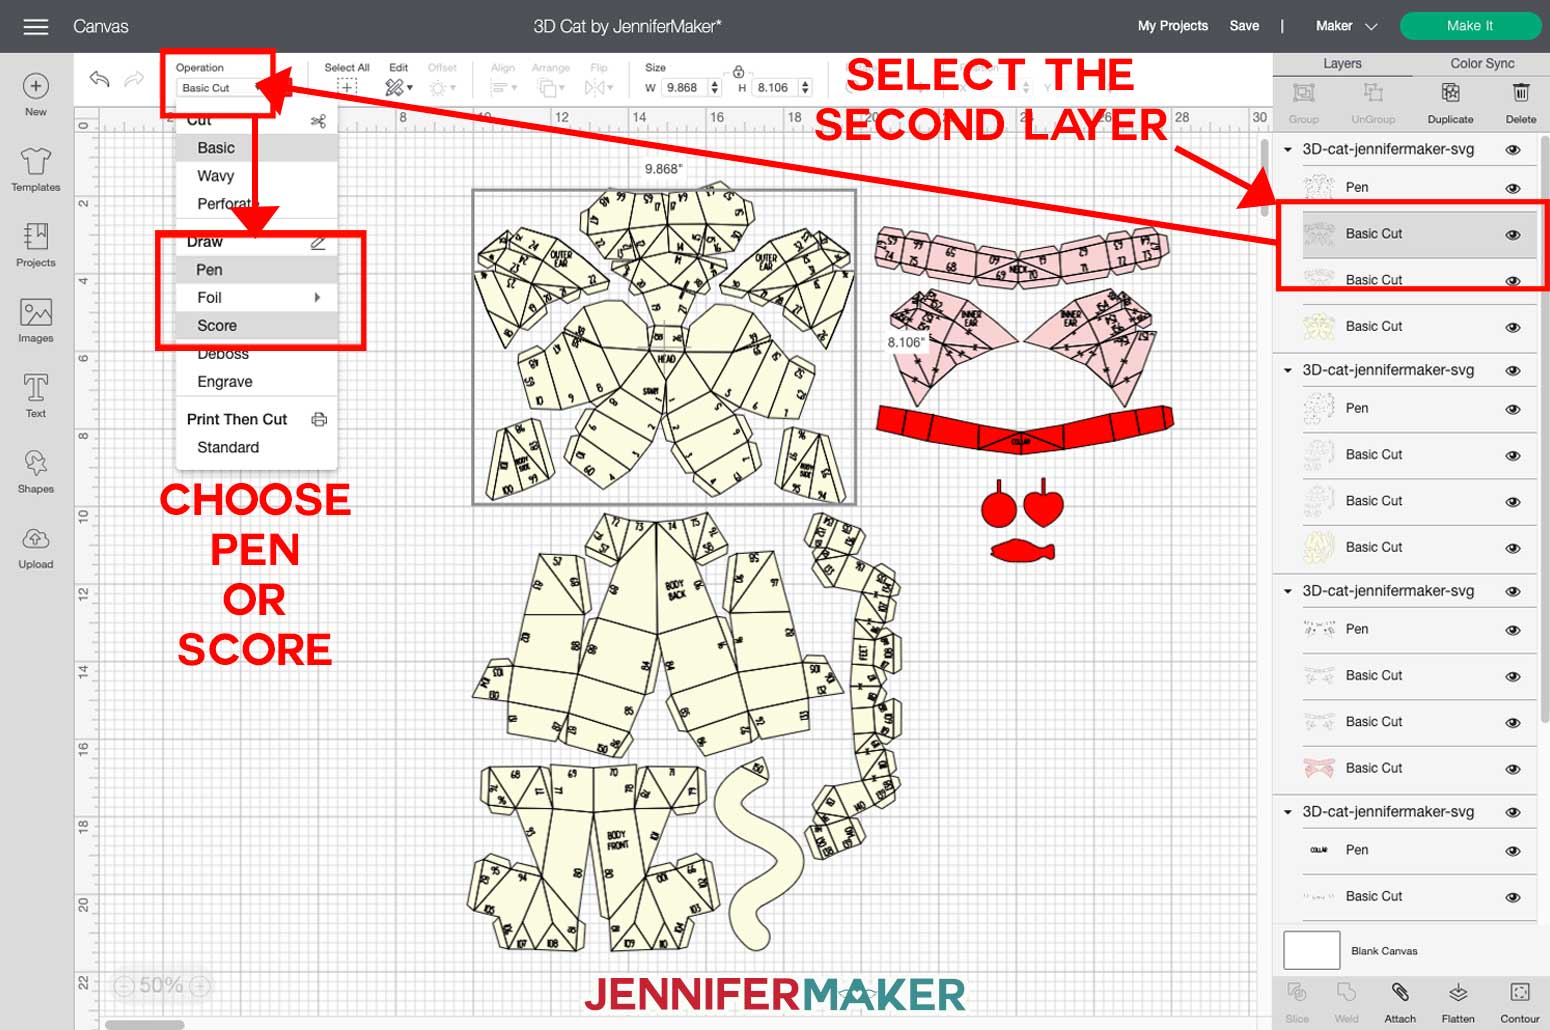
Then decide what you want to do the other middle layer. I'm going to change mine to "Pen" so I can see my score lines better. Do this for all middle layers in all groups (remember, it's the middle layer).
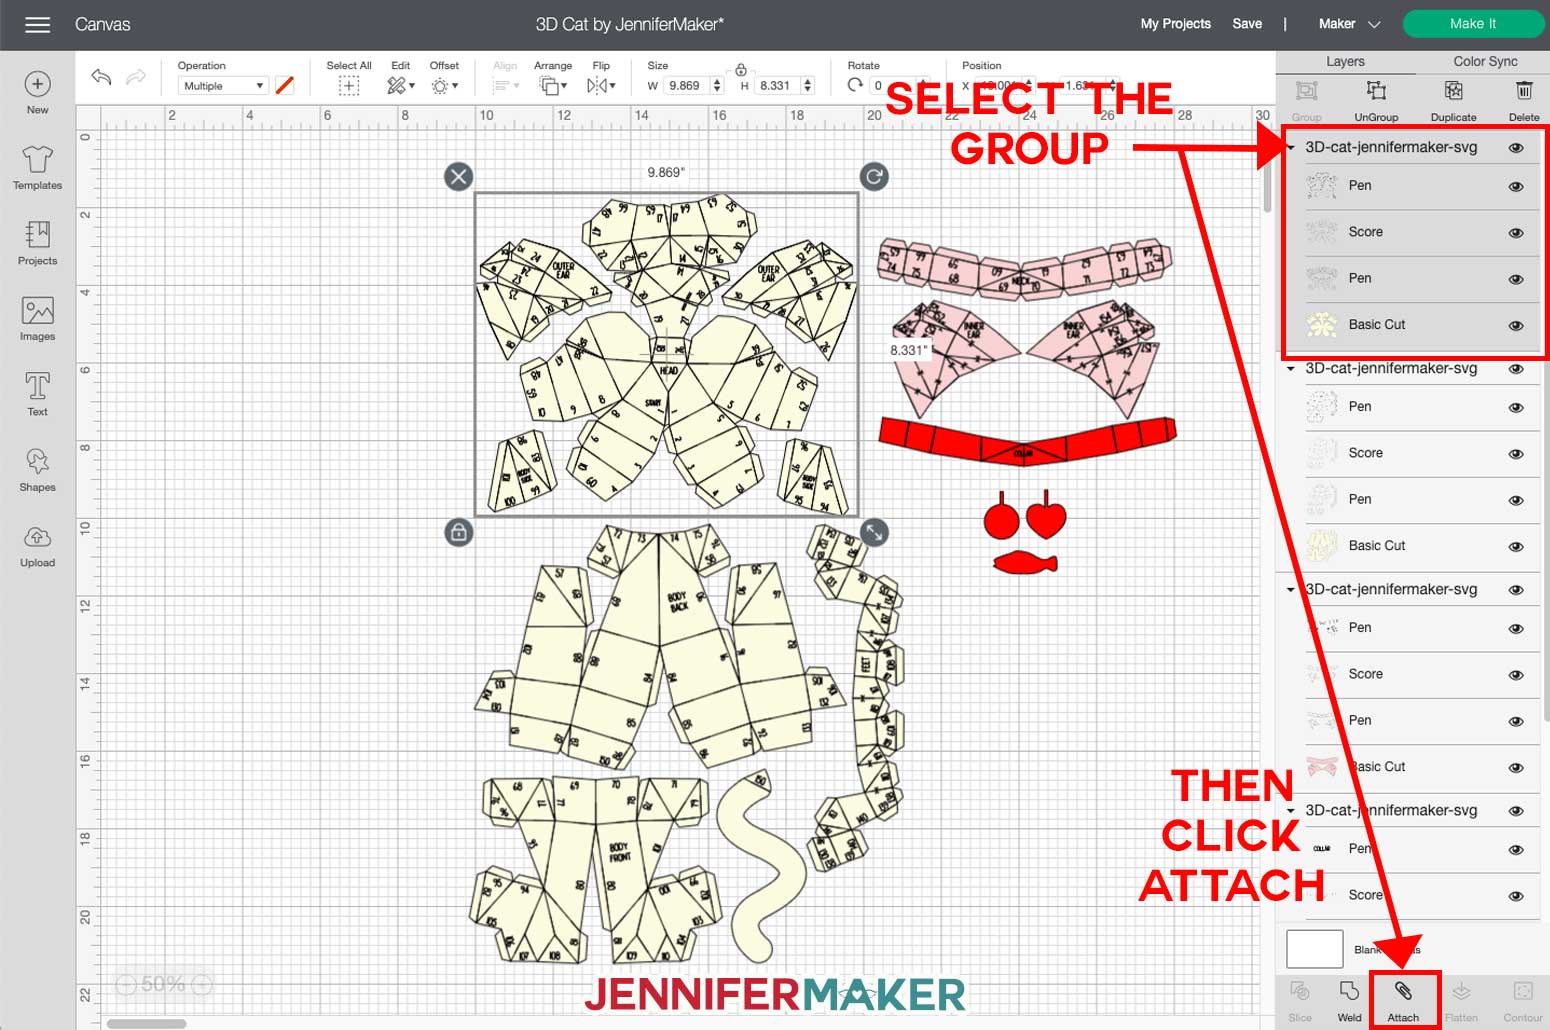
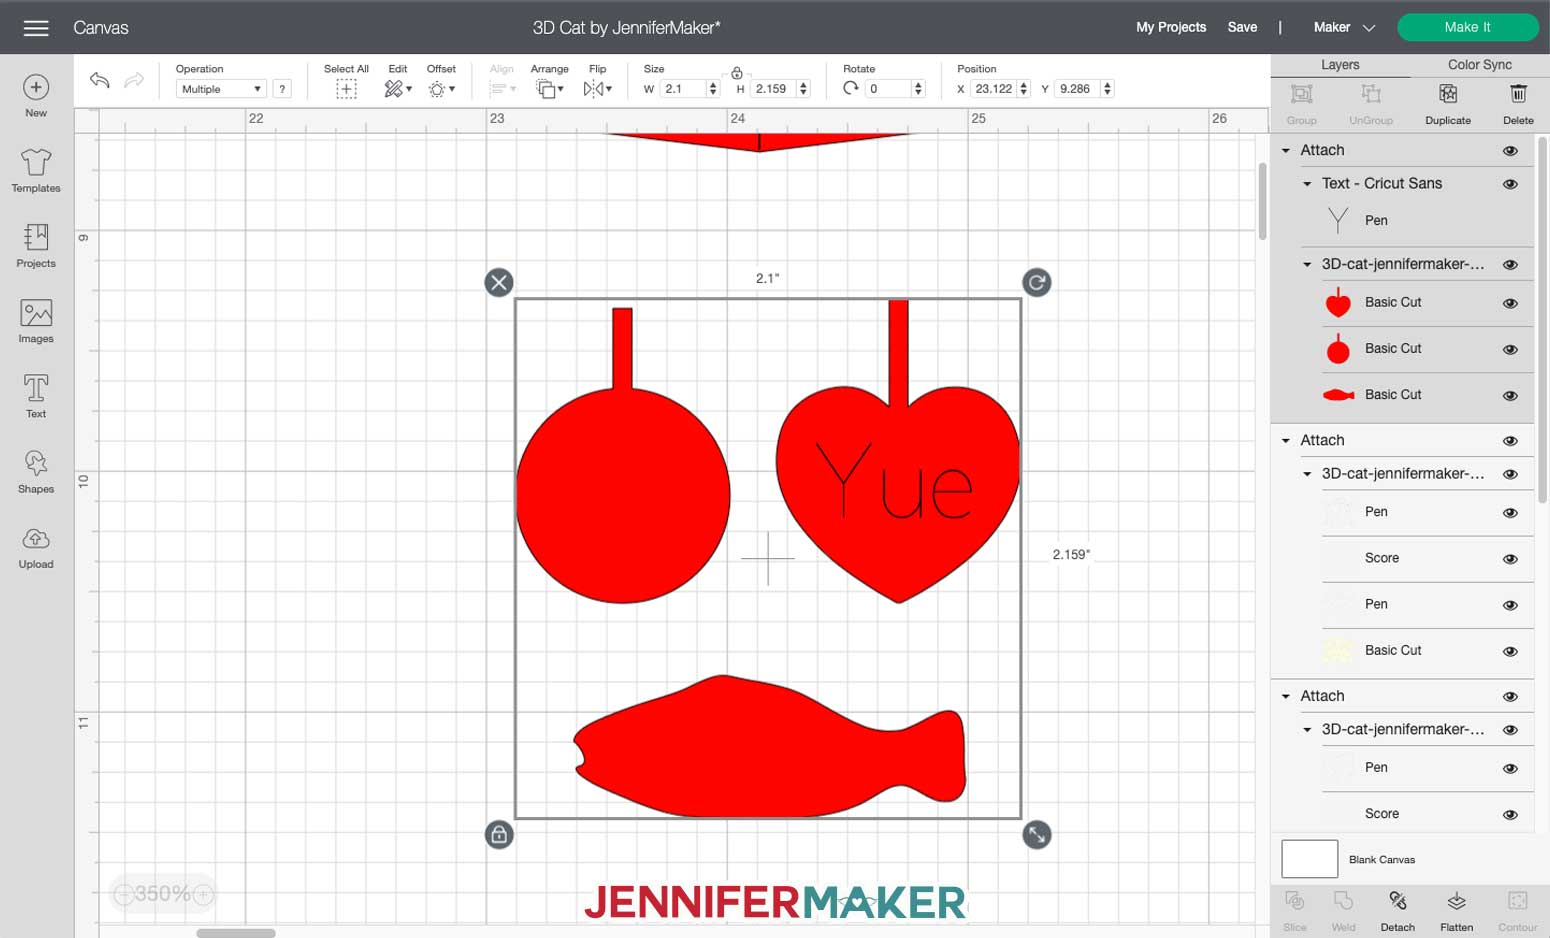
Select each group and attach the pen and score layers to the base layer by clicking on "Attach." Do this for all groups.
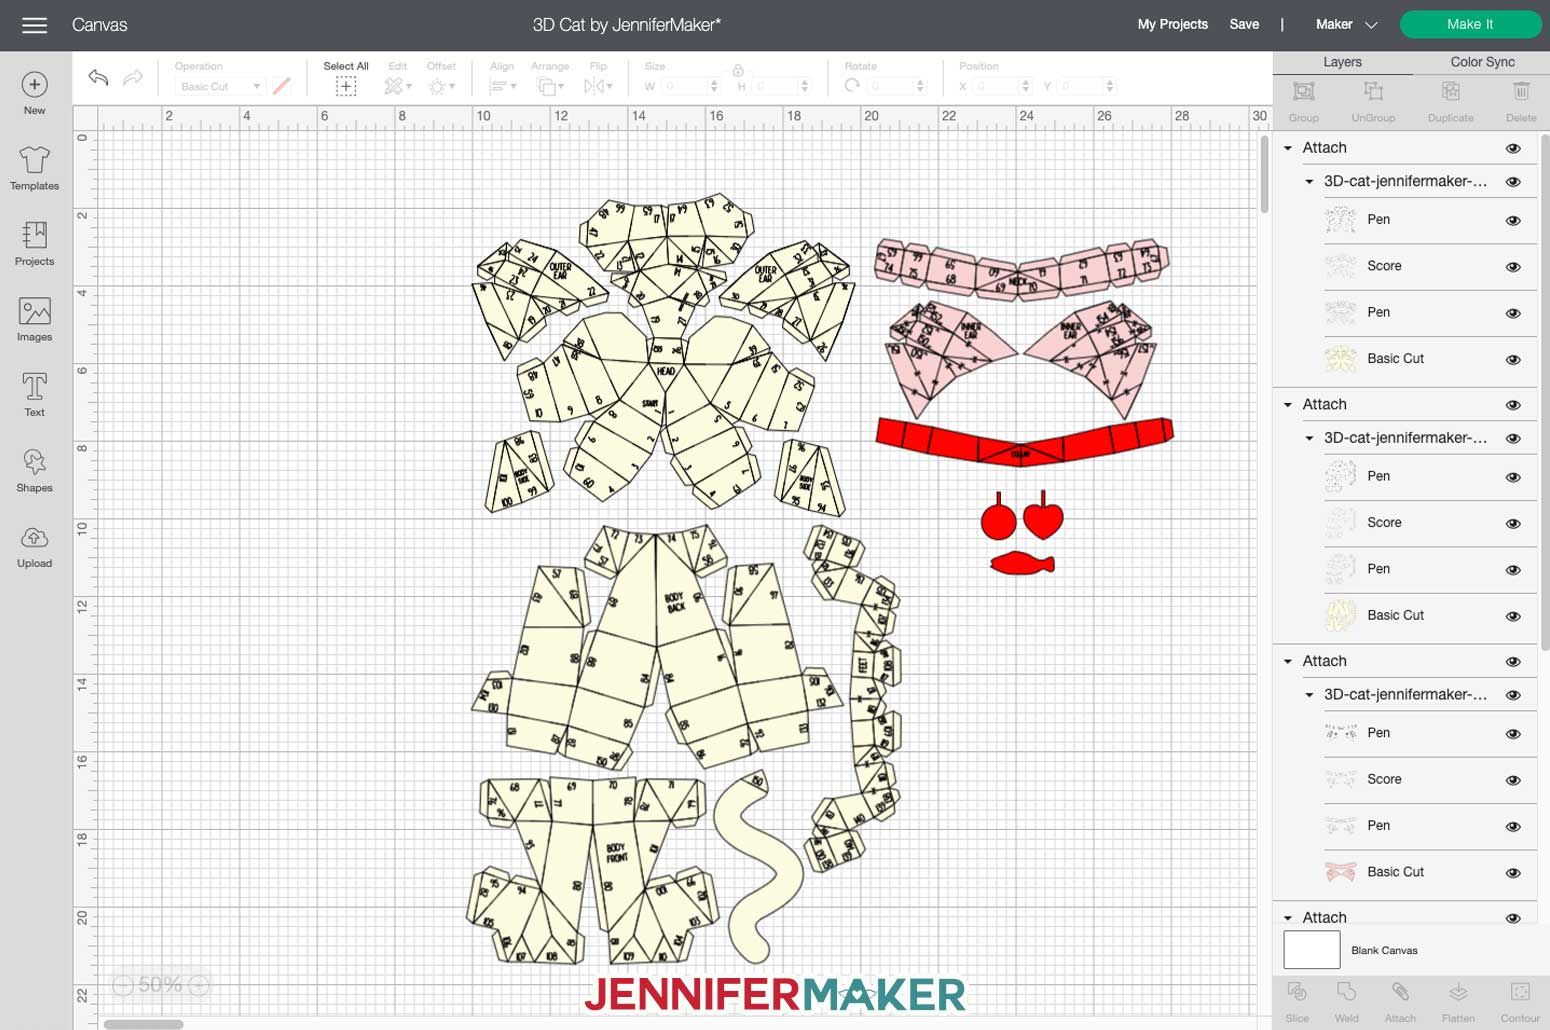
This is what the Layers panel in Cricut Design Space should look like when every pen and score line is properly attached to its base cut layer.
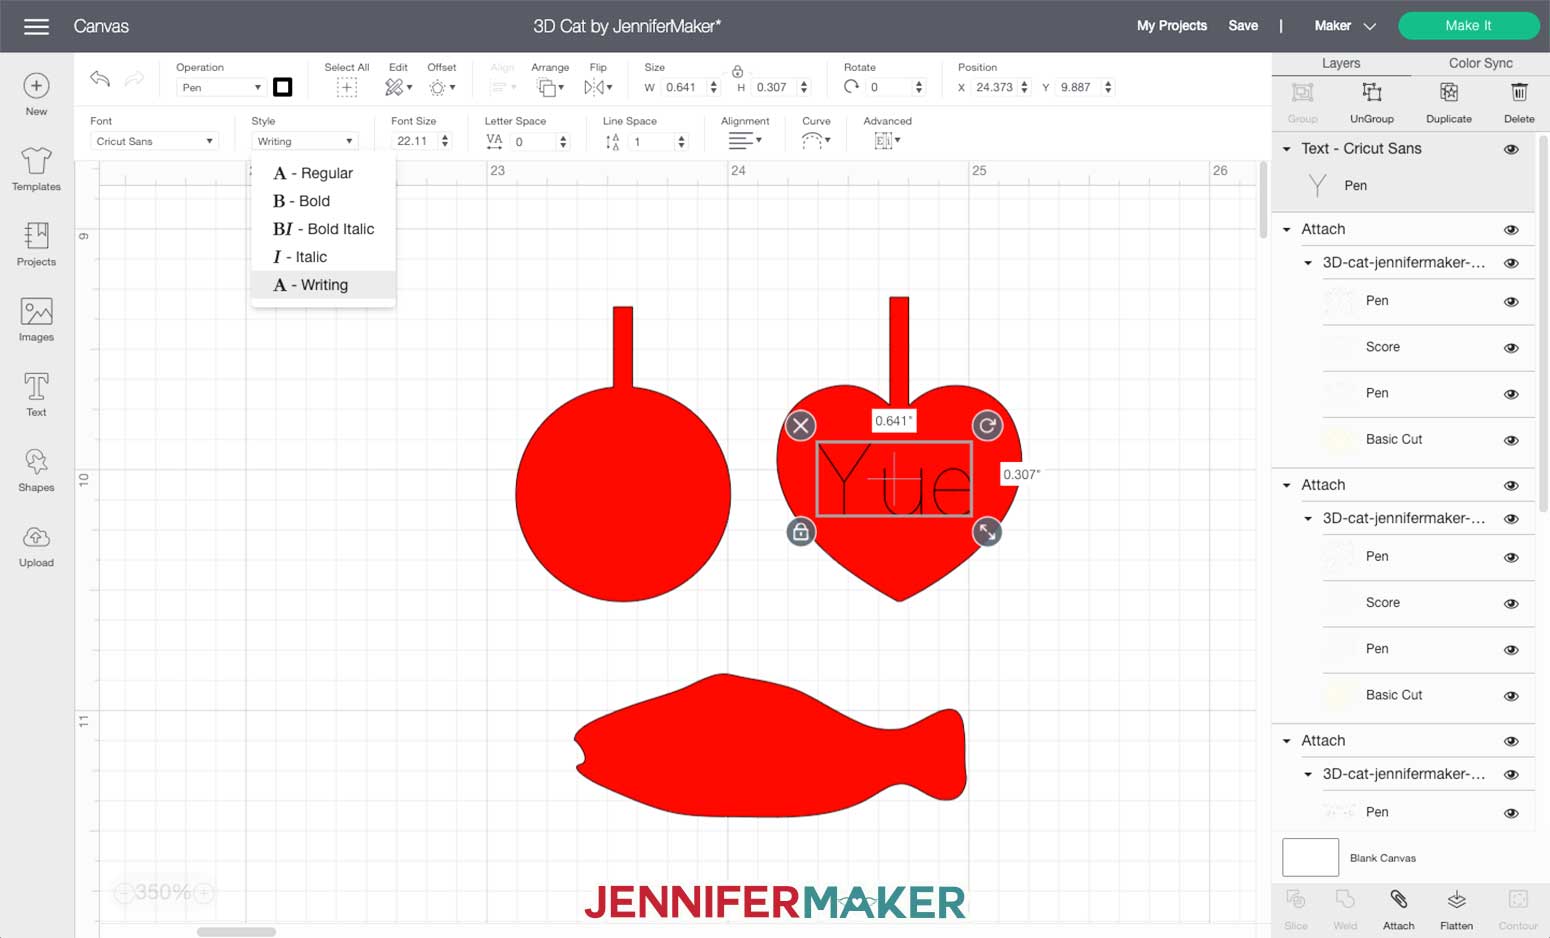
If you'd like to add some writing on a tag, just click on the Text tool, type a name, change the font to a writing font (I'm using free Cricut Sans in the writing style), resize and position on the tag, and then attach the text to one the tags.
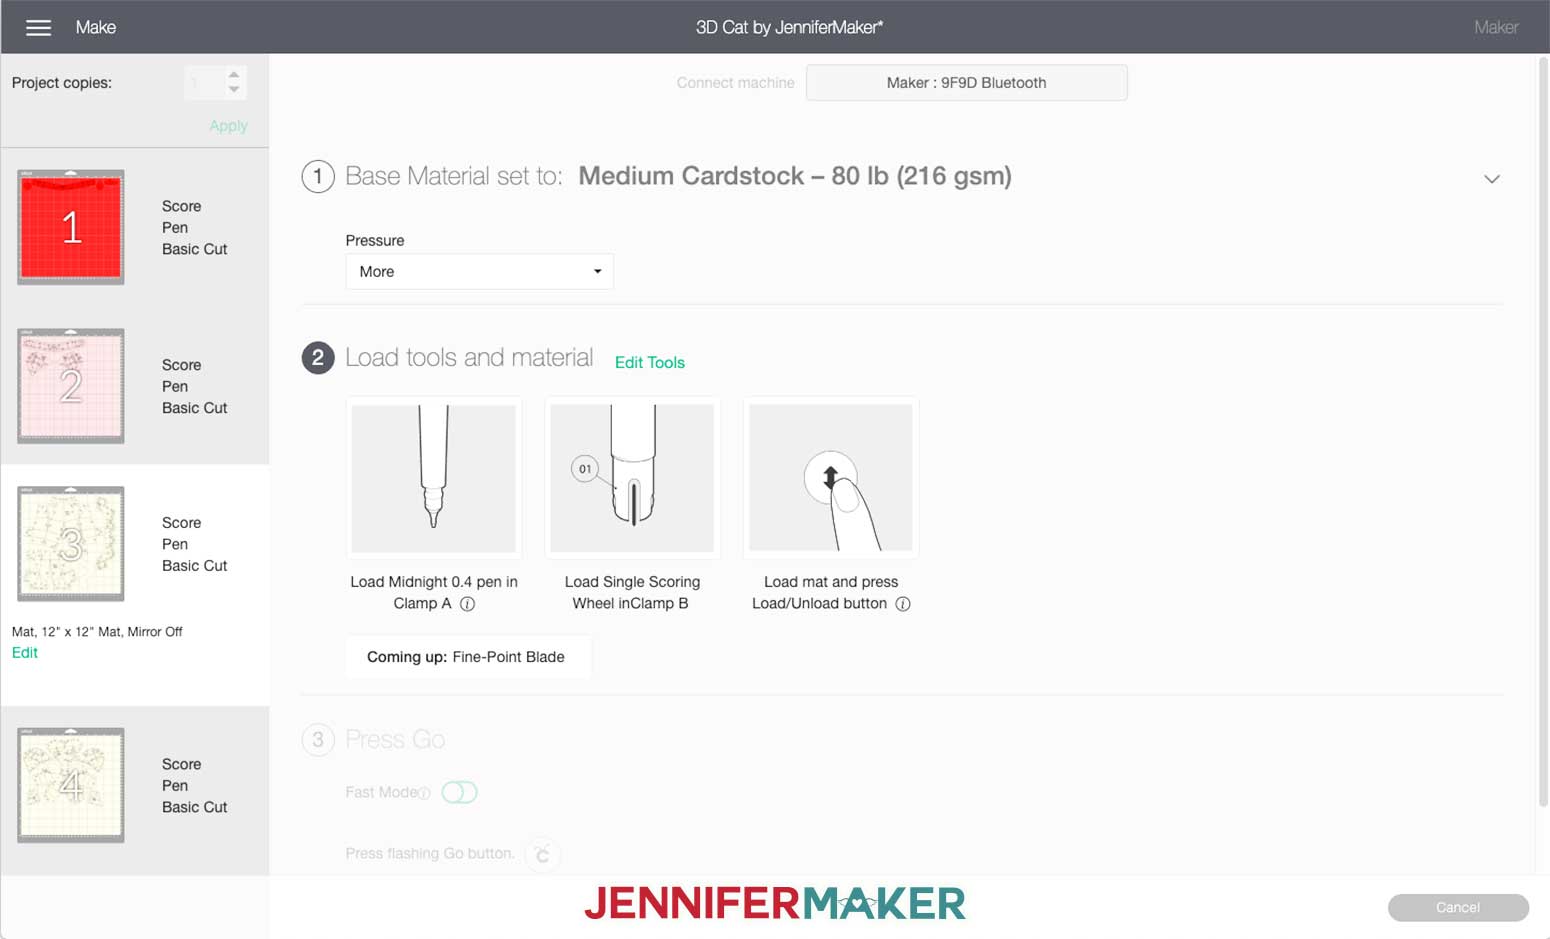
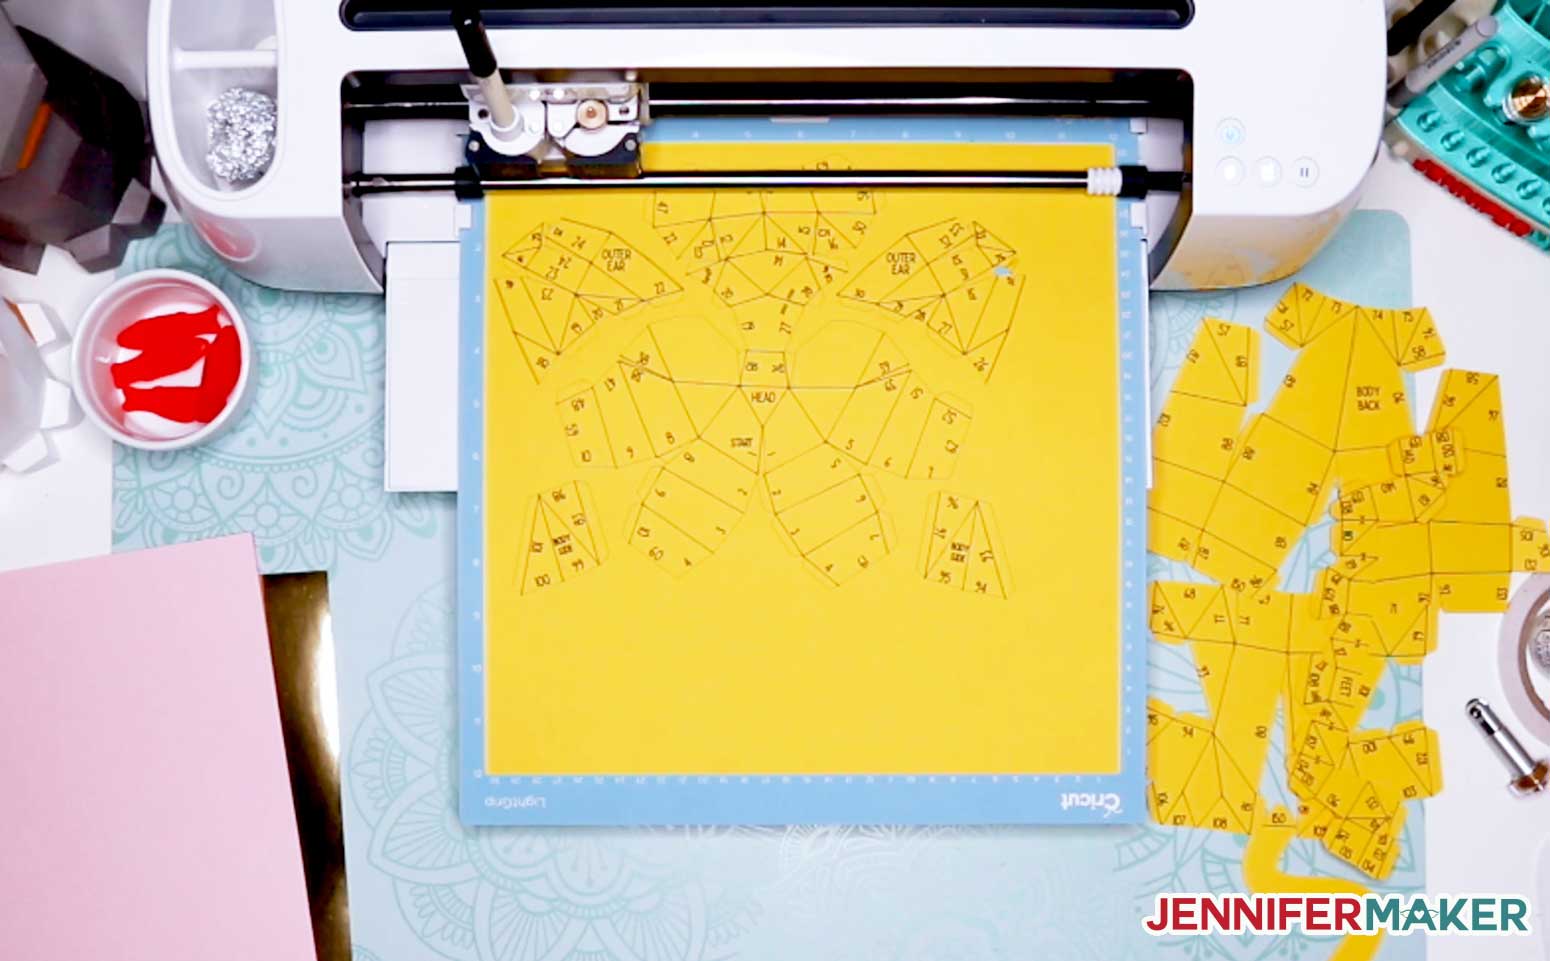
When everything looks good, save your work! And then click Make It and check the mats. You should see four mats: two for your main solid color, one mat for your inner ears and neck, and one color for your collar and tags. Easy peasy!

Click Continue and choose your material. If you're using 65 lb. cardstock as I am, you can choose Medium Cardstock and give it a little extra pressure. I recommend you use a smooth or very lightly textured cardstock for best results. Heavily textured and glitter cardstocks will be hard to score and glue, so avoid them unless you're ready for a challenge.
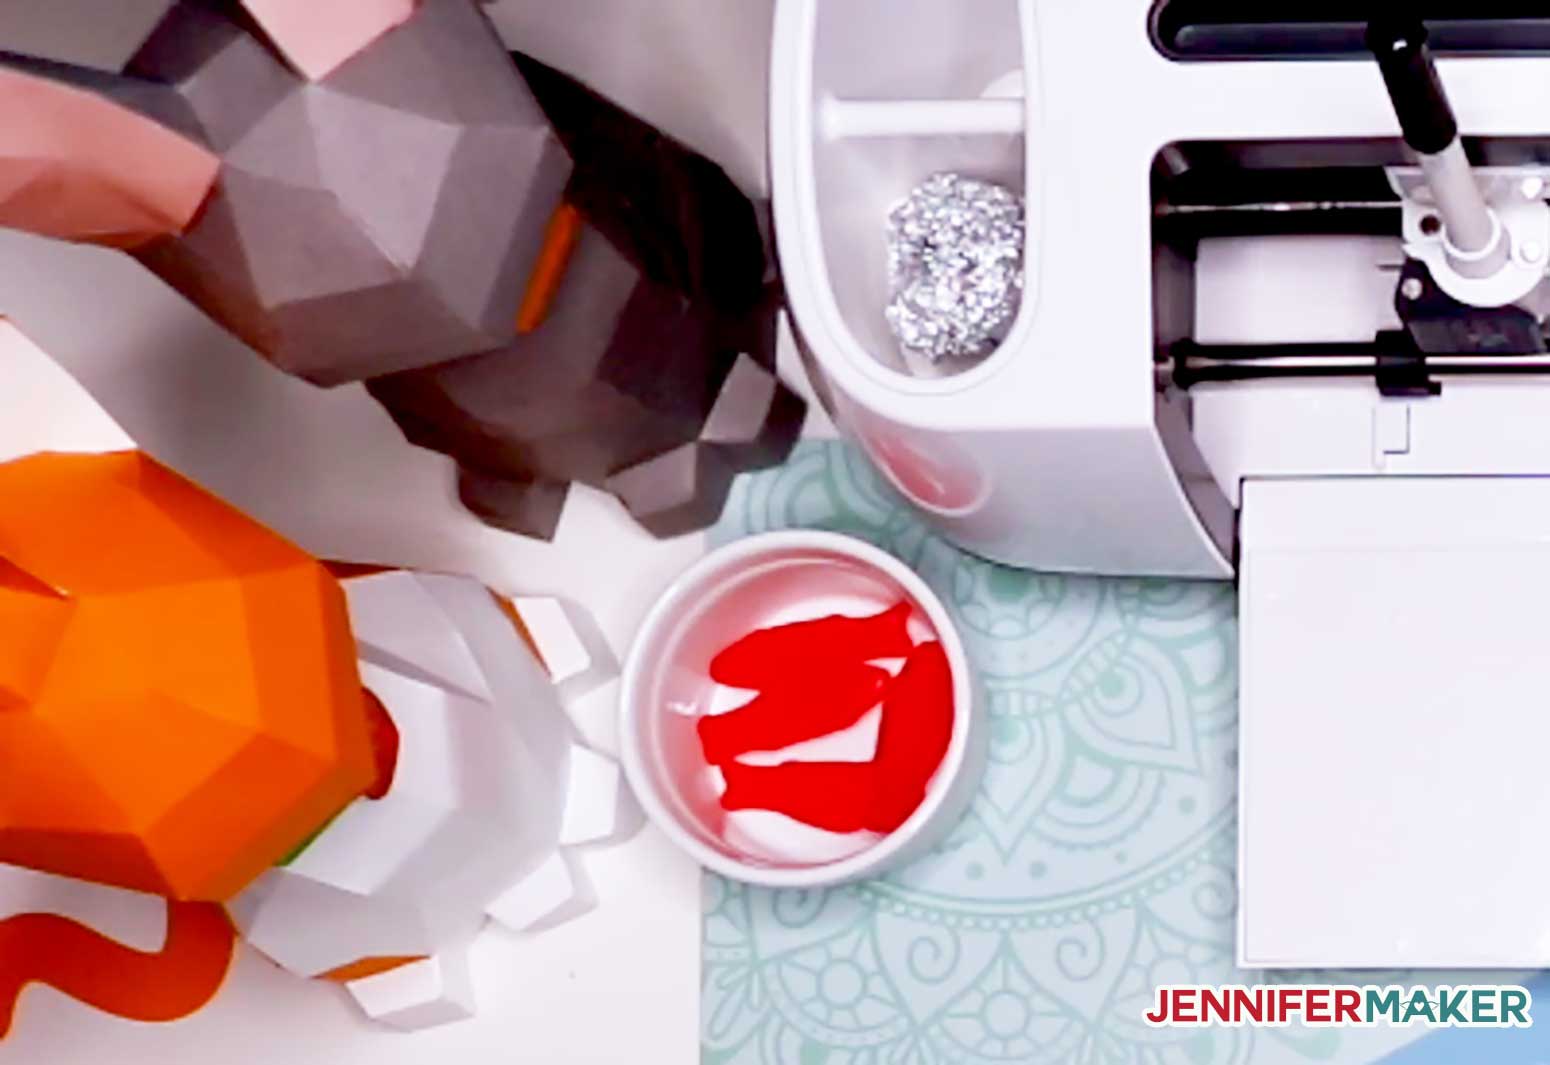
Now you may be wondering about those Swedish fish I suggested. I would put a few into a little bowl now and keep one for yourself. You have to keep your energy up for what is to come!
Now place your cardstock on your mat. If you're using patterned or single-sided cardstock, but the side you want to be seen on the outside of your cat FACE DOWN on the mat. Use a clean and sticky blue Light Grip machine mat for best results. You can also use a green Standard Grip machine mat so long as it is not brand new and super sticky. The act of drawing and scoring will really press the cardstock into your mat, and you'll find it challenging to remove your cardstock from a super sticky green mat.

Insert a fine-point Cricut pen into clamp A on .your cutting machine. Place the cap on the end so you don't lose it, and close the clamp. If you're cutting black cardstock, use something like a silver gel or metallic pen so you can see your draw lines, otherwise black is fine.
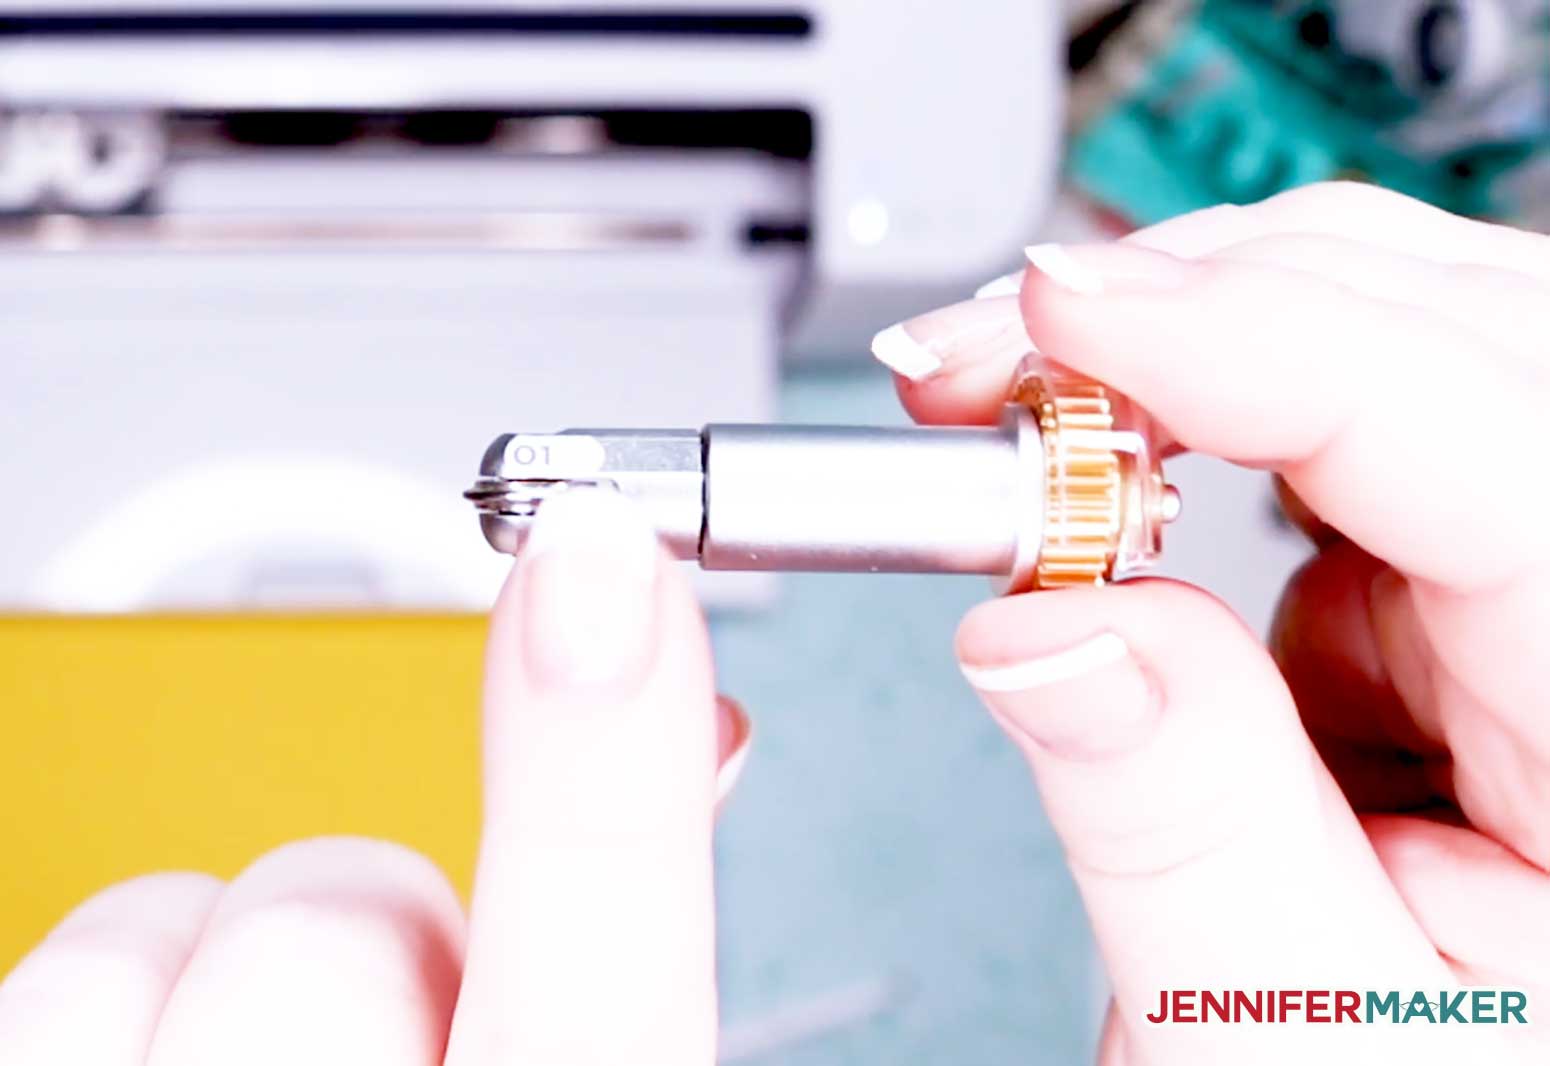
Place a scoring stylus (Explore and Maker) or a single scoring wheel (Maker only) into your cutting machine. If you're using the scoring wheel, it looks like this and has "01" printed on the side. Do not confuse it with the rotary blade, which looks similar, but will not work for this project.
Load your machine mat and begin cutting. Your cutting machine will first score, then draw, and finally cut.
When prompted onscreen, change your pen or scoring wheel as necessary.
When your materials are all drawn, scored, and cut, press Unload to remove the mat. Flip your mat over onto your work surface and peel the mat away from your cardstock carefully to avoid curling or ripping your paper. If necessary, use a spatula tool to release small, delicate bits from your mat without tearing them.
Continue doing this until all mats are cut. And feel free to indulge in a few fishies during this process, which I'm sure any self-respecting cat would do.
The cutting process took me about one hour total. You could speed this up by not drawing one or both of the layers.
STEP 3: FOLD AND CREASE YOUR 3D CAT PIECES
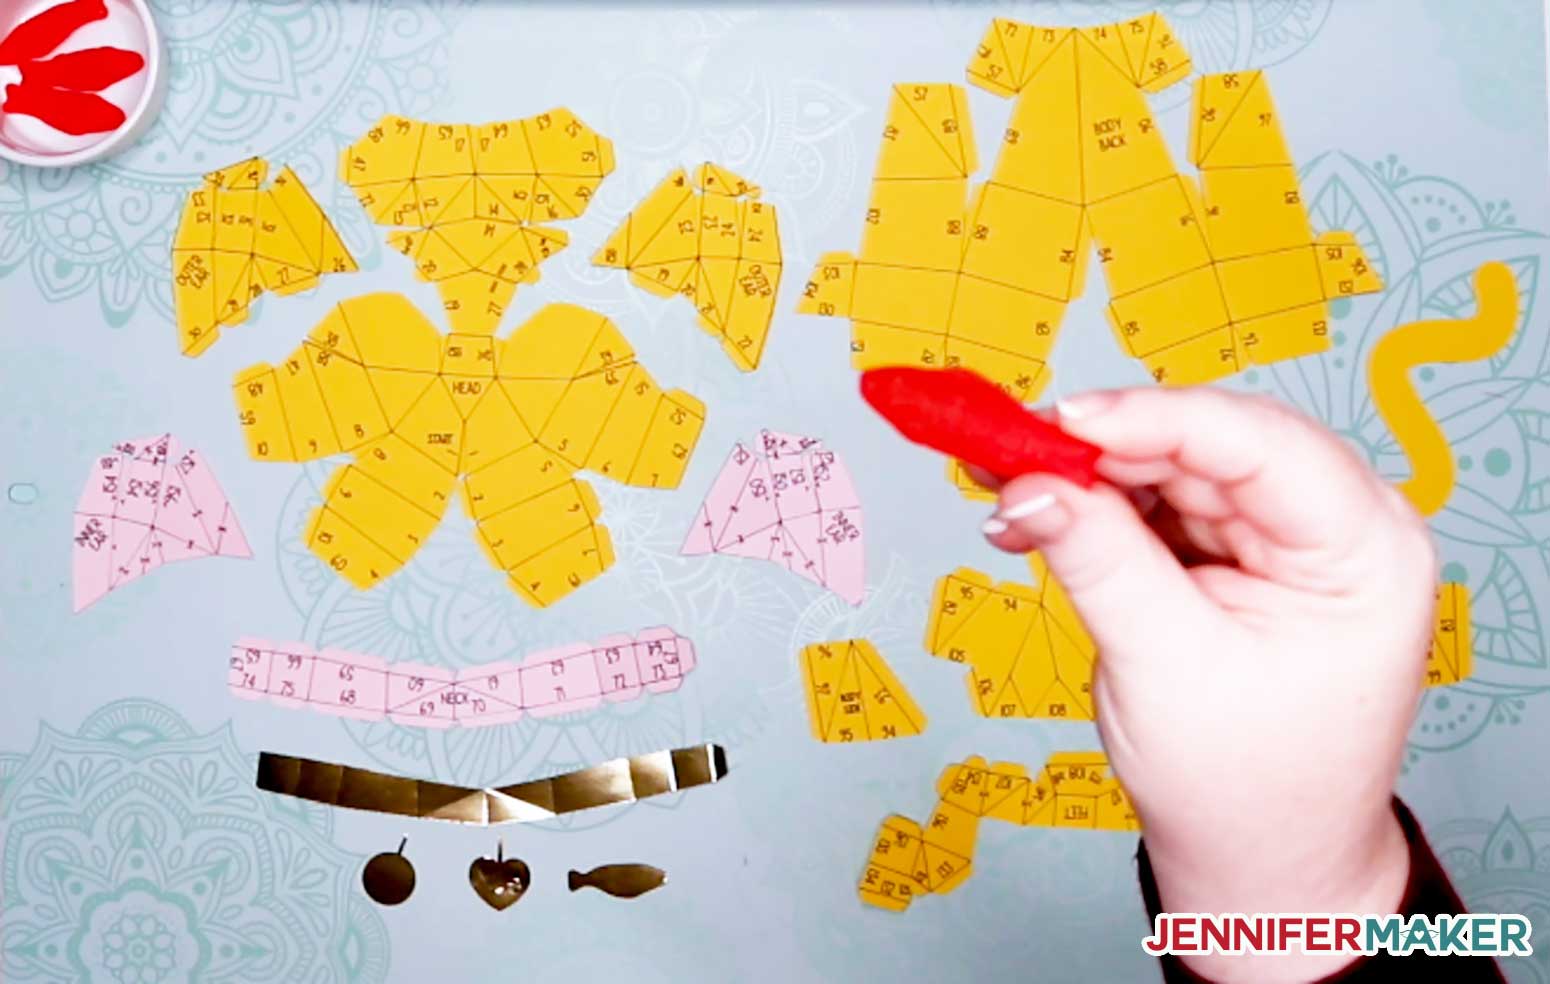
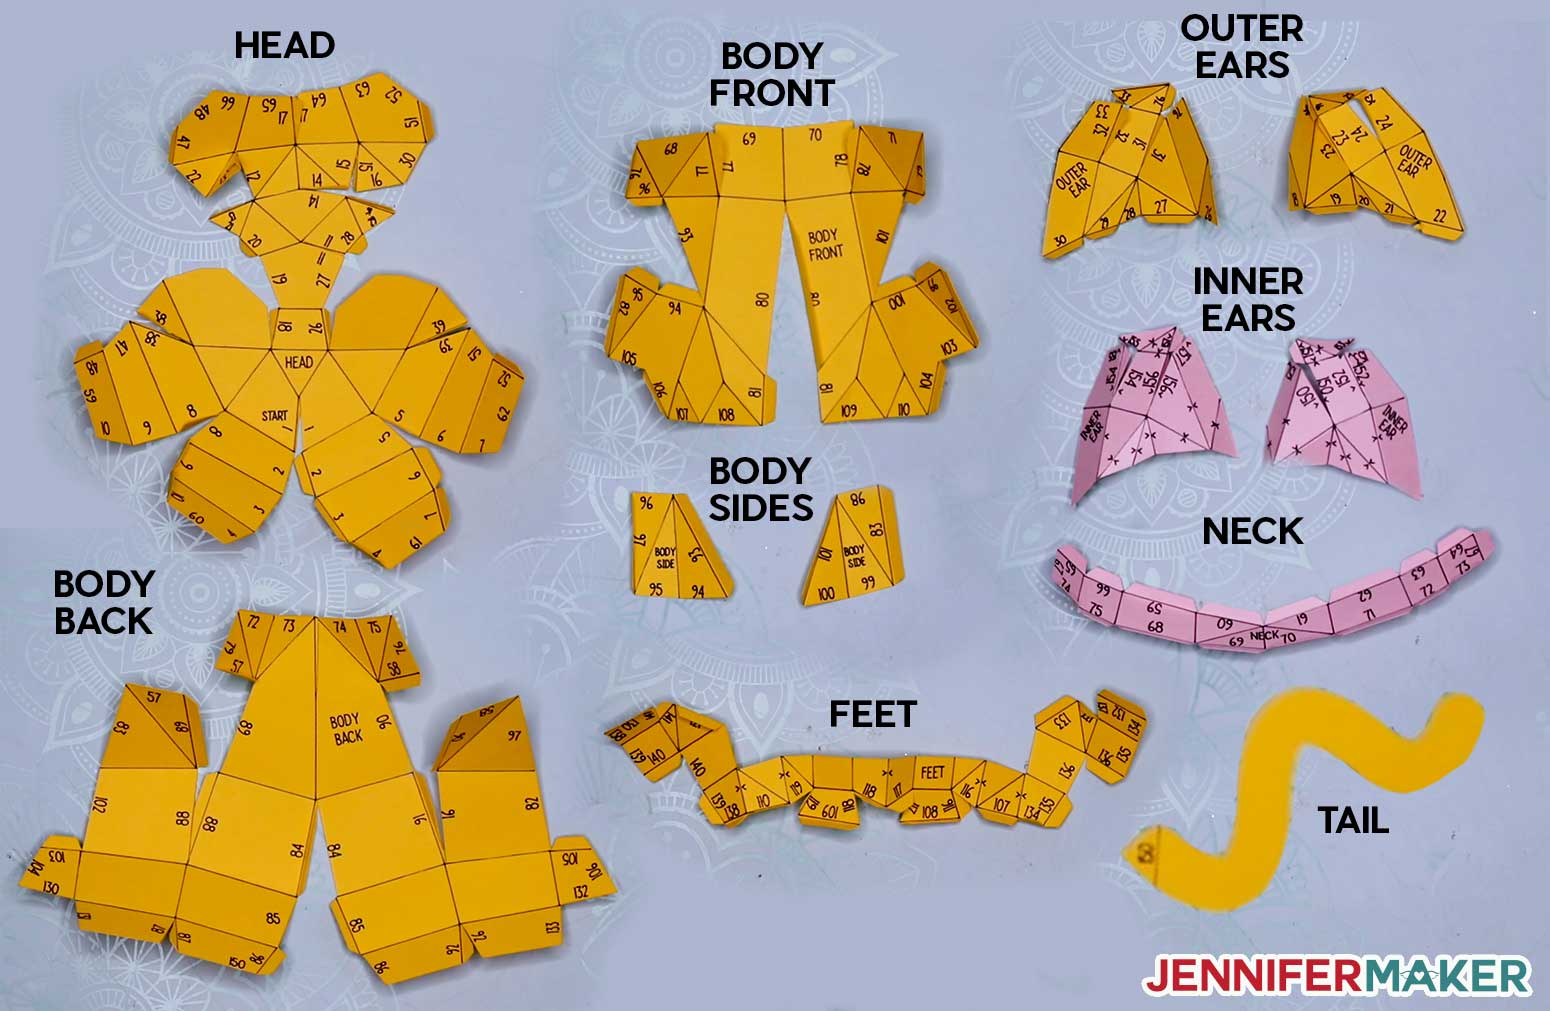
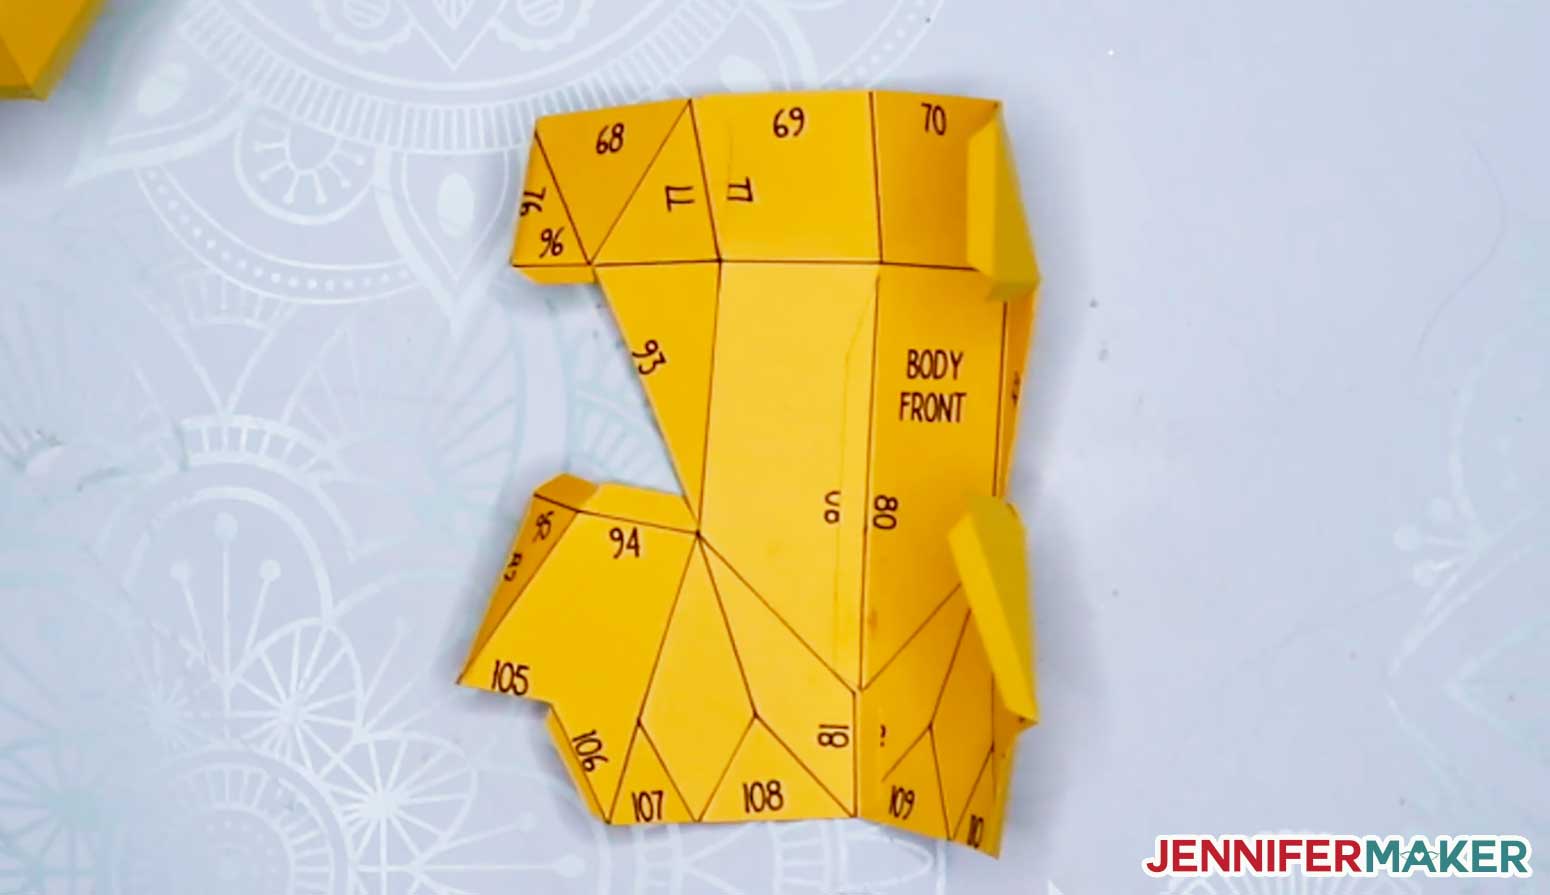
These are the pieces you will have when you are finished cutting your cat pieces. There's a head, two outer ears, two inner ears, neck, a front body, back body, two side bodies, feet, and a tail. You may also have an optional collar and/or tag if you chose to cut those out.
The first thing you need to do is fold ALL pieces on the score lines. Most folds will be "fold-ins," as you can see in the image below.
But some of the folds will be "fold-outs," which are indicated by two symbols like this: >
To fold the pieces, press your thumbnail or a scraper against the score line and fold the section in against itself. If you want crisp folds, press the crease after you folded it with your finger or a scraper.
Here's what all the pieces of the 3D cat look like after being folded (the optional collar and tag are not shown):
When you're all done folding, which took me about 25 minutes, take a little break and nibble on a tasty Swedish fish.
STEP 4: ATTACH AND ASSEMBLE YOUR 3D CAT
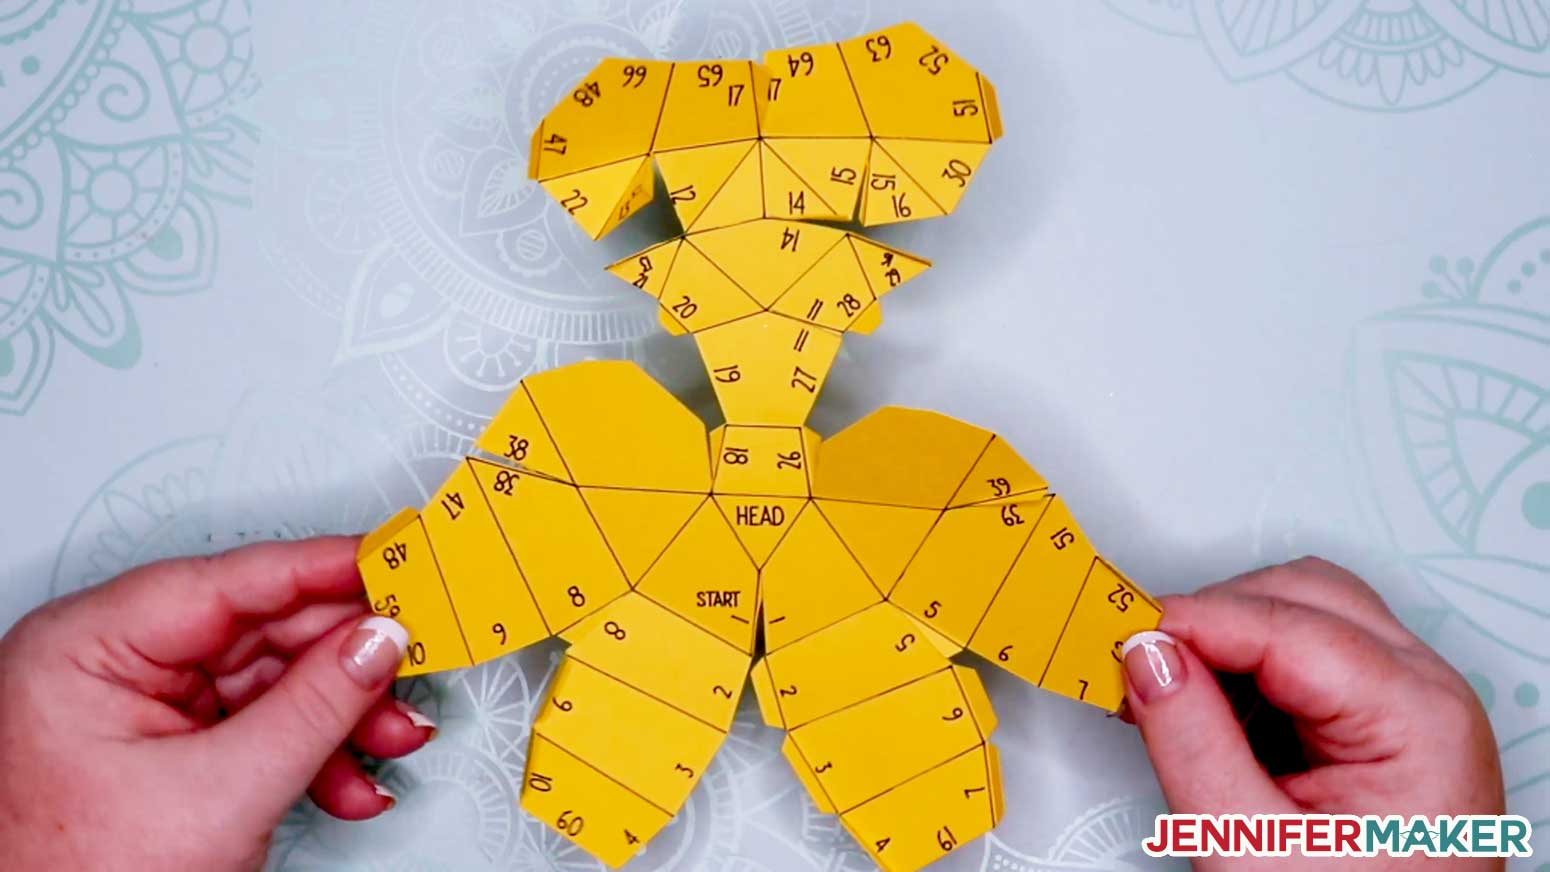
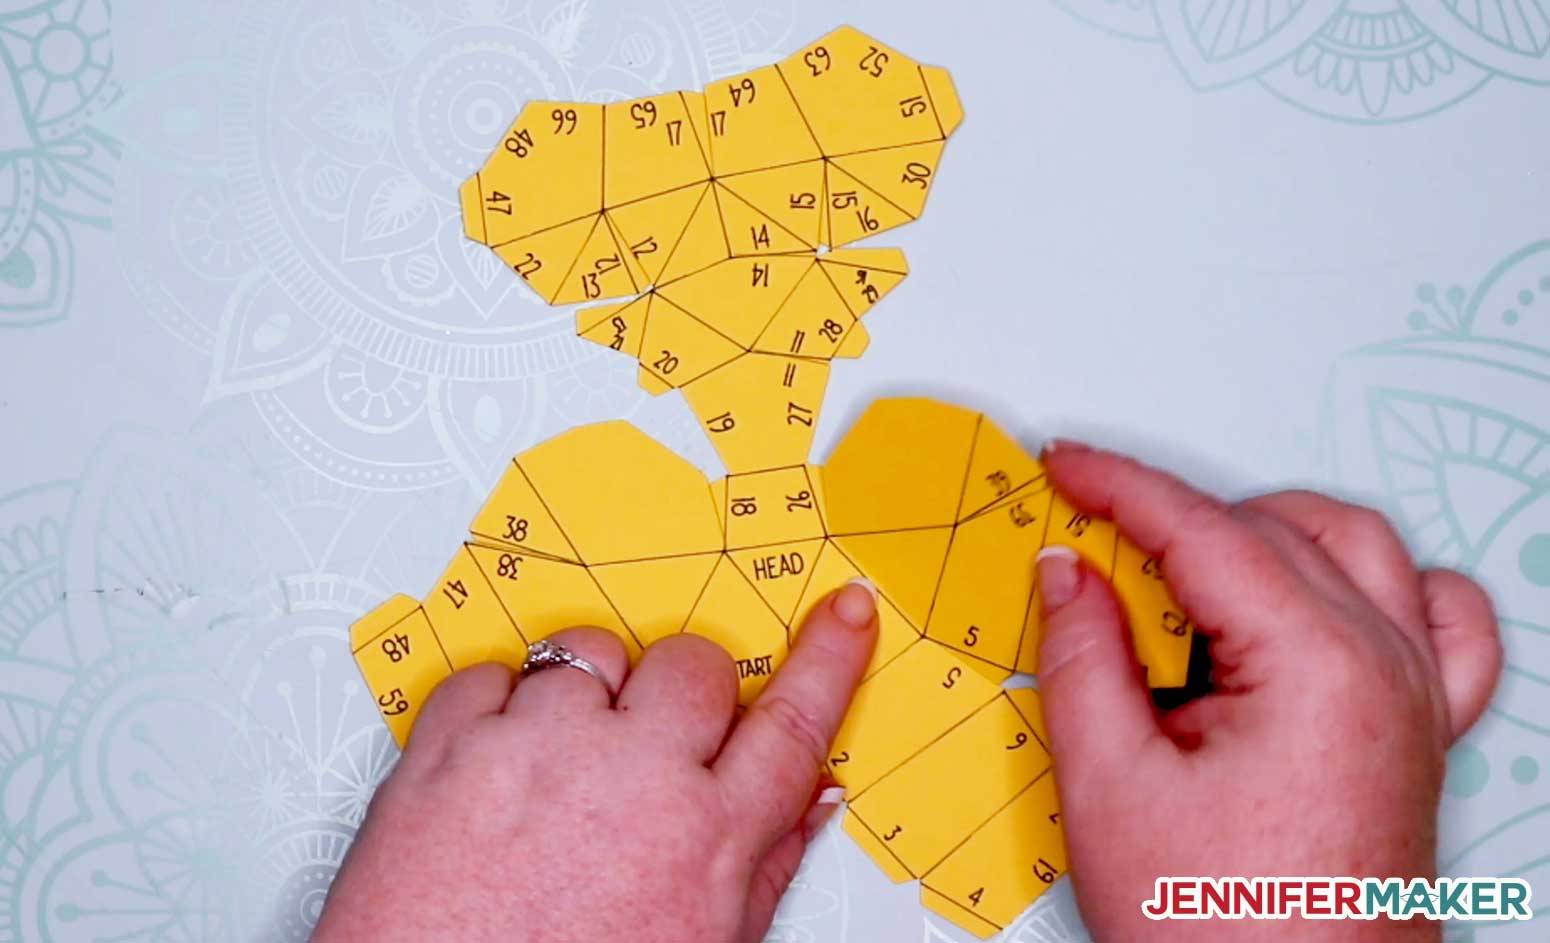
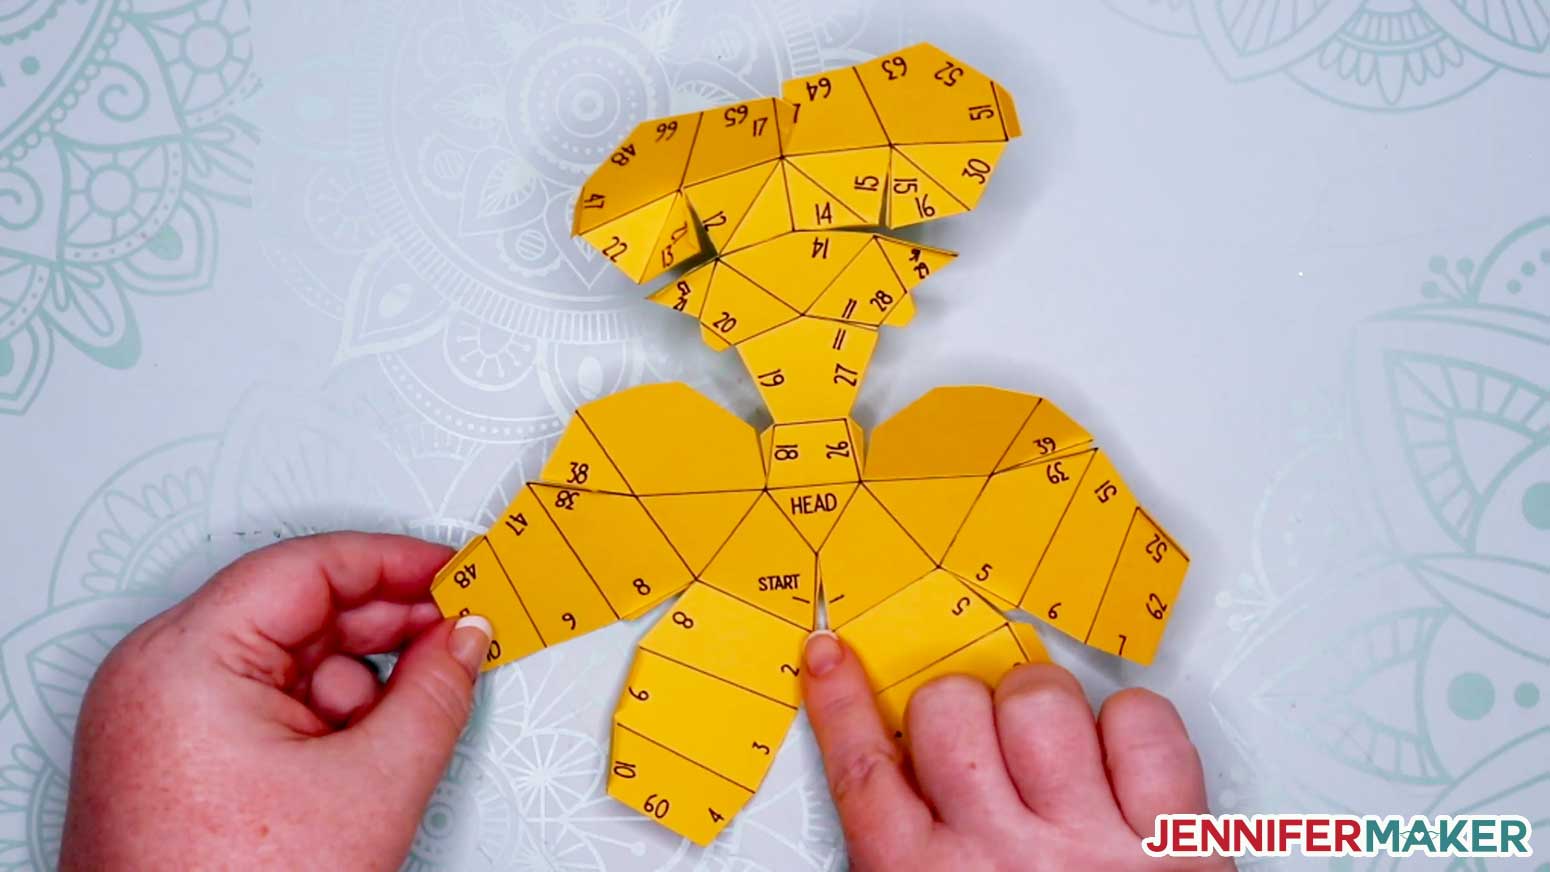
Beginning with the Head piece, look for the word "Start" written on the side with the numbers. Beside it you will see the number 1, and near it is another number 1.
Starting here, apply a small amount of glue to the underside of the tab next to the #1. The tab is quite small, but large enough for a little glue. Do not use too much glue -- just a small amount will do. I am using a precision tip on a bottle of Bearly Art glue here, which works really well.
Note: If you find glue too messy, or your glue isn't adhering well to your cardstock, you can also use double-sided Scor-Tape which is just 1/8" wide.
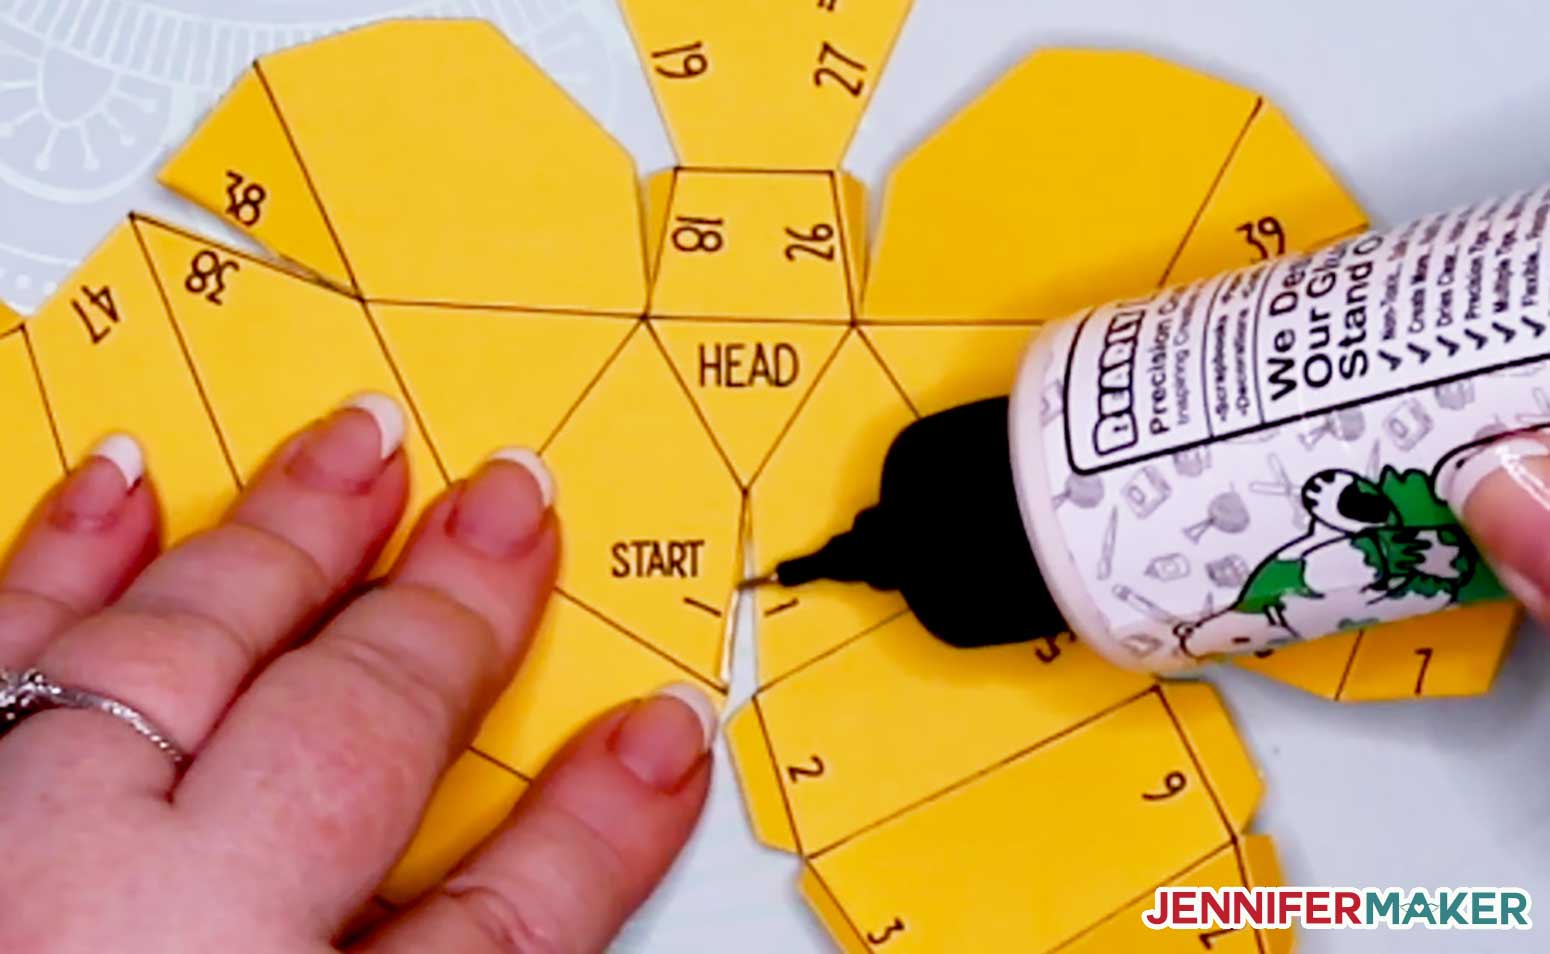
Turn the cardstock over so you can see the "good" side (which is the side without pen on it), and line up the #1 tab under the #1 side so that the fold of the tab meets the other side's edge and you can catch any glue messes. Press the tab against the side, holding them in place with your fingers until they side stay together. This usually only needs 5-10 seconds of pressure.
Continue matching up numbers from this point on, gluing and pressing in place with your fingers until it stays in place. I recommend going in general order starting with the #2 tab. Just be aware that not all numbers are represented on the 3D cat (I skip over many numbers).
Be careful not to guess at where sections are glued — always match numbers when gluing. For example, if you guess, you may think that #18 and #26 get glued right next to the sections beside them, but in fact they join up with #18 and #26 on the outer ears.
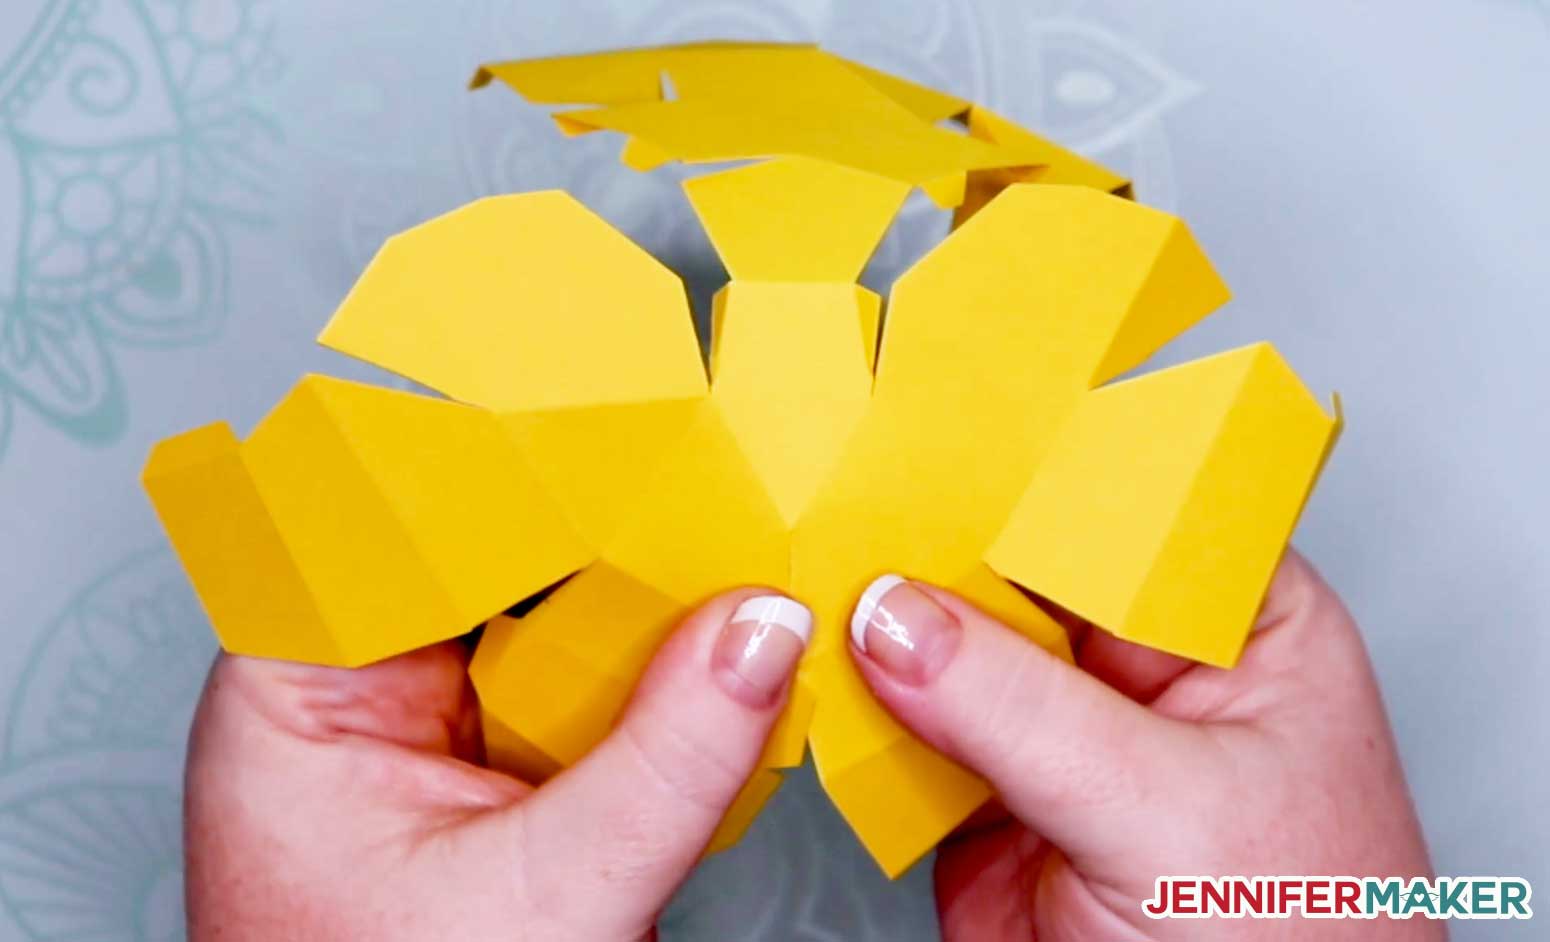
When you're done gluing the head of your 3D cat, it will look like this. Note that the pieces in front of the ear are not glued to anything — they sort of float there loosely, giving you access to the inside of the head during assembly. You can just push them inward for now.
This is a great time to enjoy a little Swedish fish. Hey, it's a "Fat Free Food" — no guilt!
Once your 3D cat head is glued together, it's time to add other parts to it by matching up the numbers. I recommend you start with the outer ears. Pick up one of the outer ear pieces and begin gluing it in the same way you did with the head, matching up numbers. Like before, I recommend gluing from the "good side" so you can make sure your edges meet and you can watch for glue issues.
Here's what the outer ear looks like when all glued:
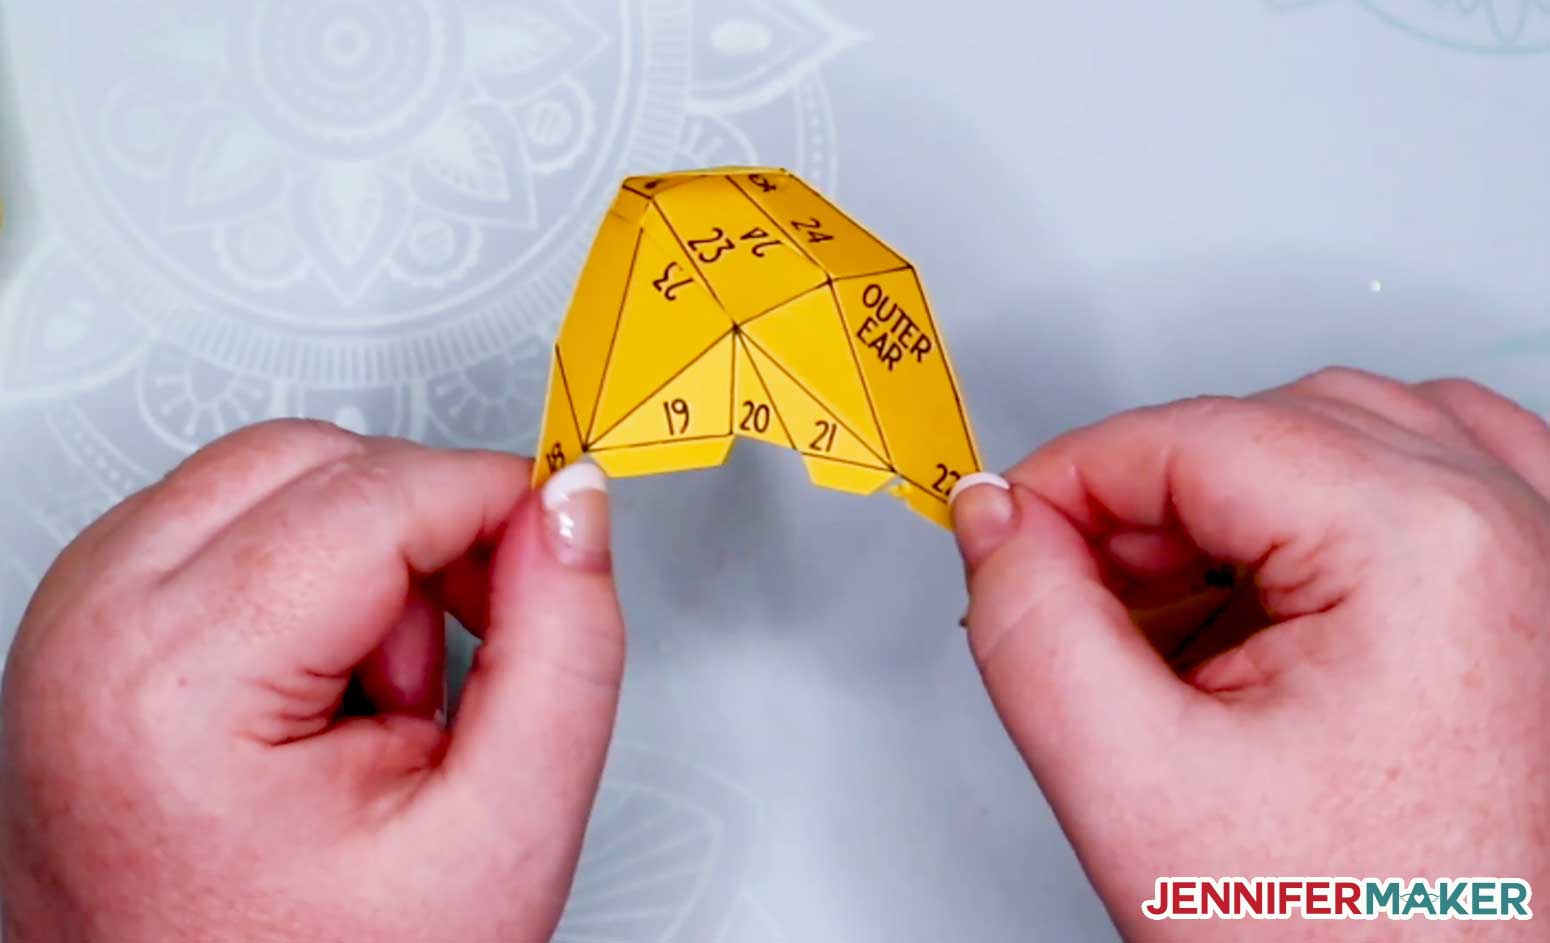
Glue the other outer ear piece together as well.
Now it's time to attach the outer ears to the 3D cat's head. Match up the numbers just like before — the pen ink should appear on the inside of the ear. You may be tempted to glue several tabs at once, but I recommend you just do one at a time.
Here's what the 3D cat's head looks like with its outer ears attached.
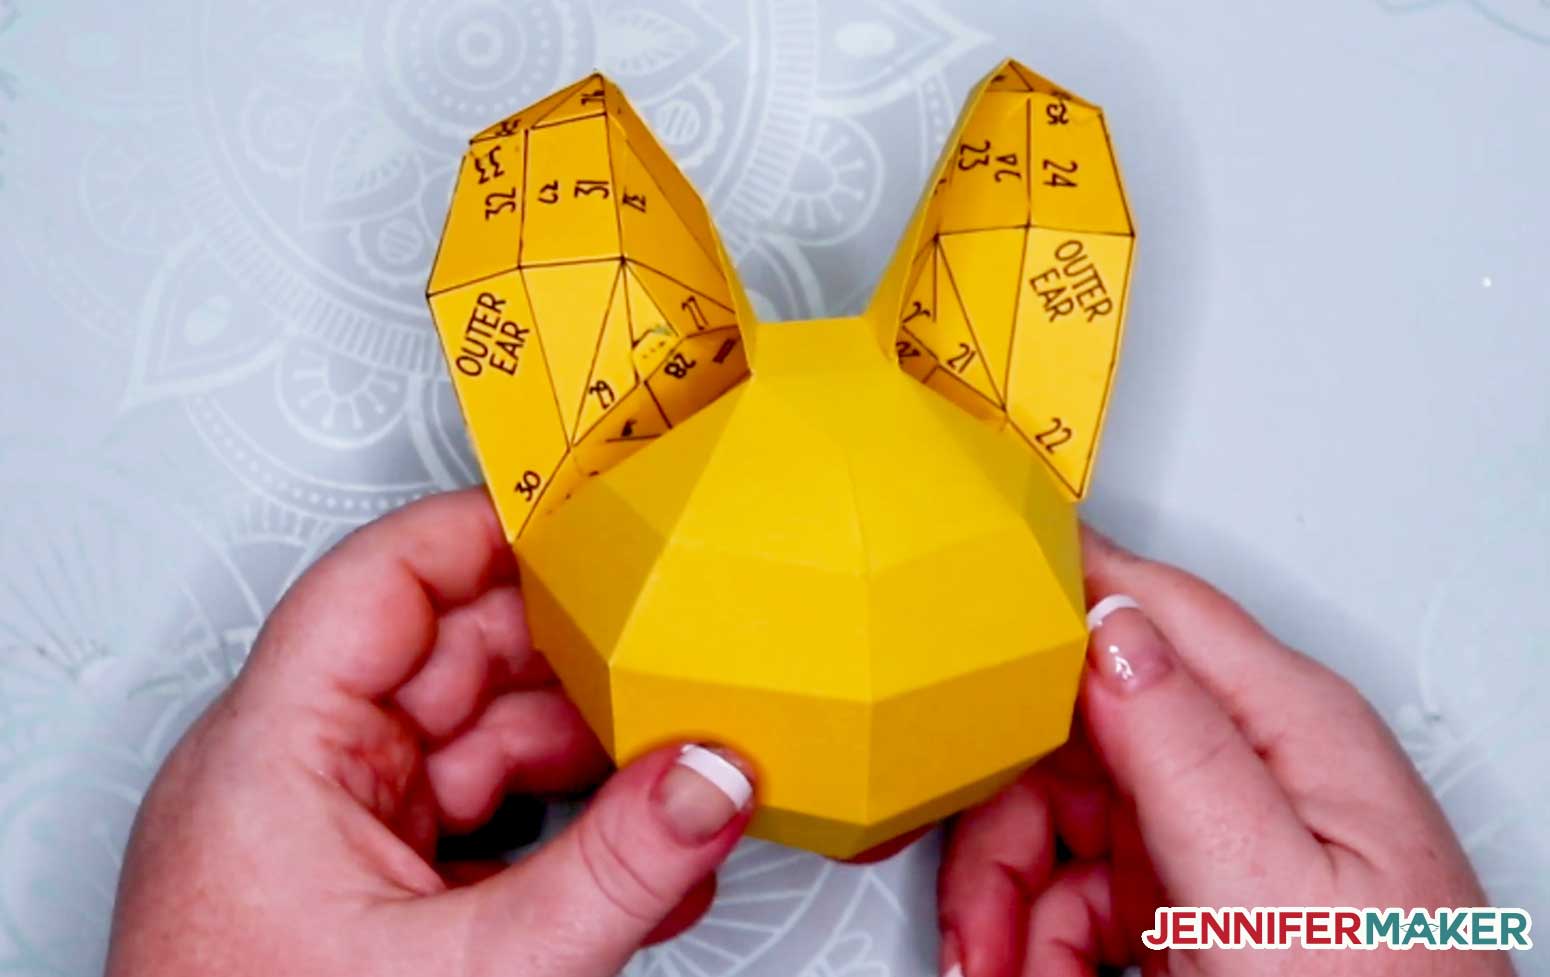
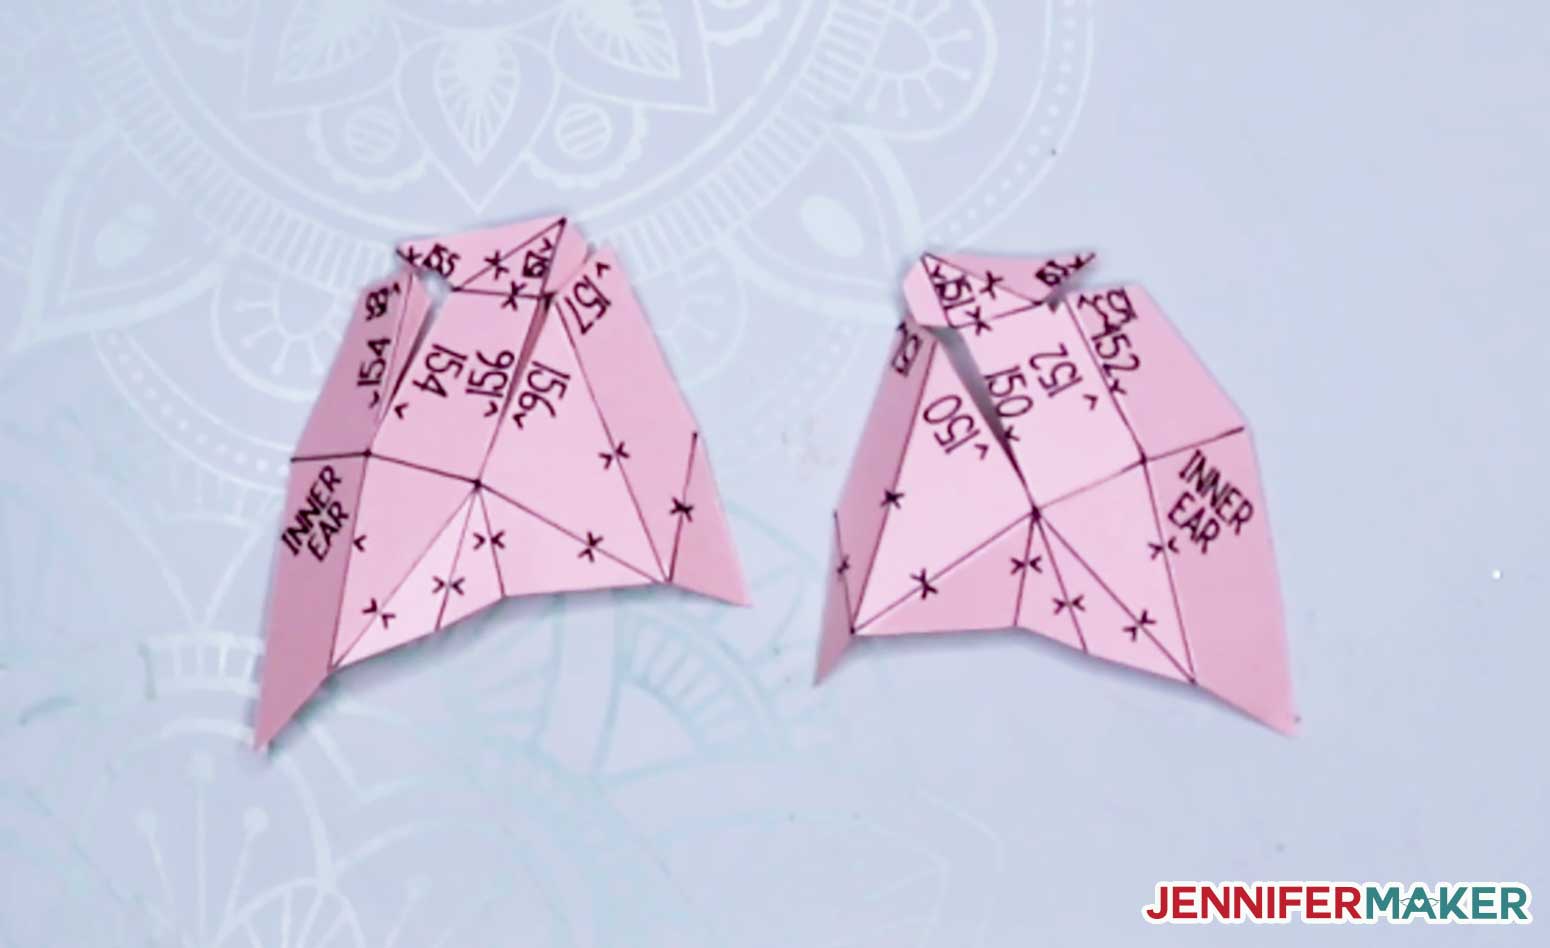
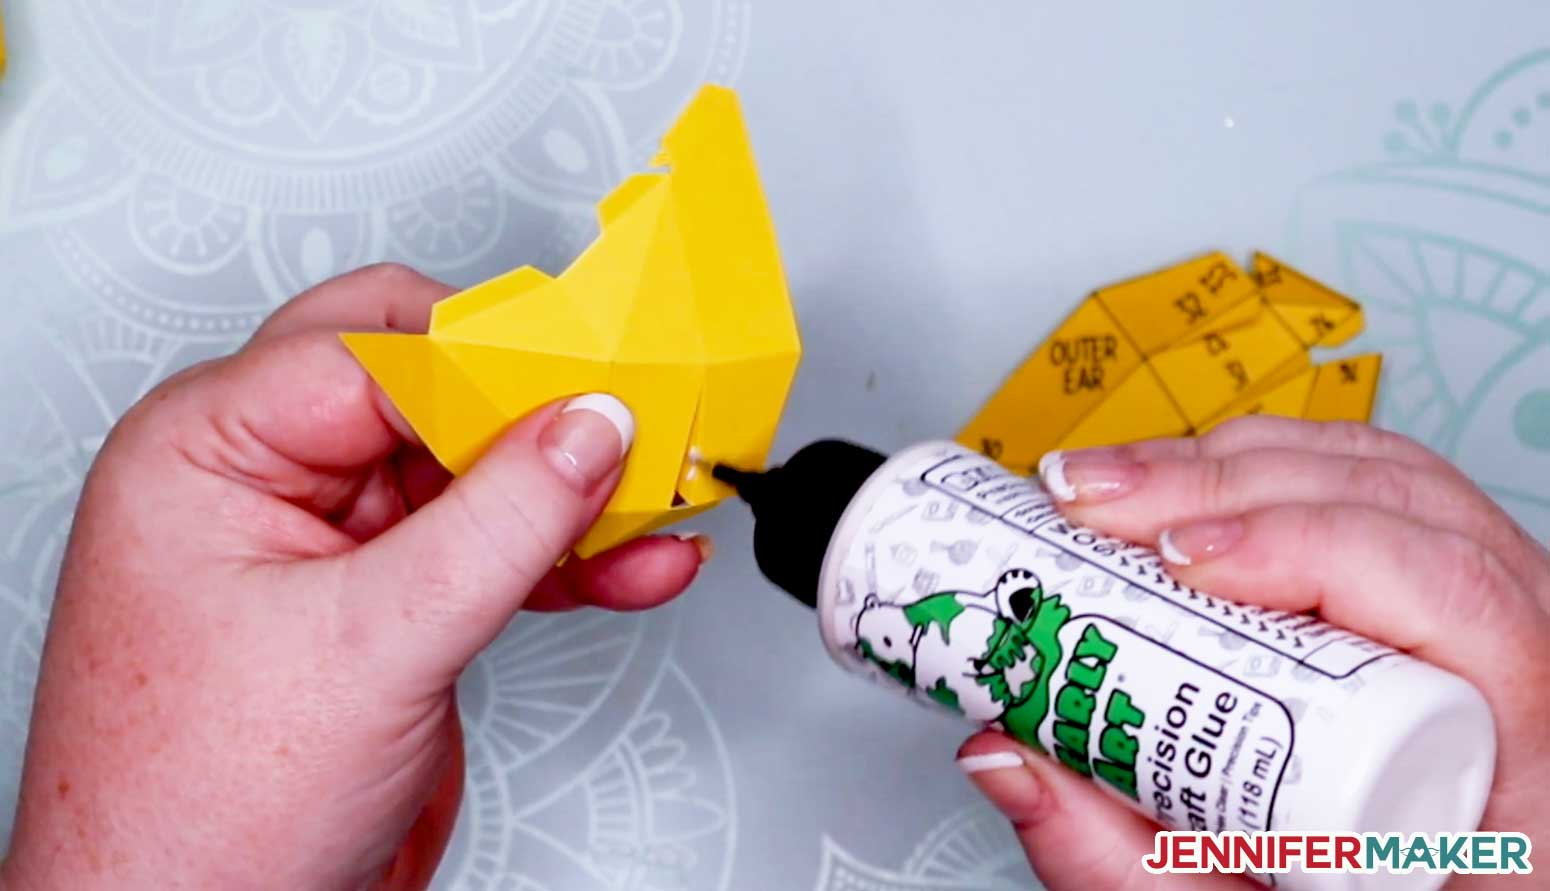
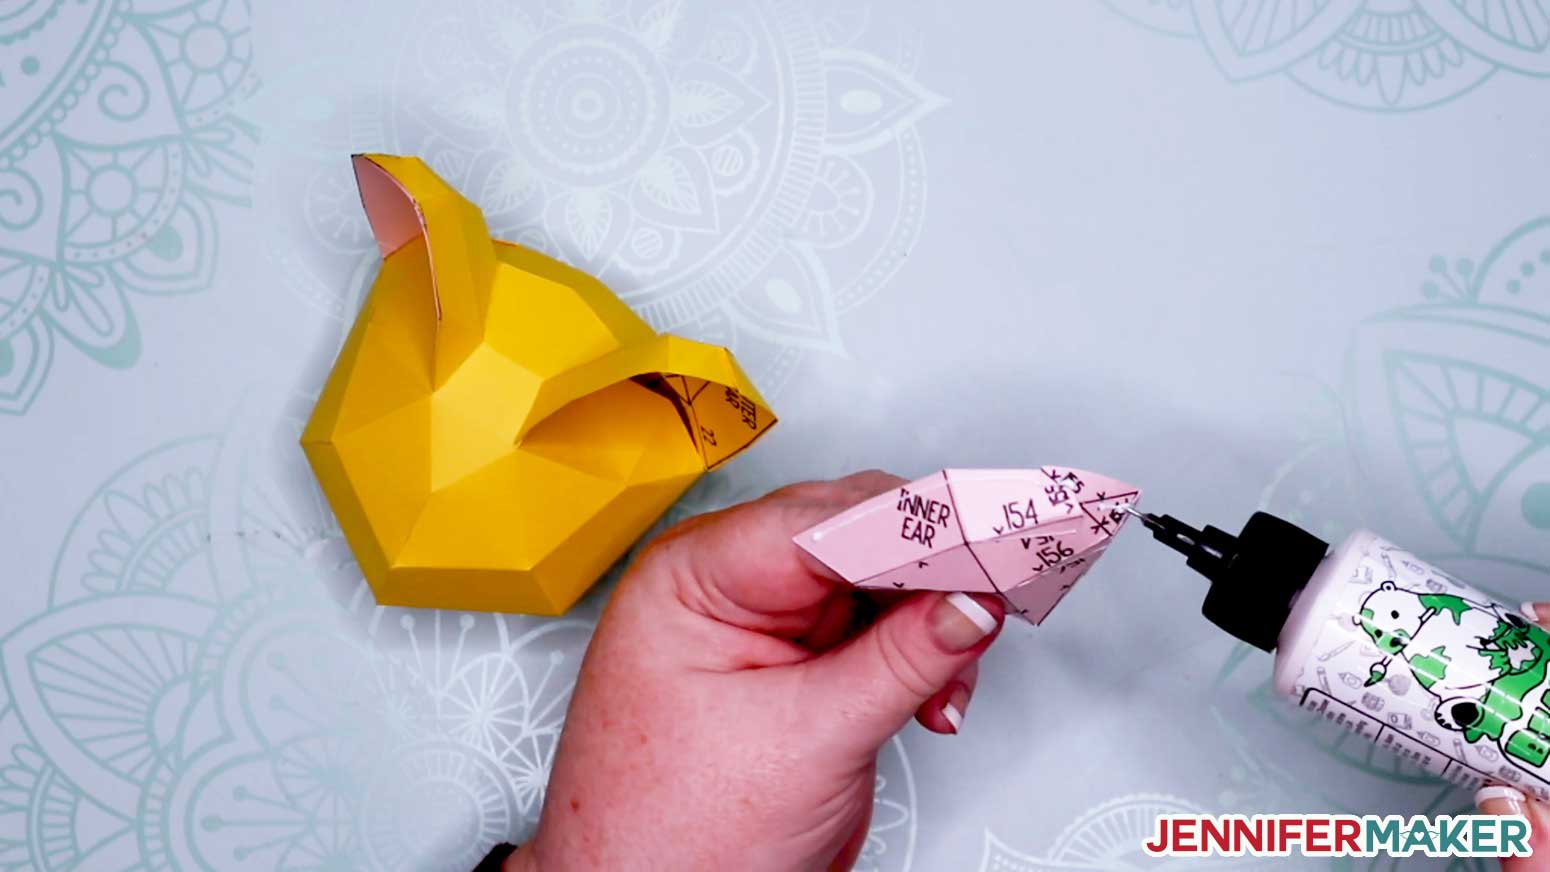
Now you'll notice that you can see all of your pen lines on the inside of your cat's ears, but we're going to fix that right now with inner ears. There are two inner ear pieces. Glue them into their shapes first, and remember that the inner ear has the >
Your inner ears should fit right into place inside your outer ears. You can put a thin line of glue around the outer edge of the inner ear (the side with the pen) and press it to the outer ear to keep it in place.
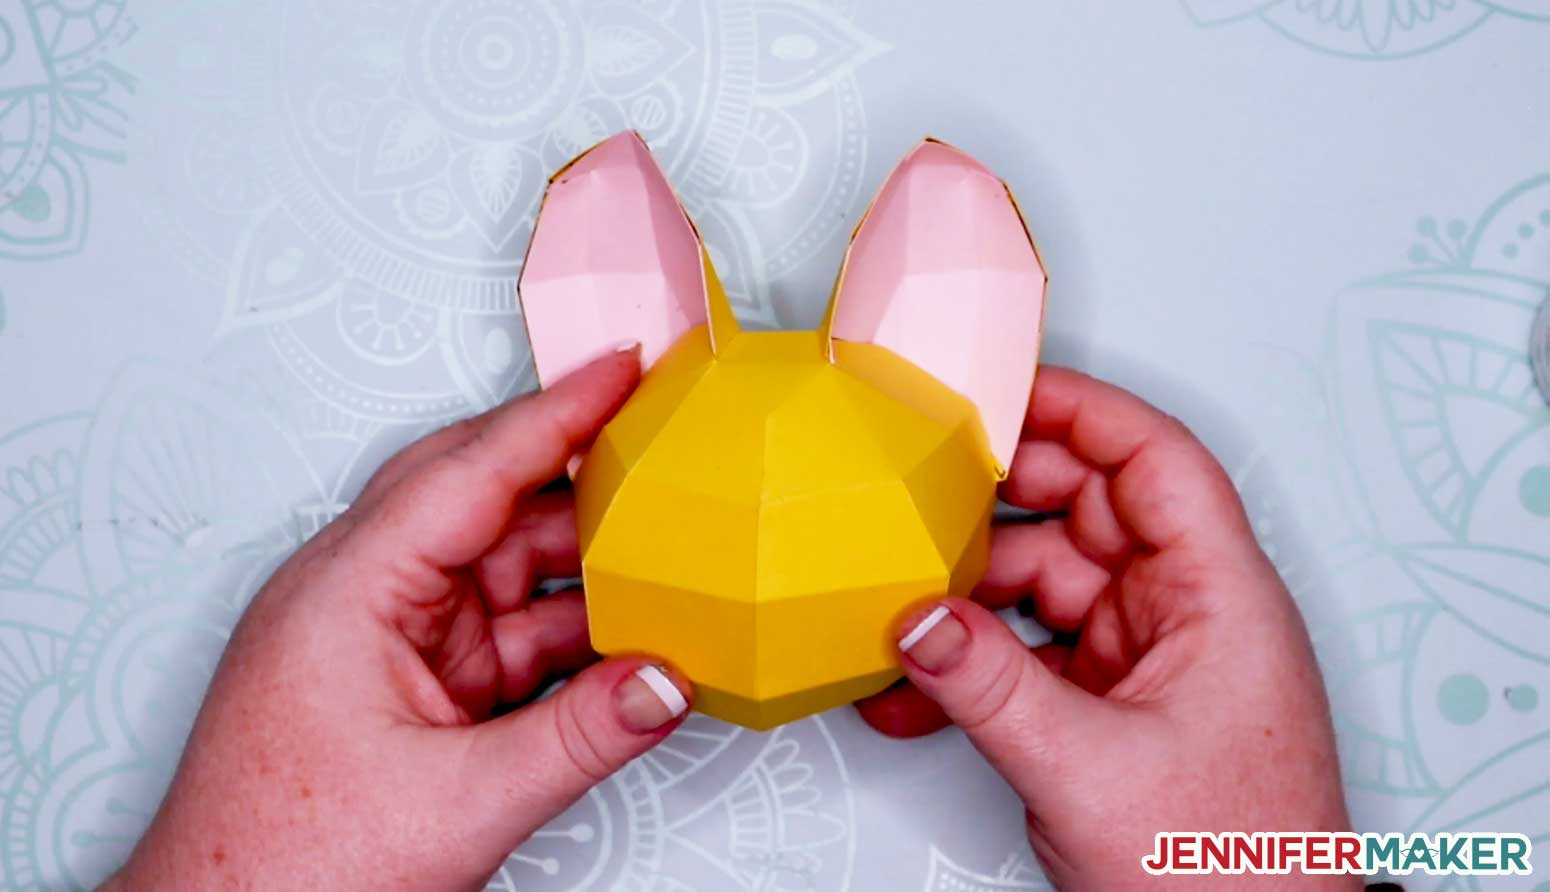
Here is what our 3D cat looks like with both the outer ears and inner ears attached.
You may need to refill that bowl with Swedish fish by this point. I know I did. I had to keep my energy!
Once the head and ears are attached, it's time to attach the neck. I recommend starting with #65, matching it up from the collar to the head.
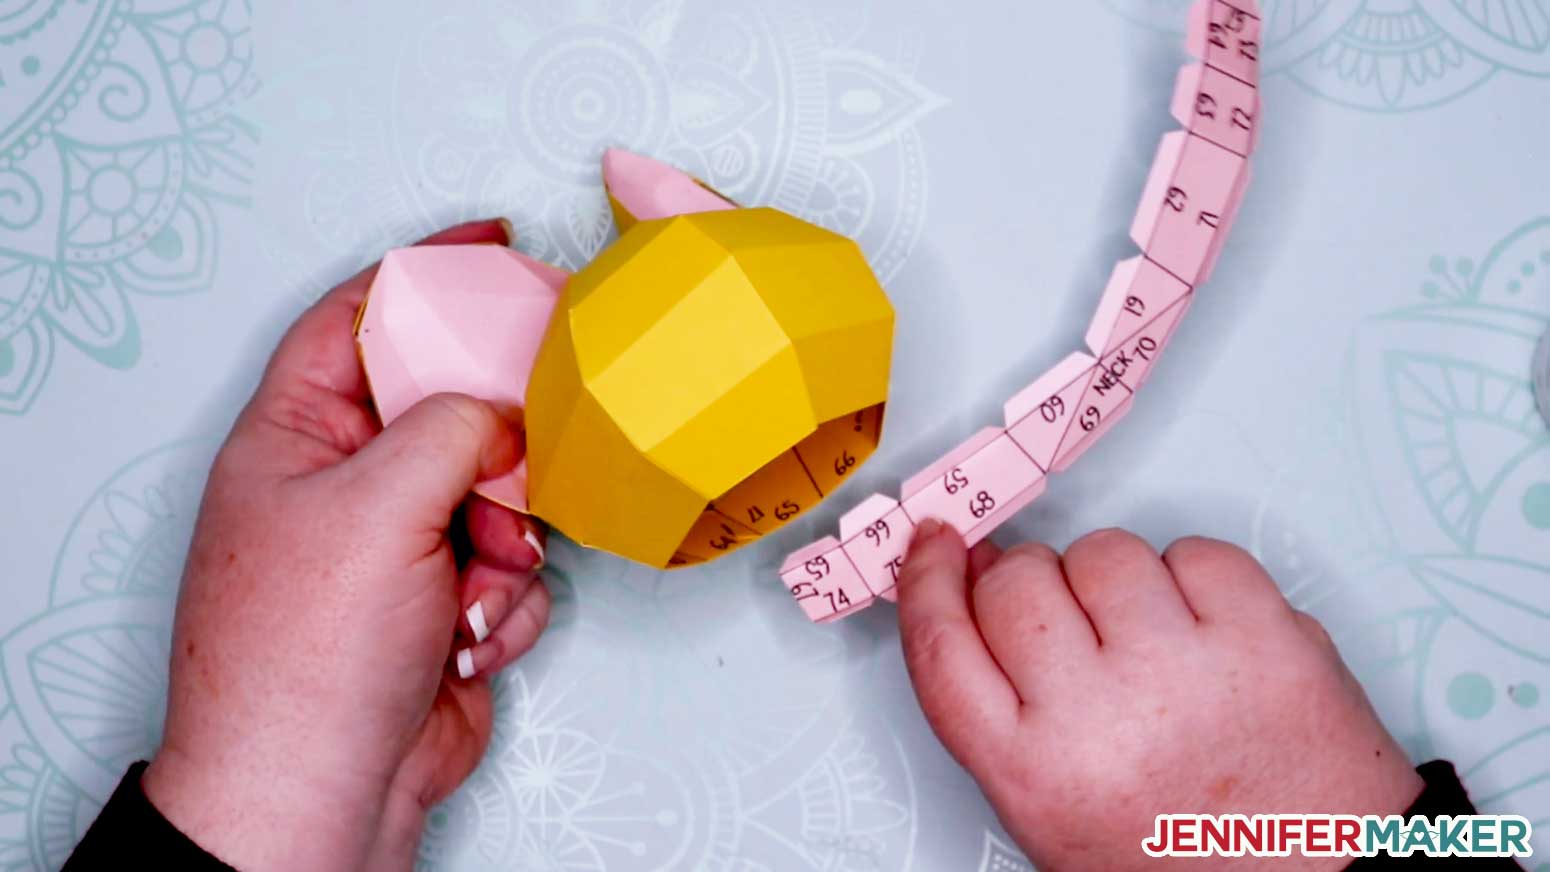
Then work your way around the entire circumference of the head, one tab at a time.
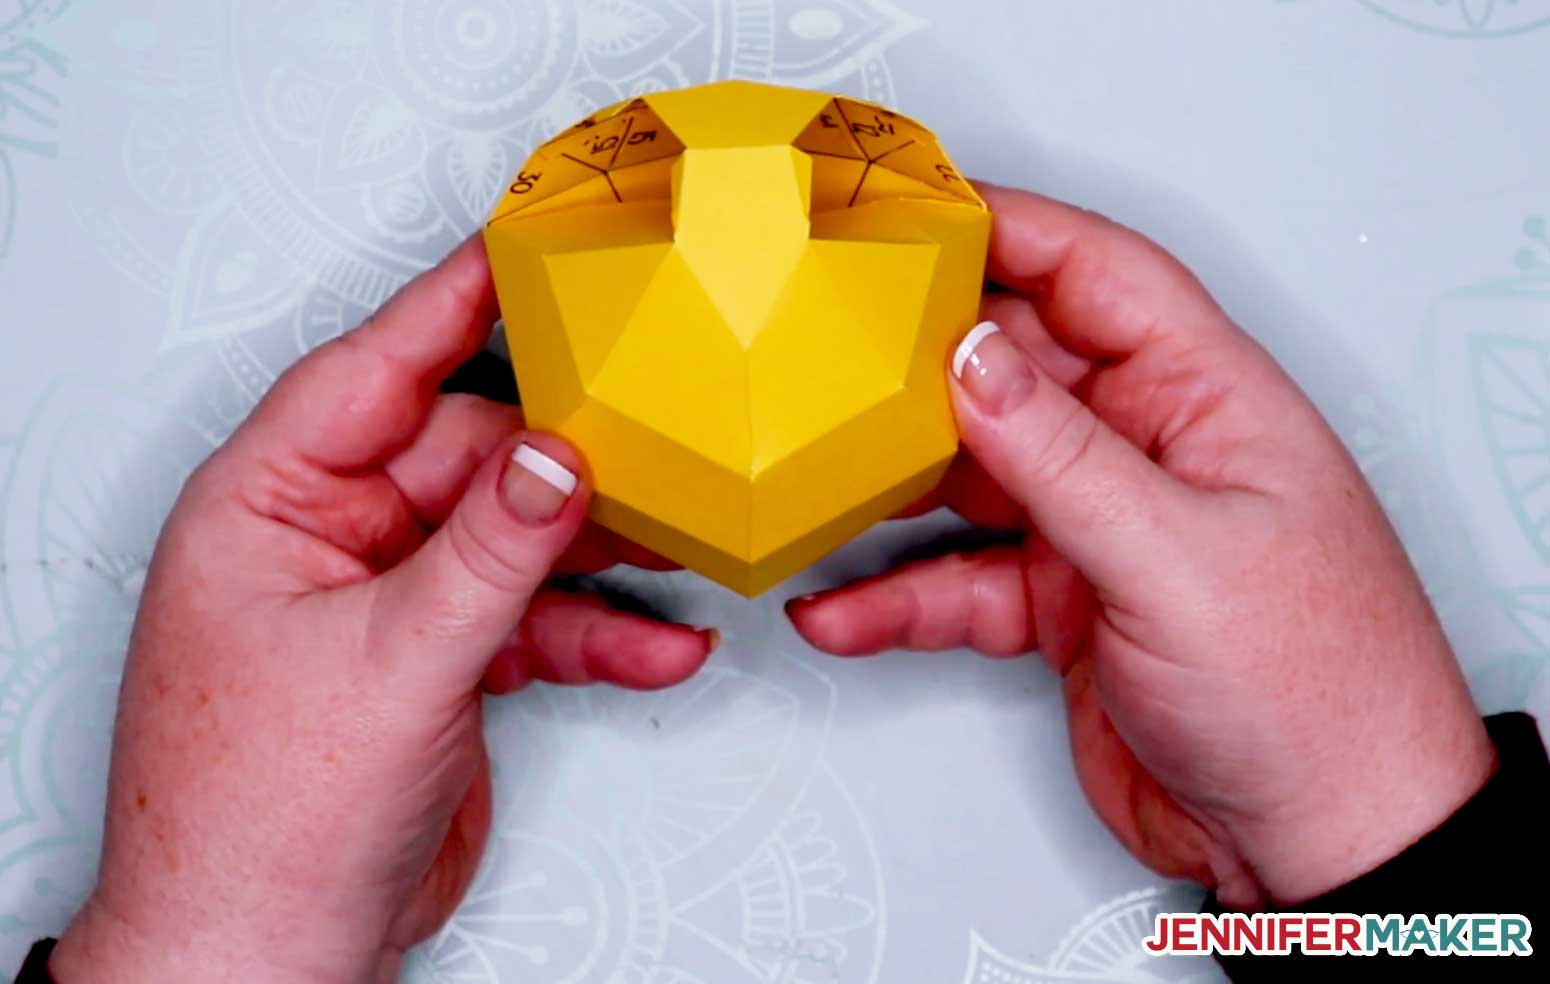
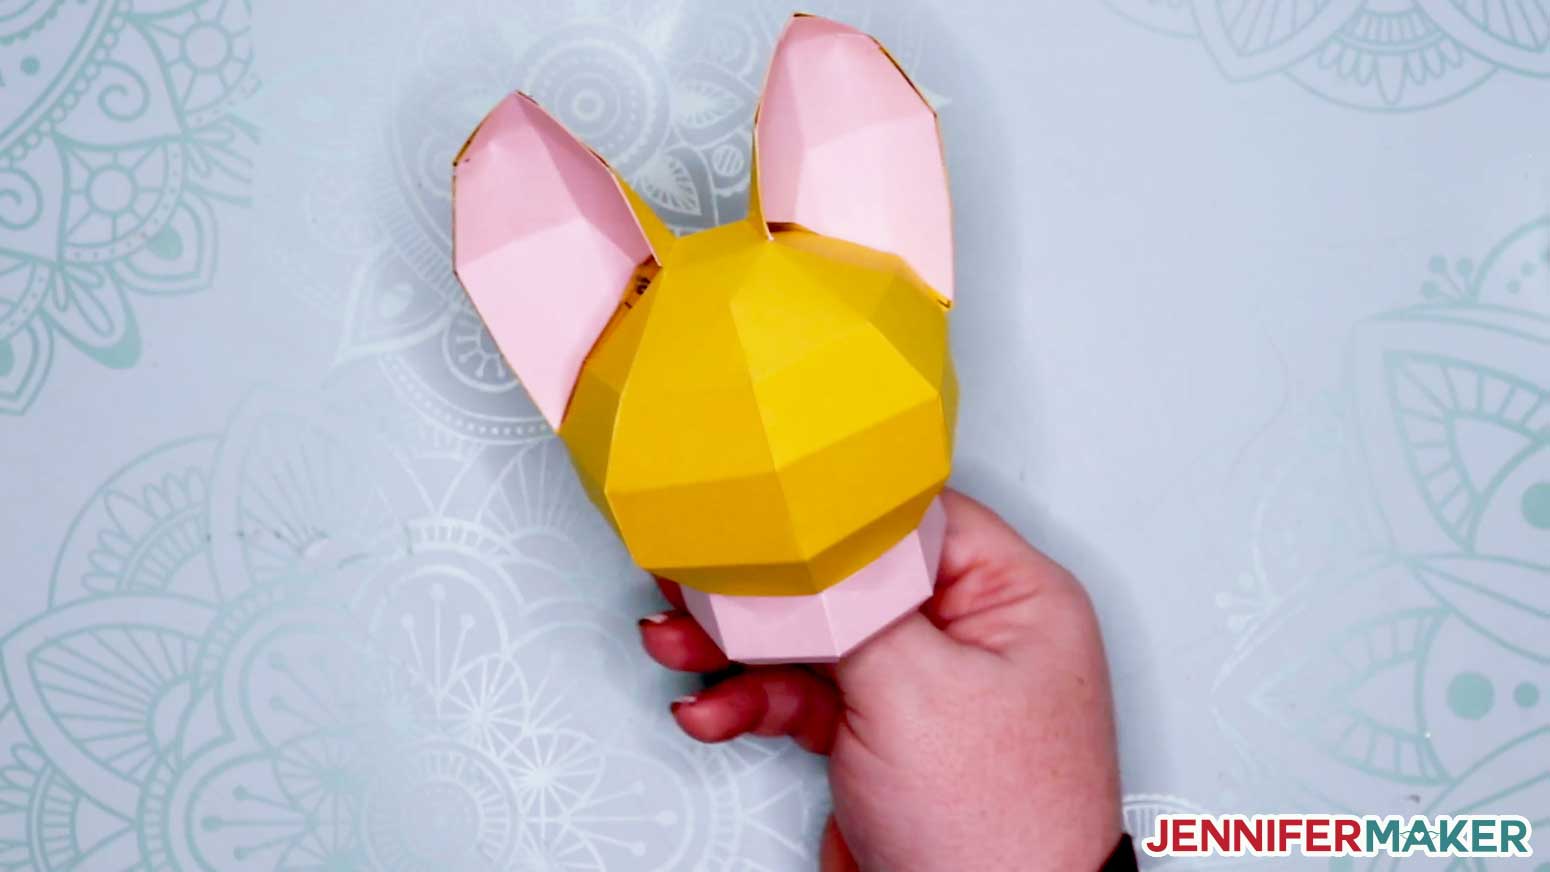
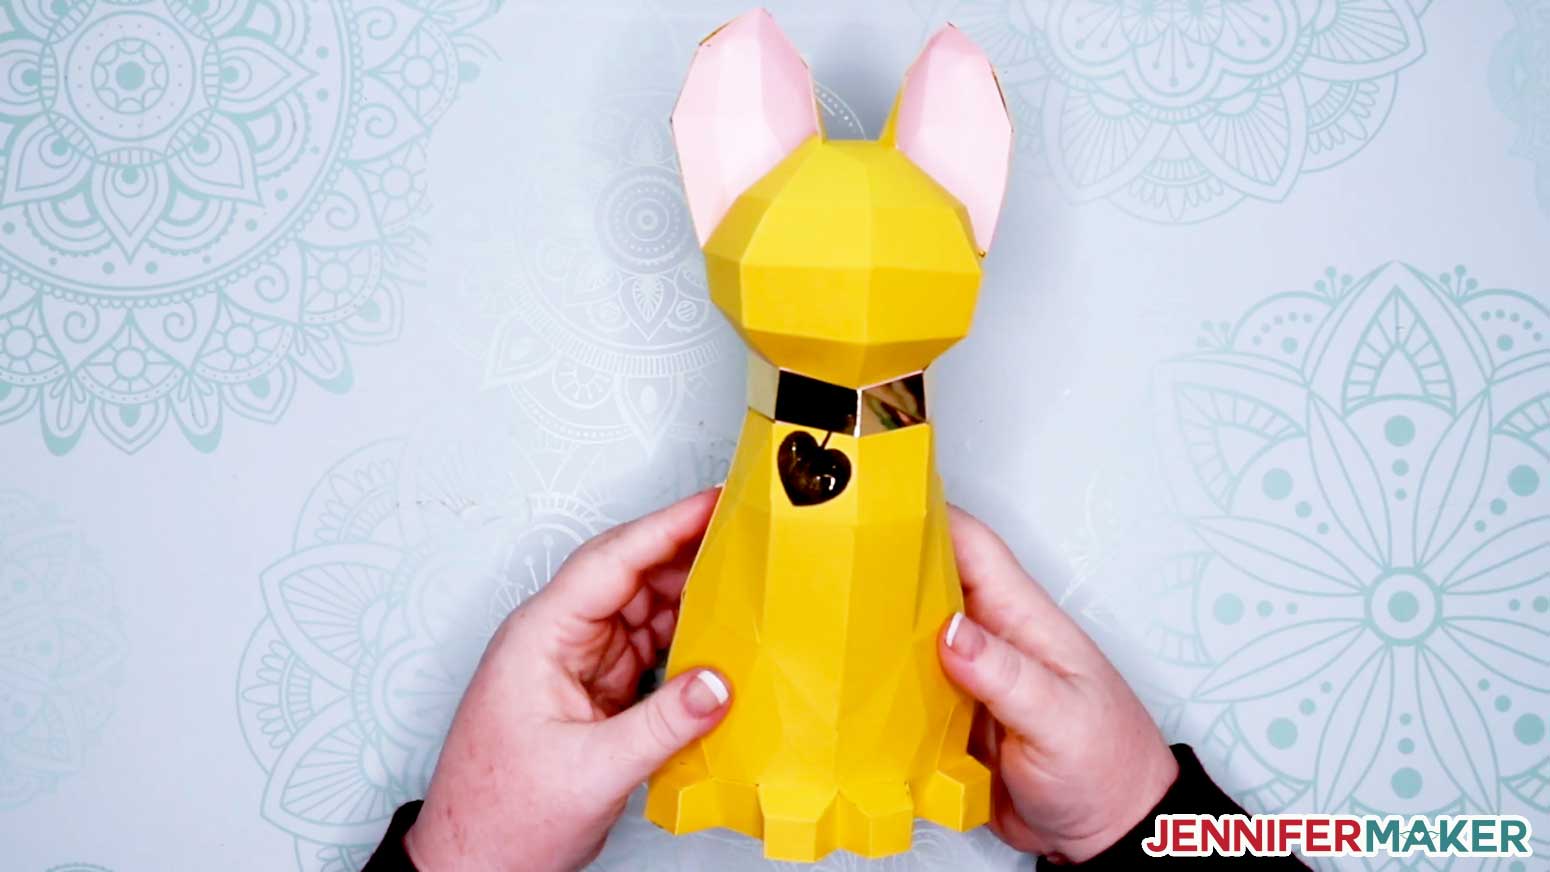
When you're all finished, your 3D cat head and neck should look like this!
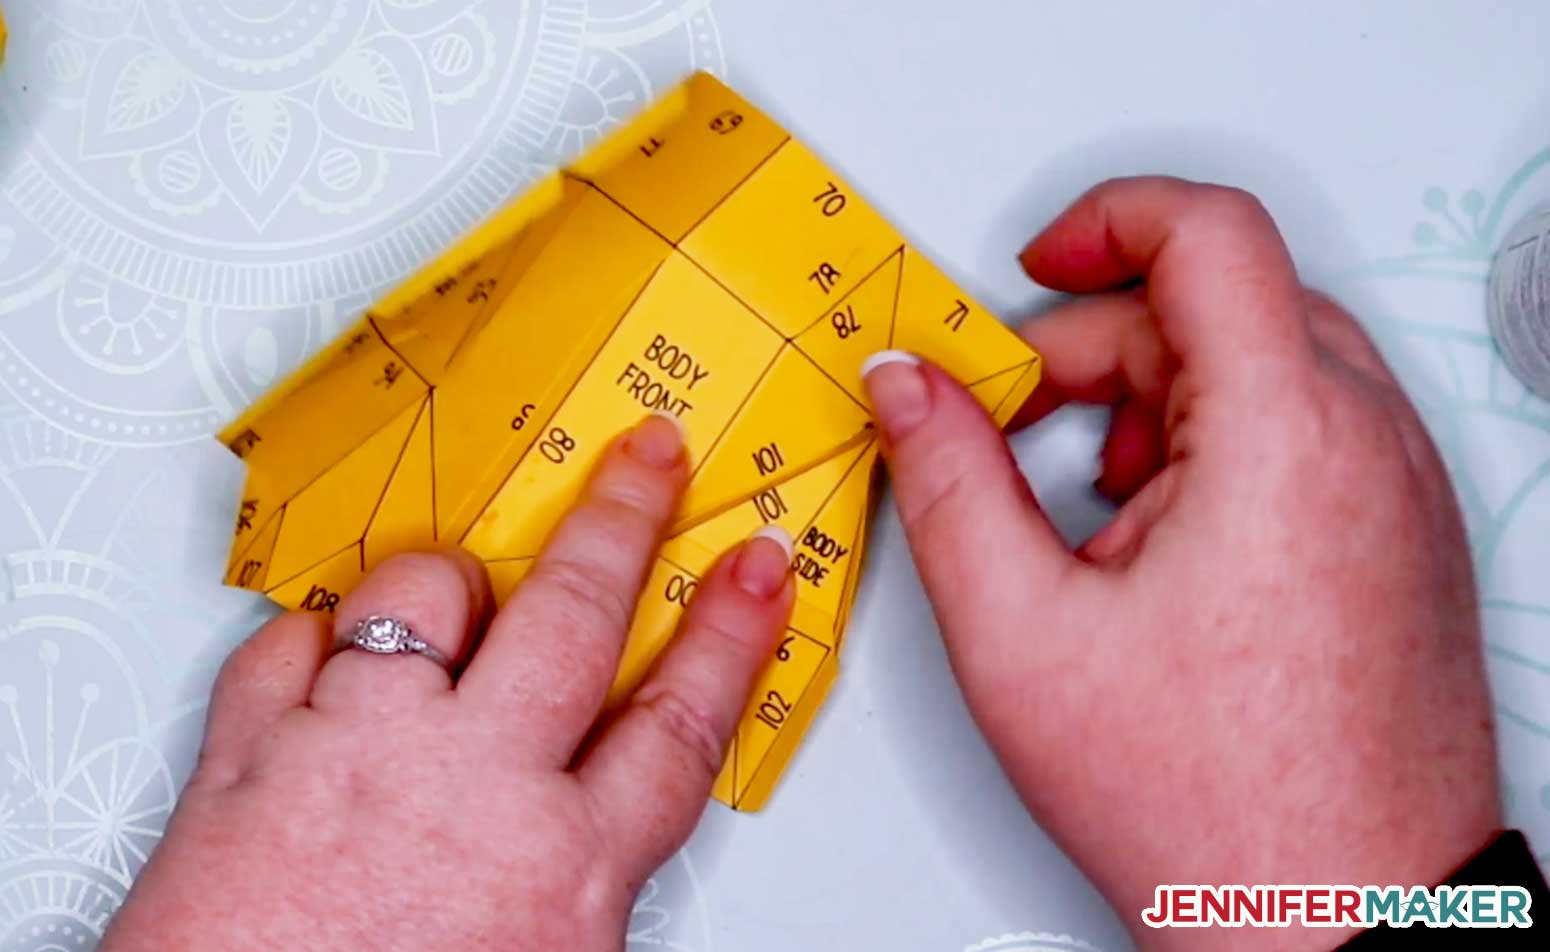
Now it's time to put the body into shape, beginning with the Body Front piece.
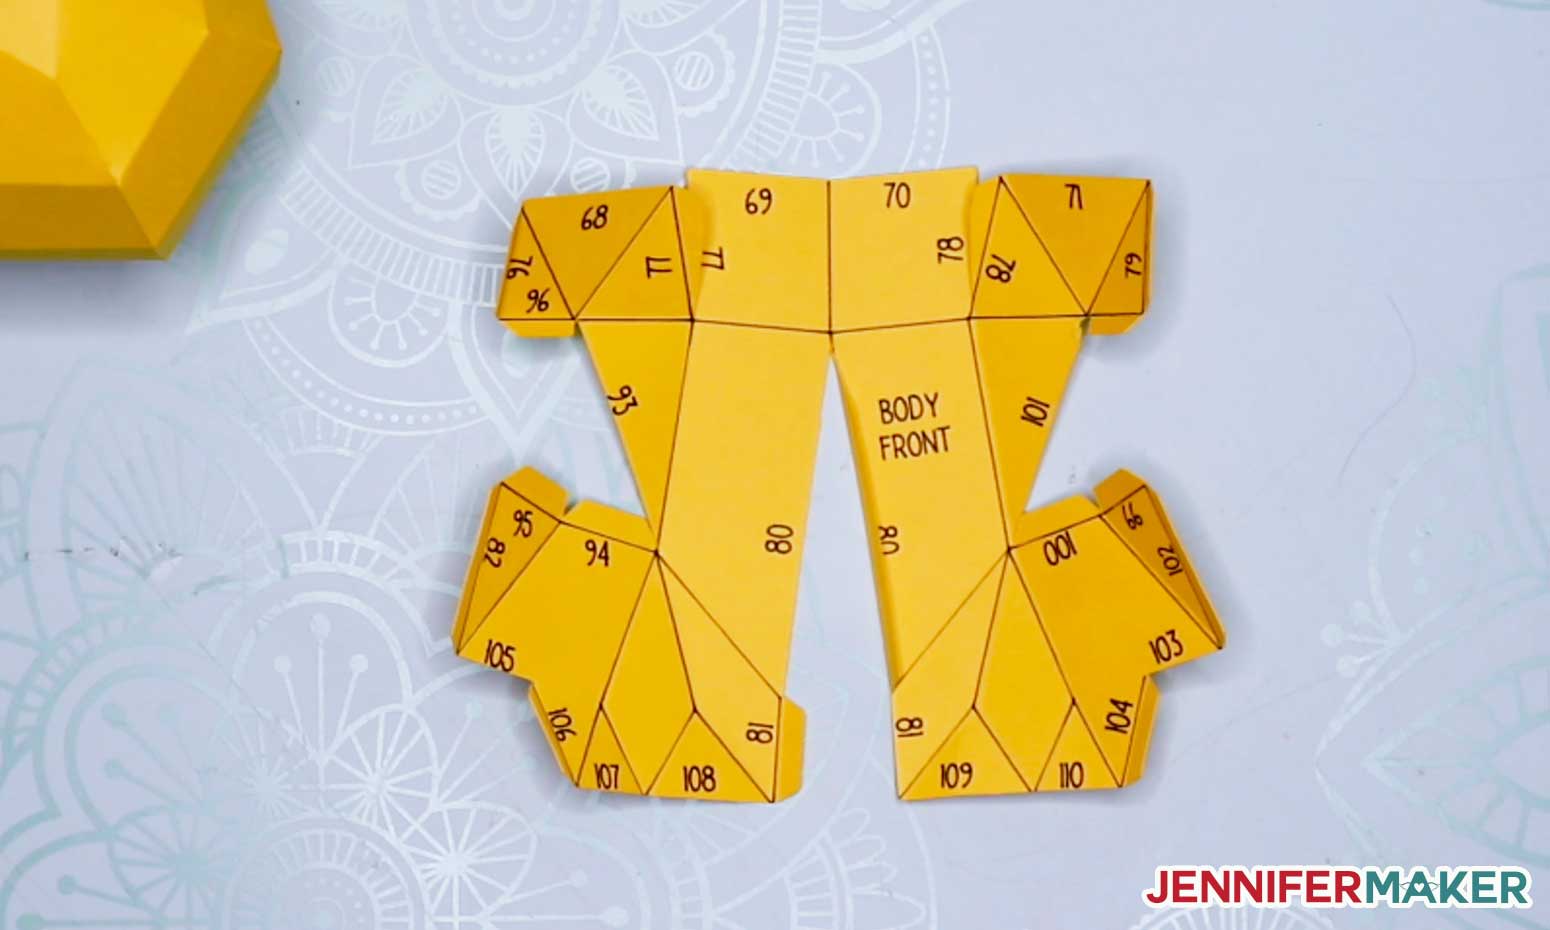
Start with tab #80 and begin gluing it together, remembering to match tabs to sides as you go.

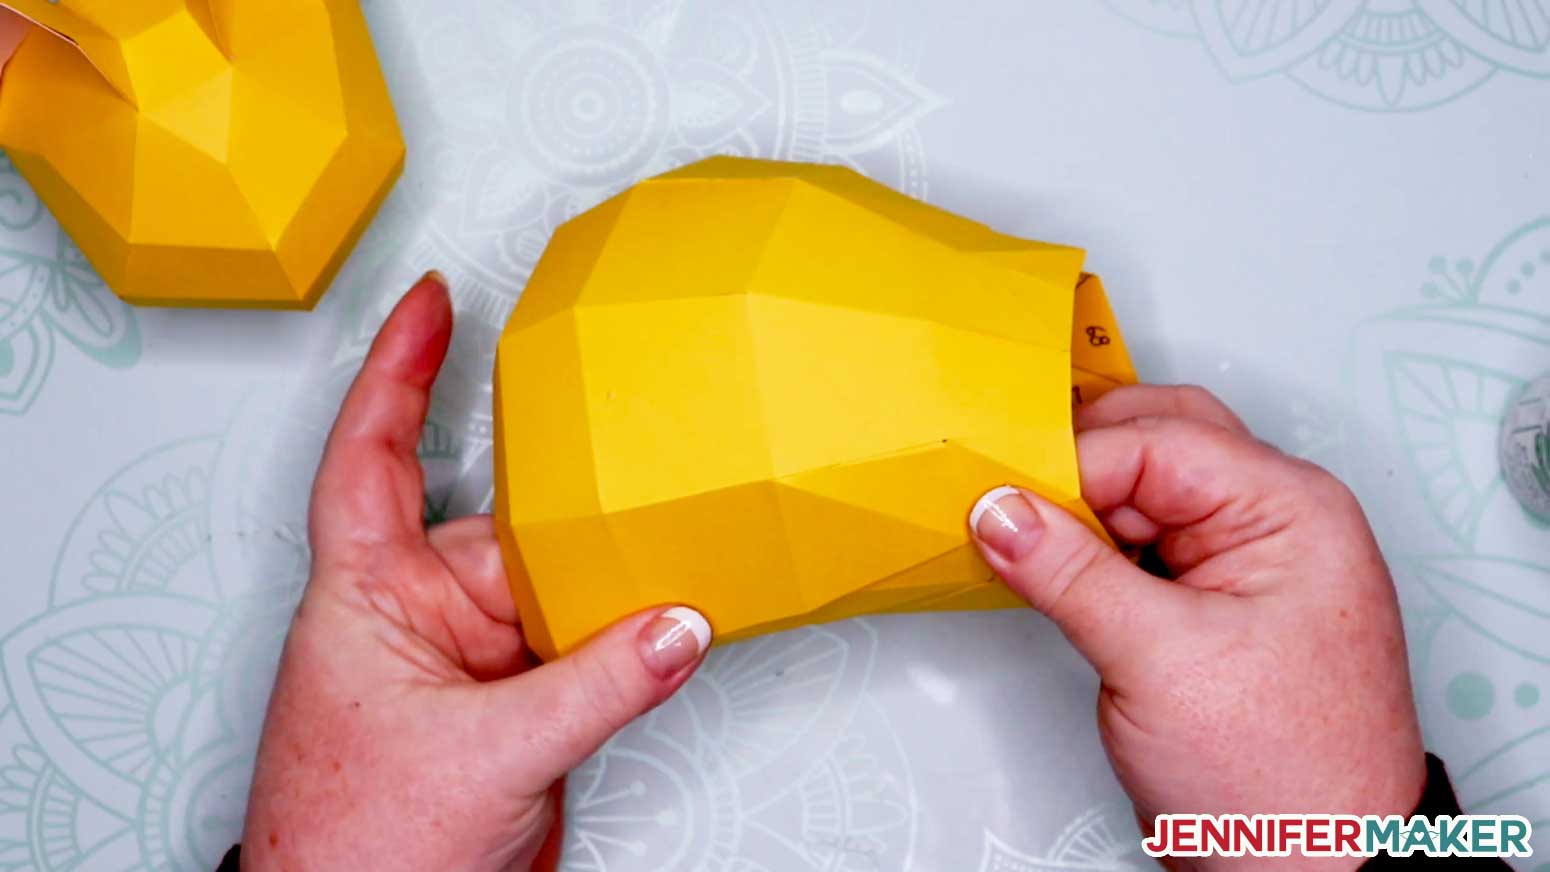
This is what the body front piece looks like after shaping and gluing it.
Now glue and add the side pieces to the body front.
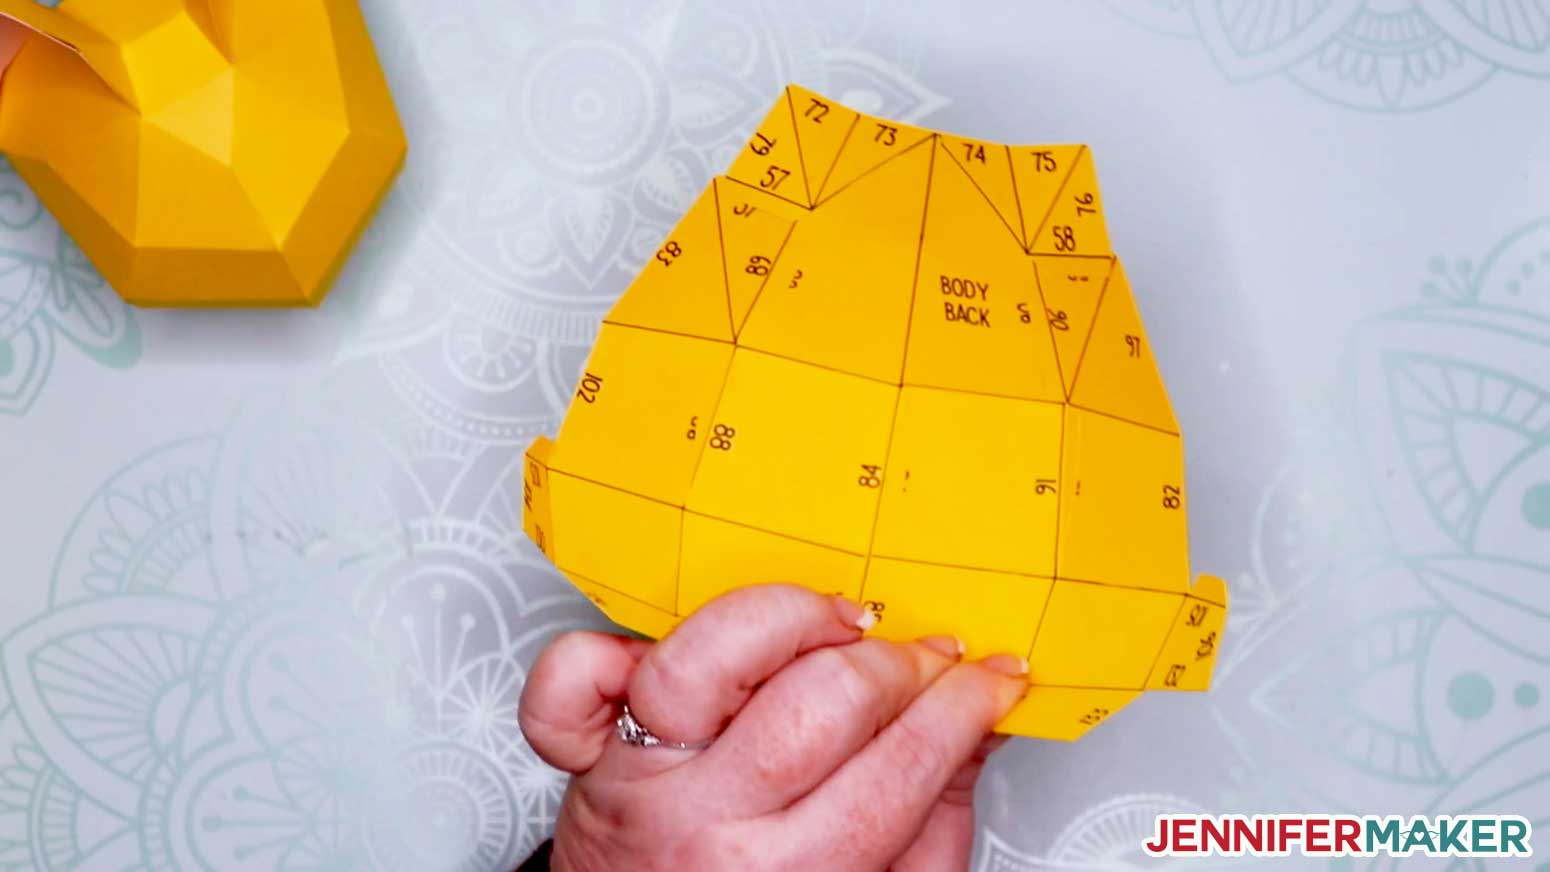
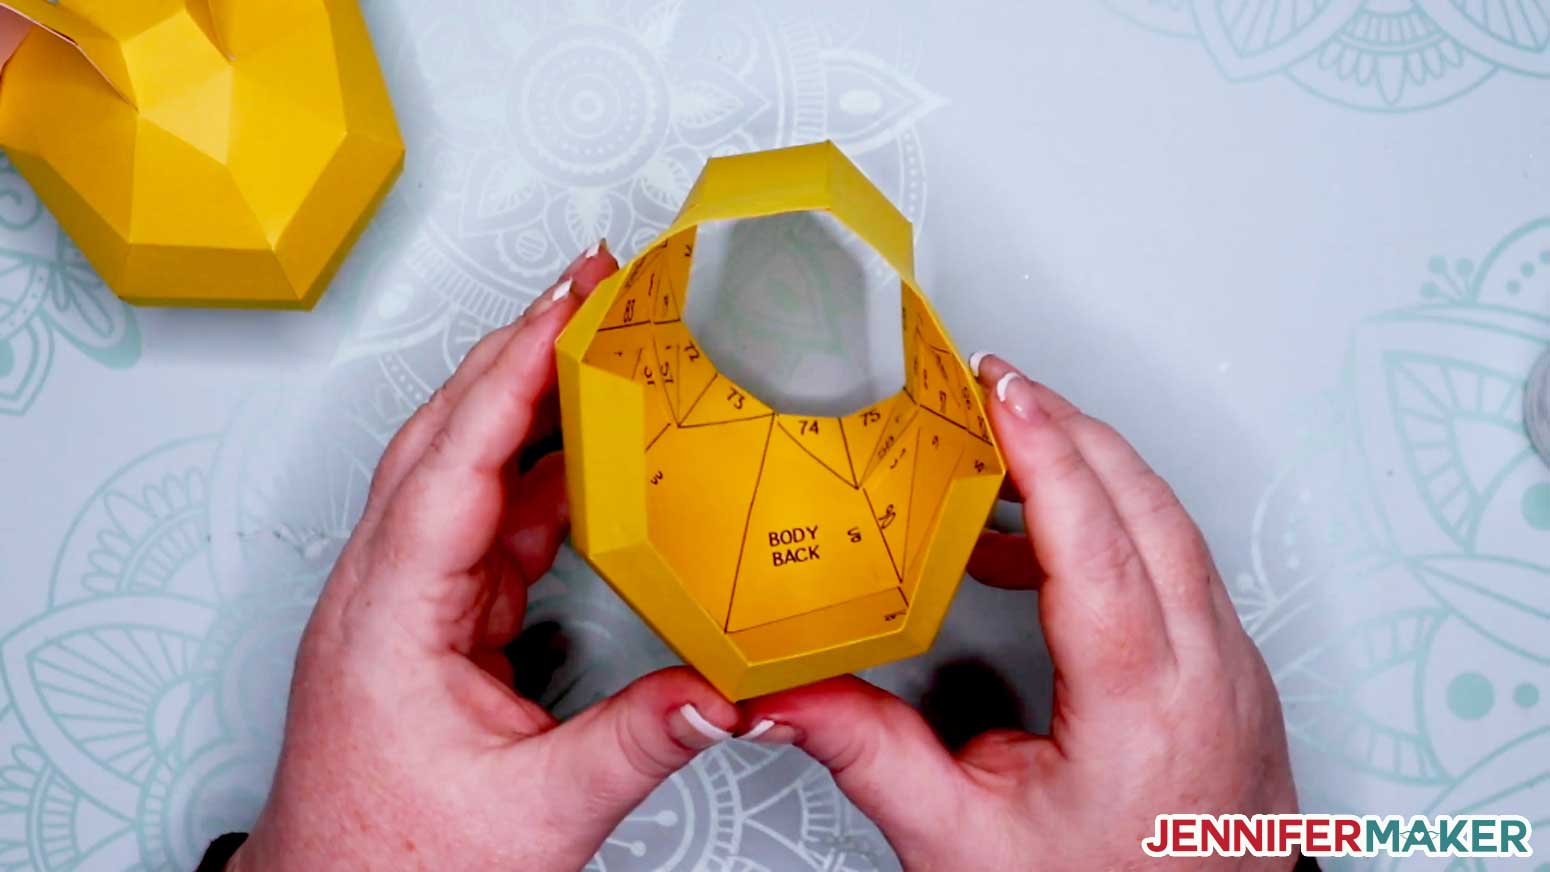
Once that's done, your next step is to glue and shape the Body Back piece, starting with tab 84.
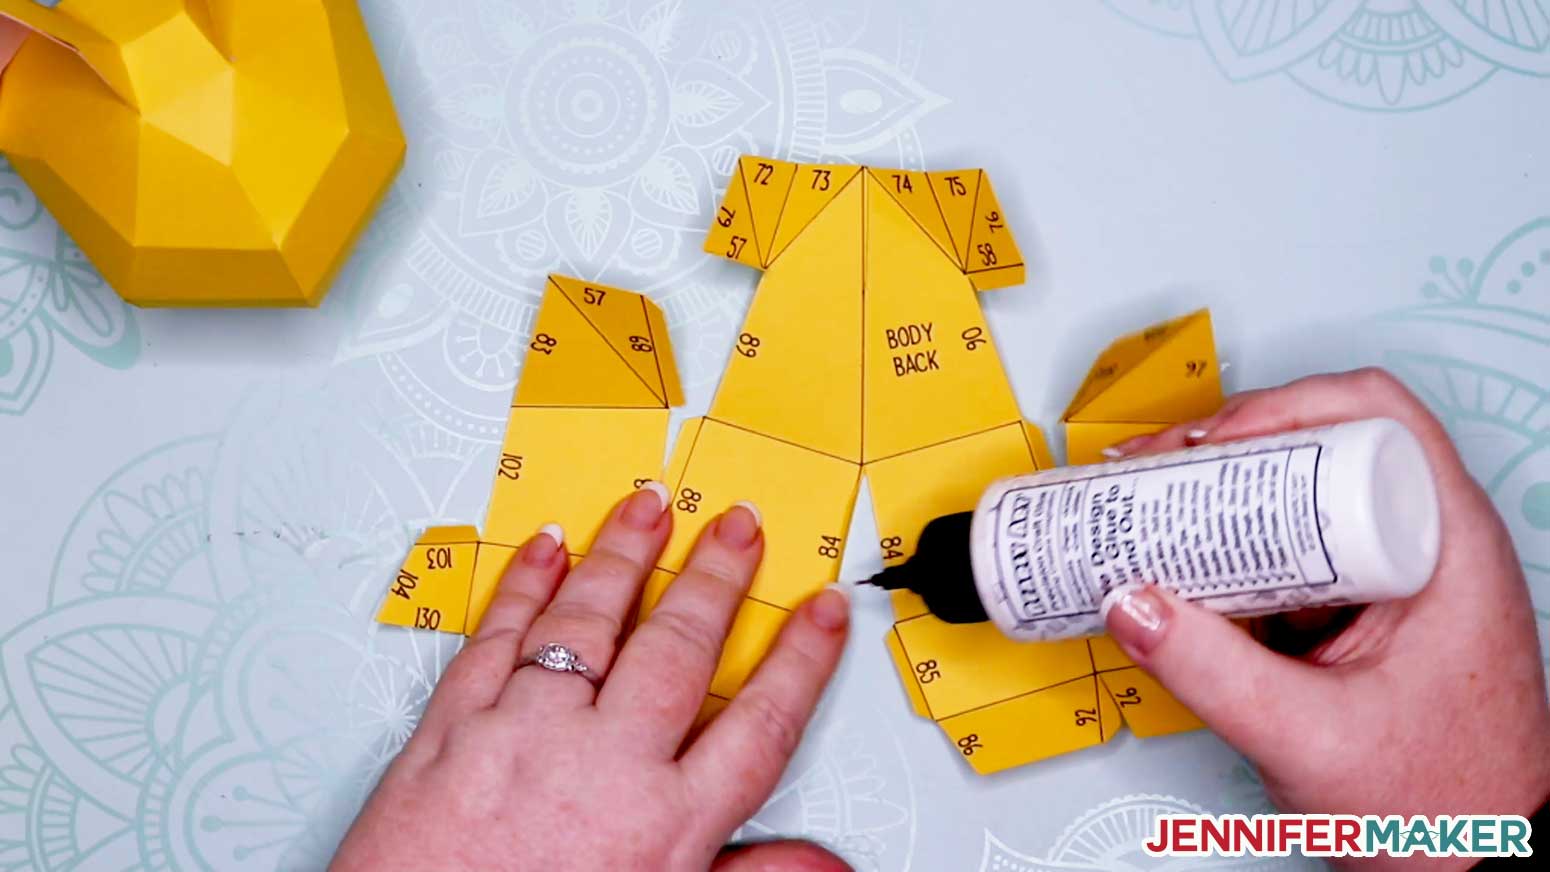
Here's what the Body Back piece looks like when glued and shaped.
Now it's time to attach your Body Front to your Body Back. I recommend starting by matching up tab 79.
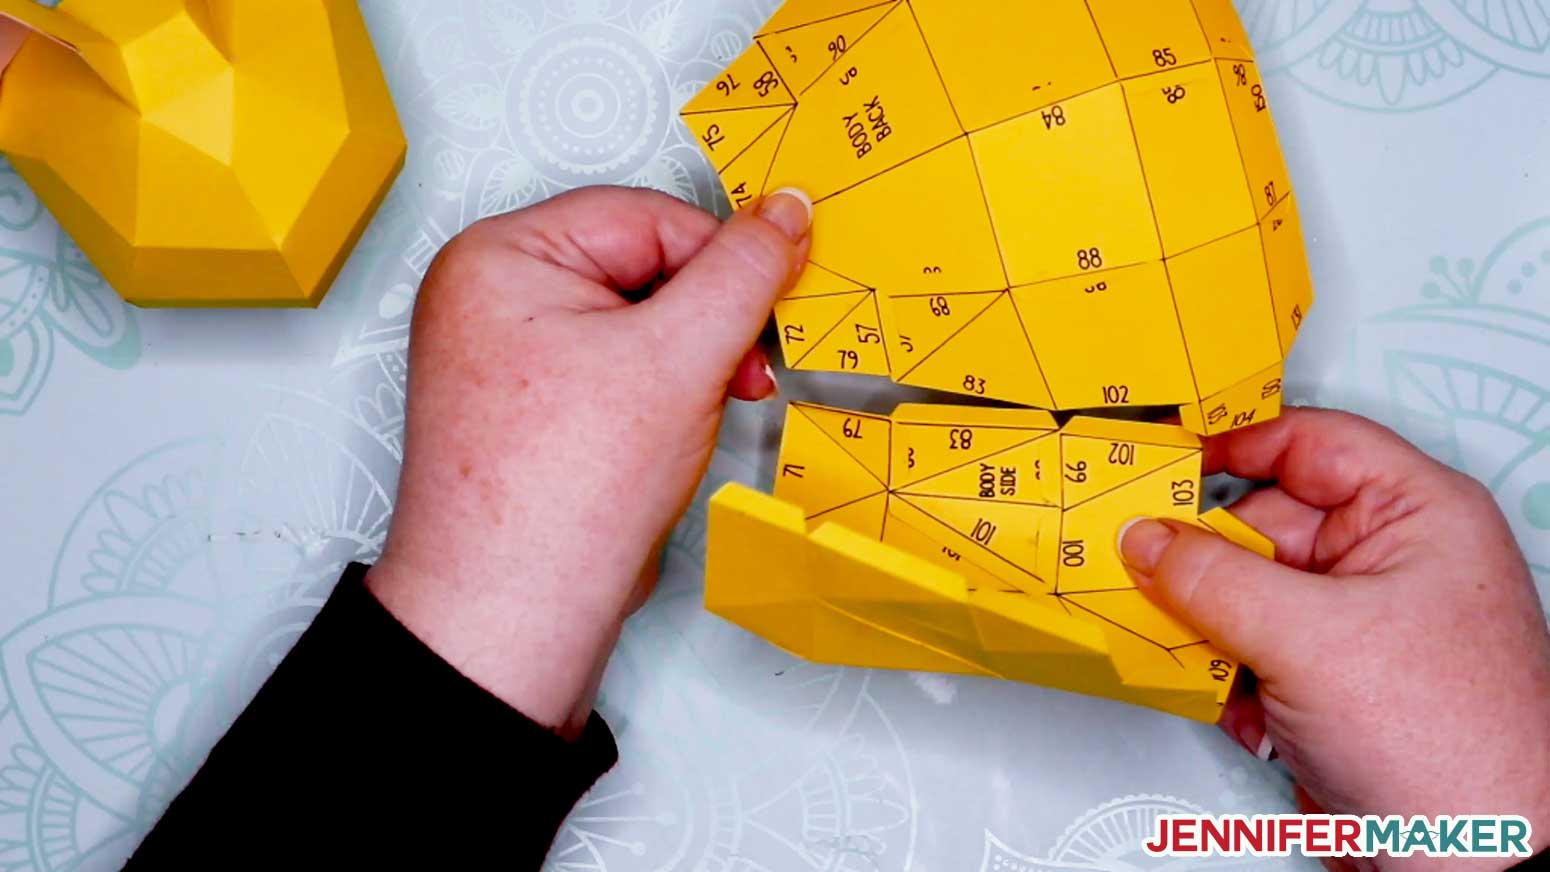
Do one side at a time.
]
Then be sure to also attach the other side to close the body piece.
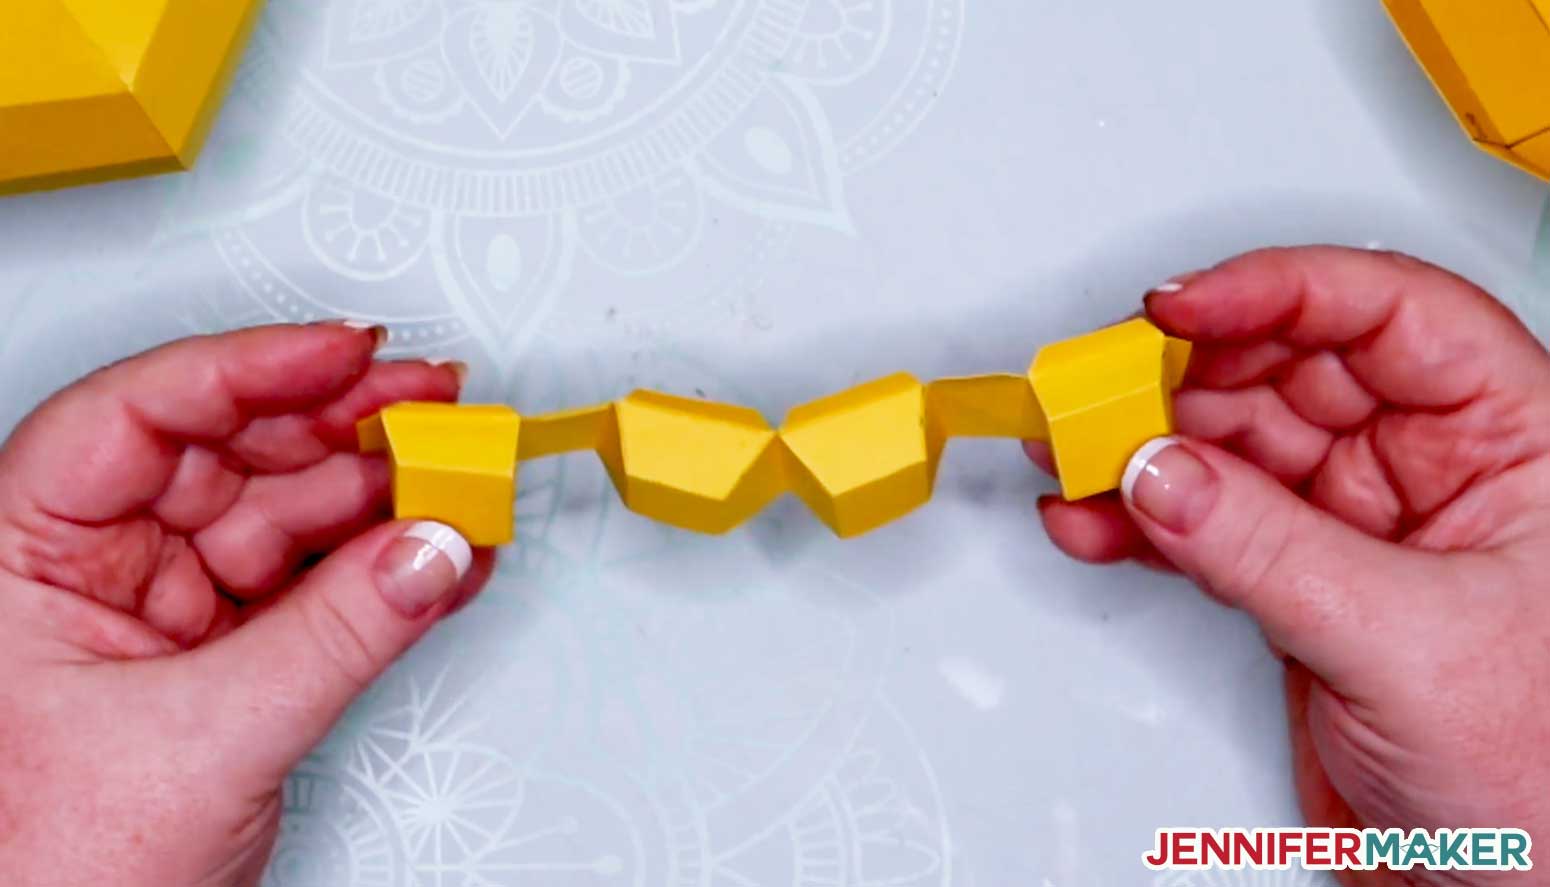
Now it's time to put the feet together. The feet are really like little boxes — one box for each paw — and if you match numbers, everything goes together properly.
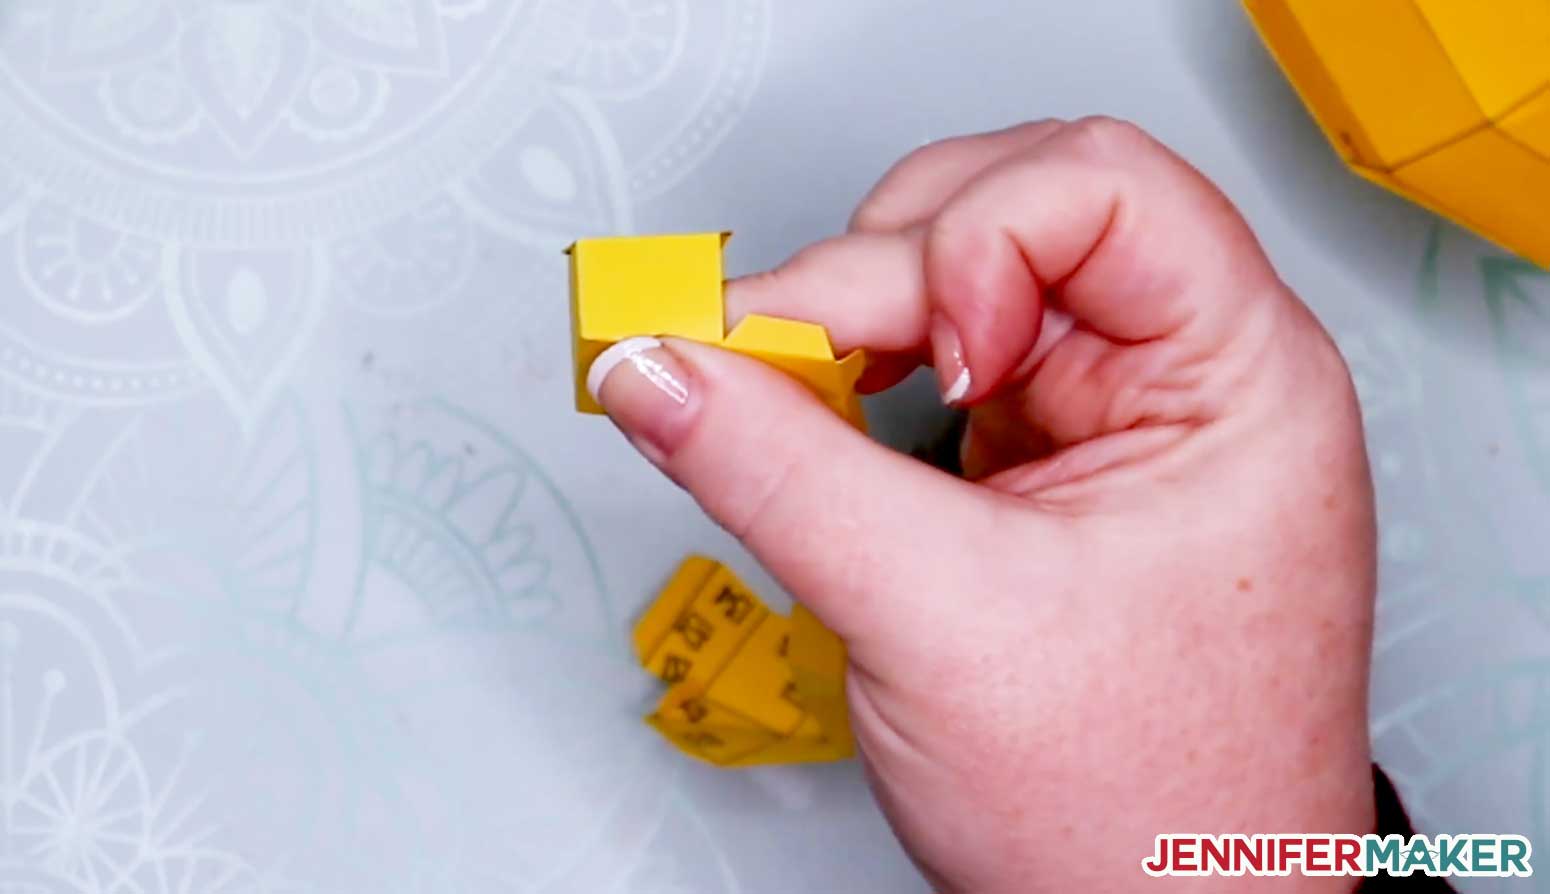
Note that there are several outward folds in the feet, as marked by the >
Here are what the feet look like when they are all glued and shaped.
Now just attach the feet to the body. Remember to match up numbers -- I started with #131.
Here's our 3D cat with its feet attached!
We've finished both the head and body! Time for a fishie!
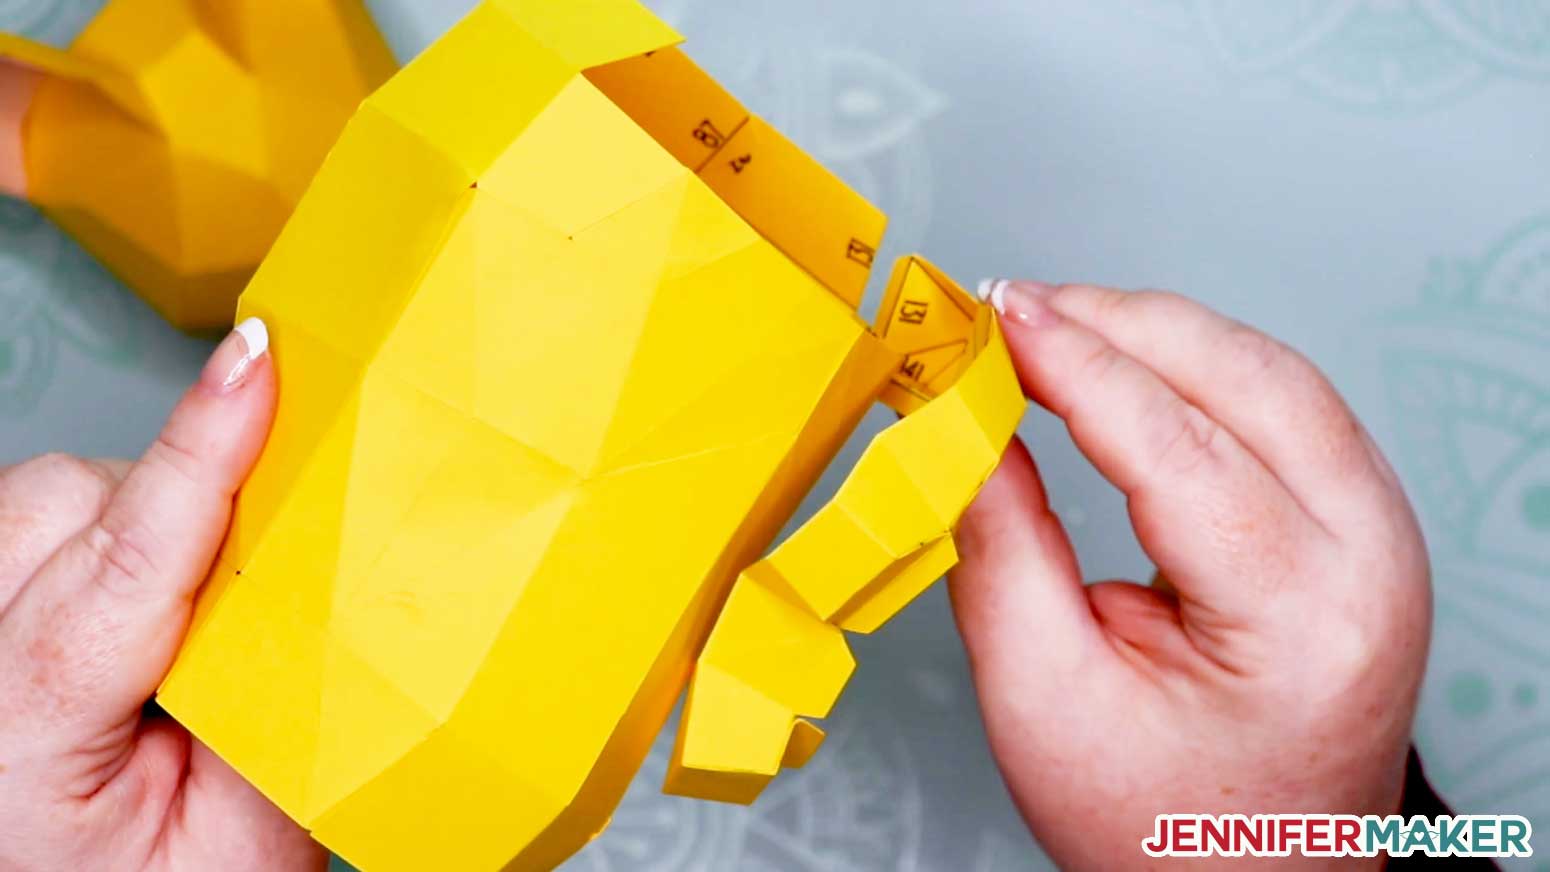
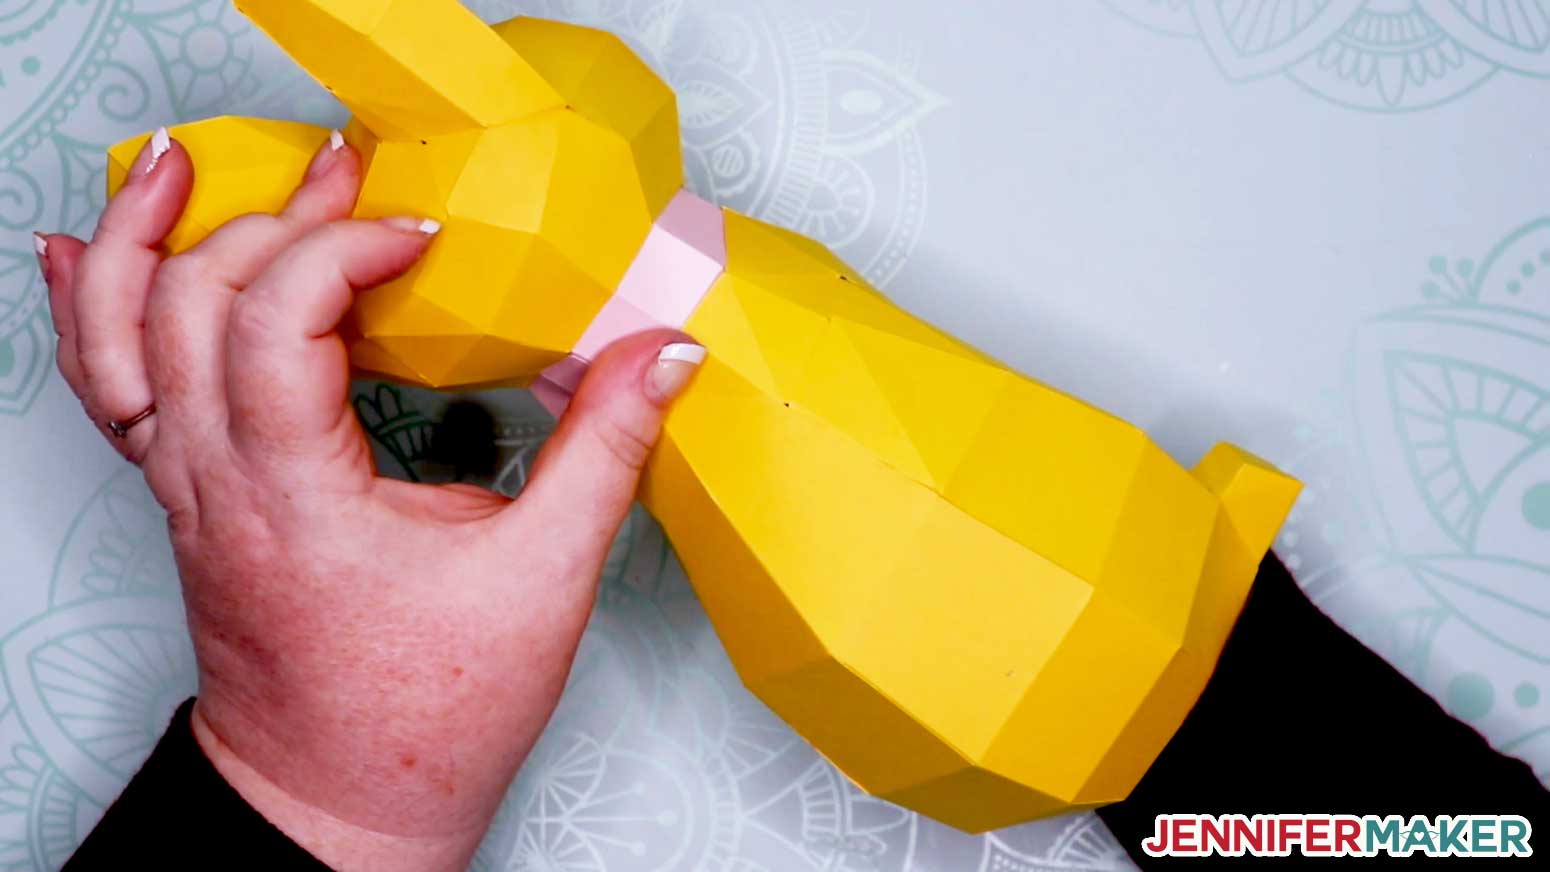
Attach the neck to the body is just a matter of matching up numbers.
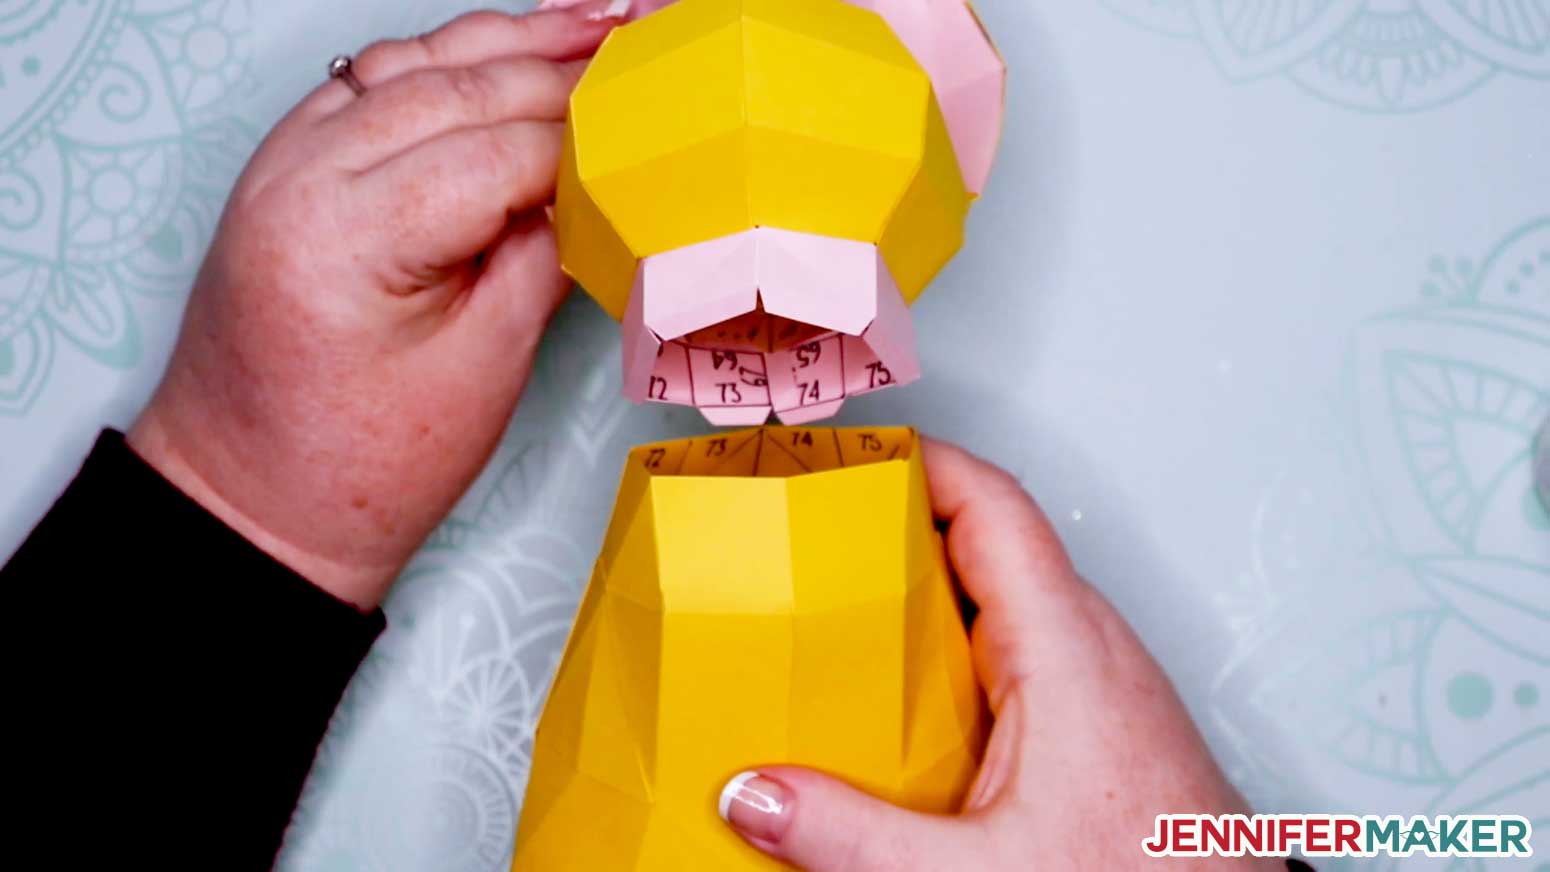
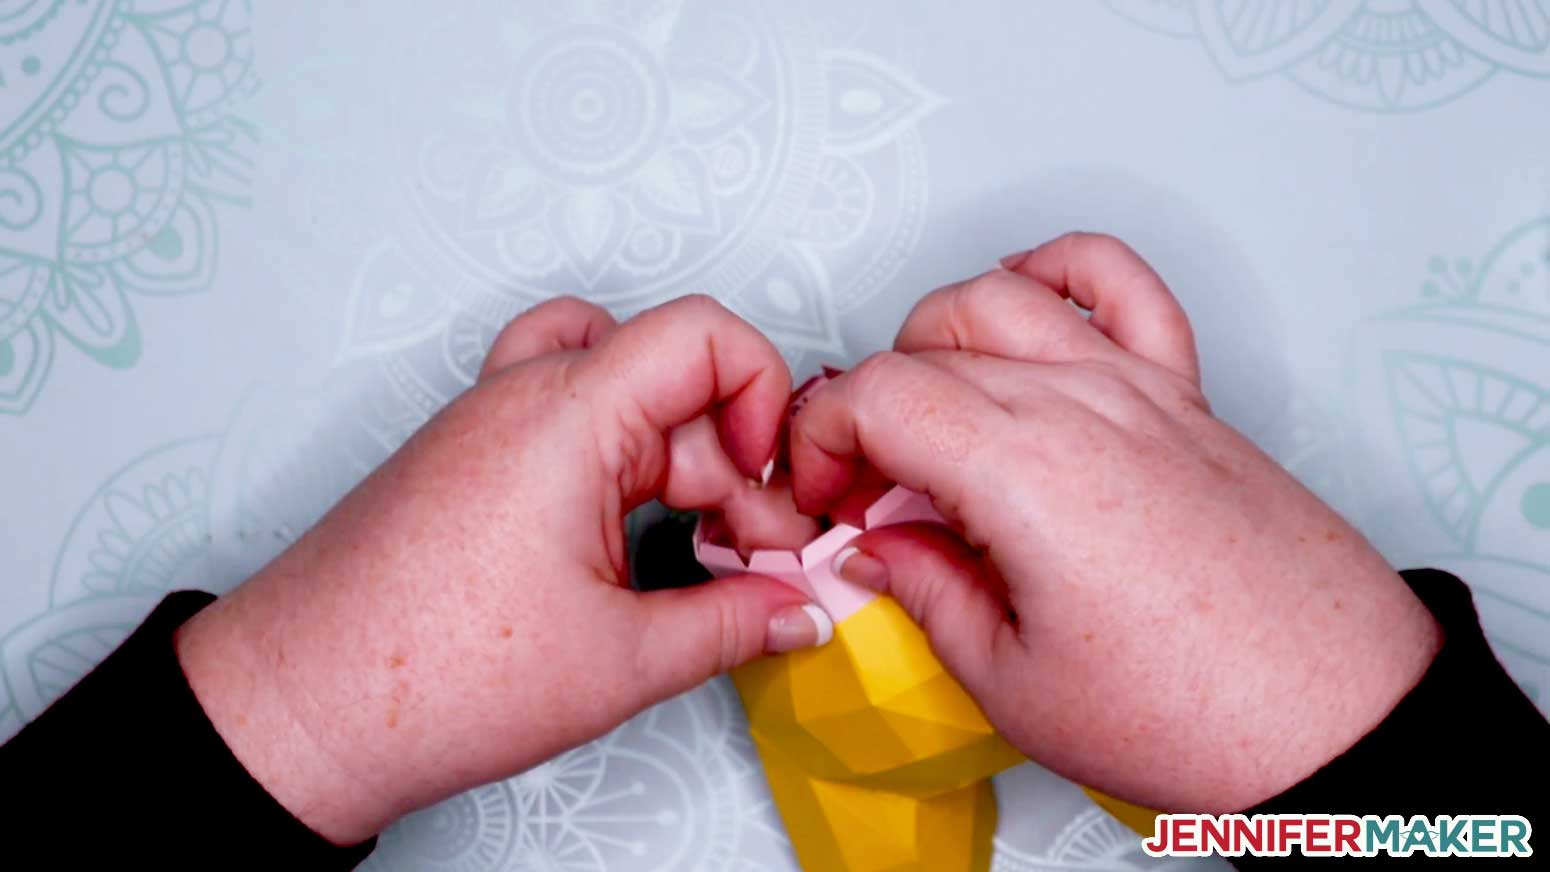
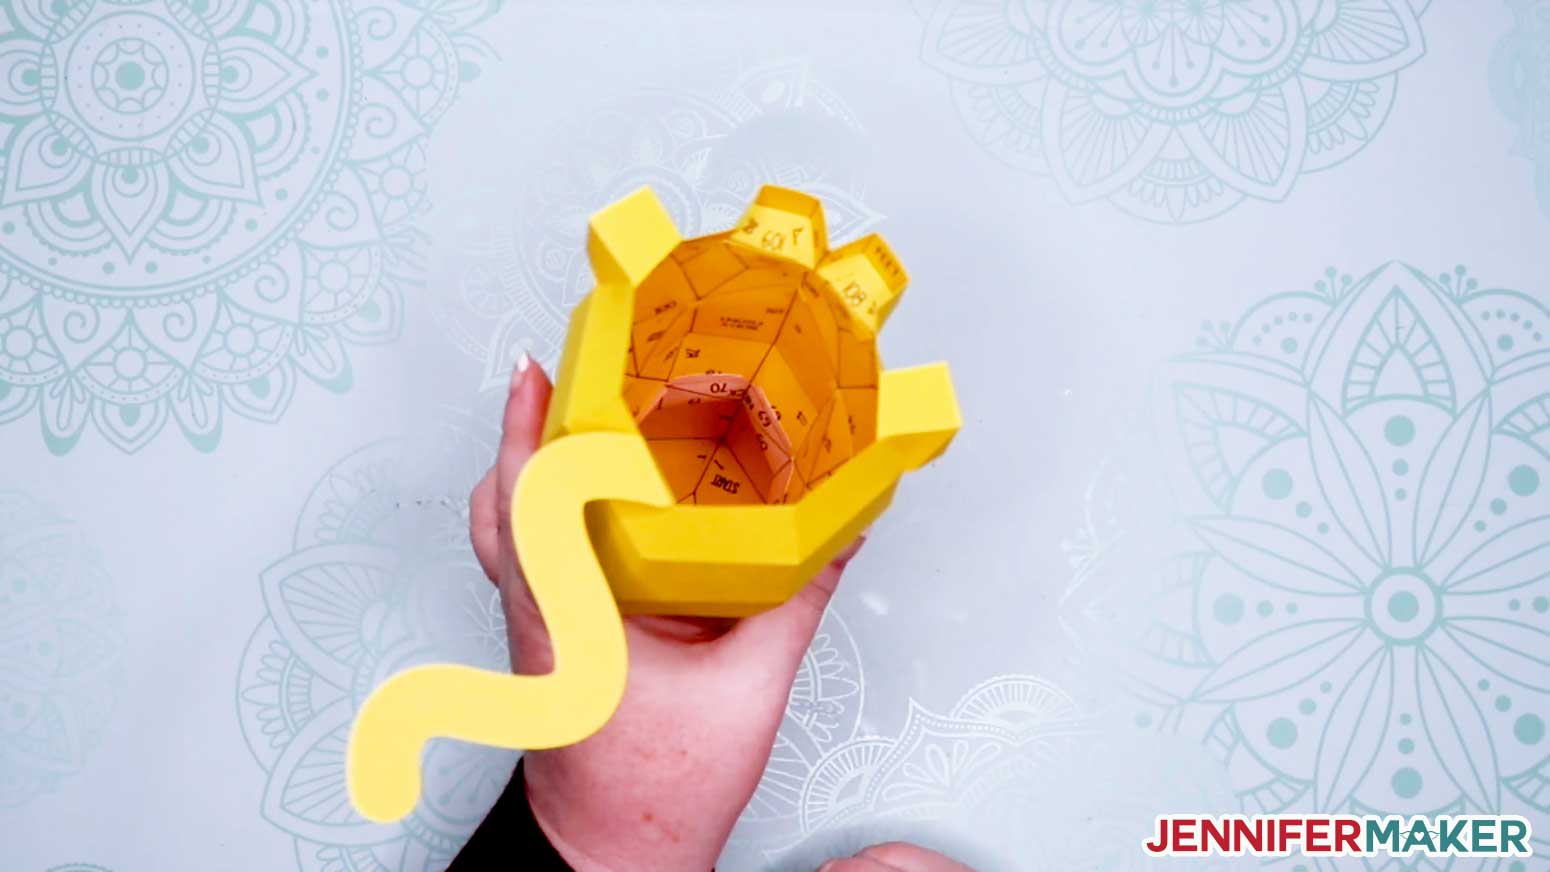
I find it worked best to put my hand inside the cat so I could press on the glued tabs from both the inside and outside.
It will feel awkward to glue it this way -- just go slow and be patient. If you cannot get your hand inside your cat, go in through the holes in front of the ear.
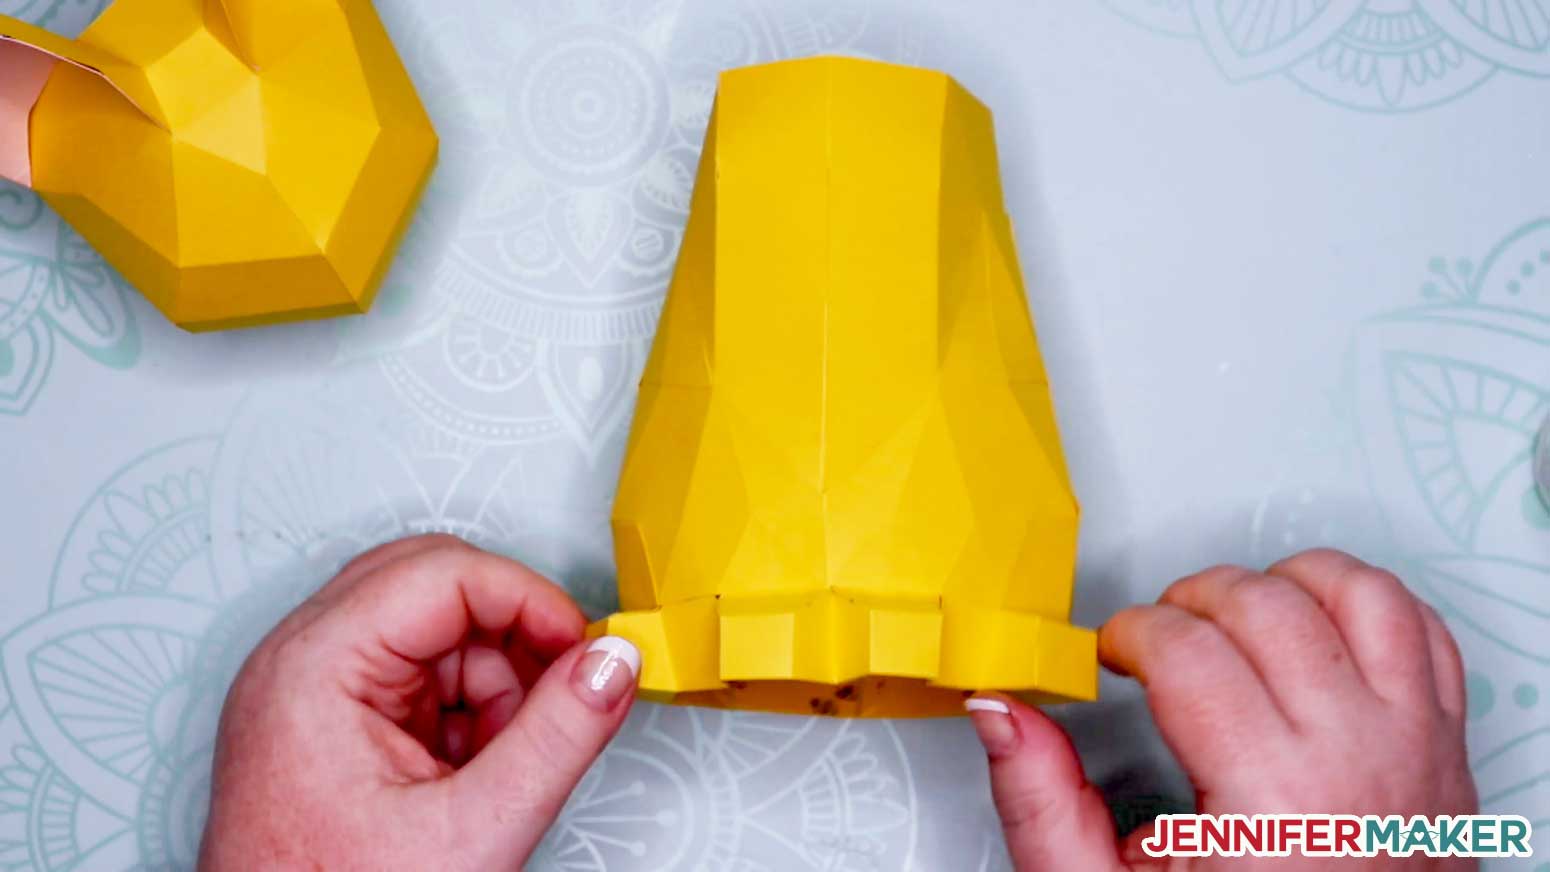
This is what you 3D cat looks like with the head and body attached.
You will want to push the flaps in front of the ears up and out a bit so it closes up the hole, too.
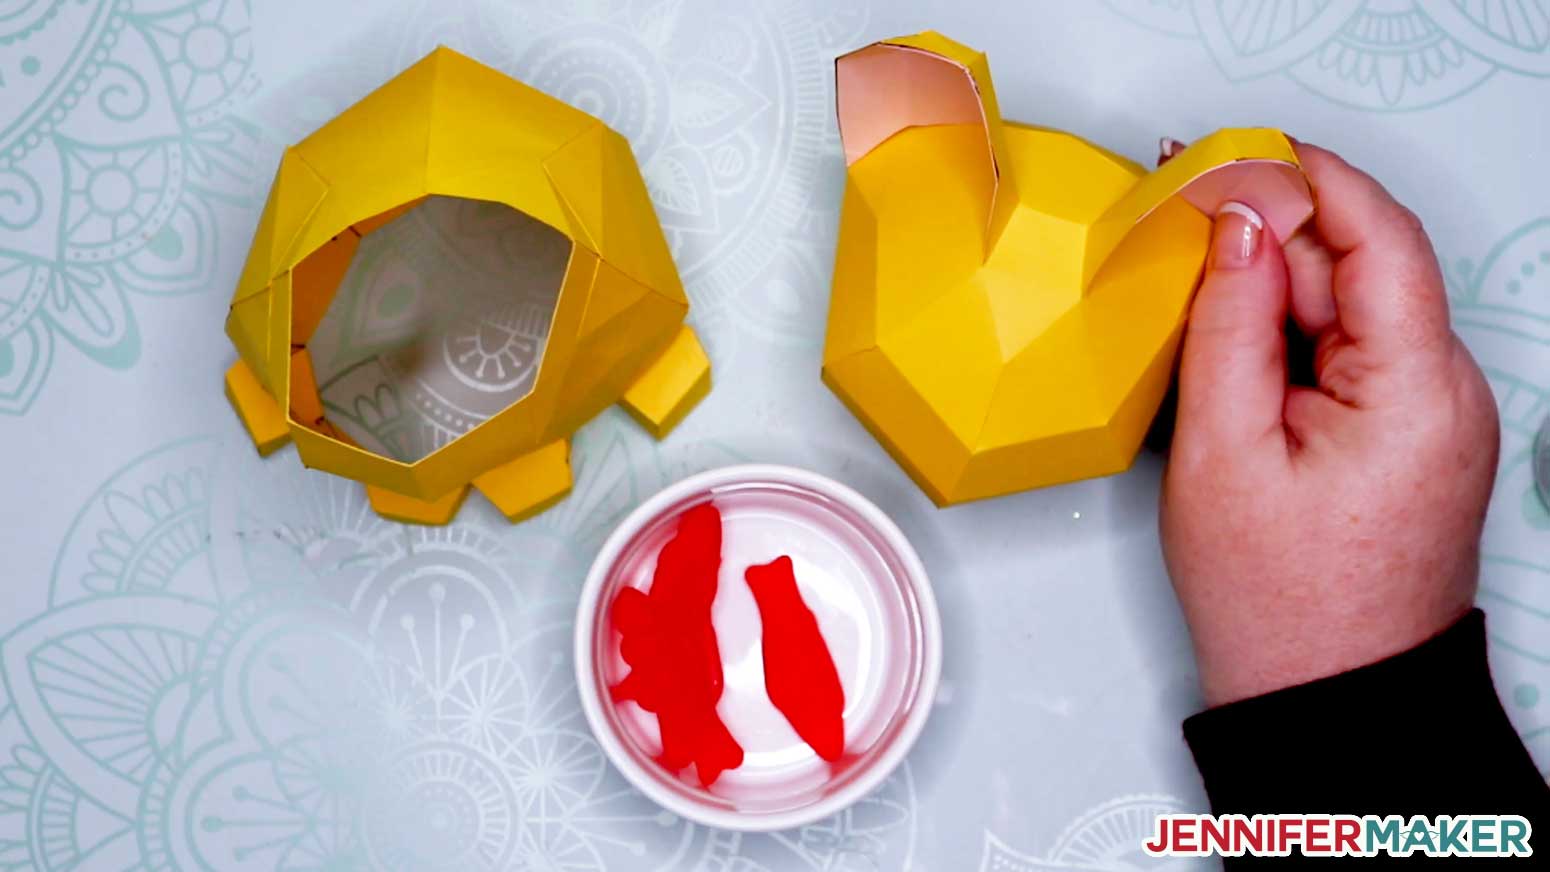
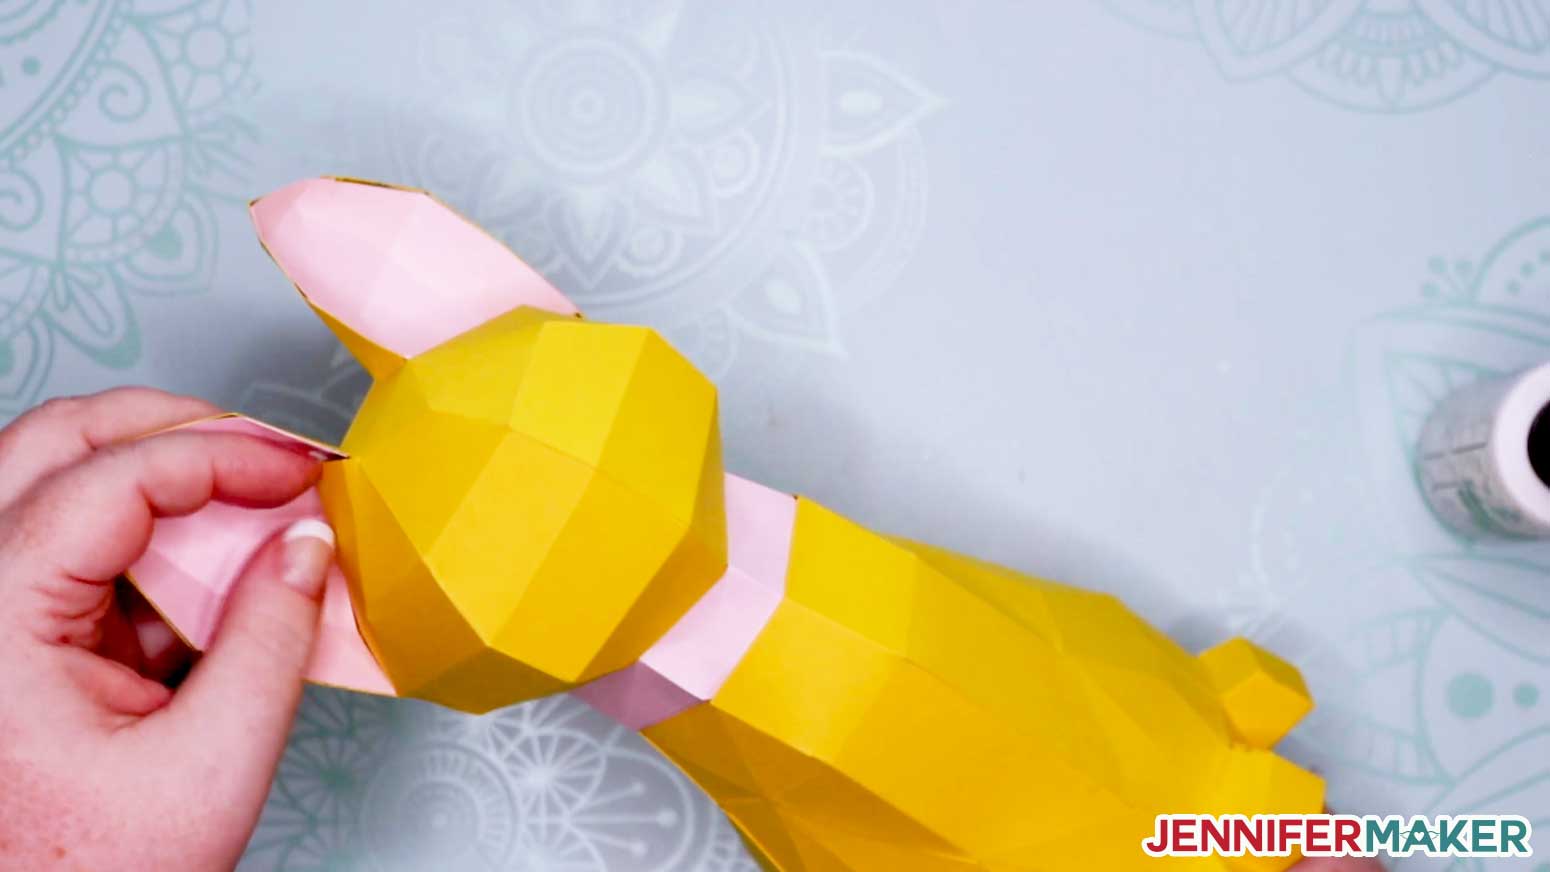
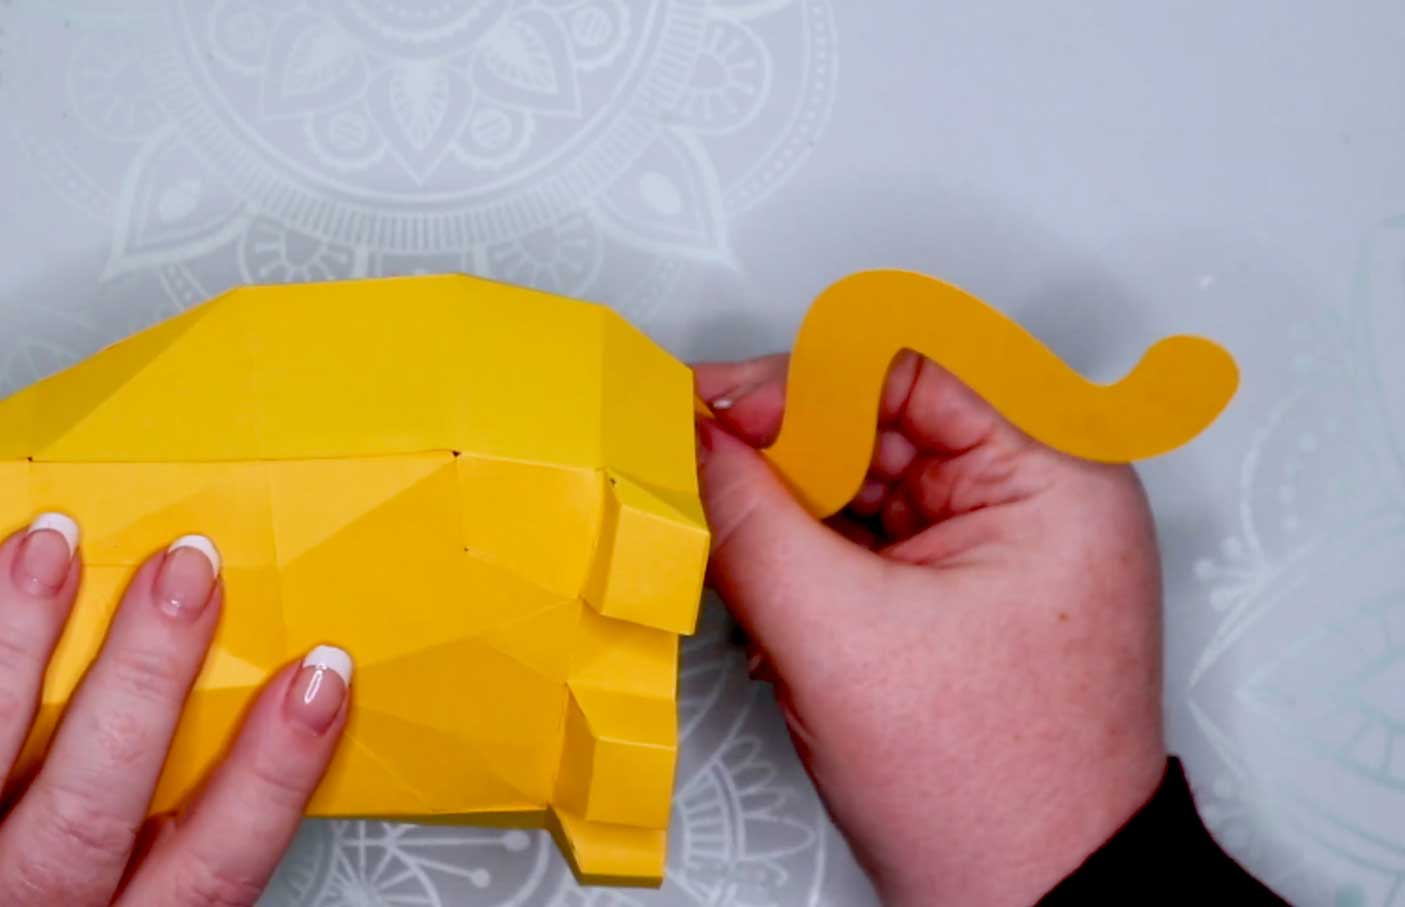
Now you just need to attach the tail, collar, and tag, all of which are optional.
The tail has one tab at the end -- just fold it and glue it wherever you wish.
And now you can glue on the optional collar and tag if you wish! I glued the tag to the inside of the collar, then glued the collar to the 3D cat!

STEP 5: SHOW IT OFF
Your amazing 3D cat is finished!
All of your numbers are hidden inside the 3D cat!
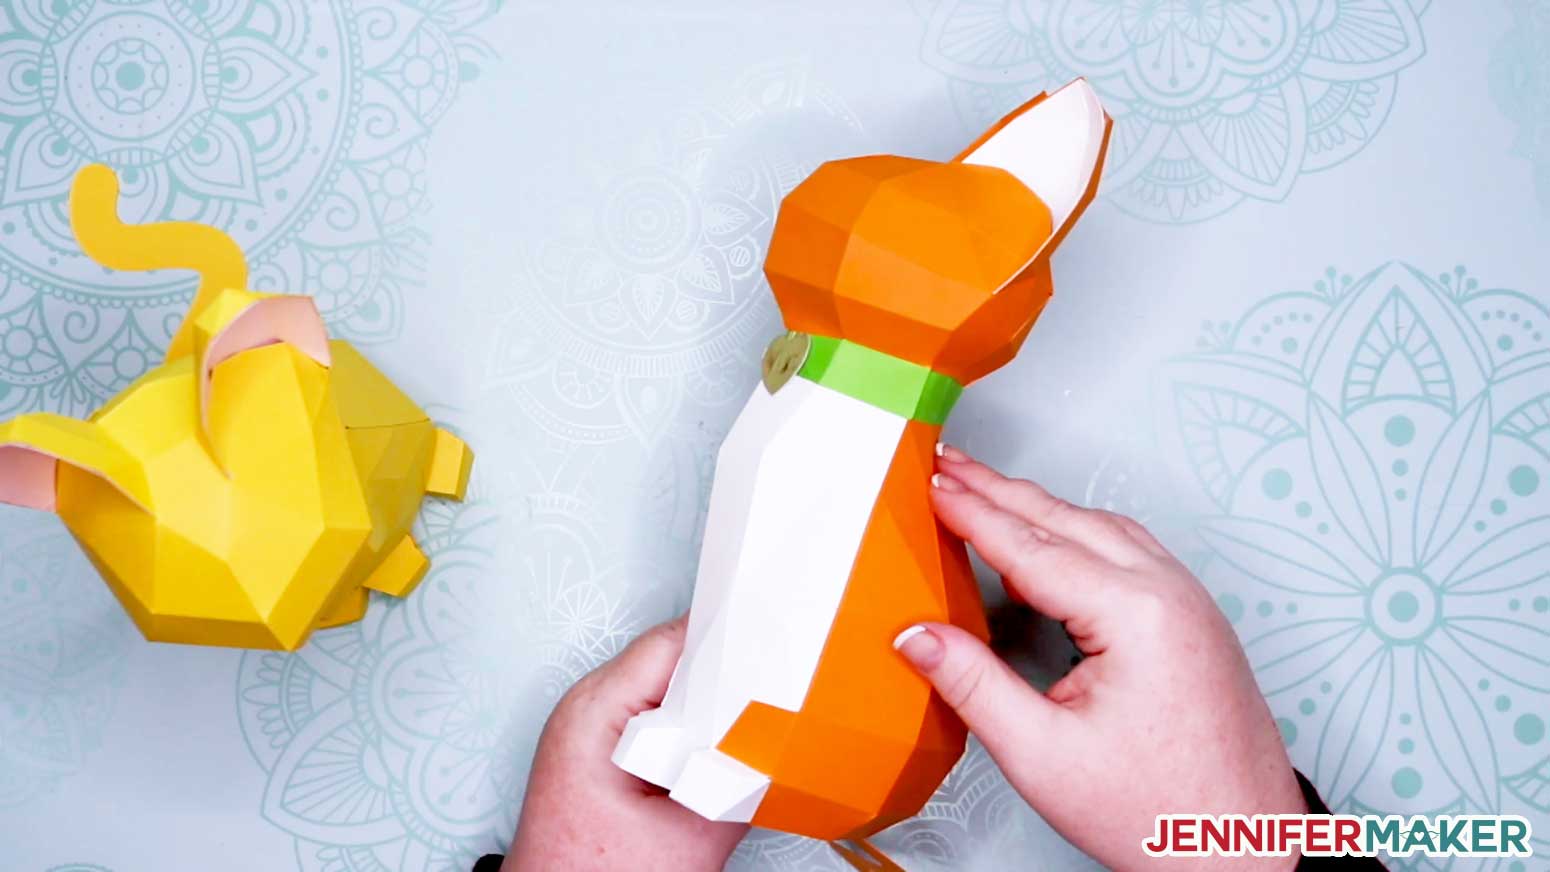
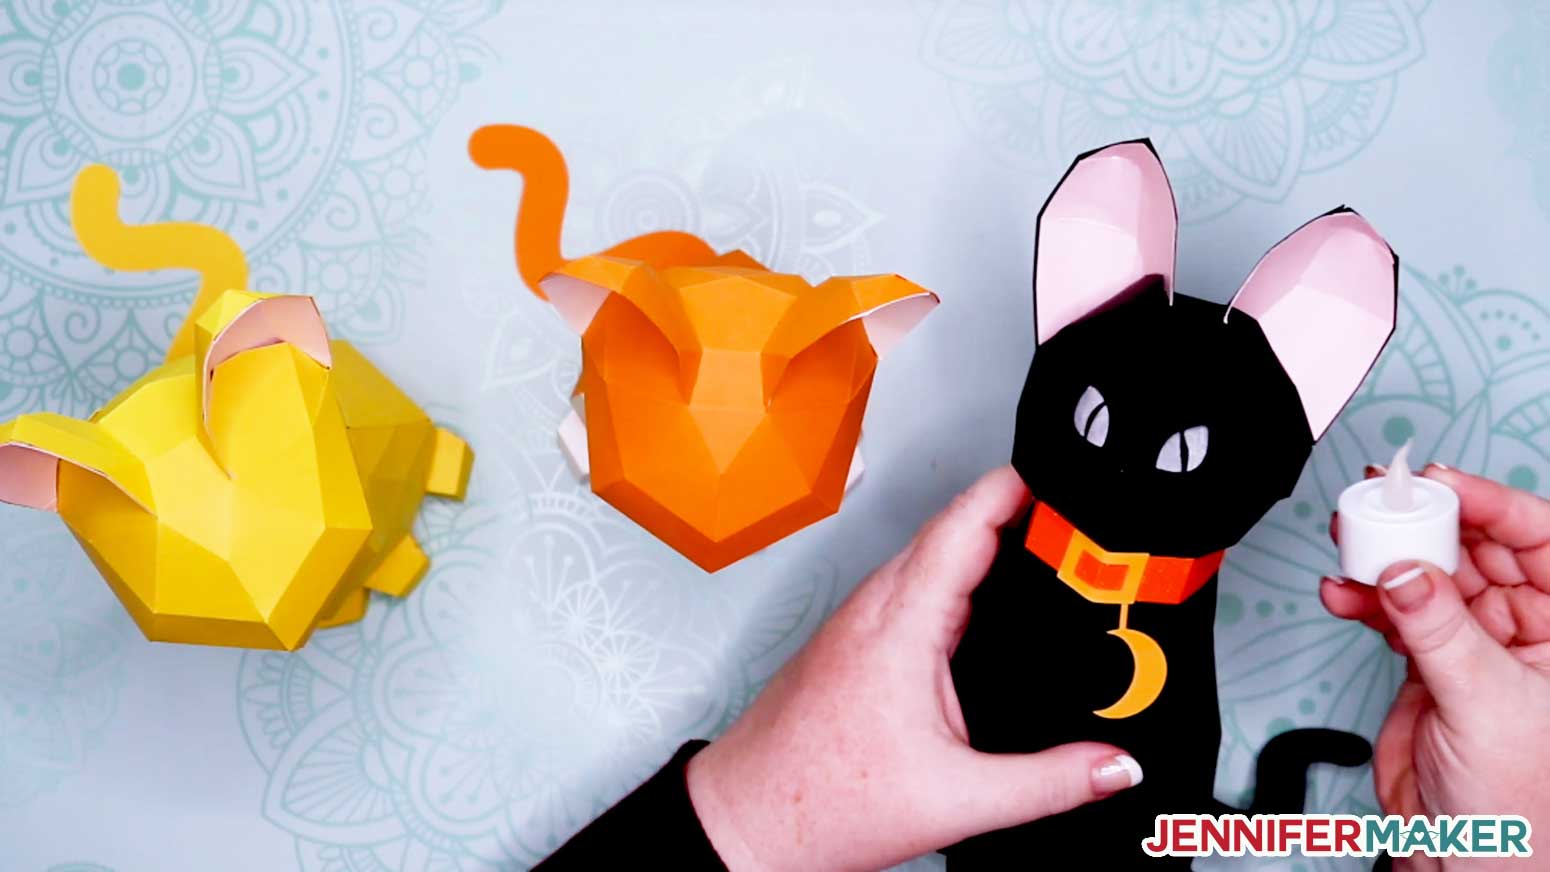
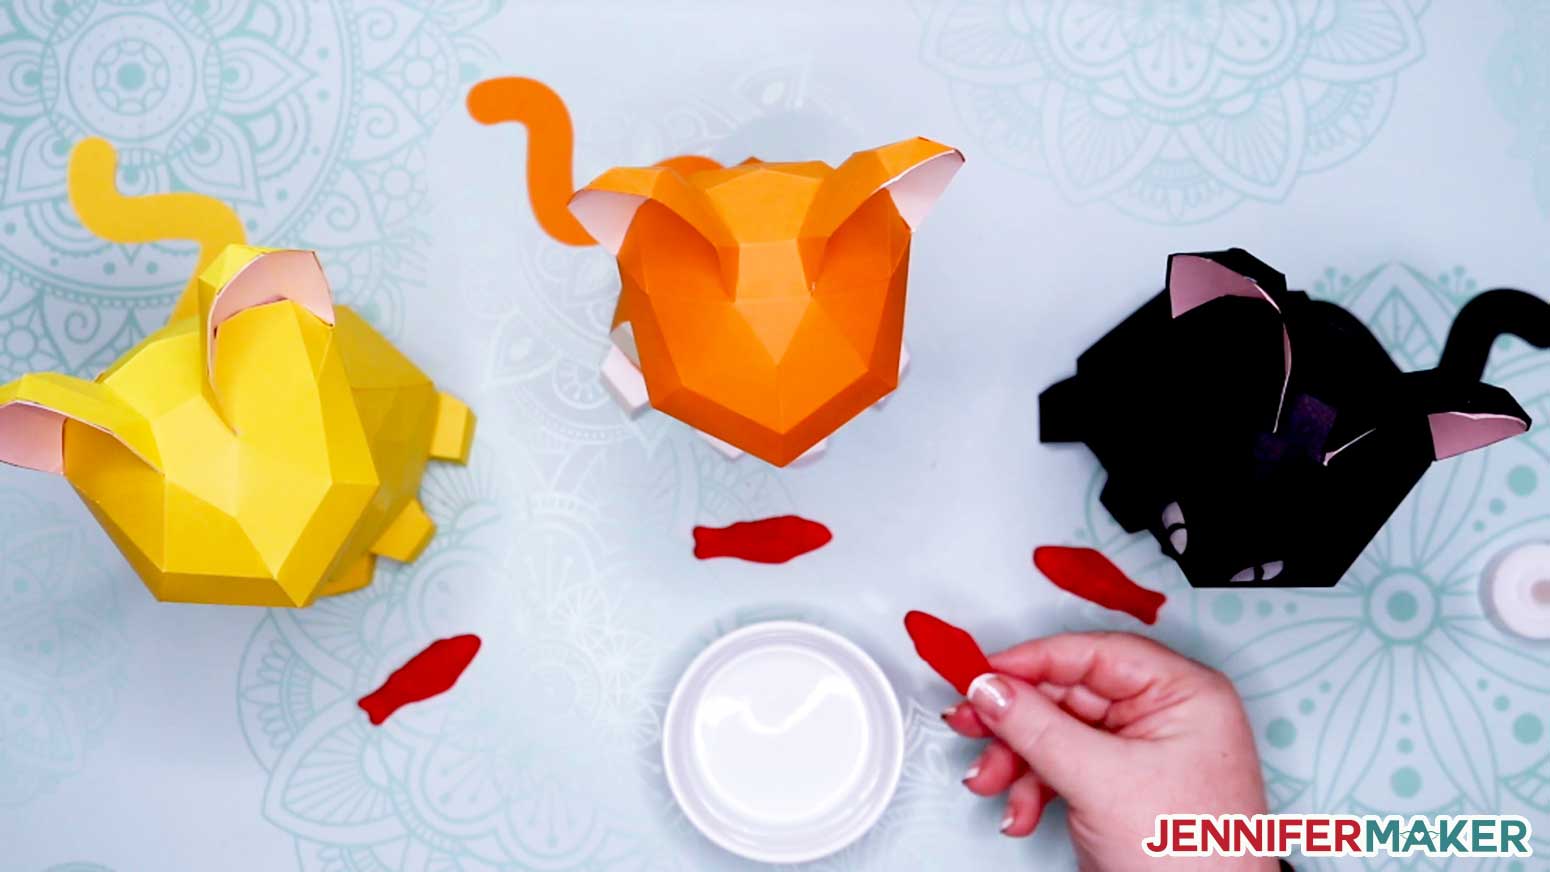
You can also make a Tuxedo Cat like this ginger and white one here.
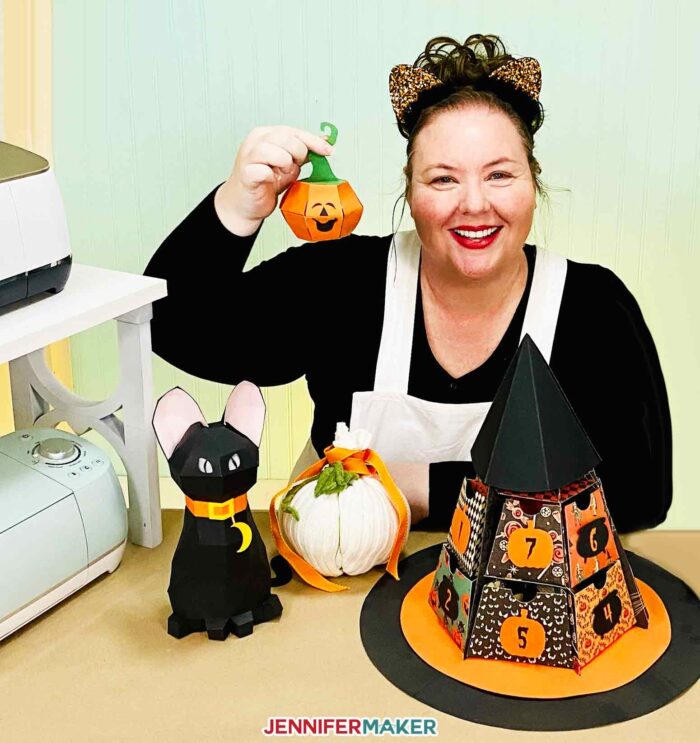
Or how about a black cat for Halloween, and this one has cut-out eyes so you can light them up with an LED tealight!
And that's it! Great work! Everyone has earned a little fishie!
Recommended Products
As an Amazon Associate and member of other affiliate programs, I earn from qualifying purchases.
-
 Cricut Coach Playbook
 -
Lemon Drop Yellow Cardstock Paper - 12 X 12 Inch 100 Lb. Heavyweight Cover - 25 Sheets From Cardstock Warehouse
-
Bearly Art Precision Craft Glue - The Mini - 2fl oz with Tip Kit - Dries Clear - Metal Tip - Wrinkle Resistant - Flexible and Crack Resistant - Strong Hold Adhesive - Made in USA


Answers to Your Questions About Making a 3D Cat
Q: Can I use copy paper or construction paper instead?
No, copy paper won’t be strong enough, and construction paper is not a high enough quality to withstand the intricate cuts. I recommend an 65 lb. cardstock for the best results.
Q: Do I have to use a pen?
No, feel free to make this without the markings, which are only there to help you assemble this 3D cat. If you’re not going to draw out the markings, be sure to hide or delete that layer before cutting.
Q: Can I make this paper cat smaller?
Yes, but be aware that if it is significantly smaller, it will be harder to cut and assemble. And you may not be able to fit your hand inside to attach parts together. View my Resizing Tutorial to learn how to resize an SVG cut file.
Q: I don’t have vellum for the Halloween cat’s eyes. Is there something else I can use?
Yes, you can use another paper that is slightly opaque but allows some light to pass, such as wax paper or a very thin copy paper.
Q: My score lines are not pre-set nor pre-attached. What do I do?
You will need to select each layer that should be a score line, change it to score in the Operation menu, then attach the score line to the base layer. See my scoring tutorial for more details.
Get my free SVG files to create a 3D Paper Cat
I’d love to see your paper cat projects and all the colors you choose to use! Please share a photo in our Facebook group or tag me on social media with #jennifermaker.
Love,

Want to remember this? Save this 3D Paper Cat Tutorial to your favorite Pinterest Board!